Page 21 of 546
H10
CCHH AARRGG IINN GG TT HH EE PP LLUU GG--IINN HH YY BBRRIIDD VV EEHH IICC LLEE (( CC OO NNTT..))
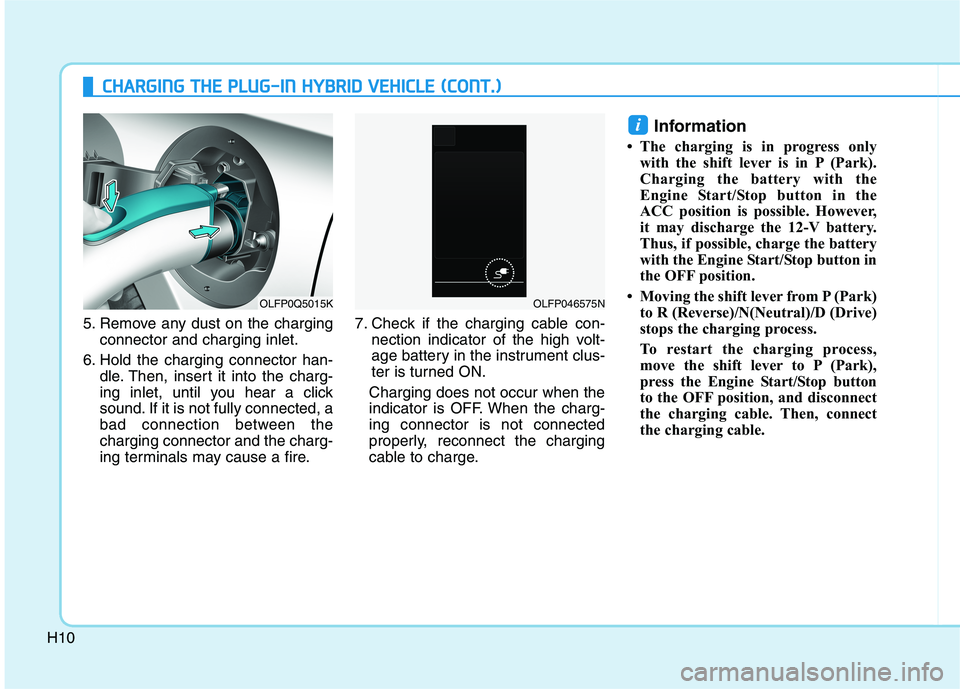
5. Remove any dust on the charging
connector and charging inlet.
6. Hold the charging connector han- dle. Then, insert it into the charg-
ing inlet, until you hear a click
sound. If it is not fully connected, a
bad connection between thecharging connector and the charg-
ing terminals may cause a fire. 7. Check if the charging cable con-
nection indicator of the high volt-
age battery in the instrument clus-
ter is turned ON.
Charging does not occur when the
indicator is OFF. When the charg-ing connector is not connected
properly, reconnect the charging
cable to charge. Information
The charging is in progress only with the shift lever is in P (Park).
Charging the battery with the
Engine Start/Stop button in the
ACC position is possible. However,
it may discharge the 12-V battery.
Thus, if possible, charge the battery
with the Engine Start/Stop button in
the OFF position.
Moving the shift lever from P (Park) to R (Reverse)/N(Neutral)/D (Drive)
stops the charging process.
To restart the charging process,
move the shift lever to P (Park),
press the Engine Start/Stop button
to the OFF position, and disconnect
the charging cable. Then, connect
the charging cable.
i
OLFP0Q5015KOLFP046575N
Page 27 of 546
H16
CCHH AARRGG IINN GG TT HH EE PP LLUU GG--IINN HH YY BBRRIIDD VV EEHH IICC LLEE (( CC OO NNTT..))
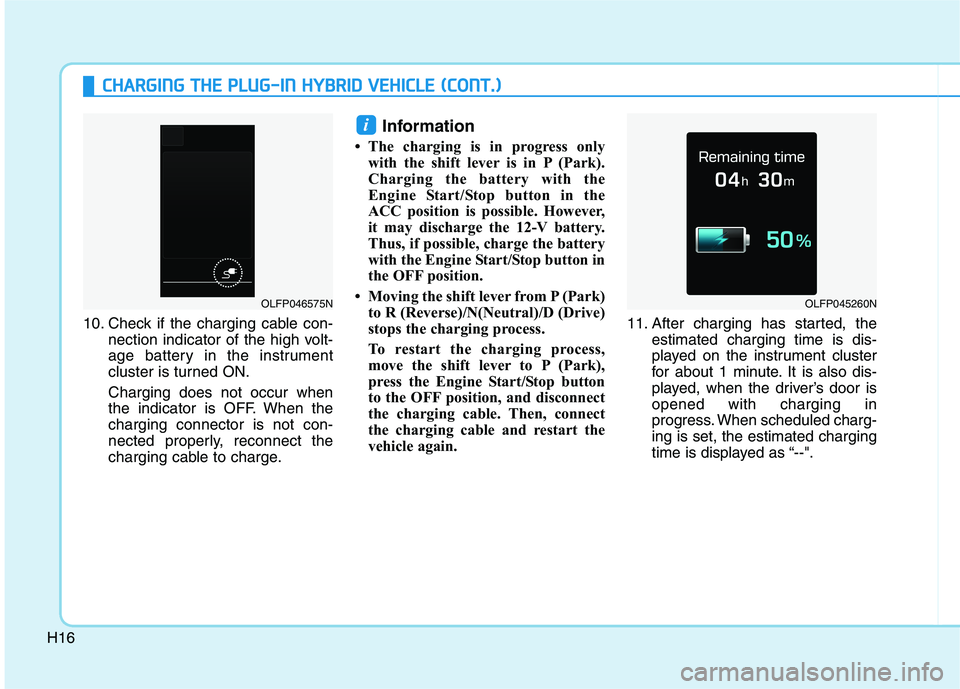
10. Check if the charging cable con-
nection indicator of the high volt-
age battery in the instrument
cluster is turned ON.
Charging does not occur when
the indicator is OFF. When thecharging connector is not con-
nected properly, reconnect the
charging cable to charge. Information
The charging is in progress only with the shift lever is in P (Park).
Charging the battery with the
Engine Start/Stop button in the
ACC position is possible. However,
it may discharge the 12-V battery.
Thus, if possible, charge the battery
with the Engine Start/Stop button in
the OFF position.
Moving the shift lever from P (Park) to R (Reverse)/N(Neutral)/D (Drive)
stops the charging process.
To restart the charging process,
move the shift lever to P (Park),
press the Engine Start/Stop button
to the OFF position, and disconnect
the charging cable. Then, connect
the charging cable and restart the
vehicle again. 11. After charging has started, the
estimated charging time is dis-
played on the instrument cluster
for about 1 minute. It is also dis-
played, when the driver’s door isopened with charging in
progress. When scheduled charg-ing is set, the estimated charging
time is displayed as “--".
i
OLFP045260NOLFP046575N
Page 38 of 546
H27
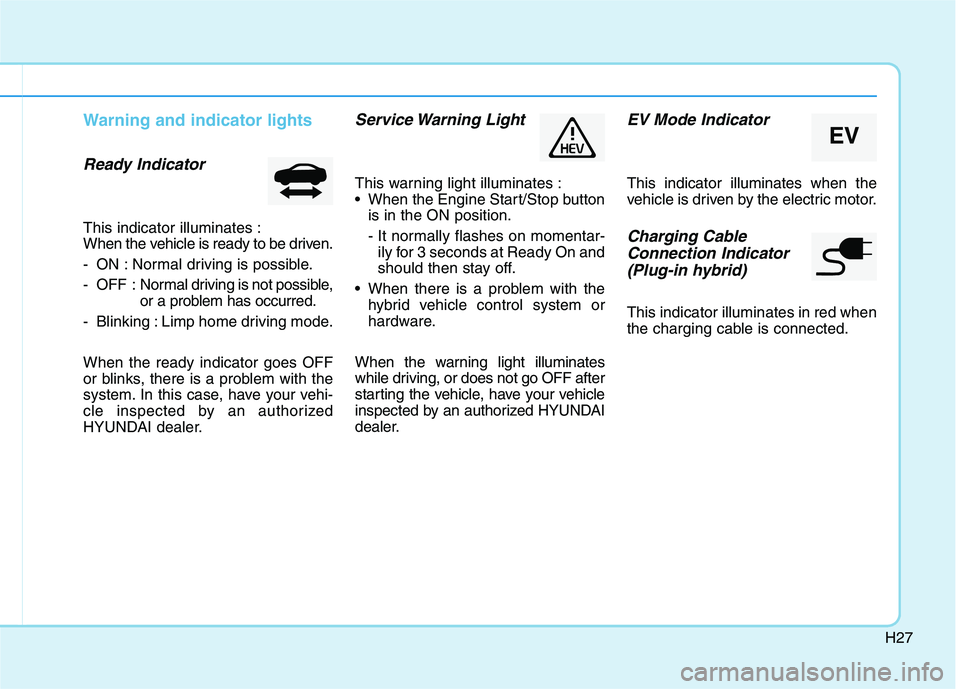
Warning and indicator lights
Ready Indicator
This indicator illuminates :
When the vehicle is ready to be driven.
- ON : Normal driving is possible.
- OFF : Normal driving is not possible,
or a problem has occurred.
- Blinking : Limp home driving mode. When the ready indicator goes OFF
or blinks, there is a problem with the
system. In this case, have your vehi-
cle inspected by an authorized
HYUNDAI dealer.
Service Warning Light
This warning light illuminates :
When the Engine Start/Stop button is in the ON position.
- It normally flashes on momentar-ily for 3 seconds at Ready On and
should then stay off.
When there is a problem with the hybrid vehicle control system or
hardware.
When the warning light illuminates
while driving, or does not go OFF after
starting the vehicle, have your vehicle
inspected by an authorized HYUNDAI
dealer.
EV Mode Indicator
This indicator illuminates when the
vehicle is driven by the electric motor.
Charging Cable Connection Indicator (Plug-in hybrid)
This indicator illuminates in red when
the charging cable is connected.
EV
Page 43 of 546
H32
DDRRIIVV IINN GG TT HH EE HH YY BBRRIIDD //PP LLUU GG--IINN HH YY BBRRIIDD VV EEHH IICC LLEE (( CC OO NNTT..))
❈ Example of a deceleration event is
going down an extended hill, slow-
ing down approaching a toll booth,and approaching reduced speed
zones.
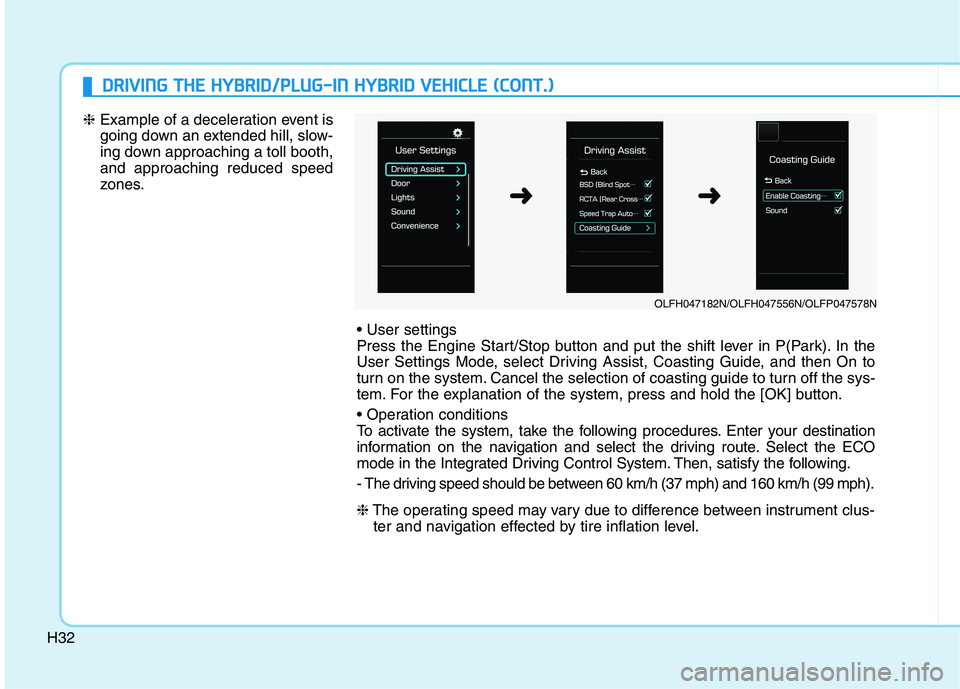
Press the Engine Start/Stop button and put the shift lever in P(Park). In the
User Settings Mode, select Driving Assist, Coasting Guide, and then On to
turn on the system. Cancel the selection of coasting guide to turn off the sys-
tem. For the explanation of the system, press and hold the [OK] button.
To activate the system, take the following procedures. Enter your destination
information on the navigation and select the driving route. Select the ECO
mode in the Integrated Driving Control System. Then, satisfy the following.
- The driving speed should be between 60 km/h (37 mph) and 160 km/h (99 mph). ❈The operating speed may vary due to difference between instrument clus-
ter and navigation effected by tire inflation level.
OLFH047182N/OLFH047556N/OLFP047578N
➜➜
Page 60 of 546

H49
When the hybrid vehicle shuts off
When the high voltage battery is dis-
charged, when the 12-volt battery isdischarged, or when the fuel tank is
empty, the hybrid system may not
operate while driving. When the
Hybrid system does not operate, do
the followings:
1.Gradually reduce the vehiclespeed. Pull over your vehicle off
the road in a safe area.
2.Locate the shift lever in P (Park).
3. Turn ON the hazard warning flashers.
4.Turn OFF the Engine Start/Stop button, and try to start the hybrid system, while depressing the
brake pedal and pressing the
Engine Start/Stop button. 5.When the hybrid system still does
not operate, refer to "EMERGENCY
STARTING" in the chapter 6.
Before jump-starting the vehicle,
check the fuel level and the exact
procedure to jump start. For further
details, refer to "EMERGENCY
STARTING" in the chapter 6. When
the fuel level is low, do not attempt
to drive the vehicle only with the
battery power. The high voltage bat-
tery may be discharged, and the
hybrid system will turn OFF.
Page 65 of 546
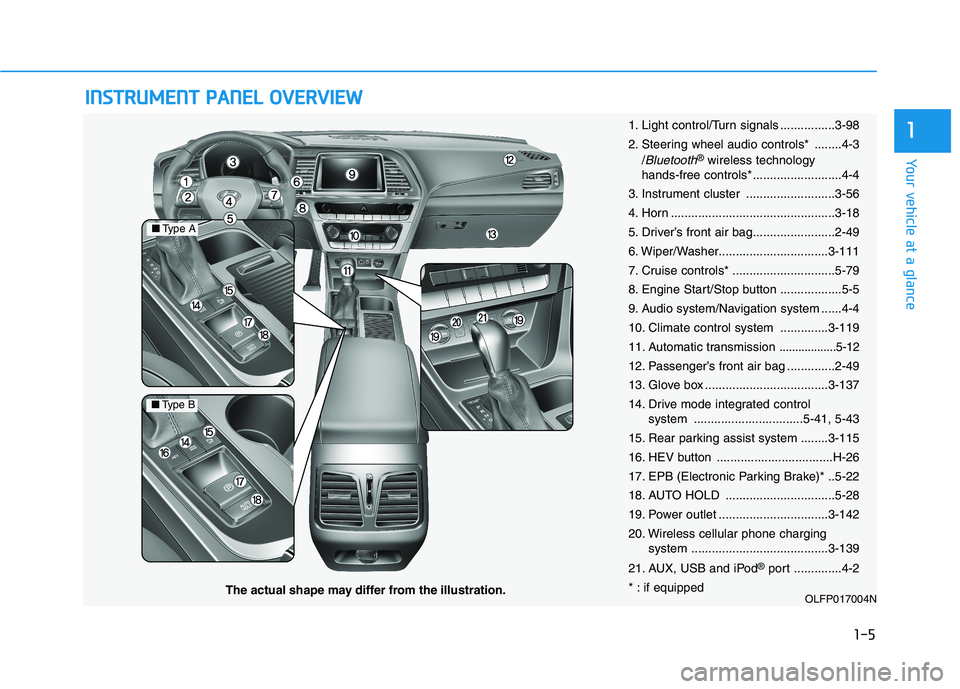
IINN SSTT RR UU MM EENN TT PP AA NN EELL OO VVEERR VV IIEE WW
1-5
Your vehicle at a glance
1
OLFP017004N
■Type A
■Type B
The actual shape may differ from the illustration. 1. Light control/Turn signals ................3-98
2. Steering wheel audio controls* ........4-3
/
Bluetooth®wireless technology
hands-free controls* ..........................4-4
3. Instrument cluster ..........................3-56
4. Horn ................................................3-18
5. Driver’s front air bag........................2-49
6. Wiper/Washer................................3-111
7. Cruise controls* ..............................5-79
8. Engine Start/Stop button ..................5-5
9. Audio system/Navigation system ......4-4
10. Climate control system ..............3-119
11. Automatic transmission
..................5-12
12. Passenger’s front air bag ..............2-49
13. Glove box ....................................3-137
14. Drive mode integrated control system ................................5-41, 5-43
15. Rear parking assist system ........3-115
16. HEV button ..................................H-26
17. EPB (Electronic Parking Brake)* ..5-22
18. AUTO HOLD ................................5-28
19. Power outlet ................................3-142
20. Wireless cellular phone charging system ........................................3-139
21. AUX, USB and iPod ®
port ..............4-2
* : if equipped
Page 87 of 546
2-21
Safety system of your vehicle
While the engine is running, push
either of the switches to warm the dri-
ver's seat or front passenger's seat.
During mild weather or under condi-
tions where the operation of the seat
warmer is not needed, keep the
switches in the OFF position.
Each time you push the switch, thetemperature setting of the seat is
changed as follows :
When pressing the switch for more than 1.5 seconds with the seat
warmer operating, the seat warmer
will turn OFF. The seat warmer defaults to the
OFF position whenever the Engine
Start/Stop button is in the ON posi-tion.
Information
With the seat warmer switch in the
ON position, the heating system in the
seat turns off or on automatically
depending on the seat temperature.
i
2
OLFH037017
OLFH037021
■ Type A
■Type B
OFF HIGH ( )
LOW ( ) MIDDLE ( )
��
�
�
OFF HIGH ( )
LOW ( ) MIDDLE ( )
��
�
�
■
Type A
■ Type B
Page 89 of 546
2-23
Safety system of your vehicle
2
Rear seat warmers (if equipped)
While the engine is running, push
either of the switches to warm the rearseat.
During mild weather or under condi-
tions where the operation of the seat
warmer is not needed, keep the
switches in the OFF position.Each time you push the switch, the
temperature setting of the seat is
changed as follows :
The seat warmer defaults to the OFF
position whenever the Engine
Start/Stop button is in the ON position.
Information
With the seat warmer switch in the
ON position, the heating system in the
seat turns off or on automatically
depending on the seat temperature.
i
OFF �HIGH ( ) �LOW ( )
�
OLF034028