Page 122 of 570
419
Features of your vehicle
Theft-alarm stage
The alarm will be activated if any of
the following occurs while the system
is armed.
transmitter, smart key or mechanical
key.
without using the transmitter or
smart key.
The horn will sound and the hazard
warning lights will blink continuously
for approximately 30 seconds. The
alarm will repeat once more unless
the system is disarmed. To turn off
the system, unlock the doors with the
mechanical key or transmitter or
smart key.
Disarmed stage
Using the smart key (if equipped)
The system will be disarmed when
the doors are unlocked by pressing
the unlock button on the smart key or
pressing the lock/unlock button of the
front outside door handle with the
smart key in your possession.
After unlocking the doors, the hazard
warning lights and chime will operate
twice to indicate that the system is
disarmed.
After unlocking the doors, if any door
is not opened within 30 seconds, the
system will be rearmed.
Using the transmitter (if equipped)
The system will be disarmed when
the doors are unlocked by pressing
the unlock button on the transmitter.
After unlocking the doors, the hazard
warning lights will blink twice to indi-
cate that the system is disarmed.
After unlocking the doors, if any door
is not opened within 30 seconds, the
system will be rearmed.
Using the mechanical key
The system will be disarmed when
the doors are unlocked with the
mechanical key.
✽ ✽ NOTICE
If you lock or unlock the doors by
using the mechanical key, the haz-
ard warning light and chime sound
won't operate.
Page 138 of 570
435
Features of your vehicle
1. Setting
To activate the Smart Liftgate (Smart
Tailgate), go to User Settings Mode
and select Smart Liftgate (Smart
Tailgate) on the LCD display.
❈For more details, refer to "LCD
Display" in this chapter.
2. Detect and Alert
If you are positioned in the detecting
area (50 ~100 cm (20 ~ 40 in.)
behind the vehicle) carrying a smart
key, the hazard warning lights will
blink and chime will sound to alert
you the smart key has been detected
and the tailgate will open.✽ ✽NOTICE
Do not approach the detecting area
if you do not want the liftgate (tail-
gate) to open. If you have uninten-
tionally entered the detecting area
and the hazard warning lights and
chime starts to operate, leave the
detecting area with the smart key.
The liftgate (tailgate) will stay
closed.
ONC047078
Page 139 of 570
Features of your vehicle
36
4
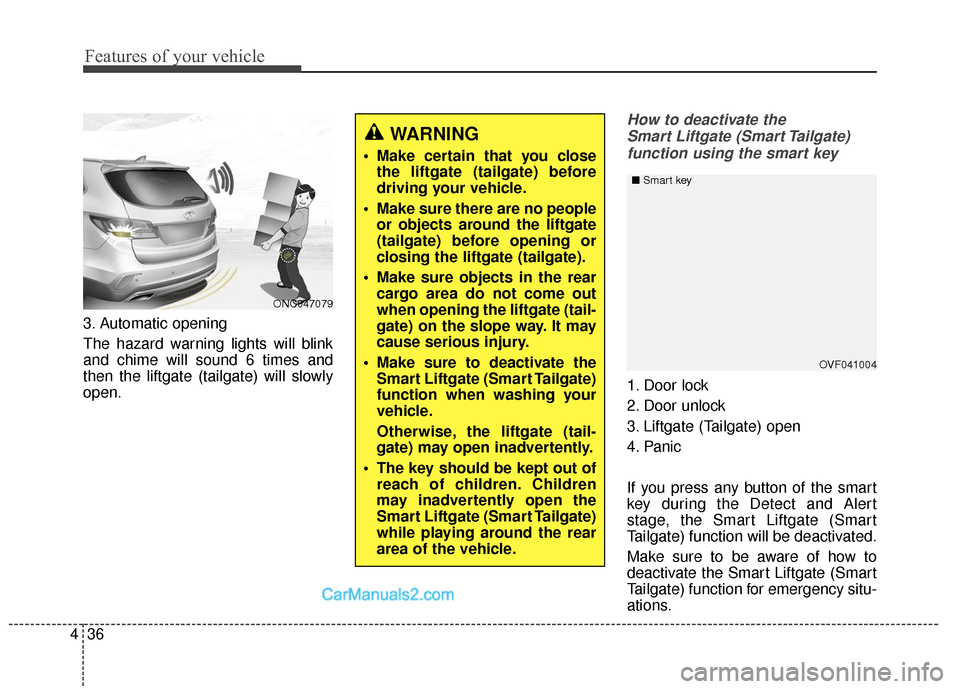
3. Automatic opening
The hazard warning lights will blink
and chime will sound 6 times and
then the liftgate (tailgate) will slowly
open.
How to deactivate the
Smart Liftgate (Smart Tailgate)function using the smart key
1. Door lock
2. Door unlock
3. Liftgate (Tailgate) open
4. Panic
If you press any button of the smart
key during the Detect and Alert
stage, the Smart Liftgate (Smart
Tailgate) function will be deactivated.
Make sure to be aware of how to
deactivate the Smart Liftgate (Smart
Tailgate) function for emergency situ-
ations.
OVF041004
■
Smart key
WARNING
Make certain that you close
the liftgate (tailgate) before
driving your vehicle.
Make sure there are no people or objects around the liftgate
(tailgate) before opening or
closing the liftgate (tailgate).
Make sure objects in the rear cargo area do not come out
when opening the liftgate (tail-
gate) on the slope way. It may
cause serious injury.
Make sure to deactivate the Smart Liftgate (Smart Tailgate)
function when washing your
vehicle.
Otherwise, the liftgate (tail-
gate) may open inadvertently.
The key should be kept out of reach of children. Children
may inadvertently open the
Smart Liftgate (Smart Tailgate)
while playing around the rear
area of the vehicle.
ONC047079
Page 160 of 570
457
Features of your vehicle
(Continued)
• Some noises may be heard whenoperating the steering in low tem-
peratures. When the temperature
rises, the noise will disappear. This
is a normal condition.
• The steering effort may become heavy when the charging system
warning light comes on.Tilt & telescopic steering
A tilt steering wheel allows you to
adjust the steering wheel before you
drive. You can also raise it to give
your legs more room when you exit
and enter the vehicle (if equipped).
The steering wheel should be posi-
tioned so that it is comfortable for
you to drive, while permitting you to
see the instrument panel warning
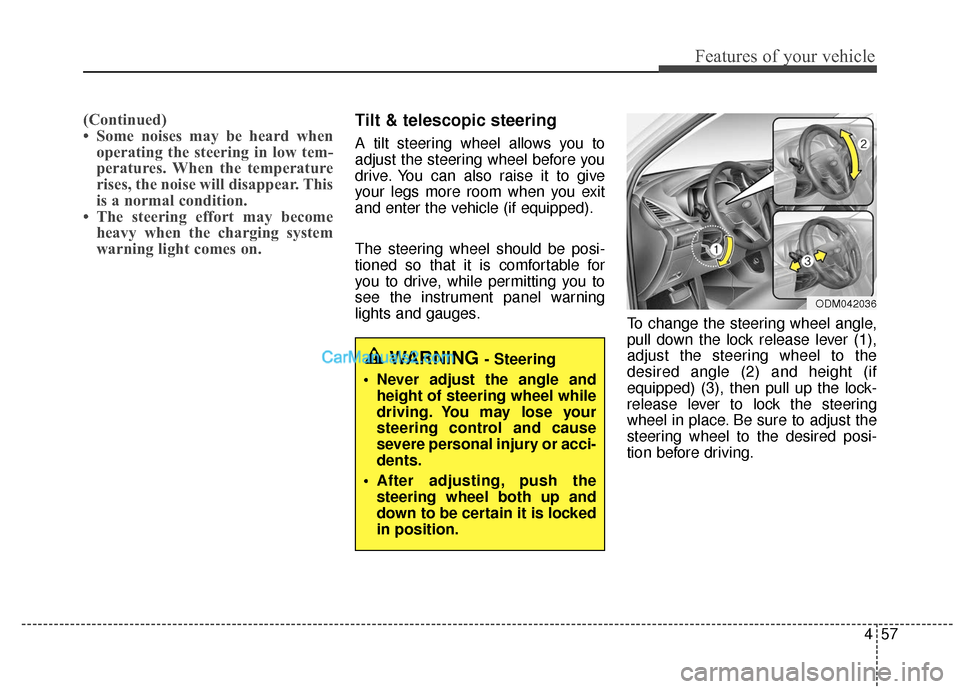
lights and gauges. To change the steering wheel angle,
pull down the lock release lever (1),
adjust the steering wheel to the
desired angle (2) and height (if
equipped) (3), then pull up the lock-
release lever to lock the steering
wheel in place. Be sure to adjust the
steering wheel to the desired posi-
tion before driving.
WARNING - Steering
Never adjust the angle and height of steering wheel while
driving. You may lose your
steering control and cause
severe personal injury or acci-
dents.
After adjusting, push the steering wheel both up and
down to be certain it is locked
in position.
ODM042036
Page 163 of 570
Features of your vehicle
60
4
MIRRORS
Inside rearview mirror
Adjust the rearview mirror so that the
center view through the rear window
is seen. Make this adjustment before
you start driving.
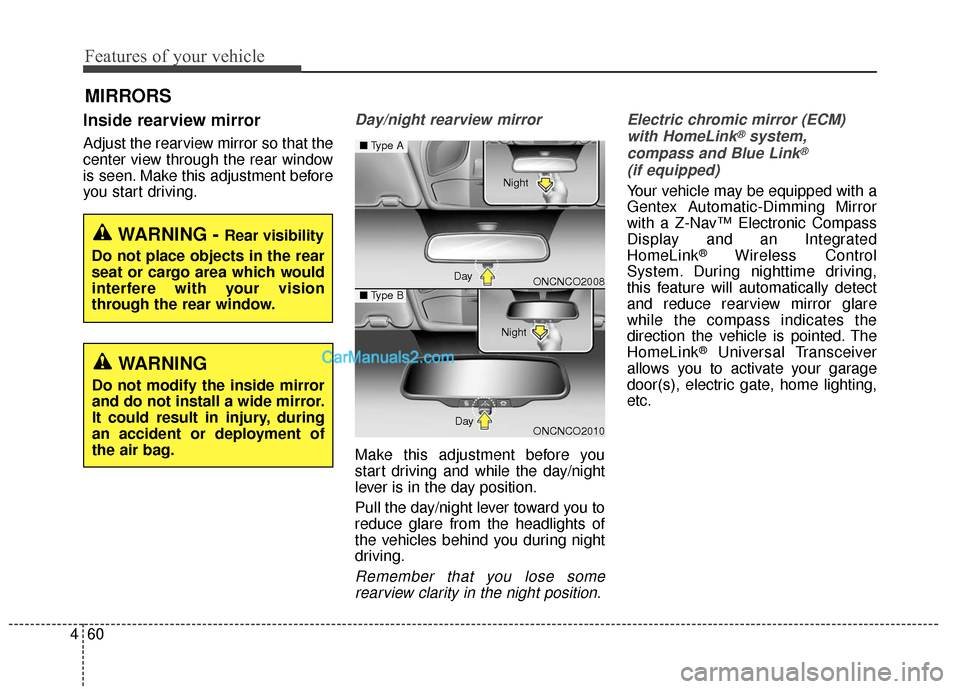
Day/night rearview mirror
Make this adjustment before you
start driving and while the day/night
lever is in the day position.
Pull the day/night lever toward you to
reduce glare from the headlights of
the vehicles behind you during night
driving.
Remember that you lose some
rearview clarity in the night position. Electric chromic mirror (ECM)
with HomeLink
®system,
compass and Blue Link®
(if equipped)
Your vehicle may be equipped with a
Gentex Automatic-Dimming Mirror
with a Z-Nav™ Electronic Compass
Display and an Integrated
HomeLink
®Wireless Control
System. During nighttime driving,
this feature will automatically detect
and reduce rearview mirror glare
while the compass indicates the
direction the vehicle is pointed. The
HomeLink
®Universal Transceiver
allows you to activate your garage
door(s), electric gate, home lighting,
etc.
WARNING - Rear visibility
Do not place objects in the rear
seat or cargo area which would
interfere with your vision
through the rear window.
WARNING
Do not modify the inside mirror
and do not install a wide mirror.
It could result in injury, during
an accident or deployment of
the air bag.
ONCNCO2008
ONCNCO2010
■ Type A
■Type B
Day Night
Day Night
Page 175 of 570
Features of your vehicle
72
4
INSTRUMENT CLUSTER
1. Tachometer
2. Speedometer
3. Engine coolant temperature gauge
4. Fuel gauge
5. LCD display
6. Warning and indicator lights (if equipped)
7. Turn signal indicator lights
ONC047117N/ONC047084N
■
■
Type A
❈The actual cluster in the vehicle may differ
from the illustration.
For more details, refer to the "Gauges" in
this chapter.
■
■ Type B
Page 187 of 570
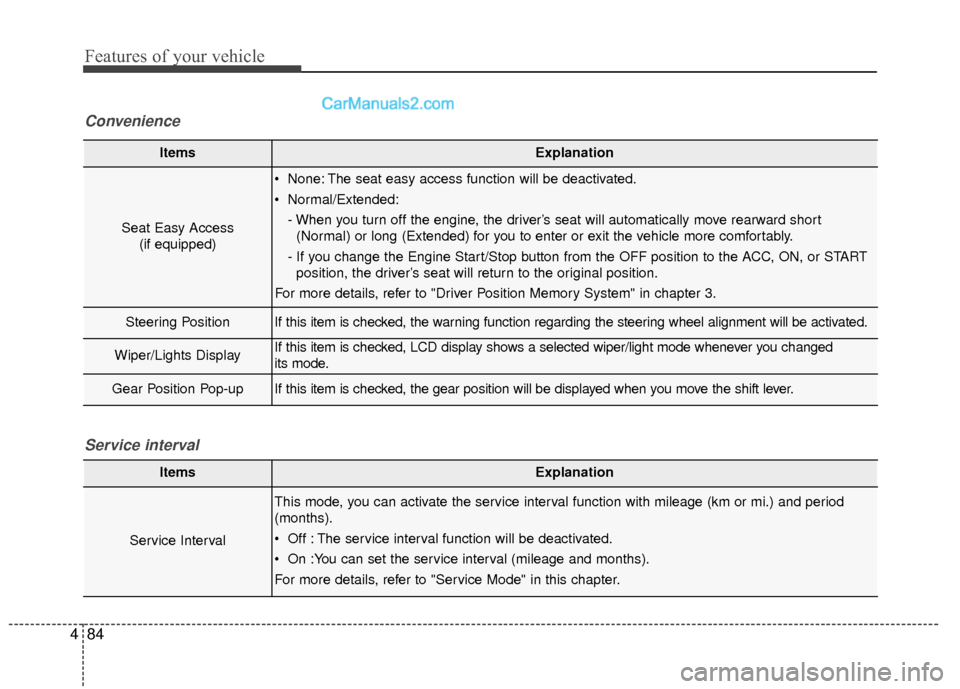
Features of your vehicle
84
4
ItemsExplanation
Seat Easy Access
(if equipped)
None: The seat easy access function will be deactivated.
Normal/Extended:
- When you turn off the engine, the driver’s seat will automatically move rearward short(Normal) or long (Extended) for you to enter or exit the vehicle more comfortably.
- If you change the Engine Start/Stop button from the OFF position to the ACC, ON, or START position, the driver’s seat will return to the original position.
For more details, refer to "Driver Position Memory System" in chapter 3.
Steering PositionIf this item is checked, the warning function regarding the steering wheel alignment will be activated.
Wiper/Lights DisplayIf this item is checked, LCD display shows a selected wiper/light mode whenever you changed
its mode.
Gear Position Pop-upIf this item is checked, the gear position will be displayed when you move the shift lever.
Convenience
ItemsExplanation
Service Interval
This mode, you can activate the service interval function with mileage (km or mi.) and period
(months).
Off : The service interval function will be deactivated.
On :You can set the service interval (mileage and months).
For more details, refer to "Service Mode" in this chapter.
Service interval
Page 203 of 570
Features of your vehicle
100
4
Warning lights
✽
✽
NOTICE - Warning lights
Make sure that all warning lights
are OFF after starting the engine. If
any light is still ON, this indicates a
situation that needs attention.
Air bag Warning Light
This warning light illuminates:
Once you set the ignition switch or
Engine Start/Stop Button to the ON
position.
- It illuminates for approximately 6seconds and then goes off.
When there is a malfunction with the SRS.
In this case, have your vehicle
inspected by an authorized
HYUNDAI dealer.
Seat Belt Warning Light
This warning light informs the driver
that the seat belt is not fastened.
For more details, refer to the "Seat
Belts" in chapter 3.
WARNING AND INDICATOR LIGHTS