2019 Hyundai Santa Fe hill
[x] Cancel search: hillPage 16 of 557

I
IN
N S
ST
T R
R U
U M
M E
EN
N T
T
P
P A
A N
N E
EL
L
O
O V
VE
ER
R V
V I
IE
E W
W
(
( I
I)
)
The actual shape may differ from the illustration.
1-5
Your vehicle at a glance
11. Instrument cluster ....................................3-68
2. Horn ........................................................3-29
3. Driver’s front air bag ................................2-51
4. Key ignition switch/ ....................................5-6
Engine Start/Stop button ............................5-9
5. Hazard warning flasher switch ..................6-2
6. Audio system/Navigation system ..............4-4
7. Manual climate control system/ ............3-138 Automatic climate control system ..........3-147
8. Heated steering wheel ............................3-30
9. Seat warmer ............................................2-21
10. Air ventilation seat ................................2-22
11. Power outlet ........................................3-170
12. Aux, USB and iPod
®................................4-2
13. USB charger ........................................3-173
14. Wireless cellular phone charging system ..................................3-173
15. Passenger’s front air bag ......................2-51
16. Glove box ............................................3-165
17. Automatic transmission shift lever ........5-14
18. Drive mode button ................................5-51
19. Idle Stop and Go(ISG) OFF button ......5-46
20. Downhill Brake Control (DBC) ..............5-36
21. Parking Distance Warning (Reverse) OFF button ..........................................3-133
22. Surround view monitor button ............3-131
23. Electronic Parking Brake (EPB) ............5-21
24. Auto Hold switch ....................................5-27
25. AC inverter ..........................................3-171
OTMA018004
Page 175 of 557
3-86
Convenient features of your vehicle
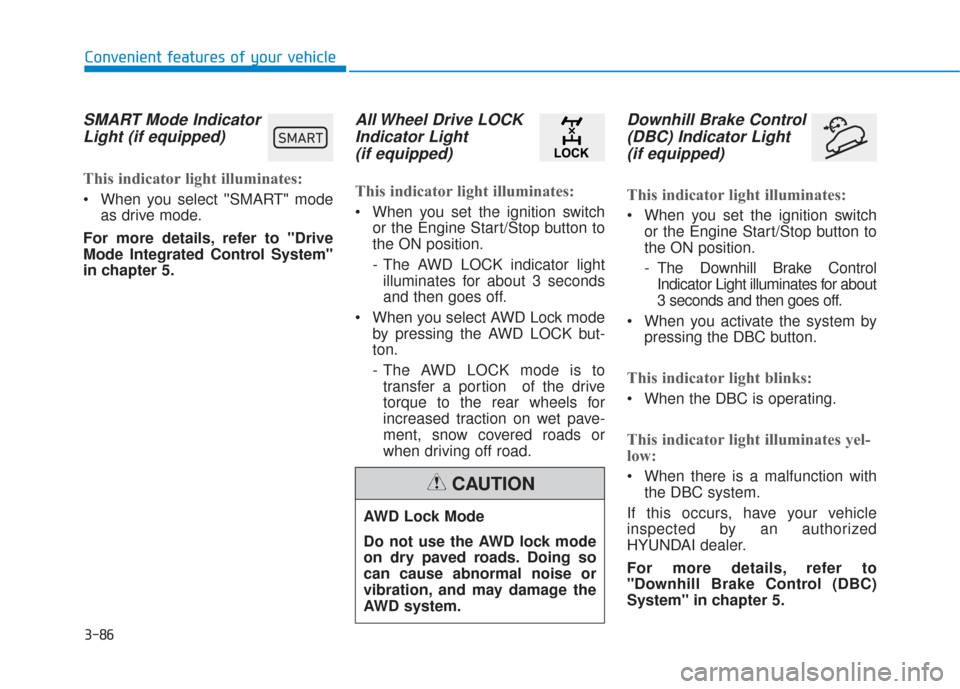
SMART Mode IndicatorLight (if equipped)
This indicator light illuminates:
When you select ''SMART" mode
as drive mode.
For more details, refer to "Drive
Mode Integrated Control System''
in chapter 5.
All Wheel Drive LOCK Indicator Light (if equipped)
This indicator light illuminates:
When you set the ignition switch
or the Engine Start/Stop button to
the ON position.
- The AWD LOCK indicator lightilluminates for about 3 seconds
and then goes off.
When you select AWD Lock mode by pressing the AWD LOCK but-
ton.
- The AWD LOCK mode is totransfer a portion of the drive
torque to the rear wheels for
increased traction on wet pave-
ment, snow covered roads or
when driving off road.
Downhill Brake Control(DBC) Indicator Light(if equipped)
This indicator light illuminates:
When you set the ignition switch
or the Engine Start/Stop button to
the ON position.
- The Downhill Brake ControlIndicator Light illuminates for about
3 seconds and then goes off.
When you activate the system by pressing the DBC button.
This indicator light blinks:
When the DBC is operating.
This indicator light illuminates yel-
low:
When there is a malfunction withthe DBC system.
If this occurs, have your vehicle
inspected by an authorized
HYUNDAI dealer.
For more details, refer to
"Downhill Brake Control (DBC)
System" in chapter 5.
AWD Lock Mode
Do not use the AWD lock mode
on dry paved roads. Doing so
can cause abnormal noise or
vibration, and may damage the
AWD system.
CAUTION
00360030002400350037
Page 207 of 557
3-118
Convenient features of your vehicleThe system may not operate nor-
mally if any of the following con-
ditions should occur:
1) When the illumination from an on-coming vehicle or a
vehicle in front is dim. Such
examples may include:
When the headlamps of an on-
coming vehicle or the tail
lamps of a vehicle in front is
covered with dust, snow, or
water.
When the headlamps on an on-
coming vehicle are OFF, but the
fog lamps are ON.
2) When the High Beam Assist camera is adversely affected
by an external condition.
Such examples may include:
When the vehicle's head-
lamps have been damaged or
not repaired properly.
When the vehicle headlamps
are not aimed properly.
When the vehicle is driven on
a narrow curved road or rough
road.
When the vehicle is driven on
an uphill road or downhill
road.
When only part of the vehicle in
front is visible on a crossroad
or curved road.
When there is a traffic light,
reflecting sign, flashing sign or
mirror.
When the road conditions are
bad such as being wet or cov-
ered with snow.
When a vehicle suddenly
appears from a curve.
When the vehicle is tilted from
a flat tire or being towed.
When the Lane Keeping Assist
(LKA) system warning light
illuminates.
When the light from the on-
coming or front vehicle is not
detected because of exhaust
fume, smoke, fog, snow, etc.
When the front window is cov-
ered with foreign matters such
as ice, dust, fog, or is damaged.
3) When the forward visibility is poor. Such examples may
include:
When the headlamps of an on-
coming vehicle or a vehicle in
front is not detected due to
poor outside visibility (smog,
smoke, dust, fog, heavy rain,
snow, etc.).
When the windshield visibility
is poor.
WARNING
Page 233 of 557
3-144
Convenient features of your vehicle
Operation Tips
To keep dust or unpleasant fumesfrom entering the vehicle through
the ventilation system, temporarily
set the air intake control to recir-
culation mode. Return the control
to fresh mode when the unpleas-
ant air outside has diminished.
This will help keep the driver alert
and comfortable.
To help prevent the inside of the windshield from fogging, set the air
intake control to fresh mode and
fan speed to the desired position,
turn on the air conditioning sys-
tem, and adjust the temperature
control to the desired temperature.
Air conditioning
Your HYUNDAI vehicle air condition-
ing system is filled with R-1234yf
refrigerant.
1. Start the engine.
2. Press the air conditioning button.
3. Select the Face Level mode.
4. Set the air intake control toRecirculation mode temporarily to
allow the cabin to cool quickly.
When the desired temperature in
the cabin is reached, change the
air intake control back to Fresh
mode.
5. Adjust the fan speed control and temperature control to maintain
maximum comfort.
When maximum cooling is desired,
set the temperature control to the
MAX A/C position, then set the fan
speed control to the highest setting. When using the air conditioning
system, monitor the engine tem-
perature gauge closely while driv-
ing up hills or in heavy traffic when
outside temperatures are high. Air
conditioning system operation
when climbing a steep grade or in
high outside ambient tempera-
tures can cause engine overheat-
ing.
Continue to use the fan, but turn
the air conditioning system off if
the engine temperature gauge
indicates engine overheating.
NOTICE
Page 246 of 557
3-157
Convenient features of your vehicle
3
When using the air conditioning
system, monitor the engine tem-
perature gauge closely while driv-
ing up hills or in heavy traffic
when outside temperatures. Air
conditioning system operation
when climbing a steep grade or in
high outside ambient tempera-
tures can cause engine overheat-
ing. Continue to use the fan, but
turn the air conditioning system
off if the engine temperature
gauge indicates engine overheat-
ing.
Air conditioning system operation
tips
If the vehicle has been parked indirect sunlight during hot weather,
open the windows for a short time
to let the hot air inside the vehicle
escape.
After sufficient cooling has been achieved, switch back from recir-
culation mode to fresh mode. To help reduce moisture inside of
the windows on rainy or humid
days, decrease the humidity
inside the vehicle by operating the
air conditioning system with the
windows and sunroof closed.
Use the air conditioning system every month only for a few min-
utes to ensure maximum system
performance.
If you operate air conditioner excessively, the difference
between the temperature of the
outside air and that of the wind-
shield could cause the outer sur-
face of the windshield to fog up,
causing loss of visibility. In this
case, set the mode selection knob
or button to the position and
fan speed control to the lower
speed.
System Maintenance
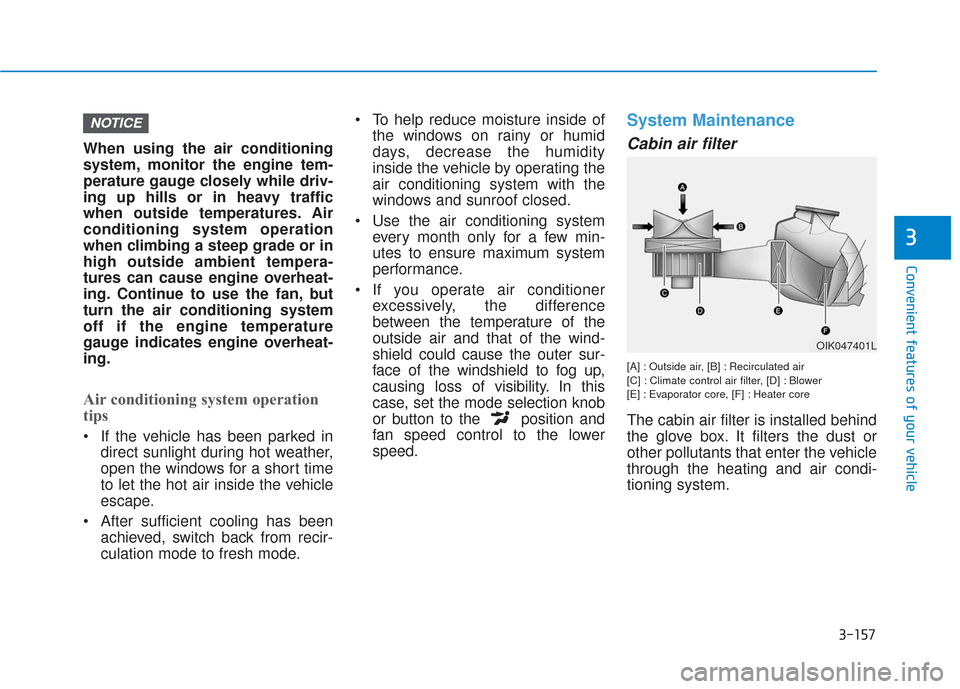
Cabin air filter
[A] : Outside air, [B] : Recirculated air
[C] : Climate control air filter, [D] : Blower
[E] : Evaporator core, [F] : Heater core
The cabin air filter is installed behind
the glove box. It filters the dust or
other pollutants that enter the vehicle
through the heating and air condi-
tioning system.
NOTICE
OIK047401L
Page 275 of 557

Driving your vehicle
5
Before Driving ........................................................5-4
Before Entering the Vehicle ...........................................5-4
Before Starting ..................................................................5-4
Ignition Switch ........................................................5-6
Key Ignition Switch ...........................................................5-6
Engine Start/Stop Button................................................5-9
Automatic Transmission ......................................5-14
Automatic Transmission Operation .............................5-14
Good Driving Practices ..................................................5-18
Braking System ....................................................5-20
Power Brakes ...................................................................5-20
Disc Brakes Wear Indicator ..........................................5-21
Electronic Parking Brake (EPB)...................................5-21
Auto Hold ........................................................................\
..5-27
Anti-lock Brake System (ABS) ....................................5-30
Electronic Stability Control (ESC)................................5-32
Vehicle Stability Management (VSM).........................5-35
Hill-Start Assist Control (HAC) ....................................5-36
Downhill Brake Control (DBC) ......................................5-36
Good Braking Practices .................................................5-39
All Wheel Drive (AWD) ........................................5-40
AWD operation.................................................................5-41
Emergency precautions .................................................5-44
ISG (Idle Stop and Go) System ..........................5-46
To Activate the ISG System ..........................................5-46
To Deactivate the ISG System......................................5-49
ISG System Malfunction ................................................5-49
Battery Sensor Deactivation ........................................5-50
Drive Mode Integrated Control System ............5-51
Drive Mode .......................................................................5\
-51
Smart shift on trip computer .......................................5-53
Forward Collision-Avoidance
Assist (FCA) System ............................................5-54
System Setting and Activation.....................................5-54
FCA Warning Message and System Control ............5-57
FCA Sensor .......................................................................5\
-59
System Malfunction .......................................................5-61
Limitations of the System .............................................5-62
Blind-Spot Collision Warning/Blind-Spot
Collision-Avoidance Assist .................................5-68
System Description .........................................................5-68
System Setting and Activation.....................................5-69
Warning and System Control .......................................5-72
Detecting Sensor (Camera and Radar) ......................5-74
Limitations of the System .............................................5-77
Page 289 of 557
5-15
Driving your vehicle
5
Transmission ranges
The indicator in the instrument clus-
ter displays the shift lever position
when the ignition switch is in the ON
position.
P (Park)
Always come to a complete stop
before shifting into P (Park).
To shift from P (Park), you must
depress firmly on the brake pedal.
Make sure your foot is off the accel-
erator pedal.
If you have done all of the above and
still cannot shift the lever out of P
(Park), see "Shift-Lock Release" in
this section.
The shift lever must be in P (Park)
before turning the engine off.
R (Reverse)
Use this position to drive the vehicle
backward.
Always come to a complete stop
before shifting into or out of R
(Reverse); you may damage the
transmission if you shift into R
(Reverse) while the vehicle is in
motion.
N (Neutral)
The wheels and transmission are not
engaged.
Use N (Neutral) if you need to restart
a stalled engine.
Shift into P (Park) if you need to
leave your vehicle for any reason.
Always depress the brake pedal
when you are shifting from N
(Neutral) to another gear.
NOTICE
Shifting into P (Park) while the
vehicle is in motion may
cause you to lose control of
the vehicle.
After the vehicle has stopped,
always make sure the shift
lever is in P (Park), apply the
parking brake, and turn the
engine off.
When parking on an incline,
place the shift lever in P (Park)
and apply the parking brake to
prevent the vehicle from
rolling downhill.
WARNING
Page 290 of 557
5-16
Driving your vehicle
D (Drive)
This is the normal driving position.
The transmission will automatically
shift through a eight-gear sequence,
providing the best fuel economy and
power.
For extra power when passing anoth-
er vehicle or driving uphill depress
the accelerator pedal further until
you feel the transmission downshift
to a lower gear.
The DRIVE MODE switch, located
on the shift lever console, allows the
driver to switch from NORMAL mode
to SPORT mode.
For more information, refer to
"Drive Mode Integrated Control
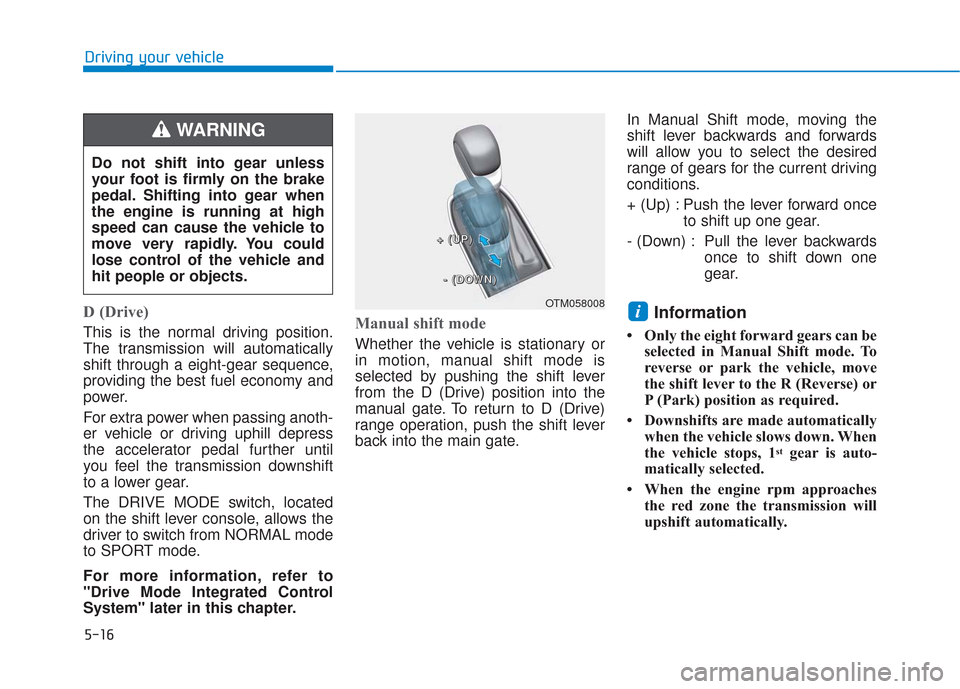
System" later in this chapter.Manual shift mode
Whether the vehicle is stationary or
in motion, manual shift mode is
selected by pushing the shift lever
from the D (Drive) position into the
manual gate. To return to D (Drive)
range operation, push the shift lever
back into the main gate.In Manual Shift mode, moving the
shift lever backwards and forwards
will allow you to select the desired
range of gears for the current driving
conditions.
+ (Up) : Push the lever forward once
to shift up one gear.
- (Down) : Pull the lever backwards once to shift down one
gear.
Information
• Only the eight forward gears can beselected in Manual Shift mode. To
reverse or park the vehicle, move
the shift lever to the R (Reverse) or
P (Park) position as required.
• Downshifts are made automatically when the vehicle slows down. When
the vehicle stops, 1
stgear is auto-
matically selected.
• When the engine rpm approaches the red zone the transmission will
upshift automatically.
i
Do not shift into gear unless
your foot is firmly on the brake
pedal. Shifting into gear when
the engine is running at high
speed can cause the vehicle to
move very rapidly. You could
lose control of the vehicle and
hit people or objects.
WARNING
OTM058008
+
+
+
+
(
(
(
(
U
U
U
U
P
P
P
P
)
)
)
)
-
-
-
-
(
(
(
(
D
D
D
D
O
O
O
O
W
W
W
W
N
N
N
N
)
)
)
)