2019 Hyundai Santa Fe Drive mode button
[x] Cancel search: Drive mode buttonPage 16 of 557

I
IN
N S
ST
T R
R U
U M
M E
EN
N T
T
P
P A
A N
N E
EL
L
O
O V
VE
ER
R V
V I
IE
E W
W
(
( I
I)
)
The actual shape may differ from the illustration.
1-5
Your vehicle at a glance
11. Instrument cluster ....................................3-68
2. Horn ........................................................3-29
3. Driver’s front air bag ................................2-51
4. Key ignition switch/ ....................................5-6
Engine Start/Stop button ............................5-9
5. Hazard warning flasher switch ..................6-2
6. Audio system/Navigation system ..............4-4
7. Manual climate control system/ ............3-138 Automatic climate control system ..........3-147
8. Heated steering wheel ............................3-30
9. Seat warmer ............................................2-21
10. Air ventilation seat ................................2-22
11. Power outlet ........................................3-170
12. Aux, USB and iPod
®................................4-2
13. USB charger ........................................3-173
14. Wireless cellular phone charging system ..................................3-173
15. Passenger’s front air bag ......................2-51
16. Glove box ............................................3-165
17. Automatic transmission shift lever ........5-14
18. Drive mode button ................................5-51
19. Idle Stop and Go(ISG) OFF button ......5-46
20. Downhill Brake Control (DBC) ..............5-36
21. Parking Distance Warning (Reverse) OFF button ..........................................3-133
22. Surround view monitor button ............3-131
23. Electronic Parking Brake (EPB) ............5-21
24. Auto Hold switch ....................................5-27
25. AC inverter ..........................................3-171
OTMA018004
Page 93 of 557

3-4
Convenient features of your vehicle
Remote Key (if equipped)
Your HYUNDAI uses a remote key,
which you can use to lock or unlock
the driver and passenger doors or
the rear liftgate.
1. Door Lock
2. Door Unlock
3. Liftgate Unlock
4. Panic
Locking your vehicle
To lock your vehicle:
1. Make sure all doors, the enginehood and the liftgate are closed.
2. Press the Door Lock button (1) on the remote key to lock all doors.
3. If the Door Lock button (1) is pressed once more within four
seconds, the horn will beep once
and the hazard warning lights will
blink.
4. Make sure the doors are locked by checking the position of the door
lock button inside the vehicle.
Unlocking your vehicle
To unlock your vehicle :
1. Press the Door Unlock button (2)on the remote key.
2. The driver's door will unlock. The hazard warning lights will blink two
times.
Two Press Unlock Feature
The priority for unlocking the driver
door only, or unlocking all the doors
with one press may be adjusted in
the User Settings mode in the cluster
LCD display.
The Two Press Unlock feature, when
enabled, will require the user to
press the door unlock button once for
driver door only and twice for unlock-
ing all the doors.
Select or Deselect the Two Press
Unlock feature in the User Settings
mode in the cluster LCD display. The
option can be found under the follow-
ing menu:
User Settings ➞ Door ➞Two Press
Unlock
A A C
CC
CE
E S
SS
SI
IN
N G
G
Y
Y O
O U
UR
R
V
V E
EH
H I
IC
C L
LE
E
OPD046001
Do not leave the keys in your
vehicle with unsupervised chil-
dren. Unattended children
could place the key in the igni-
tion switch and may operate
power windows or other con-
trols, or even make the vehicle
move, which could result in
serious injury or death.
WARNING
Page 98 of 557
3-9
Convenient features of your vehicle
3
Two Press Unlock Feature
The priority for unlocking the driver
door only, or unlocking all the doors
with one press may be adjusted in
the User Settings mode in the cluster
LCD display.
The Two Press Unlock feature, when
enabled, will require the user to
press the door unlock button once for
driver door only and twice for unlock-
ing all the doors.
Select or Deselect the Two Press
Unlock feature in the User Settings
mode in the cluster LCD display. The
option can be found under the follow-
ing menu:
User Settings ➞Door ➞Two Press
Unlock The Two Press Unlock feature can
also be enabled or disabled by
pressing the door lock and unlock
buttons simultaneously on the Key
FOB:
Press and hold both the Door Lock
button and the Door Unlock button
simultaneously until the hazard
warning lights blink.
This will enable or disable the Two
Press Unlock feature. Repeat this
procedure to enable/disable the
mode again.
Information
• The door handle buttons will only
operate when the smart key is with-
in 28-40 inches (0.7~1m) from the
outside door handle
• Either the driver or front passenger door can be opened with the door
handle button when the smart key
is within this range
• If you press the front passenger outside door handle with the smart
key in your possession, all the doors
will unlock
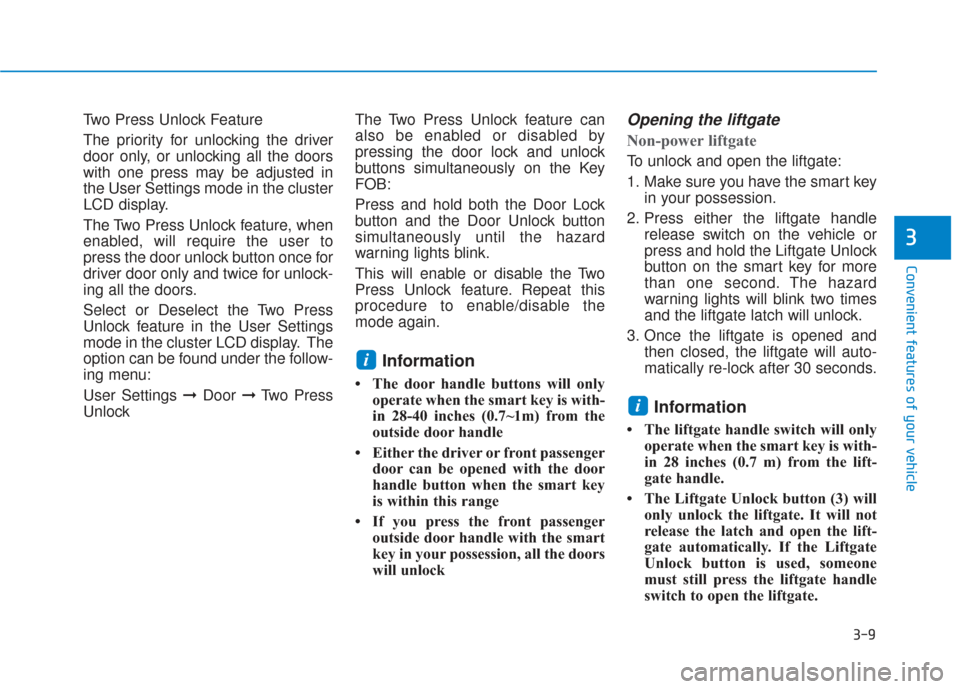
Opening the liftgate
Non-power liftgate
To unlock and open the liftgate:
1. Make sure you have the smart keyin your possession.
2. Press either the liftgate handle release switch on the vehicle or
press and hold the Liftgate Unlock
button on the smart key for more
than one second. The hazard
warning lights will blink two times
and the liftgate latch will unlock.
3. Once the liftgate is opened and then closed, the liftgate will auto-
matically re-lock after 30 seconds.
Information
• The liftgate handle switch will onlyoperate when the smart key is with-
in 28 inches (0.7 m) from the lift-
gate handle.
• The Liftgate Unlock button (3) will only unlock the liftgate. It will not
release the latch and open the lift-
gate automatically. If the Liftgate
Unlock button is used, someone
must still press the liftgate handle
switch to open the liftgate.
i
i
Page 99 of 557
3-10
Convenient features of your vehicle
Power liftgate
To unlock and open the liftgate:
1. Make sure you have the smart keyin your possession.
2. Press either the liftgate handle release switch on the vehicle or
press and hold the Liftgate Unlock
button on the smart key for more
than one second. The hazard
warning lights will blink two times
and the liftgate latch will open.
3. Once the liftgate is opened and then closed, the liftgate will auto-
matically re-lock after 30 seconds.
Information
The liftgate handle switch will only
operate when the smart key is within
28 inches (0.7 m) from the liftgate
handle.
Panic button
Press and hold the Panic button (4)
for more than one second. The horn
sounds and hazard warning lights
blink for about 30 seconds. To cancel
the panic mode, press any button on
the Smart Key.
Start-up
You can start the vehicle without
inserting the key.
For information, refer to the
"Engine Start/Stop Button" sec-
tion in chapter 5.
To prevent damaging the smart key:
Keep the smart key in a cool, dryplace to avoid damage or mal-
function. Exposure to moisture
or high temperature may cause
the internal circuit of the smart
key to malfunction which may
not be covered under warranty.
Avoid dropping or throwing the smart key.
Protect the smart key from extreme temperatures.
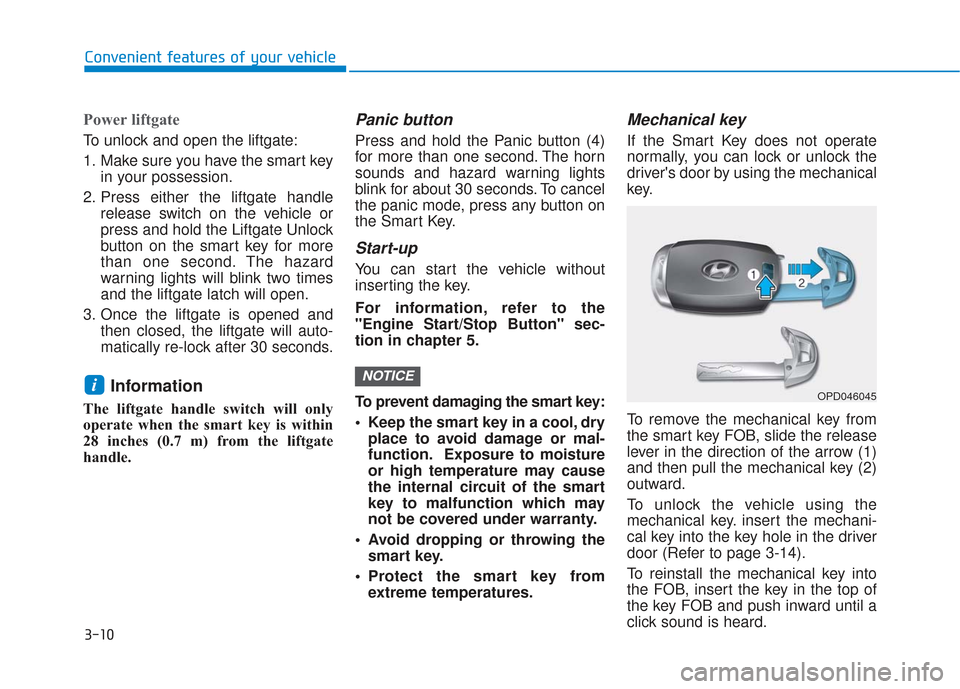
Mechanical key
If the Smart Key does not operate
normally, you can lock or unlock the
driver's door by using the mechanical
key.
To remove the mechanical key from
the smart key FOB, slide the release
lever in the direction of the arrow (1)
and then pull the mechanical key (2)
outward.
To unlock the vehicle using the
mechanical key. insert the mechani-
cal key into the key hole in the driver
door (Refer to page 3-14).
To reinstall the mechanical key into
the FOB, insert the key in the top of
the key FOB and push inward until a
click sound is heard.
NOTICEiOPD046045
Page 104 of 557
3-15
Convenient features of your vehicle
3
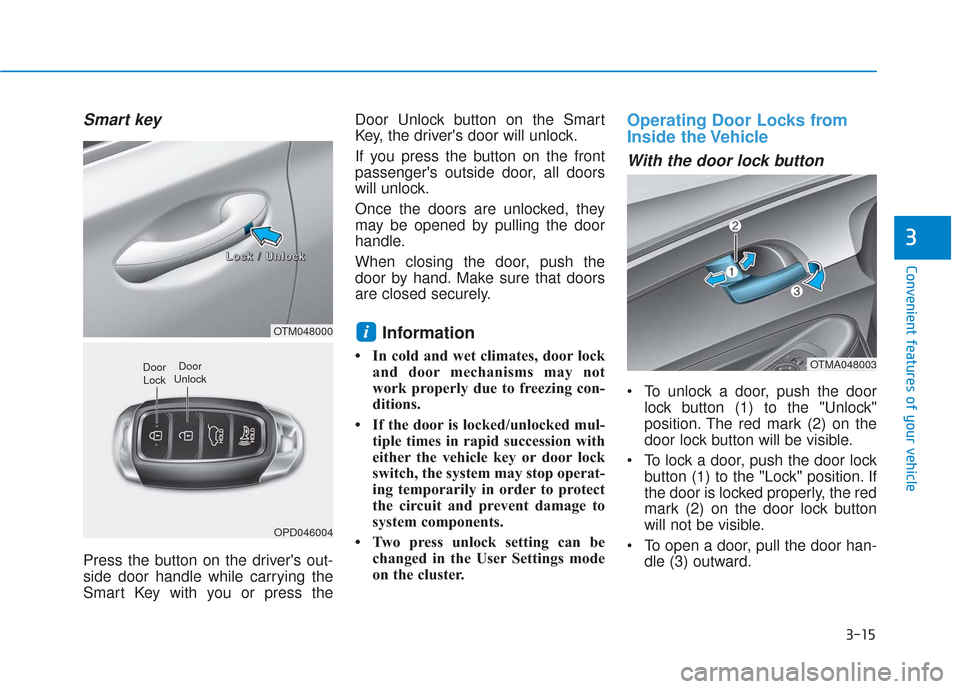
Smart key
Press the button on the driver's out-
side door handle while carrying the
Smart Key with you or press theDoor Unlock button on the Smart
Key, the driver's door will unlock.
If you press the button on the front
passenger's outside door, all doors
will unlock.
Once the doors are unlocked, they
may be opened by pulling the door
handle.
When closing the door, push the
door by hand. Make sure that doors
are closed securely.
Information
• In cold and wet climates, door lock
and door mechanisms may not
work properly due to freezing con-
ditions.
• If the door is locked/unlocked mul- tiple times in rapid succession with
either the vehicle key or door lock
switch, the system may stop operat-
ing temporarily in order to protect
the circuit and prevent damage to
system components.
• Two press unlock setting can be changed in the User Settings mode
on the cluster.
Operating Door Locks from
Inside the Vehicle
With the door lock button
To unlock a door, push the doorlock button (1) to the "Unlock"
position. The red mark (2) on the
door lock button will be visible.
To lock a door, push the door lock button (1) to the "Lock" position. If
the door is locked properly, the red
mark (2) on the door lock button
will not be visible.
To open a door, pull the door han- dle (3) outward.
iOTM048000
OPD046004
Door
UnlockDoor Lock
L
L
L
L
o
o
o
o
c
c
c
c
k
k
k
k
/
/
/
/
U
U
U
U
n
n
n
n
l
l
l
l
o
o
o
o
c
c
c
c
k
k
k
k
OTMA048003
Page 116 of 557
3-27
Convenient features of your vehicle
3
Reattempt to do the resettingprocedure again, when the reset-
ting procedure incompletely
stops or the notification sound
do not stop.
Make sure that there is no obsta- cle around the driver's seat in
advance of resetting the driver's
seat memory system.
Easy Access Function
The system will move the driver's
seat automatically as follows:
- It will move the driver’s seat rear- ward when the ignition key is
removed.
- It will move the driver’s seat for- ward when the ignition key is
inserted.
- It will move the driver’s seat rear- ward when the Engine Start/Stop
button is pressed to the OFF posi-
tion. - It will move the driver’s seat for-
ward when the Engine Start/Stop
button is pressed to the ACC or
START position.
You can activate or deactivate the
Easy Access Function from the User
Settings mode in the cluster LCD dis-
play.
'Convenience →Seat Easy Access →
Off/Normal/Extended'.
For more details, refer to "LCD
Display" in this chapter.
NOTICE
Driver should be cautious when
using this function to assure no
injury to passenger or child on
the back seat. In case of emer-
gency the driver has to stop
movement of front seat (when
easy access feature is activat-
ed) by pressing SET button or
any of the driver seat control
switches.
CAUTION
Page 124 of 557
3-35
Convenient features of your vehicle
3
To adjust the Zone setting:
1. Determine the desired ZoneNumber based upon your current
location on the Zone Map.
2. Press and hold the Control Button for up to 6 seconds, the current
Zone Number will appear on the
display.
3. Release and press the Control Button and then hold the Control
Button again will cause the num-
bers to increment (Note: they will
repeat …13, 14, 15, 1, 2, …).
Releasing the button when the
desired Zone Number appears on
the display will set the new Zone.
4. Within about 5 seconds the com- pass will start displaying a com-
pass heading again.
There are some conditions that can
cause changes to the vehicle mag-
nets, such as installing a ski rack or
a CB antenna. Body repair work on
the vehicle can also cause changes
to the vehicle's magnetic field. In
these situations, the compass will
need to be re-calibrated to correct
these changes. If you need to recalibrate the com-
pass:
1. Press and hold the Control Button
for more than 6 seconds. When
the compass memory is cleared, a
"C" will appear in the display.
2. Drive the vehicle in 2 complete cir- cles at less than 5 mph (8 km/h).
Integrated HomeLink®Wireless
Control System
The HomeLink®Wireless Control
System can replace up to three
hand-held radio-frequency (RF)
transmitters with a single built-in
device. This innovative feature will
learn the radio frequency codes of
most current transmitters to operate
devices such as gate operators,
garage door openers, entry door
locks, security systems, even home
lighting. Both standard and rolling
code-equipped transmitters can be
programmed by following the out-
lined procedures.
Additional HomeLink
®information
can be found at: www.homelink.com,
www.youtube.com/HomeLinkGentex
or by calling 1-800-355-3515. Retain the original transmitter of the RF
device you are programming for use in
other vehicles as well as for future
HomeLink
®programming. It is also sug-
gested that upon the sale of the vehicle,
the programmed HomeLink
®buttons be
erased for security purposes.
Before programming HomeLink
®
to a garage door opener or gate
operator, make sure people and
objects are out of the way of the
device to prevent potential harm
or damage. Do not use the
HomeLink
®with any garage
door opener that lacks the safe-
ty stop and reverse features
required by U.S. federal safety
standards (this includes any
garage door opener model man-
ufactured before April 1, 1982). A
garage door that cannot detect
an object - signaling the door to
stop and reverse - does not meet
current U.S. federal safety stan-
dards. Using a garage door
opener without these features
increases the risk of serious
injury or death.
WARNING
Page 146 of 557
3-57
Convenient features of your vehicle
3
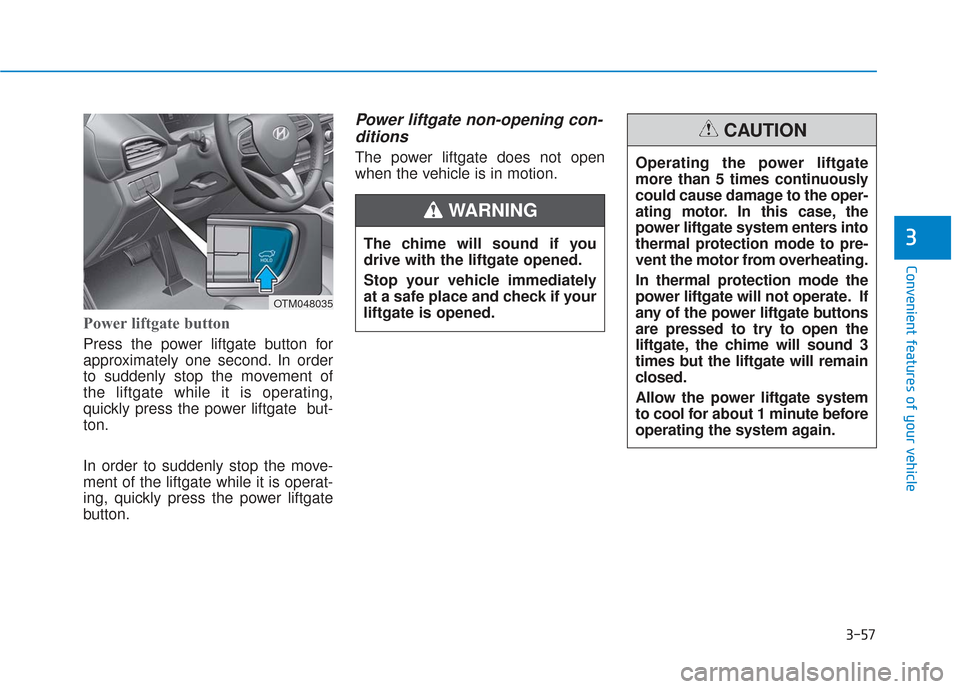
Power liftgate button
Press the power liftgate button for
approximately one second. In order
to suddenly stop the movement of
the liftgate while it is operating,
quickly press the power liftgate but-
ton.
In order to suddenly stop the move-
ment of the liftgate while it is operat-
ing, quickly press the power liftgate
button.
Power liftgate non-opening con-ditions
The power liftgate does not open
when the vehicle is in motion.
The chime will sound if you
drive with the liftgate opened.
Stop your vehicle immediately
at a safe place and check if your
liftgate is opened.
WARNING
OTM048035
Operating the power liftgate
more than 5 times continuously
could cause damage to the oper-
ating motor. In this case, the
power liftgate system enters into
thermal protection mode to pre-
vent the motor from overheating.
In thermal protection mode the
power liftgate will not operate. If
any of the power liftgate buttons
are pressed to try to open the
liftgate, the chime will sound 3
times but the liftgate will remain
closed.
Allow the power liftgate system
to cool for about 1 minute before
operating the system again.
CAUTION