2019 Hyundai Santa Fe engine light
[x] Cancel search: engine lightPage 423 of 557
6-3
What to do in an emergency
If you Have a Flat Tire While
Driving
If a tire goes flat while you are driving:
Take your foot off the acceleratorpedal and let the vehicle slow down
while driving straight ahead. Do not
apply the brakes immediately or
attempt to pull off the road as this
may cause loss of vehicle control
resulting in an accident. When the
vehicle has slowed to such a speed
that it is safe to do so, brake care-
fully and pull off the road. Drive off
the road as far as possible and
park on firm, level ground. If you
are on a divided highway, do not
park in the median area between
the two traffic lanes.
When the vehicle is stopped, press the hazard warning flasher button,
move the shift lever into P (Park),
and apply the parking brake, and
place the ignition switch in the
LOCK/OFF position.
Have all passengers get out of the vehicle. Be sure they all get out on
the side of the vehicle that is away
from traffic.
When changing a flat tire, follow the instructions provided later in
this chapter.
If the Engine Doesn't Turn
Over or Turns Over Slowly
Be sure the shift lever is in N
(Neutral) or P (Park). The engine
starts only when the shift lever is in
N (Neutral) or P (Park).
Check the battery connections to be sure they are clean and tight.
Turn on the interior light. If the light dims or goes out when you oper-
ate the starter, the battery is
drained.
Do not push or pull the vehicle to
start it. This could cause damage to
your vehicle. See instructions for
"Jump Starting" provided in this
chapter.
If the Engine Turns Over
Normally but Doesn't Start
Check the fuel level and add fuel if
necessary.
If the engine still does not start, have
your vehicle checked by an author-
ized HYUNDAI dealer.
6
I I F
F
T
T H
H E
E
E
E N
N G
GI
IN
N E
E
W
W I
IL
L L
L
N
N O
O T
T
S
S T
T A
A R
RT
T
Push or pull starting the vehicle
may cause the catalytic con-
verter to overload which can
lead to damage to the emission
control system.
CAUTION
Page 425 of 557
6-5
What to do in an emergency
6
Information
An inappropriately disposedbattery can be harmful to the
environment and human
health. Dispose of the battery
according to your local law(s)
or regulations.
To prevent damage to your vehicle:
Only use a 12-volt power supply (battery or jumper system) to
jump start your vehicle.
Do not attempt to jump start your vehicle by push-starting.
Jump starting procedure
1. Position the vehicles close enough that the jumper cables will reach,
but do not allow the vehicles to
touch.
2. Avoid fans or any moving parts in the engine compartment at all
times, even when the vehicles are
turned off.
3. Turn off all electrical devices such as radios, lights, air conditioning,
etc. Put the vehicles in P (Park)
and set the parking brakes. Turn
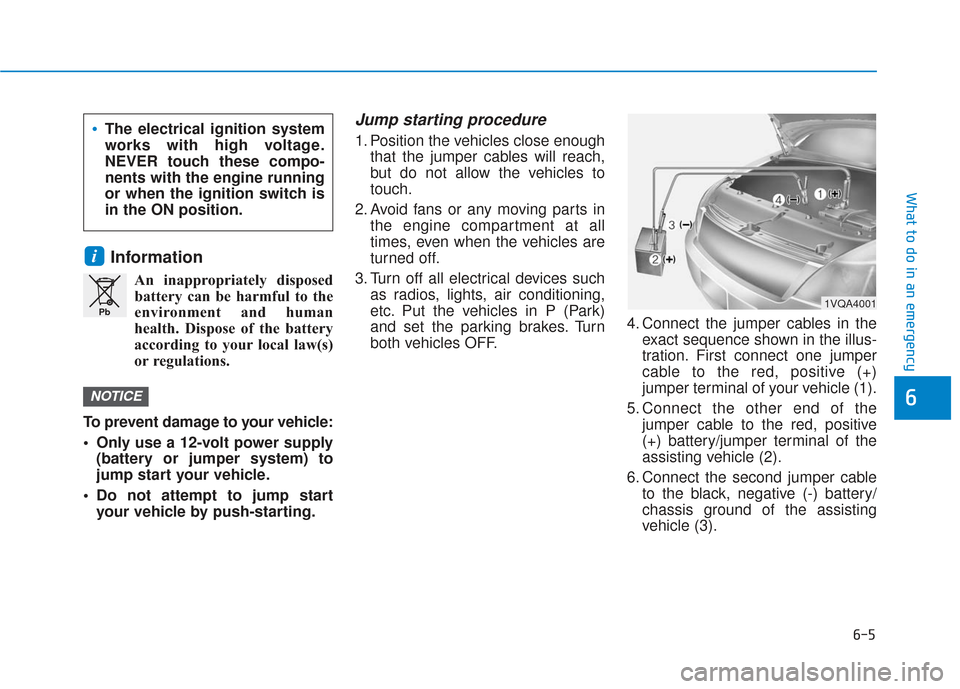
both vehicles OFF. 4. Connect the jumper cables in the
exact sequence shown in the illus-
tration. First connect one jumper
cable to the red, positive (+)
jumper terminal of your vehicle (1).
5. Connect the other end of the jumper cable to the red, positive
(+) battery/jumper terminal of the
assisting vehicle (2).
6. Connect the second jumper cable to the black, negative (-) battery/
chassis ground of the assisting
vehicle (3).
NOTICE
i
Pb
The electrical ignition system
works with high voltage.
NEVER touch these compo-
nents with the engine running
or when the ignition switch is
in the ON position.
1VQA4001
Page 430 of 557

6-10
What to do in an emergency
If any of the below happens, have
the system checked by an author-
ized HYUNDAI dealer.
1.The Low Tire Pressure TPMS Malfunction Indicator does not
illuminate for 3 seconds when
the ignition switch is placed to
the ON position or engine is run-
ning.
2.The TPMS Malfunction Indicator remains illuminated after blink-
ing for approximately 1 minute.
3.The Low Tire Pressure LCD dis- play remains illuminated
Low Tire Pressure
Telltale
Low Tire Pressure
LCD Display with
Position Indicator
When the tire pressure monitoring
system warning indicators are illumi-
nated and the warning message is
displayed on the cluster LCD display,
one or more of your tires is signifi-
cantly under-inflated. The LCD posi-
tion indicator will indicate which tire
is significantly under-inflated by illu-
minating the corresponding position
light. If any of your tire pressures are indi-
cated as being low, immediately
reduce your speed, avoid hard cor-
nering, and anticipate increased
stopping distances. You should stop
and check your tires as soon as pos-
sible. Inflate the tires to the proper
pressure as indicated on the vehi-
cle’s placard or tire inflation pressure
label located on the driver's side cen-
ter pillar outer panel.
If you cannot reach a service station
or if the tire cannot hold the newly
added air, replace the low pressure
tire with the spare tire.
The Low Tire Pressure LCD position
indicator will remain on and the
TPMS Malfunction Indicator may
blink for one minute and then remain
illuminated until you have the low
pressure tire repaired and replaced
on the vehicle.
The spare tire is not equipped with
a tire pressure sensor.
NOTICE
NOTICE
OTMA048123
Page 444 of 557

7
Tires and Wheels .................................................7-37
Tire Care ........................................................................\
....7-37
Recommended Cold Tire Inflation Pressures ..........7-38
Check Tire Inflation Pressure ......................................7-39
Tire Rotation...................................................................\
..7-39
Wheel Alignment and Tire Balance ............................7-40
Tire Replacement ...........................................................7-41
Wheel Replacement ........................................................7-42
Tire Traction ....................................................................7-42\
Tire Maintenance ............................................................7-43
Tire Sidewall Labeling ....................................................7-43
Tire Terminology and Definitions ..............................7-47
All Season Tires ...............................................................7-50
Snow Tires ........................................................................\
7-50
Radial-Ply Tires ...............................................................7-50
Fuses ......................................................................7-\
52
Instrument Panel Fuse Replacement..........................7-53
Engine Compartment Panel Fuse Replacement.......7-54
Fuse/Relay Panel Description ......................................7-55
Light Bulbs ............................................................7-65
Headlamp, Parking lamp, Daytime Running Light,
Turn signal lamp and Side marker ..............................7-65
Front Fog Lamp Replacement......................................7-69
Side Repeater Lamp Replacement ..............................7-69
Rear Combination Light Bulb Replacement ..............7-70
High Mounted Stop Lamp Bulb Replacement ..........7-73
License Plate Light Bulb Replacement .....................7-73
Interior Light Bulb Replacement .................................7-74
Appearance Care..................................................7-76
Exterior Care ....................................................................7-76\
Interior Care .....................................................................7-8\
1
Emission Control System ....................................7-84
Crankcase Emission Control System ..........................7-84
Evaporative Emission Control System Including
Onboard Refueling Vapor Recovery (ORVR)............7-84Exhaust Emission Control System .............................7-85
California Perchlorate Notice.............................7-88
Page 448 of 557

Owner Maintenance Schedule
When you stop for fuel:
• Check the engine oil level.
Check the coolant level in theengine coolant reservoir.
Check the windshield washer fluid level.
Check the tire for low or under- inflated tires.
While operating your vehicle:
Note any changes in the sound ofthe exhaust or any smell of
exhaust fumes in the vehicle.
Check for vibrations in the steer- ing wheel. Notice if there is any
increased steering effort or loose-
ness in the steering wheel, or
change in its straight-ahead posi-
tion.
Notice if your vehicle constantly turns slightly or "pulls" to one side
when traveling on smooth, level
road.
When stopping, listen and check for unusual sounds, pulling to one
side, increased brake pedal travel
or "hard-to-push" brake pedal.
If any slipping or changes in the operation of your transmission
occurs, check the transmission
fluid level.
Check the automatic transmission P (Park) function. Check the parking brake.
Check for fluid leaks under your
vehicle (water dripping from the air
conditioning system during or
after use is normal).
At least monthly:
Check coolant level in the enginecoolant reservoir.
Check the operation of all exterior lights, including the brake lights,
turn signals and hazard warning
flashers.
Check the inflation pressures of all tires including the spare for tires
that are worn, show uneven wear,
or are damaged.
Check for loose wheel lug nuts.
At least twice a year: (i.e., every Spring and Autumn)
Check radiator, heater and air
conditioning hoses for leaks or
damage.
Check windshield washer spray and wiper operation. Clean wiper
blades with a clean cloth damp-
ened with washer a fluid.
Be careful when checking your
engine coolant level when the
engine is hot. This may result in
coolant being blown out of the
opening and cause serious
burns and other injuries.
WARNING
Maintenance
7-6
Page 494 of 557
F
FU
U S
SE
E S
S
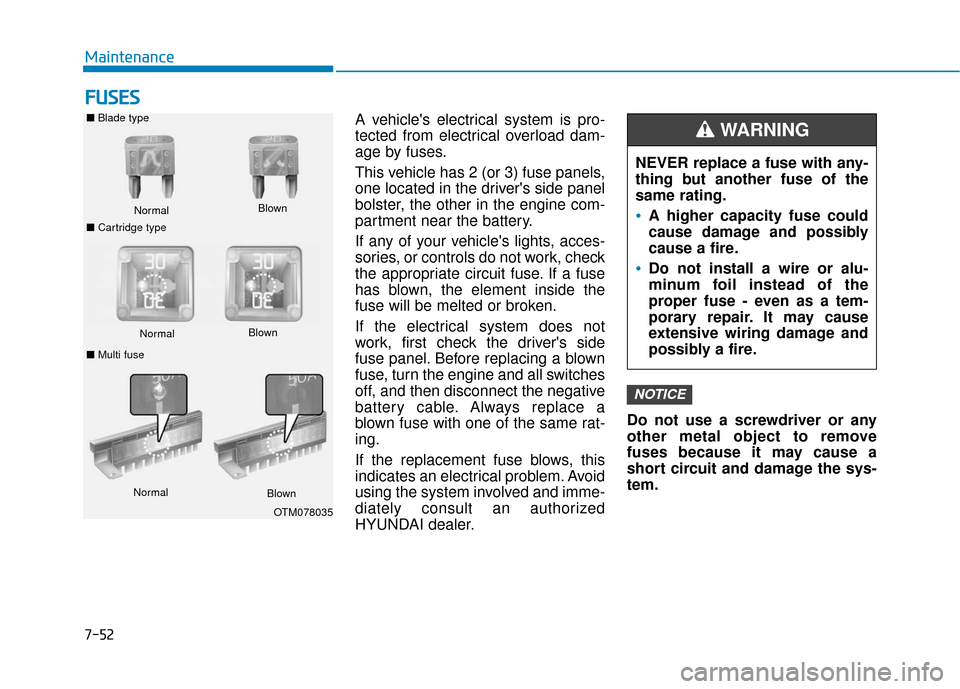
A vehicle's electrical system is pro-
tected from electrical overload dam-
age by fuses.
This vehicle has 2 (or 3) fuse panels,
one located in the driver's side panel
bolster, the other in the engine com-
partment near the battery.
If any of your vehicle's lights, acces-
sories, or controls do not work, check
the appropriate circuit fuse. If a fuse
has blown, the element inside the
fuse will be melted or broken.
If the electrical system does not
work, first check the driver's side
fuse panel. Before replacing a blown
fuse, turn the engine and all switches
off, and then disconnect the negative
battery cable. Always replace a
blown fuse with one of the same rat-
ing.
If the replacement fuse blows, this
indicates an electrical problem. Avoid
using the system involved and imme-
diately consult an authorized
HYUNDAI dealer. Do not use a screwdriver or any
other metal object to remove
fuses because it may cause a
short circuit and damage the sys-
tem.
NOTICE
NEVER replace a fuse with any-
thing but another fuse of the
same rating.
A higher capacity fuse could
cause damage and possibly
cause a fire.
Do not install a wire or alu-
minum foil instead of the
proper fuse - even as a tem-
porary repair. It may cause
extensive wiring damage and
possibly a fire.
WARNING ■
Blade type
Normal
■ Cartridge type Blown
Normal
Blown
■ Multi fuse
Normal Blown
OTM078035
Maintenance
7-52
Page 512 of 557

Rear Combination Light Bulb
Replacement
Type A
(1) Stop/Tail lamp
(2) Tail lamp
(3) Side marker
(4) Turn signal lamp
(5) Backup lamp
Stop/Tail lamp and side marker
lamp
1. Turn off the engine.
2. Open the liftgate.
3. Remove the cover using a flat-blade screwdriver. 4. Loosen the lamp assembly retain-
ing screws with a cross-tip screw-
driver.
5. Remove the rear combination lamp assembly from the body of
the vehicle.
OTM078006
OTMA078004
OTM078005
Maintenance
7-70
Page 546 of 557

I-3
Bottle holder .................................................................3-168
Brake fluid ......................................................................7-\
26
Brake system ...................................................................5-20Anti-lock Brake System (ABS)..................................5-30
Auto hold ....................................................................5-27\
Disc brakes wear indicator .........................................5-21
Downhill Brake Control (DBC) .................................5-36
Electronic Parking Brake (EPB) ................................5-21
Electronic Stability Control (ESC).............................5-32
Good braking practices ..............................................5-39
Hill-start Assist Control (HAC) .................................5-36
Power brakes ..............................................................5-20
Vehicle Stability Management (VSM) .......................5-35
Bulb replacement ............................................................7-65 Daytime running light (DRL) ....................................7-65
Front fog lamp ............................................................7-69
Front parking lamp .....................................................7-65
Front turn signal lamp ................................................7-65
Headlamp....................................................................7-65\
High mounted stop lamp ............................................7-73
Interior light................................................................7-74
License plate light ......................................................7-73
Rear combination light bulb .......................................7-70
Side marker ................................................................7-65
Side repeater lamp ......................................................7-69
Bulb wattage .....................................................................8-3\
Button start/stop, see engine start/stop button ..................5-9 Capacities (Lubricants) .....................................................8-7
Care
Exterior care ...............................................................7-76
Interior care ................................................................7-81
Tire care ......................................................................7-\
37
Cargo security screen ....................................................3-178
Cartridge type fuse..........................................................7-54
Cellular phone holder ...................................................3-141
Center console storage ..................................................3-165
Central door lock/unlock switch .....................................3-16
Certification label ...........................................................8-10
Chains Tire chains ................................................................5-129
Check tire inflation pressure ...........................................7-39
Child restraint system (CRS) ..........................................2-38 Booster seats...............................................................2-41
Forward-facing child restraint system........................2-41
Installing a child restraint system (CRS) ...................2-41
Lap/shoulder belt ........................................................2-46
Lower anchors ............................................................2-44
Rearward-facing child restraint system......................2-40
Selecting a child restraint system (CRS) ...................2-39
Tether anchors ............................................................2-45
Child-protector rear door lock ........................................3-19
Climate control air filter replacement.............................7-29
I
Index
C