2019 Hyundai Santa Fe turn signal
[x] Cancel search: turn signalPage 209 of 557
3-120
Convenient features of your vehicle
One-touch turn signal function
To activate the One Touch Turn
Signal function, push the turn signal
lever up or down to position (B) and
then release it.
The lane change signals will blink 3,
5 or 7 times.
You can activate or deactivate the
One Touch Turn Signal function or
choose the number of blinks (3, 5, or
7) from the User Settings mode in
the LCD display.
For more details, refer to the "LCD
Display" section in this chapter.
Front fog lamp (if equipped)
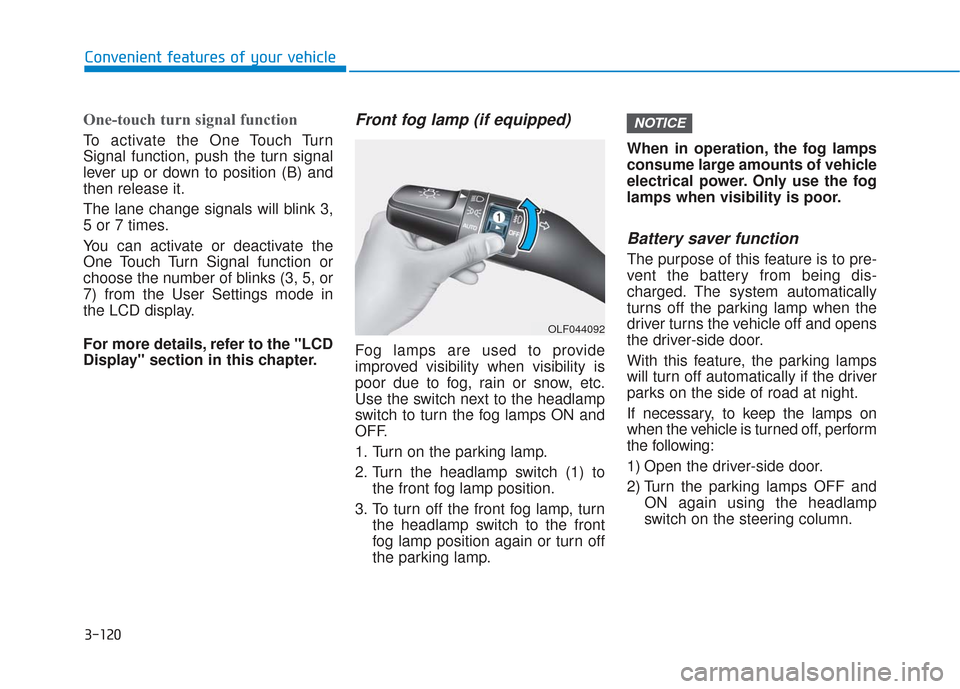
Fog lamps are used to provide
improved visibility when visibility is
poor due to fog, rain or snow, etc.
Use the switch next to the headlamp
switch to turn the fog lamps ON and
OFF.
1. Turn on the parking lamp.
2. Turn the headlamp switch (1) tothe front fog lamp position.
3. To turn off the front fog lamp, turn the headlamp switch to the front
fog lamp position again or turn off
the parking lamp. When in operation, the fog lamps
consume large amounts of vehicle
electrical power. Only use the fog
lamps when visibility is poor.
Battery saver function
The purpose of this feature is to pre-
vent the battery from being dis-
charged. The system automatically
turns off the parking lamp when the
driver turns the vehicle off and opens
the driver-side door.
With this feature, the parking lamps
will turn off automatically if the driver
parks on the side of road at night.
If necessary, to keep the lamps on
when the vehicle is turned off, perform
the following:
1) Open the driver-side door.
2) Turn the parking lamps OFF and
ON again using the headlamp
switch on the steering column.
NOTICE
OLF044092
Page 251 of 557
3-162
Convenient features of your vehicle
When the Auto Defogging
System operates, the indi-
cator will illuminate.
If a high amount of humidity is
detected in the vehicle, the Auto
Defogging System will be enabled.
The following steps will be performed
automatically:
Step 1) The A/C button will turn ON.
Step 2) The air intake control will change to Fresh mode.
Step 3) The mode will be changed to defrost to direct airflow to the
windshield.
Step 4) The fan speed will be set to MAX.
If the air conditioning is off or recircu-
lated air position is manually select-
ed while Auto Defogging System is
ON, the Auto Defogging System
Indicator will blink 3 times to signal
that the manual operation has been
canceled.To cancel or reset the
Auto Defogging System
Press the front windshield defroster
button for 3 seconds when the igni-
tion switch is in the ON position.
When the Auto Defogging System is
canceled, the ADS OFF symbol will
blink 3 times and ADS OFF will be
displayed on the climate control
information screen.
When the Auto Defogging System is
reset, the ADS OFF symbol will blink
6 times without a signal.
Information
• When the air conditioning is turned on by Auto defogging system, if you
try to turn off the air conditioning,
the indicator will blink 3 times and
the air conditioning will not be
turned off.
• To maintain the effectiveness and efficiency of the Auto Defogging
System, do not select Recirculation
mode while the system is operating.
• When the Auto Defogging System is operating, the fan speed adjust-
ment button, the temperature
adjustment knob, and the air
intake control button are all dis-
abled.
Do not remove the sensor cover
located on the upper end of the
windshield glass.
Damage to system parts could
occur and may not be covered by
your vehicle warranty.
NOTICE
i
Page 342 of 557

5-68
Driving your vehicle
System Description
Blind-Spot Collision Warning(BCW)
The Blind-Spot Collision Warning
(BCW) system uses radar sensors in
the rear bumper to monitor and warn
the driver of an approaching vehicle
in the driver's blind spot area.
1) Blind-Spot Area
The blind spot detection range varies
relative to vehicle speed.
Note that if your vehicle is traveling
much faster than the vehicles around
you, the warning will not occur. 2) Closing at high speed
The Lane Change Assist feature will
alert you when a vehicle is approach-
ing in an adjacent lane at a high rate
of speed. If the driver activates the
turn signal when the system detects
an oncoming vehicle, the system
sounds an audible alert.
Blind-Spot Collision-Avoidance
Assist (BCA)
The Blind-Spot Collision-Avoidance
Assist (BCA) system helps detect the
front lane through the camera
installed on the upper front wind-
shield and helps the side/rear areas
through radar sensors.
The Blind-Spot Collision-Avoidance
Assist system may activate the
Electronic Stability Control (ESC) in
accordance with a colliding possibili-
ty with an approaching vehicle while
changing lanes. It is to help the col-
liding risk or mitigate the colliding
damage.
B B L
LI
IN
N D
D-
-S
S P
P O
O T
T
C
C O
O L
LL
LI
IS
S I
IO
O N
N
W
W A
AR
RN
N I
IN
N G
G/
/B
B L
LI
IN
N D
D-
-S
S P
P O
O T
T
C
C O
O L
LL
LI
IS
S I
IO
O N
N-
-A
A V
VO
O I
ID
D A
A N
N C
CE
E
A
A S
SS
SI
IS
S T
T
(
( I
IF
F
E
E Q
Q U
UI
IP
P P
PE
ED
D )
)
OTM058120L
OTM058121L
OTM058108
Page 346 of 557
5-72
Driving your vehicle
Warning and System Control
Blind-Spot Collision Warning(BCW) system
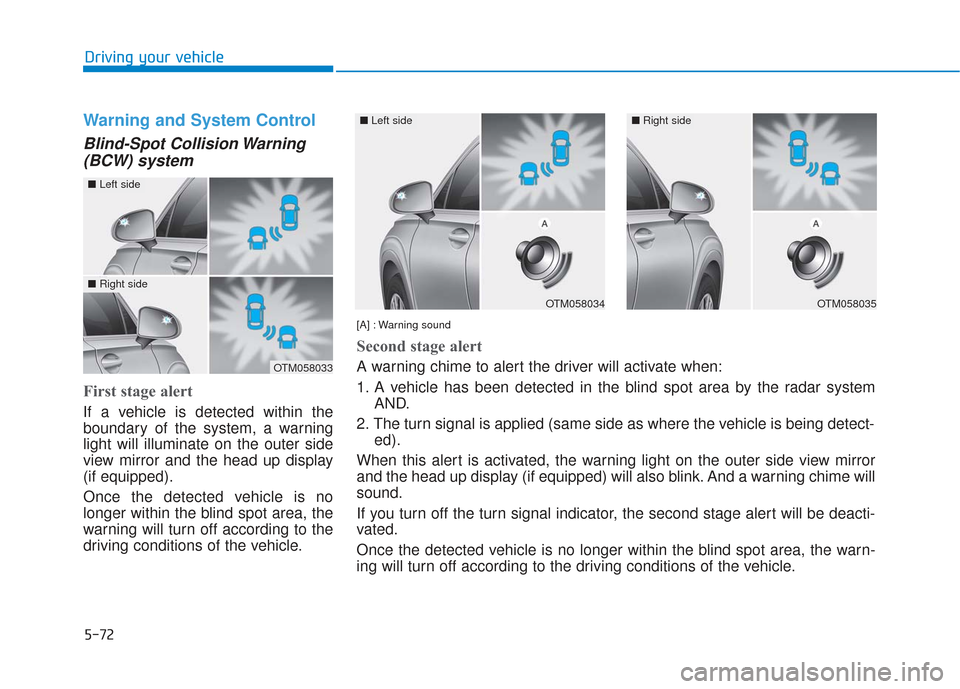
First stage alert
If a vehicle is detected within the
boundary of the system, a warning
light will illuminate on the outer side
view mirror and the head up display
(if equipped).
Once the detected vehicle is no
longer within the blind spot area, the
warning will turn off according to the
driving conditions of the vehicle.
OTM058033
OTM058034
■ Left side
OTM058035
■Right side
[A] : Warning sound
Second stage alert
A warning chime to alert the driver will activate when:
1. A vehicle has been detected in the blind spot area by the radar systemAND.
2. The turn signal is applied (same side as where the vehicle is being detect- ed).
When this alert is activated, the warning light on the outer side view mirror
and the head up display (if equipped) will also blink. And a warning chime will
sound.
If you turn off the turn signal indicator, the second stage alert will be deacti-
vated.
Once the detected vehicle is no longer within the blind spot area, the warn-
ing will turn off according to the driving conditions of the vehicle.
■ Left side■Right side
Page 373 of 557
5-99
Driving your vehicle
5
The LKA system will not be in the
ENABLED state and/or the steering
wheel will not be assisted when:
The turn signal is turned on beforechanging a lane. If you change
lanes without the turn signal on, the
steering wheel might be controlled.
The vehicle is not driven in the mid- dle of the lane when the system is
turned on or right after changing a
lane.
ESC (Electronic Stability Control) or VSM (Vehicle Stability Management)
is activated.
The vehicle is driven on a sharp curve.
Vehicle speed is below 35 mph (56 km/h) and over 110 mph (177
km/h).
The vehicle makes sharp lane changes.
The vehicle brakes suddenly.
The lane is very wide or narrow.
There are more than two lane lines on the road. (e.g. construction area)
Only one side of the lane marker is detected. Radius of a curve is too small.
The vehicle is driven on a steep
incline.
The steering wheel is turned sud- denly.
Limitations of the System
The LKA system may operate pre-
maturely even if the vehicle does not
depart from the intended lane, OR,
the LKA system may not warn you if
the vehicle leaves the intended lane
under the following circumstances:
When the lane and road condi-
tions are poor
It is difficult to distinguish the lanemarker from the road because the
lane marker is covered with dust or
sand.
It is difficult to distinguish the color of the lane marker from the road.
There are markings on the road surface that look like a lane marker
that is inadvertently being detected
by the camera.
damaged. The lane marker is merged or
divided. (e.g. tollgate)
The lane number increases or decreases or the lane marker are
crossing complicatedly.
There are more than two lane markers on the road in front of you.
The lane marker is very thick or thin.
The lane marker ahead is not visible due to rain, snow, water on the
road, damaged or stained road sur-
face, or other factors.
The shadow is on the lane marker by a median strip, trees, guardrail,
noise barriers, etc.
The lane markers are complicated or a structure substitutes for the
lines such as a construction area.
There are crosswalk signs or other symbols on the road.
The lane marker in a tunnel is stained with oil, etc.
The lane suddenly disappears such as at the intersection.
Page 411 of 557
5-137
Driving your vehicle
5
Distance
Stay at least twice as far behind the
vehicle ahead as you would when
driving your vehicle without a trailer.
This can help you avoid situations
that require heavy braking and sud-
den turns.
Passing
You will need more passing distance
up ahead when you’re towing a trail-
er. And, because of the increased
vehicle length, you’ll need to go
much farther beyond the passed
vehicle before you can return to your
lane.
Backing up
Hold the bottom of the steering
wheel with one hand. Then, to move
the trailer to the left, move your hand
to the left. To move the trailer to the
right, move your hand to the right.
Always back up slowly and, if possi-
ble, have someone guide you.
Making turns
When you’re turning with a trailer,
make wider turns than normal. Do
this so your trailer won't strike soft
shoulders, curbs, road signs, trees, or
other objects. Avoid jerky or sudden
maneuvers. Signal well in advance.
Turn signals
When you tow a trailer, your vehicle
has to have a different turn signal
flasher and extra wiring. The green
arrows on your instrument panel will
flash whenever you signal a turn or
lane change. Properly connected,
the trailer lights will also flash to alert
other drivers you're about to turn,
change lanes, or stop.
When towing a trailer, the green
arrows on your instrument panel will
flash for turns even if the bulbs on the
trailer are burned out. Thus, you may
think drivers behind you are seeing
your signals when, in fact, they are
not. It’s important to check occasion-
ally to be sure the trailer bulbs are still
working. You must also check the
lights every time you disconnect and
then reconnect the wires.Do not connect a trailer lighting
system directly to your vehi-
cle’s lighting system. Use an
approved trailer wiring harness.
Failure to do so could result in
damage to the vehicle electrical
system and/or personal injury.
Consult an authorized HYUNDAI
dealer for assistance.
WARNING
Page 413 of 557
5-139
Driving your vehicle
5
5. Start the vehicle, apply the brakes,shift to neutral, release the park-
ing brake and slowly release the
brakes until the trailer chocks
absorb the load.
6. Reapply the brakes and parking brakes.
7. Move the shift lever to P (Park).
8. Shut off the vehicle and release the vehicle brakes but leave the
parking brake set.Driving the vehicle after it hasbeen parked on a hill
1. With the gear shift lever in P
(Park), apply the brakes and hold
the brake pedal down while per-
forming the following:
and
2. Slowly remove your foot from the brake pedal.
3. Drive slowly until the trailer is clear of the chocks.
4. Stop and have someone pick up and store the chocks.
Maintenance when trailer tow-
ing
Your vehicle will need service more
often when you regularly pull a trail-
er. Important items to pay particular
attention to include engine oil, auto-
matic transmission fluid, axle lubri-
cant and cooling system fluid. Brake
condition is another important item to
frequently check. If you’re trailering,
it’s a good idea to review these items
before you start your trip. Don't forget
to also maintain your trailer and
hitch. Follow the maintenance sched-
ule that accompanied your trailer and
check it periodically. Preferably,
inspect the vehicle and trailer at the
start of each day's driving. Inspect
the hitch mounting to make sure the
hitch is properly secured to the vehi-
cle. Inspect the trailer electrical
wiring to make sure brake lights, turn
signal lights, running lights, and haz-
ard lights are working properly.
Do not get out of the vehicle
without the parking brake
firmly set. If you have left the
engine running, the vehicle
can move suddenly. You and
others could be seriously or
fatally injured.
Do not apply the accelerator
pedal to hold the vehicle on
an uphill.
WARNING
Page 422 of 557
6-2
The hazard warning flasher serves
as a warning to other drivers to exer-
cise extreme caution when approach-
ing, overtaking, or passing your vehi-
cle.
It should be used whenever emer-
gency repairs are being made or
when the vehicle is stopped near the
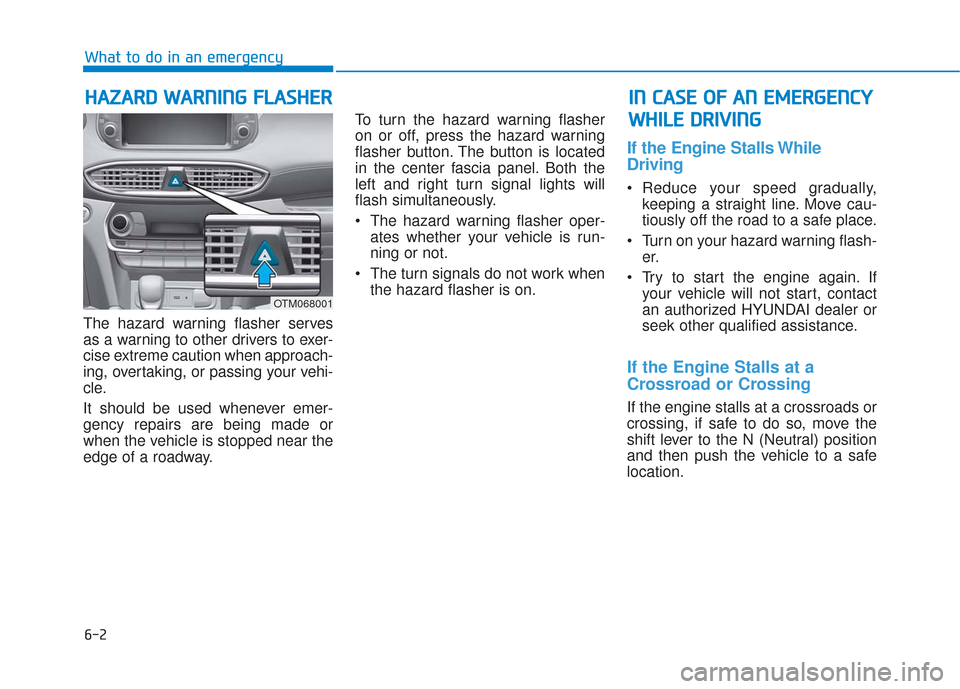
edge of a roadway.To turn the hazard warning flasher
on or off, press the hazard warning
flasher button. The button is located
in the center fascia panel. Both the
left and right turn signal lights will
flash simultaneously.
• The hazard warning flasher oper-
ates whether your vehicle is run-
ning or not.
The turn signals do not work when the hazard flasher is on.
If the Engine Stalls While
Driving
Reduce your speed gradually,keeping a straight line. Move cau-
tiously off the road to a safe place.
Turn on your hazard warning flash- er.
Try to start the engine again. If your vehicle will not start, contact
an authorized HYUNDAI dealer or
seek other qualified assistance.
If the Engine Stalls at a
Crossroad or Crossing
If the engine stalls at a crossroads or
crossing, if safe to do so, move the
shift lever to the N (Neutral) position
and then push the vehicle to a safe
location.
H HA
AZ
ZA
A R
RD
D
W
W A
AR
RN
N I
IN
N G
G
F
F L
LA
A S
SH
H E
ER
R
What to do in an emergency
I
IN
N
C
C A
A S
SE
E
O
O F
F
A
A N
N
E
E M
M E
ER
R G
G E
EN
N C
CY
Y
W
W H
HI
IL
L E
E
D
D R
RI
IV
V I
IN
N G
G
OTM068001