2019 Hyundai Santa Fe Latch
[x] Cancel search: LatchPage 65 of 557
2-47
Safety system of your vehicle
2
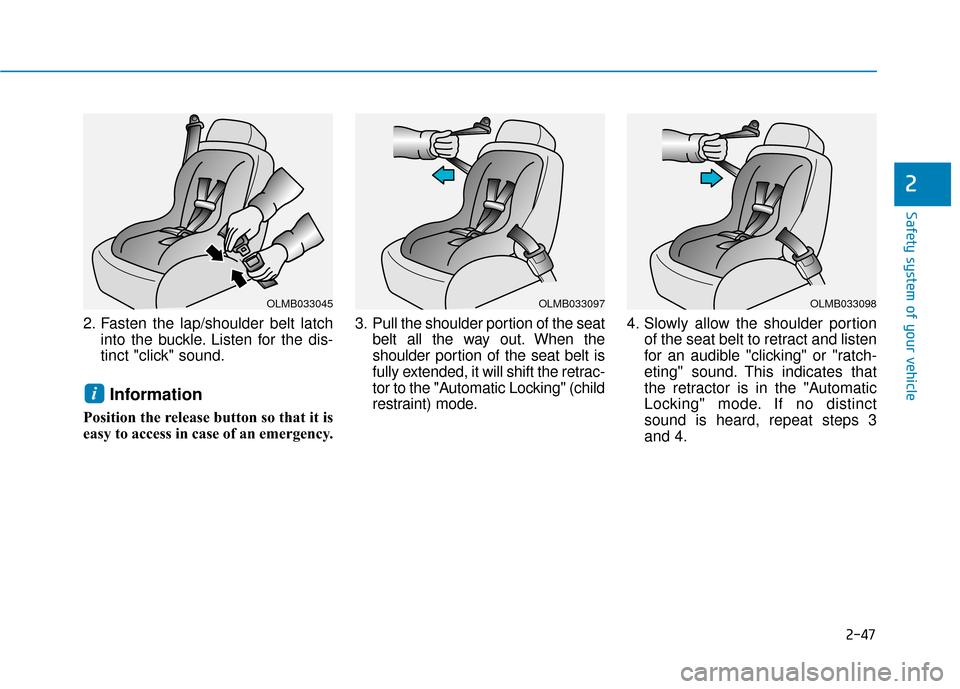
2. Fasten the lap/shoulder belt latchinto the buckle. Listen for the dis-
tinct "click" sound.
Information
Position the release button so that it is
easy to access in case of an emergency. 3. Pull the shoulder portion of the seat
belt all the way out. When the
shoulder portion of the seat belt is
fully extended, it will shift the retrac-
tor to the "Automatic Locking" (child
restraint) mode. 4. Slowly allow the shoulder portion
of the seat belt to retract and listen
for an audible "clicking" or "ratch-
eting" sound. This indicates that
the retractor is in the "Automatic
Locking" mode. If no distinct
sound is heard, repeat steps 3
and 4.
i
OLMB033045OLMB033097OLMB033098
Page 98 of 557
3-9
Convenient features of your vehicle
3
Two Press Unlock Feature
The priority for unlocking the driver
door only, or unlocking all the doors
with one press may be adjusted in
the User Settings mode in the cluster
LCD display.
The Two Press Unlock feature, when
enabled, will require the user to
press the door unlock button once for
driver door only and twice for unlock-
ing all the doors.
Select or Deselect the Two Press
Unlock feature in the User Settings
mode in the cluster LCD display. The
option can be found under the follow-
ing menu:
User Settings ➞Door ➞Two Press
Unlock The Two Press Unlock feature can
also be enabled or disabled by
pressing the door lock and unlock
buttons simultaneously on the Key
FOB:
Press and hold both the Door Lock
button and the Door Unlock button
simultaneously until the hazard
warning lights blink.
This will enable or disable the Two
Press Unlock feature. Repeat this
procedure to enable/disable the
mode again.
Information
• The door handle buttons will only
operate when the smart key is with-
in 28-40 inches (0.7~1m) from the
outside door handle
• Either the driver or front passenger door can be opened with the door
handle button when the smart key
is within this range
• If you press the front passenger outside door handle with the smart
key in your possession, all the doors
will unlock
Opening the liftgate
Non-power liftgate
To unlock and open the liftgate:
1. Make sure you have the smart keyin your possession.
2. Press either the liftgate handle release switch on the vehicle or
press and hold the Liftgate Unlock
button on the smart key for more
than one second. The hazard
warning lights will blink two times
and the liftgate latch will unlock.
3. Once the liftgate is opened and then closed, the liftgate will auto-
matically re-lock after 30 seconds.
Information
• The liftgate handle switch will onlyoperate when the smart key is with-
in 28 inches (0.7 m) from the lift-
gate handle.
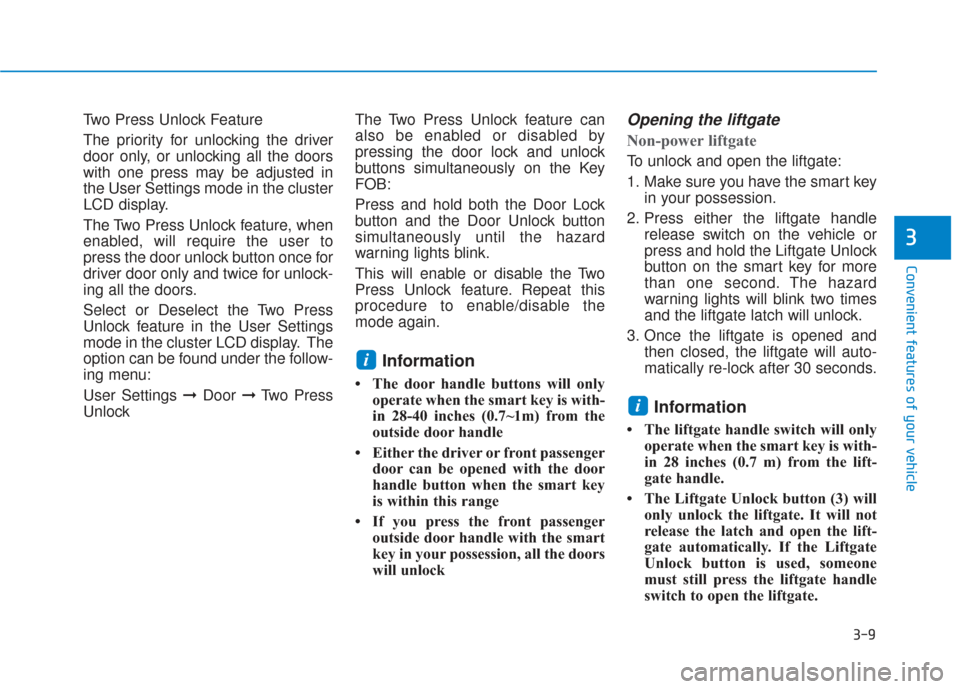
• The Liftgate Unlock button (3) will only unlock the liftgate. It will not
release the latch and open the lift-
gate automatically. If the Liftgate
Unlock button is used, someone
must still press the liftgate handle
switch to open the liftgate.
i
i
Page 99 of 557
3-10
Convenient features of your vehicle
Power liftgate
To unlock and open the liftgate:
1. Make sure you have the smart keyin your possession.
2. Press either the liftgate handle release switch on the vehicle or
press and hold the Liftgate Unlock
button on the smart key for more
than one second. The hazard
warning lights will blink two times
and the liftgate latch will open.
3. Once the liftgate is opened and then closed, the liftgate will auto-
matically re-lock after 30 seconds.
Information
The liftgate handle switch will only
operate when the smart key is within
28 inches (0.7 m) from the liftgate
handle.
Panic button
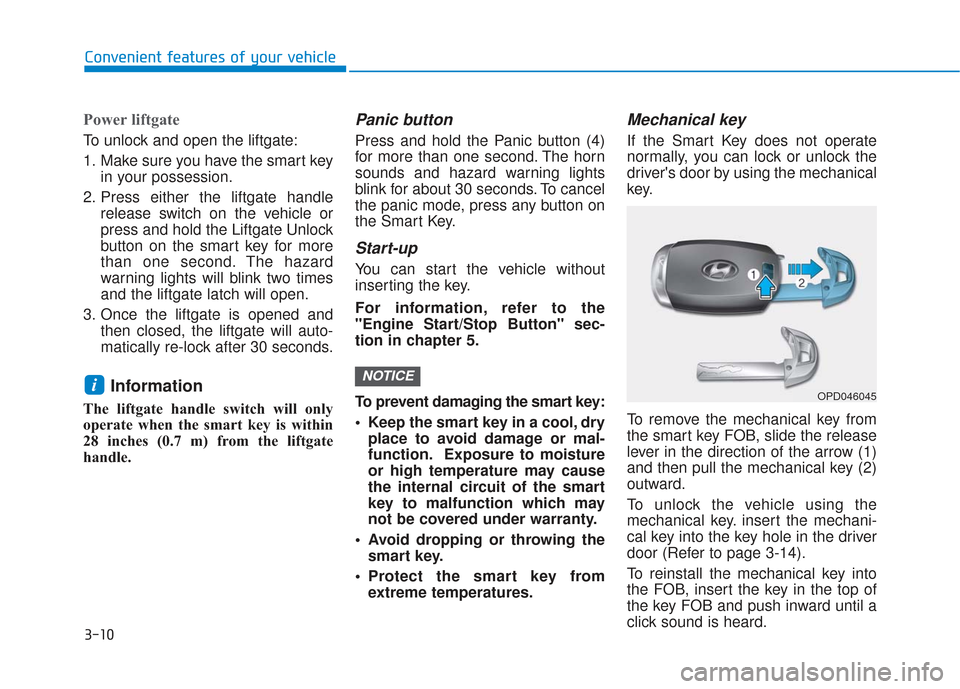
Press and hold the Panic button (4)
for more than one second. The horn
sounds and hazard warning lights
blink for about 30 seconds. To cancel
the panic mode, press any button on
the Smart Key.
Start-up
You can start the vehicle without
inserting the key.
For information, refer to the
"Engine Start/Stop Button" sec-
tion in chapter 5.
To prevent damaging the smart key:
Keep the smart key in a cool, dryplace to avoid damage or mal-
function. Exposure to moisture
or high temperature may cause
the internal circuit of the smart
key to malfunction which may
not be covered under warranty.
Avoid dropping or throwing the smart key.
Protect the smart key from extreme temperatures.
Mechanical key
If the Smart Key does not operate
normally, you can lock or unlock the
driver's door by using the mechanical
key.
To remove the mechanical key from
the smart key FOB, slide the release
lever in the direction of the arrow (1)
and then pull the mechanical key (2)
outward.
To unlock the vehicle using the
mechanical key. insert the mechani-
cal key into the key hole in the driver
door (Refer to page 3-14).
To reinstall the mechanical key into
the FOB, insert the key in the top of
the key FOB and push inward until a
click sound is heard.
NOTICEiOPD046045
Page 140 of 557

3-51
Convenient features of your vehicle
3
Hood
Opening the hood
1. Park the vehicle and set the park-ing brake.
2. Pull the release lever to unlatch the hood. The hood should pop
open slightly. 3. Go to the front of the vehicle, raise
the hood slightly, push up the sec-
ondary latch (1) inside of the hood
center and lift the hood (2). After it
has been raised about halfway, it
will raise completely by itself.
Closing the hood
1. Before closing the hood, check inand around the engine compart-
ment to ensure the following:
- Any tools or other loose objectsare removed from the engine
room area or hood opening area
- All glove, rags, or other com- bustible material is removed
from the engine compartment
- All filler caps are tightly and cor- rectly installed
2. Lower the hood halfway (lifted approximately 12 inches (30 cm)
from the closed position) and push
down to securely lock in place.
Then double check to be sure the
hood is secure. If the hood can be
raised slightly, it is not securely
locked. Open it again and close it
with more force.
E EX
X T
TE
ER
R I
IO
O R
R
F
F E
E A
A T
TU
U R
RE
ES
S
OTM048028
OTMA048029
Page 141 of 557
3-52
Convenient features of your vehicle
Non-Powered Liftgate
(if equipped)
Opening the liftgate
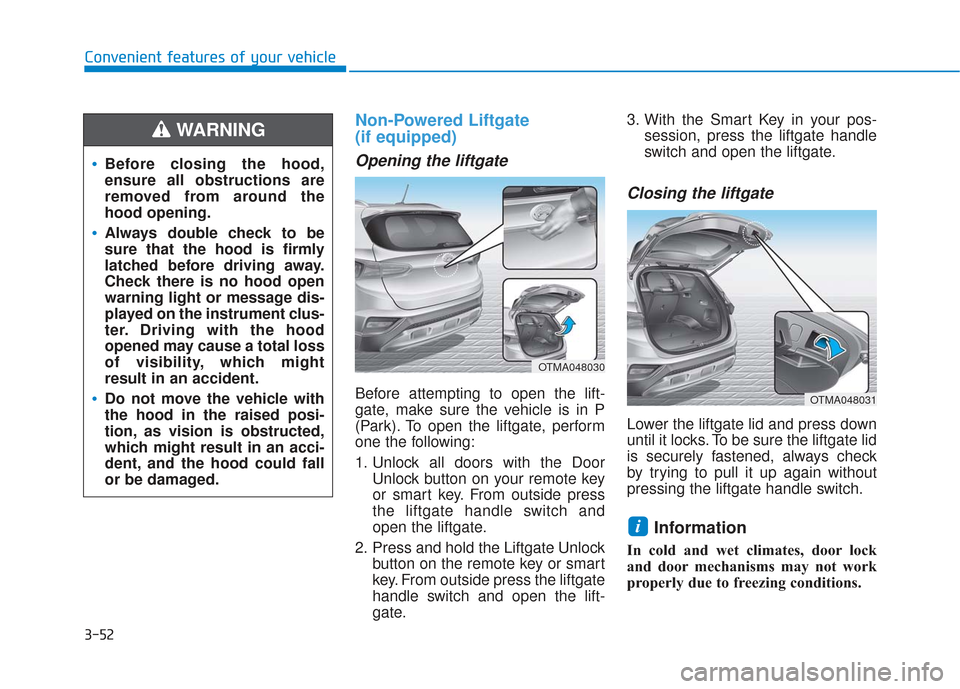
Before attempting to open the lift-
gate, make sure the vehicle is in P
(Park). To open the liftgate, perform
one the following:
1. Unlock all doors with the DoorUnlock button on your remote key
or smart key. From outside press
the liftgate handle switch and
open the liftgate.
2. Press and hold the Liftgate Unlock button on the remote key or smart
key. From outside press the liftgate
handle switch and open the lift-
gate. 3. With the Smart Key in your pos-
session, press the liftgate handle
switch and open the liftgate.
Closing the liftgate
Lower the liftgate lid and press down
until it locks. To be sure the liftgate lid
is securely fastened, always check
by trying to pull it up again without
pressing the liftgate handle switch.
Information
In cold and wet climates, door lock
and door mechanisms may not work
properly due to freezing conditions.
i
Before closing the hood,
ensure all obstructions are
removed from around the
hood opening.
Always double check to be
sure that the hood is firmly
latched before driving away.
Check there is no hood open
warning light or message dis-
played on the instrument clus-
ter. Driving with the hood
opened may cause a total loss
of visibility, which might
result in an accident.
Do not move the vehicle with
the hood in the raised posi-
tion, as vision is obstructed,
which might result in an acci-
dent, and the hood could fall
or be damaged.
WARNING
OTMA048030
OTMA048031
Page 148 of 557
3-59
Convenient features of your vehicle
3
However, in some instances the
automatic reversal system may not
detect the object if it is too soft or is
very thin, or if the liftgate is almost
fully closed near the latched position.
Caution should be taken to prevent
any objects from obstructing the lift-
gate opeining.
If the automatic reversal feature
operates more than 2 times while
attempting to open or close the lift-
gate, the power liftgate may stop at
that position. If this occurs, carefully
close the liftgate manually, and then
try to operate the power liftgate auto-
matically again.How to reset the power liftgate
If the battery has been discharged or
disconnected, or if the power liftgate
fuse has been replaced or removed,
reset the power liftgate by performing
the following procedure:
1. Put the shift lever in P (Park).
2. Press the power liftgate inner but-ton and the power liftgate outer
handle button simultaneously for
more than 3 seconds. The chime
will sound.
3. Close the liftgate manually.
If the power liftgate does not work
properly after the above procedure,
have the system checked by an
authorized HYUNDAI dealer.
When operating the power liftgate,
the gear shift lever must be in the
(P) park position in order to oper-
ate normally.
NOTICE
Never intentionally place any
object or part of your body in
the path of the power liftgate to
make sure the automatic rever-
sal operates.
WARNING
Do not put heavy objects on the
power liftgate before you oper-
ate the power liftgate feature.
Additional weight may damage
the operation of the system.
CAUTION
Page 154 of 557
3-65
Convenient features of your vehicle
3
Gasoline is highly flammable
and explosive. Failure to follow
these guidelines may result in
SERIOUS INJURY or DEATH:
Read and follow all warnings
posted at the gas station.
Before refueling, note the
location of the Emergency
Gasoline Shut-Off, if available,
at the gas station.
Before touching the fuel noz-
zle, you should eliminate the
potential build-up of static
electricity by touching a metal
part of the vehicle, a safe dis-
tance away from the fuel filler
neck, nozzle, or other gas
source, with your bare hand.
Do not use cellular phones
while refueling. Electric cur-
rent and/or electronic interfer-
ence from cellular phones can
potentially ignite fuel vapors
and cause a fire.
WARNING
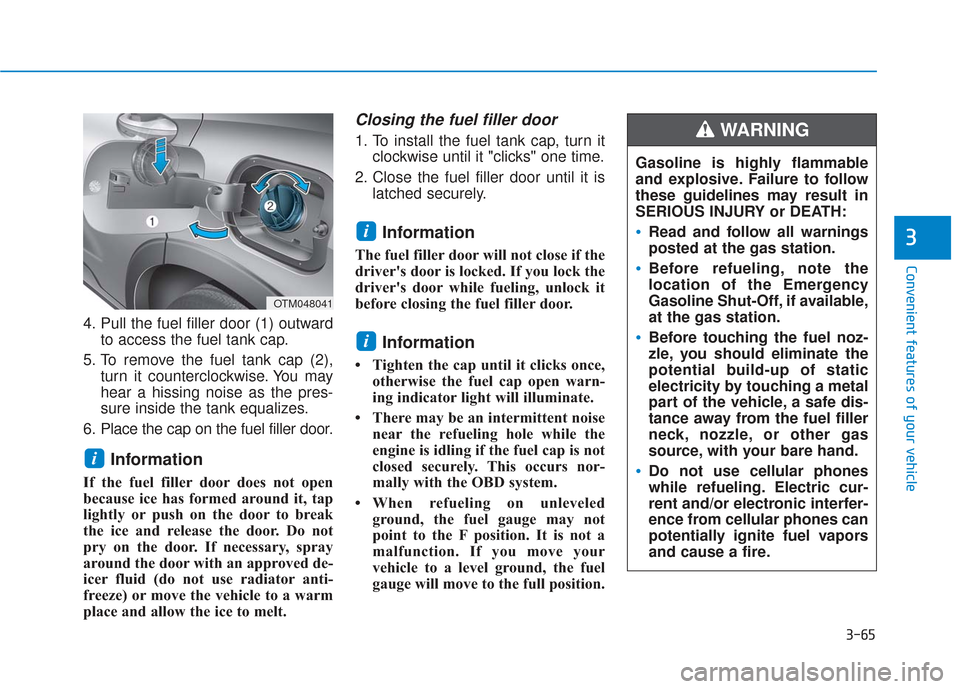
4. Pull the fuel filler door (1) outwardto access the fuel tank cap.
5. To remove the fuel tank cap (2), turn it counterclockwise. You may
hear a hissing noise as the pres-
sure inside the tank equalizes.
6. Place the cap on the fuel filler door.
Information
If the fuel filler door does not open
because ice has formed around it, tap
lightly or push on the door to break
the ice and release the door. Do not
pry on the door. If necessary, spray
around the door with an approved de-
icer fluid (do not use radiator anti-
freeze) or move the vehicle to a warm
place and allow the ice to melt.
Closing the fuel filler door
1. To install the fuel tank cap, turn it clockwise until it "clicks" one time.
2. Close the fuel filler door until it is latched securely.
Information
The fuel filler door will not close if the
driver's door is locked. If you lock the
driver's door while fueling, unlock it
before closing the fuel filler door.
Information
• Tighten the cap until it clicks once,otherwise the fuel cap open warn-
ing indicator light will illuminate.
• There may be an intermittent noise near the refueling hole while the
engine is idling if the fuel cap is not
closed securely. This occurs nor-
mally with the OBD system.
• When refueling on unleveled ground, the fuel gauge may not
point to the F position. It is not a
malfunction. If you move your
vehicle to a level ground, the fuel
gauge will move to the full position.
i
i
i
OTM048041
Page 254 of 557
3-165
Convenient features of your vehicle
3
S
ST
T O
O R
RA
A G
G E
E
C
C O
O M
M P
PA
A R
RT
TM
M E
EN
N T
T
To avoid possible theft, do not
leave valuables in the storage
compartments.
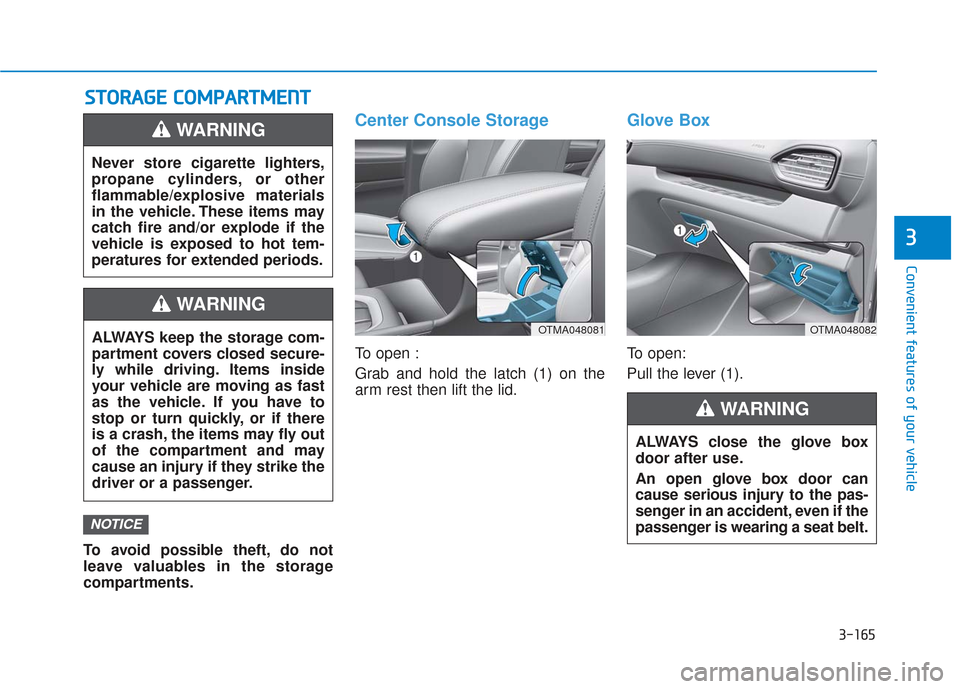
Center Console Storage
To open :
Grab and hold the latch (1) on the
arm rest then lift the lid.
Glove Box
To open:
Pull the lever (1).
NOTICE
Never store cigarette lighters,
propane cylinders, or other
flammable/explosive materials
in the vehicle. These items may
catch fire and/or explode if the
vehicle is exposed to hot tem-
peratures for extended periods.
WARNING
ALWAYS keep the storage com-
partment covers closed secure-
ly while driving. Items inside
your vehicle are moving as fast
as the vehicle. If you have to
stop or turn quickly, or if there
is a crash, the items may fly out
of the compartment and may
cause an injury if they strike the
driver or a passenger.
WARNING
ALWAYS close the glove box
door after use.
An open glove box door can
cause serious injury to the pas-
senger in an accident, even if the
passenger is wearing a seat belt.
WARNING
OTMA048081OTMA048082