Page 27 of 557

2-9
Safety system of your vehicle
2
Lumbar support
(for driver's seat, if equipped)
The lumbar support can be adjusted
by pressing the lumbar support
switch.
Press the front portion of the switch
(1) to increase support or the rear
portion of the switch (2) to decrease
support.
Power adjustment (if equipped)
The front seat can be adjusted by
using the control switches located on
the outside of the seat cushion. Before
driving, adjust the seat to the proper
position so that you can easily control
the steering wheel, foot pedals and
controls on the instrument panel.To prevent damage to the seats:
Always stop adjusting the seats
when the seat has moved as far
forward or rearward as possible.
Do not adjust the seats for longer than necessary when the
vehicle is turned off. This may
result in unnecessary battery
drain.
Do not operate two or more seats at the same time. This may
result in an electrical malfunc-
tion.
NOTICE
NEVER allow children in the
vehicle unattended. The power
seats are operable when the
vehicle is turned off.
WARNING
OTM038006
Page 28 of 557
2-10
Safety system of your vehicle
Forward and rearward adjustment
To move the seat forward or rearward:
1. Push the control switch forward orrearward.
2. Release the switch once the seat reaches the desired position.
Cushion extension
(for driver's seat, if equipped)
To move the front part of cushion for-
ward:
1. Push the front part of controlswitch to move the seat cushion to
the desired length.
2. Release the switch once the seat cushion reaches the desired
length.
To move the front part of cushion
rearward:
1. Push the rear part of control switch to move the seat cushion to
the desired length.
2. Release the switch once the seat cushion reaches the desired length.
Seatback angle
To adjust the seatback:
1. Rotate the top of control switchforward or rearward.
2. Release the switch once the seat- back reaches the desired position.
OTM038008OTM038007OTM038002
Page 29 of 557

2-11
Safety system of your vehicle
2
Reclining seatback
Sitting in a reclined position when
the vehicle is in motion can be dan-
gerous. Even when buckled up, the
protection of your restraint system
(seat belts and air bags) is greatly
reduced by reclining your seatback.Seat belts must be snug against your
hips and chest to work properly.
When the seatback is reclined, the
shoulder belt cannot do its job
because it will not be snug against
your chest. Instead, it will be in front
of you. During an accident, you could
be thrown into the seat belt, causing
neck or other injuries.
The more the seatback is reclined,
the greater chance the passenger’s
hips will slide under the lap belt or
the passenger's neck will strike the
shoulder belt.
Seat cushion tilt (1)
To change the angle of the front part
of the seat cushion:
Push the front portion of the control
switch up to raise or down to lower
the front part of the seat cushion.
Release the switch once the seat
reaches the desired position.
OTM038009NEVER ride with a reclined
seatback when the vehicle is
moving.
Riding with a reclined seatback
increases your chance of seri-
ous or fatal injuries in the event
of a collision or sudden stop.
Driver and passengers should
ALWAYS sit well back in their
seats, properly belted, and with
the seatbacks upright.
WARNING
Page 30 of 557
2-12
Safety system of your vehicle
Seat cushion height (2)
To change the height of the seat
cushion:
Push the rear portion of the control
switch up to raise or down to lower
the height of the seat cushion.
Release the switch once the seat
reaches the desired position.
Lumbar support (if equipped)
The lumbar support can be adjusted
by pressing the lumbar support
switch.
Press the front portion of theswitch (1) to increase support or
the rear portion of the switch (2) to
decrease support.
To move the support position up or down, press switch (3) or (4).
Seatback pocket
The seatback pocket is provided on
the back of the front passenger's
seatback.
To prevent the Occupant
Classification System from mal-
functioning:
Do not hang onto the front pas-
senger's seatback.
WARNING
OTM038020
OTM038010
Page 32 of 557

2-14
Safety system of your vehicle
Folding the rear seat
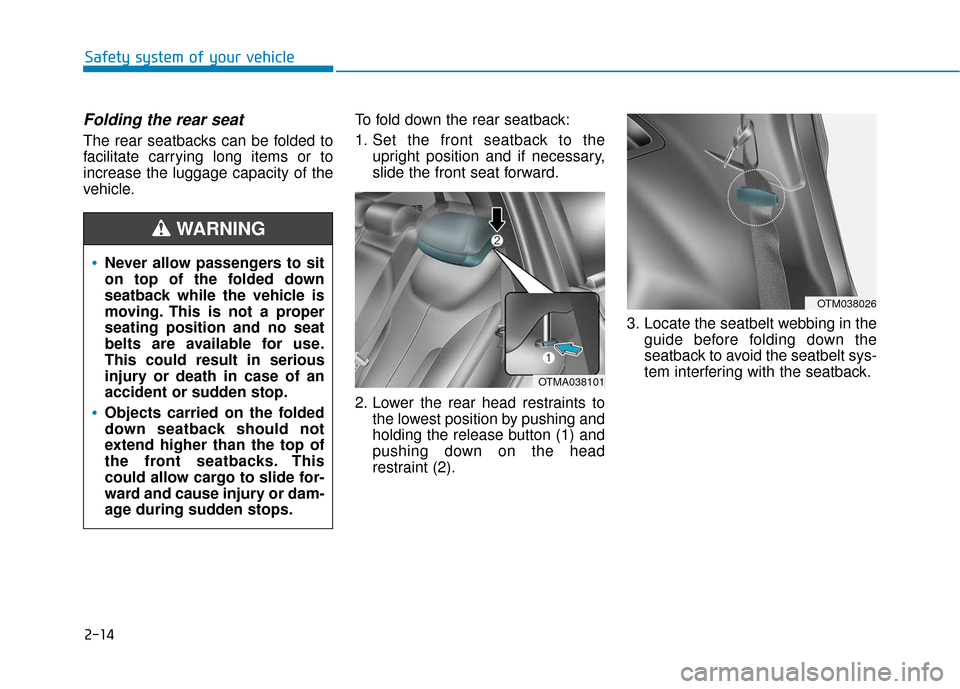
The rear seatbacks can be folded to
facilitate carrying long items or to
increase the luggage capacity of the
vehicle.To fold down the rear seatback:
1. Set the front seatback to the
upright position and if necessary,
slide the front seat forward.
2. Lower the rear head restraints to the lowest position by pushing and
holding the release button (1) and
pushing down on the head
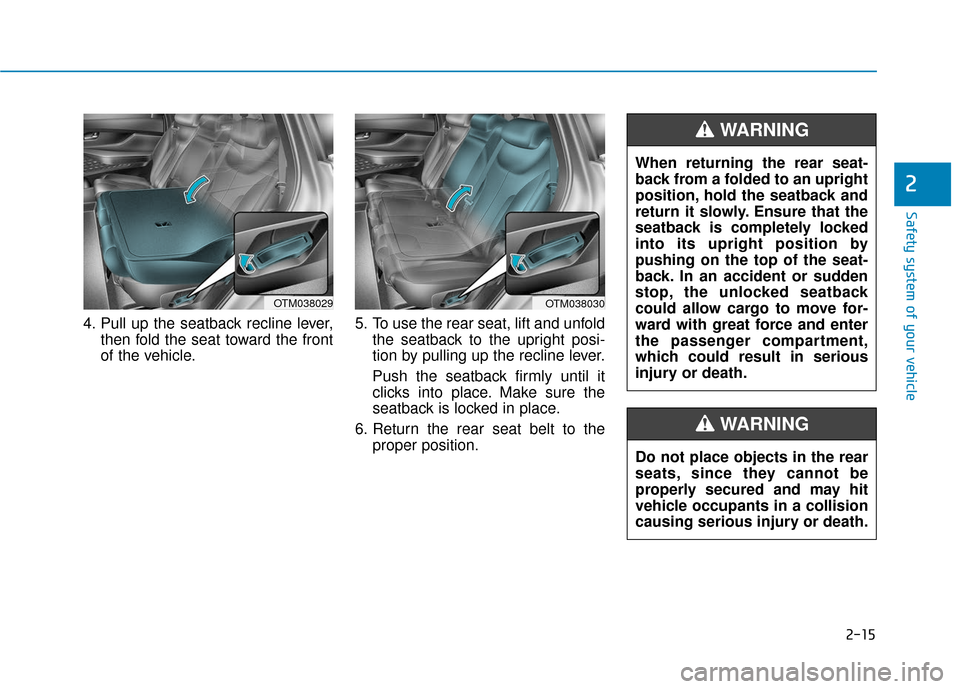
restraint (2). 3. Locate the seatbelt webbing in the
guide before folding down the
seatback to avoid the seatbelt sys-
tem interfering with the seatback.
OTMA038101
OTM038026
Never allow passengers to sit
on top of the folded down
seatback while the vehicle is
moving. This is not a proper
seating position and no seat
belts are available for use.
This could result in serious
injury or death in case of an
accident or sudden stop.
Objects carried on the folded
down seatback should not
extend higher than the top of
the front seatbacks. This
could allow cargo to slide for-
ward and cause injury or dam-
age during sudden stops.
WARNING
Page 33 of 557

2-15
Safety system of your vehicle
2
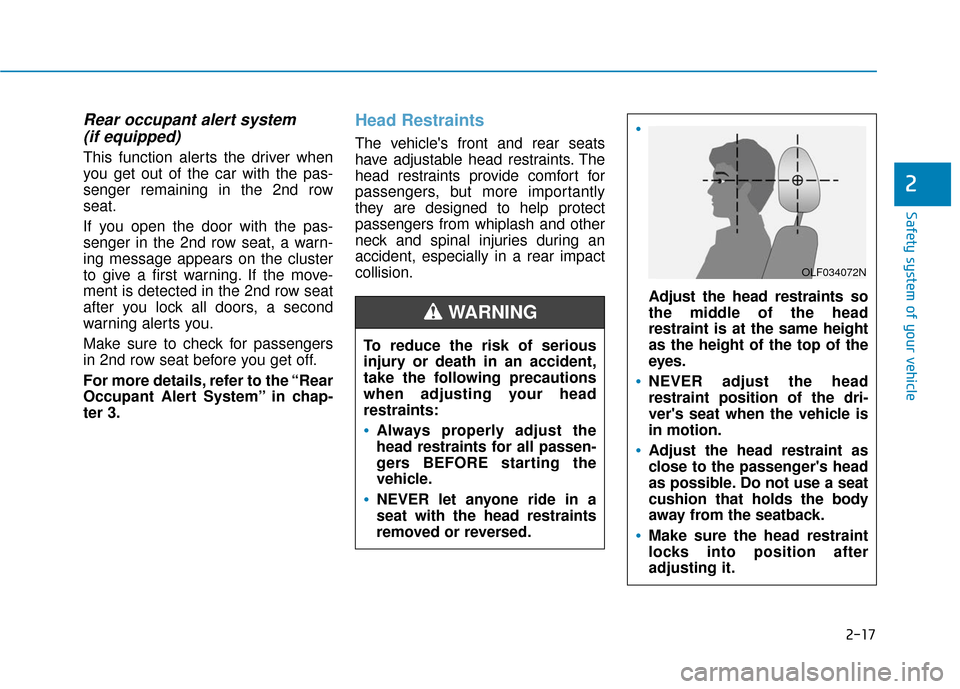
4. Pull up the seatback recline lever,then fold the seat toward the front
of the vehicle. 5. To use the rear seat, lift and unfold
the seatback to the upright posi-
tion by pulling up the recline lever.
Push the seatback firmly until it
clicks into place. Make sure the
seatback is locked in place.
6. Return the rear seat belt to the proper position. Do not place objects in the rear
seats, since they cannot be
properly secured and may hit
vehicle occupants in a collision
causing serious injury or death.
WARNING
When returning the rear seat-
back from a folded to an upright
position, hold the seatback and
return it slowly. Ensure that the
seatback is completely locked
into its upright position by
pushing on the top of the seat-
back. In an accident or sudden
stop, the unlocked seatback
could allow cargo to move for-
ward with great force and enter
the passenger compartment,
which could result in serious
injury or death.
WARNING
OTM038030OTM038029
Page 35 of 557

2-17
Safety system of your vehicle
2
Rear occupant alert system (if equipped)
This function alerts the driver when
you get out of the car with the pas-
senger remaining in the 2nd row
seat.
If you open the door with the pas-
senger in the 2nd row seat, a warn-
ing message appears on the cluster
to give a first warning. If the move-
ment is detected in the 2nd row seat
after you lock all doors, a second
warning alerts you.
Make sure to check for passengers
in 2nd row seat before you get off.
For more details, refer to the “Rear
Occupant Alert System” in chap-
ter 3.
Head Restraints
The vehicle's front and rear seats
have adjustable head restraints. The
head restraints provide comfort for
passengers, but more importantly
they are designed to help protect
passengers from whiplash and other
neck and spinal injuries during an
accident, especially in a rear impact
collision.
To reduce the risk of serious
injury or death in an accident,
take the following precautions
when adjusting your head
restraints:
Always properly adjust the
head restraints for all passen-
gers BEFORE starting the
vehicle.
NEVER let anyone ride in a
seat with the head restraints
removed or reversed.
Adjust the head restraints so
the middle of the head
restraint is at the same height
as the height of the top of the
eyes.
NEVER adjust the head
restraint position of the dri-
ver's seat when the vehicle is
in motion.
Adjust the head restraint as
close to the passenger's head
as possible. Do not use a seat
cushion that holds the body
away from the seatback.
Make sure the head restraint
locks into position after
adjusting it.
WARNING
OLF034072N
Page 36 of 557
2-18
Safety system of your vehicle
To prevent damage, NEVER hit or
pull on the head restraints.
Front seat head restraints
The vehicle's front and passenger's
seats are equipped with adjustable
head restraints for the passengers
safety and comfort.
Adjusting the height up and down
To raise the head restraint:
1. Pull it up to the desired position (1).
To lower the head restraint:
1. Push and hold the release button (2) on the head restraint support.
2. Lower the head restraint to the desired position (3).
NOTICE
OOSEV038012L
OTM038012
When there is no occupant in
the rear seats, adjust the height
of the head restraint to the low-
est position. The rear seat head
restraint can reduce the visibili-
ty of the rear area.
CAUTION