2019 Hyundai Santa Fe Display
[x] Cancel search: DisplayPage 110 of 557
3-21
Convenient features of your vehicle
3
However if you press the switch
within 10 seconds after the warn-
ing message appears (the indica-
tor on the switch will turn off), the
system judges that the driver
unlocked the door acknowledging
the rear status and released
regardless of the rear status.
3. When an approaching vehicle from the rear is detected the
moment the door is opened, the
"Watch for traffic" warning mes-
sage appears on the cluster and a
warning sounds.
The above 2 and 3 functions are activated when you select ‘Driver
Assistance →Blind-Spot Safety →
Safe Exit Assistance (SEA)’ from
the User Settings mode in the clus-
ter LCD display. The Electronic child safety lock
system will operate for approxi-
mately 10 minutes after the ignition
key is removed or turned to the
LOCK (or OFF) position. After
about 10 minutes, the indicator on
the switch turns off and you cannot
deactivate the Electronic child
safety lock system. To deactivate
the Electronic child safety lock sys-
tem, press the Electronic child safe-
ty lock switch again with the ignition
switch in the ON position or after
starting the engine.
When the power is supplied again after removing the battery or bat-
tery discharge while the child safe-
ty lock is in the lock position, press
the child safety lock switch once
again to match the state of the indi-
cator on the child safety lock switch
and actual status of the Electronic
child safety lock system.
If the airbag is activated while the child safety lock switch is ON (the
indicator on the switch illuminates)
it automatically switches OFF and
the rear door is unlocked.
The Safe Exit Assist (SEA)
system may not operate nor-
mally if there is any vehicle or
obstacle at the rear area of
your vehicle.
The Safe Exit Assist (SEA)
system may not operate nor-
mally when a vehicle is com-
ing rapidly two lanes over
from your vehicle or a vehicle
is approaching at a fast speed
from the rear in the lane next
to your vehicle.
The Safe Exit Assist (SEA)
system may be activated later
than normal or may not oper-
ate normally if a vehicle is
approaching fast from the rear
of your vehicle.
CAUTION
Page 111 of 557

3-22
Convenient features of your vehicle
Rear Occupant Alert (ROA)
System (if equipped)
The Rear Occupant Alert (ROA) sys-
tem is provided to help prevent exit-
ing the vehicle with the rear passen-
ger left in the vehicle.
• 1st alert- When you open the front doorafter opening and closing the rear
door and turning off the engine,
the “Check rear seats” warning
message appears on the cluster.
2nd alert - After the 1st alert the 2nd alertoperates when any movement is
detected in the vehicle after the
driver’s door is closed and all the
doors are locked. The horn will
activate for about 25 seconds. If
the system continues to detect a
movement the alert operates up
to 8 times.
- Unlock the door with the remote key or smart key to stop the alert.
- The system detects movement in the vehicle for 24 hours after the
door is locked. The 2nd alert is activated only after
the prior activation of the 1st alert.
You can activate or deactivate the Rear Occupant Alert (ROA) sys-
tem from the User Settings mode
in the cluster LCD display. The
option can be found under the fol-
lowing menu:
User Settings → Convenience →
Rear Seat Alert
•The Safe Exit Assist (SEA)
system will not operate if
there is a malfunction with the
Blind-Spot Collision Warning
(BCW) system as follows:
- When the BCW warning message appears
When the BCW sensor or
the sensor surrounding is
polluted or covered
- When the BCW does not warn or warns wrongly
For more details, refer to cau-
tions and limitations in "Blind-
Spot Collision Warning (BCW)"
in chapter 5.
The system does not detect
every obstacle approaching
the vehicle exit.
The driver and passenger are
responsible for any obstacles
while exiting the vehicle.
Always check the surrounding
before you exit the vehicle.
WARNING
Page 112 of 557

3-23
Convenient features of your vehicle
3
If you do not want to use the
Rear Occupant Alert (ROA)
system, press OK button on
the steering wheel when the
1st alert is displayed on the
cluster. Doing so will deacti-
vate the 2nd alert once.
OTM048165L
■
Cluster
OTMA048421
■Steering wheel
If boxes or objects are stacked
in the vehicle, the system may
not detect the obstacle. Also,
the warning may generate if
the box or object falls off.
The sensor may not operate
normally if the senor is
obscured by foreign sub-
stances.
The alert may activate if move-
ment in the driver or passen-
ger seat is detected.
The alert may activate with the
doors locked due to car wash
or surrounding vibration or
noise.
Inside movement detection is
stopped under remote start (if
equipped) status.
CAUTION
Make sure that all the win-
dows are closed. If the win-
dow is open, the alert may
activate by the sensor detect-
ing an unintended movement
(e.g. wind or bugs).
CAUTION
Page 114 of 557
3-25
Convenient features of your vehicle
3
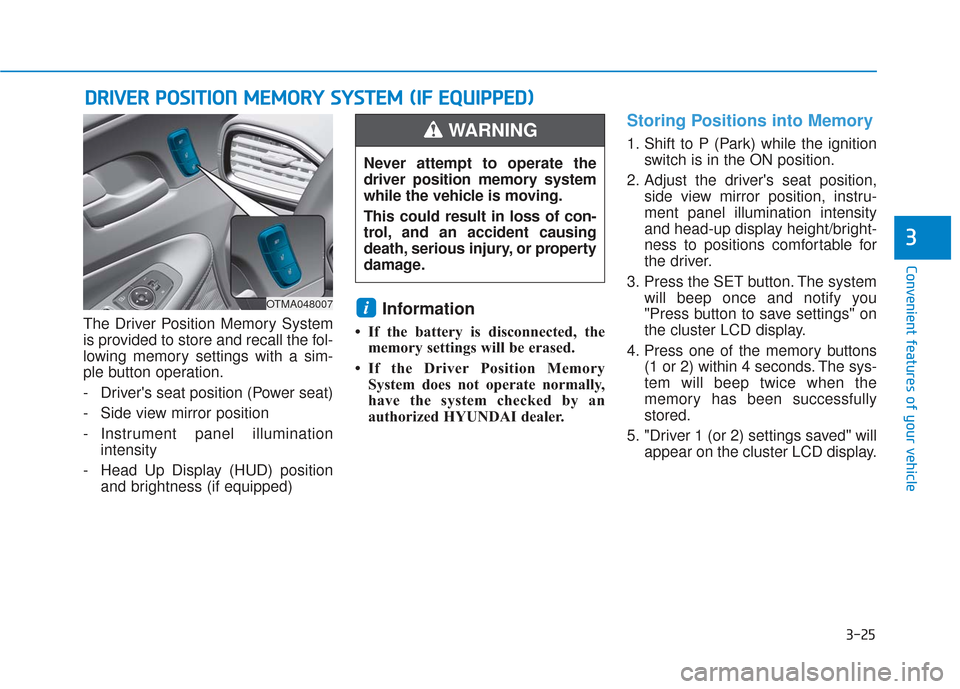
The Driver Position Memory System
is provided to store and recall the fol-
lowing memory settings with a sim-
ple button operation.
- Driver's seat position (Power seat)
- Side view mirror position
- Instrument panel illuminationintensity
- Head Up Display (HUD) position and brightness (if equipped)Information
• If the battery is disconnected, thememory settings will be erased.
• If the Driver Position Memory System does not operate normally,
have the system checked by an
authorized HYUNDAI dealer.
Storing Positions into Memory
1. Shift to P (Park) while the ignition switch is in the ON position.
2. Adjust the driver's seat position, side view mirror position, instru-
ment panel illumination intensity
and head-up display height/bright-
ness to positions comfortable for
the driver.
3. Press the SET button. The system will beep once and notify you
"Press button to save settings" on
the cluster LCD display.
4. Press one of the memory buttons (1 or 2) within 4 seconds. The sys-
tem will beep twice when the
memory has been successfully
stored.
5. "Driver 1 (or 2) settings saved" will appear on the cluster LCD display.
i
D DR
RI
IV
V E
ER
R
P
P O
O S
SI
IT
T I
IO
O N
N
M
M E
EM
M O
OR
RY
Y
S
S Y
Y S
ST
T E
EM
M
(
( I
IF
F
E
E Q
Q U
UI
IP
P P
PE
ED
D )
)
OTMA048007
Never attempt to operate the
driver position memory system
while the vehicle is moving.
This could result in loss of con-
trol, and an accident causing
death, serious injury, or property
damage.
WARNING
Page 115 of 557
3-26
Convenient features of your vehicle
Recalling Positions from
Memory
1. Shift to P (Park) while the ignitionswitch is in the ON position.
2. Press the desired memory button (1 or 2). The system will beep
once, and then the driver's seat
position, side view mirror position,
instrument panel illumination
intensity and head-up display
height/brightness will automatical-
ly adjust to the stored positions.
3. "Driver 1 (or 2) settings applied" will appear on the cluster LCD dis-
play.
Information
• While recalling the "1" memoryposition, pressing the SET or 1 but-
ton temporarily stops the adjust-
ment of the recalled memory posi-
tion. Pressing the 2 button recalls
the "2" memory position. • While recalling the "2" memory
position, pressing the SET or 2 but-
ton temporarily stops the adjust-
ment of the recalled memory posi-
tion. Pressing the 1 button recalls
the "1" memory position.
• While recalling the stored positions, pressing one of the control buttons
for the driver's seat, side view mir-
ror, instrument panel illumination
or head-up display will cause the
movement of that component to stop
and move in the direction that the
control button is pressed.
Resetting the Driver's Seat
Memory System
Take the following procedures to reset
the driver's seat memory system,
when it does not operate properly.
To reset the driver's seat memo-ry system
1. Place the ignition switch to the ON
position, shift to P (Park), and
open the driver's door. 2. Operate the control switch to set
the driver's seat and seatback to
the foremost position.
3. Simultaneously press the SET button and push forward the seat
movement switch over 2 seconds.
While resetting the driver's seatmemory system
1. It starts with the notification sound.
2. The driver's seat and seatback is
adjusted to the rearward position
with the notification sound.
3. The driver's seat and seatback is re-adjusted to the default position
(central position) with the notifica-
tion sound.
However, in the following cases, the
resetting procedure and the notifica-
tion sound may stop.
- The memory button is pressed.
- The control switch is operated.
- The gear is shifted out of P (Park).
- The driving speed exceeds 2 mph (3 km/h).
- The driver's door is closed.
i
Page 116 of 557
3-27
Convenient features of your vehicle
3
Reattempt to do the resettingprocedure again, when the reset-
ting procedure incompletely
stops or the notification sound
do not stop.
Make sure that there is no obsta- cle around the driver's seat in
advance of resetting the driver's
seat memory system.
Easy Access Function
The system will move the driver's
seat automatically as follows:
- It will move the driver’s seat rear- ward when the ignition key is
removed.
- It will move the driver’s seat for- ward when the ignition key is
inserted.
- It will move the driver’s seat rear- ward when the Engine Start/Stop
button is pressed to the OFF posi-
tion. - It will move the driver’s seat for-
ward when the Engine Start/Stop
button is pressed to the ACC or
START position.
You can activate or deactivate the
Easy Access Function from the User
Settings mode in the cluster LCD dis-
play.
'Convenience →Seat Easy Access →
Off/Normal/Extended'.
For more details, refer to "LCD
Display" in this chapter.
NOTICE
Driver should be cautious when
using this function to assure no
injury to passenger or child on
the back seat. In case of emer-
gency the driver has to stop
movement of front seat (when
easy access feature is activat-
ed) by pressing SET button or
any of the driver seat control
switches.
CAUTION
Page 121 of 557
3-32
Convenient features of your vehicle
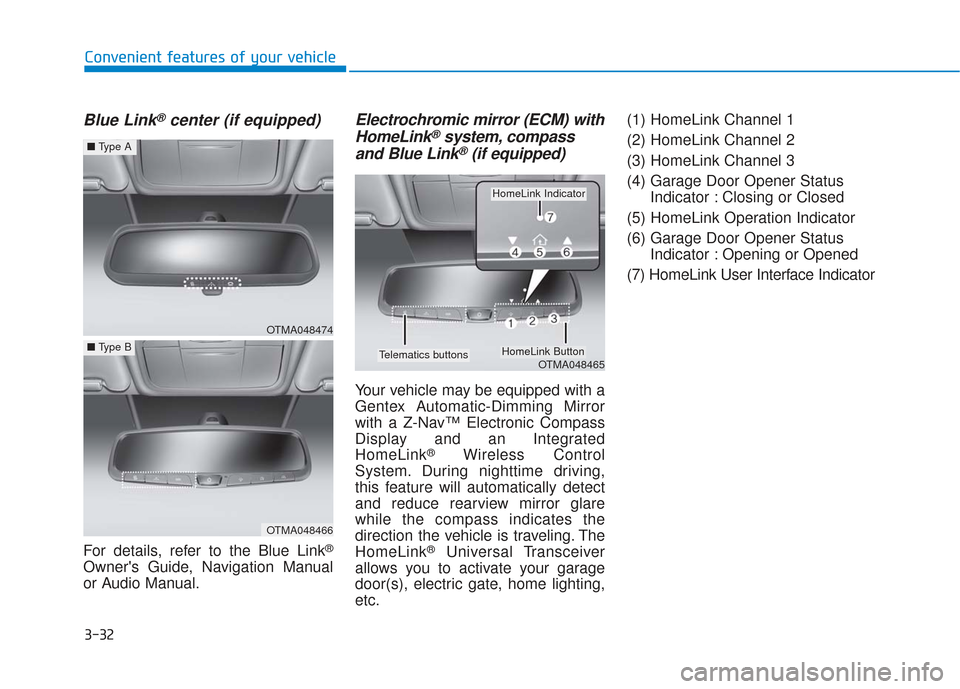
Blue Link®center (if equipped)
For details, refer to the Blue Link®
Owner's Guide, Navigation Manual
or Audio Manual.
Electrochromic mirror (ECM) withHomeLink®system, compass
and Blue Link®(if equipped)
Your vehicle may be equipped with a
Gentex Automatic-Dimming Mirror
with a Z-Nav™ Electronic Compass
Display and an Integrated
HomeLink
®Wireless Control
System. During nighttime driving,
this feature will automatically detect
and reduce rearview mirror glare
while the compass indicates the
direction the vehicle is traveling. The
HomeLink
®Universal Transceiver
allows you to activate your garage
door(s), electric gate, home lighting,
etc. (1) HomeLink Channel 1
(2) HomeLink Channel 2
(3) HomeLink Channel 3
(4) Garage Door Opener Status
Indicator : Closing or Closed
(5) HomeLink Operation Indicator
(6) Garage Door Opener Status Indicator : Opening or Opened
(7) HomeLink User Interface Indicator
OTMA048474
■ Type A
OTMA048466
■Type B
OTMA048465
HomeLink Indicator
HomeLink ButtonTelematics buttons
Page 122 of 557

3-33
Convenient features of your vehicle
3
Automatic-Dimming Night Vision
Safety™ (NVS®) Mirror
(if equipped)
The NVS®Mirror automatically
reduces glare by monitoring light lev-
els in the front and the rear of the
vehicle. Any object that obstructs
either light sensor will degrade the
automatic dimming control feature.
For more information regarding
NVS
®mirrors and other applica-
tions, please refer to the Gentex
website:
www.gentex.com
Your mirror will automatically dim
upon detecting glare from the vehi-
cles traveling behind you.
The mirror defaults to the ON posi-
tion each time the vehicle is started.
Z-Nav™ Compass Display
The NVS™ Mirror in your vehicle is
also equipped with a Z-Nav™
Compass that shows the vehicle
Compass heading in the Display
Window using the 8 basic cardinal
headings (N, NE, E, SE, etc.).
Compass function
The Compass can be turned ON and
OFF, but it returns to ON after the
ignition is cycled.
1. Press and release the Control Button within 1 second to turn the
display feature OFF.
2. Press and release the Control Button again within 1 second to
turn the display back ON.
Additional options can be set with
press and hold sequences of the
Control Button and are detailed
below.
OTMA048467