2019 Hyundai Santa Fe Auto hold
[x] Cancel search: Auto holdPage 122 of 557

3-33
Convenient features of your vehicle
3
Automatic-Dimming Night Vision
Safety™ (NVS®) Mirror
(if equipped)
The NVS®Mirror automatically
reduces glare by monitoring light lev-
els in the front and the rear of the
vehicle. Any object that obstructs
either light sensor will degrade the
automatic dimming control feature.
For more information regarding
NVS
®mirrors and other applica-
tions, please refer to the Gentex
website:
www.gentex.com
Your mirror will automatically dim
upon detecting glare from the vehi-
cles traveling behind you.
The mirror defaults to the ON posi-
tion each time the vehicle is started.
Z-Nav™ Compass Display
The NVS™ Mirror in your vehicle is
also equipped with a Z-Nav™
Compass that shows the vehicle
Compass heading in the Display
Window using the 8 basic cardinal
headings (N, NE, E, SE, etc.).
Compass function
The Compass can be turned ON and
OFF, but it returns to ON after the
ignition is cycled.
1. Press and release the Control Button within 1 second to turn the
display feature OFF.
2. Press and release the Control Button again within 1 second to
turn the display back ON.
Additional options can be set with
press and hold sequences of the
Control Button and are detailed
below.
OTMA048467
Page 126 of 557
3-37
Convenient features of your vehicle
3
• The indicator (4) is turned ON inOrange and flashes for about 60sec-
onds, during the programing mode
and if a programing is not succeed-
ed within the 60 seconds, the pro-
graming mode will be abort.
HomeLink
®should now activate your
rolling code equipped device.
Gate operator & Canadian program- ming
During programming, your handheld
transmitter may automatically stop
transmitting. Continue to press the
Integrated HomeLink
®Wireless
Control System button while you
press and re-press ("cycle") your
handheld transmitter every two sec-
onds until the frequency signal has
been learned. The indicator light will
flash slowly and then rapidly after
several seconds upon successful
training.
Operating HomeLink®
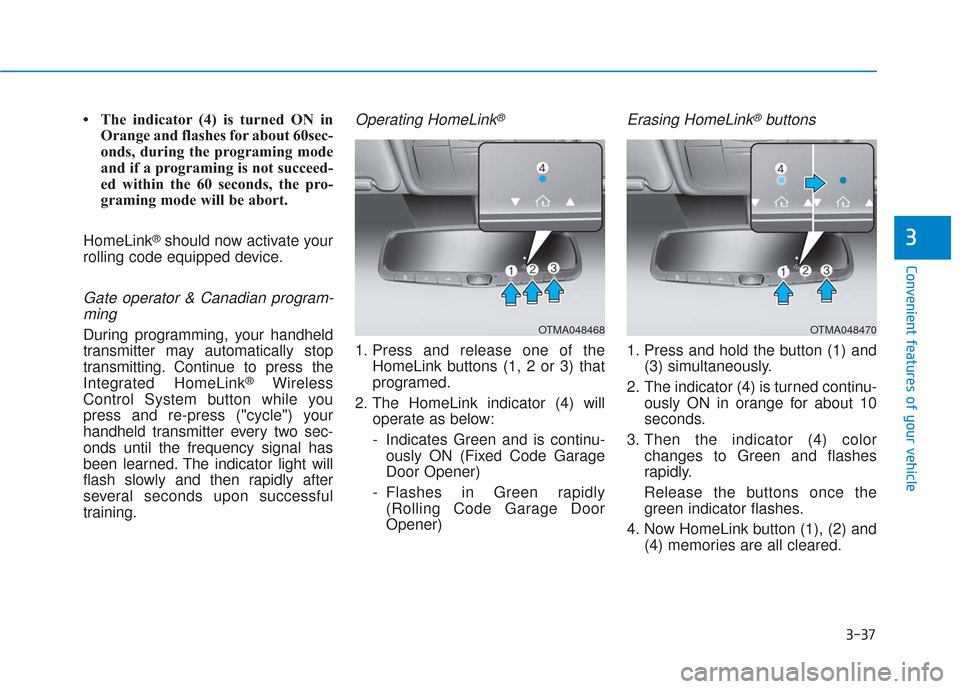
1. Press and release one of the HomeLink buttons (1, 2 or 3) that
programed.
2. The HomeLink indicator (4) will operate as below:
- Indicates Green and is continu-ously ON (Fixed Code Garage
Door Opener)
- Flashes in Green rapidly (Rolling Code Garage Door
Opener)
Erasing HomeLink®buttons
1. Press and hold the button (1) and (3) simultaneously.
2. The indicator (4) is turned continu- ously ON in orange for about 10
seconds.
3. Then the indicator (4) color changes to Green and flashes
rapidly.
Release the buttons once the green indicator flashes.
4. Now HomeLink button (1), (2) and (4) memories are all cleared.
OTMA048468OTMA048470
Page 144 of 557
3-55
Convenient features of your vehicle
3
Do not close or open the power
liftgate manually. This may cause
damage to the power liftgate. If it
is necessary to close or open the
power liftgate manually when the
battery is discharged or discon-
nected, do not apply excessive
force.
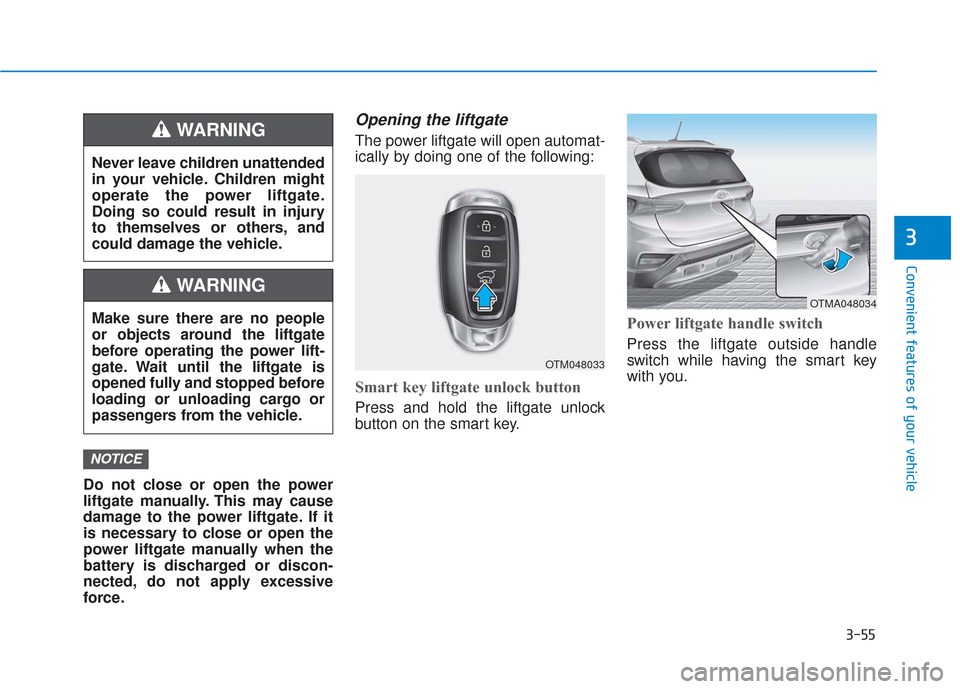
Opening the liftgate
The power liftgate will open automat-
ically by doing one of the following:
Smart key liftgate unlock button
Press and hold the liftgate unlock
button on the smart key.
Power liftgate handle switch
Press the liftgate outside handle
switch while having the smart key
with you.
NOTICE
Never leave children unattended
in your vehicle. Children might
operate the power liftgate.
Doing so could result in injury
to themselves or others, and
could damage the vehicle.
WARNING
Make sure there are no people
or objects around the liftgate
before operating the power lift-
gate. Wait until the liftgate is
opened fully and stopped before
loading or unloading cargo or
passengers from the vehicle.
WARNING
OTM048033
OTMA048034
Page 145 of 557
3-56
Convenient features of your vehicle
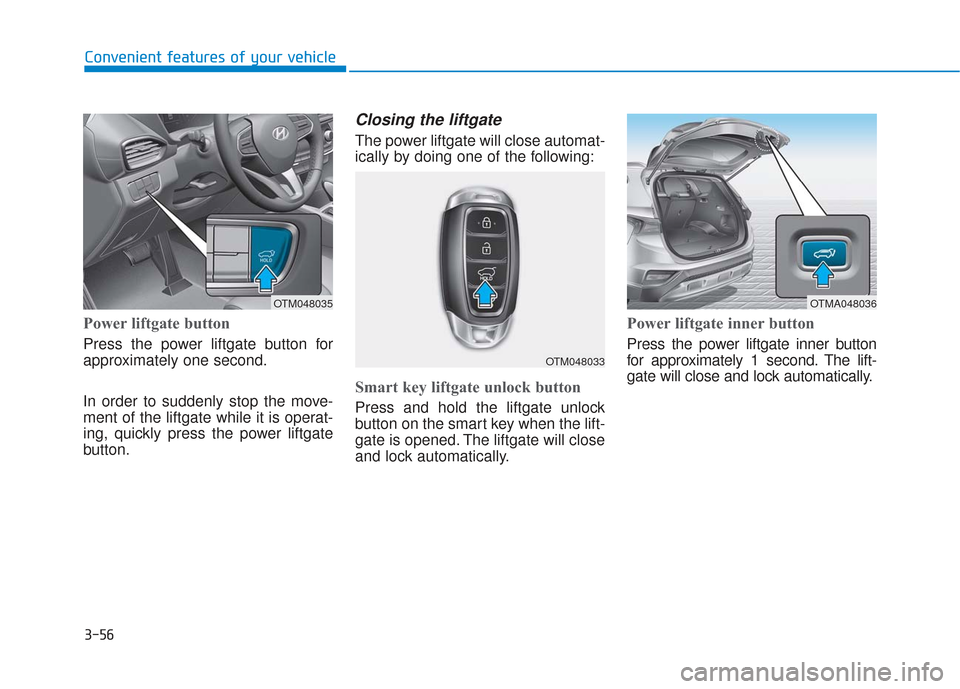
Power liftgate button
Press the power liftgate button for
approximately one second.
In order to suddenly stop the move-
ment of the liftgate while it is operat-
ing, quickly press the power liftgate
button.
Closing the liftgate
The power liftgate will close automat-
ically by doing one of the following:
Smart key liftgate unlock button
Press and hold the liftgate unlock
button on the smart key when the lift-
gate is opened. The liftgate will close
and lock automatically.
Power liftgate inner button
Press the power liftgate inner button
for approximately 1 second. The lift-
gate will close and lock automatically.
OTM048035
OTM048033
OTMA048036
Page 174 of 557
3-85
Convenient features of your vehicle
3
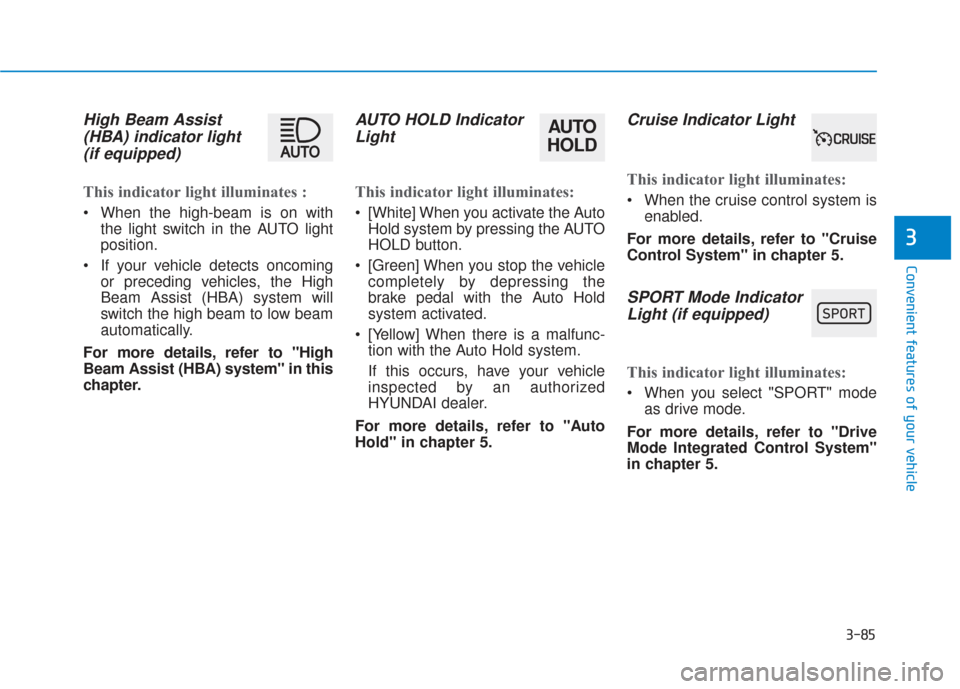
High Beam Assist(HBA) indicator light(if equipped)
This indicator light illuminates :
When the high-beam is on with
the light switch in the AUTO light
position.
If your vehicle detects oncoming or preceding vehicles, the High
Beam Assist (HBA) system will
switch the high beam to low beam
automatically.
For more details, refer to "High
Beam Assist (HBA) system" in this
chapter.
AUTO HOLD Indicator Light
This indicator light illuminates:
[White] When you activate the Auto
Hold system by pressing the AUTO
HOLD button.
[Green] When you stop the vehicle completely by depressing the
brake pedal with the Auto Hold
system activated.
[Yellow] When there is a malfunc- tion with the Auto Hold system.
If this occurs, have your vehicle
inspected by an authorized
HYUNDAI dealer.
For more details, refer to "Auto
Hold" in chapter 5.
Cruise Indicator Light
This indicator light illuminates:
When the cruise control system is enabled.
For more details, refer to "Cruise
Control System" in chapter 5.
SPORT Mode Indicator Light (if equipped)
This indicator light illuminates:
When you select "SPORT" mode
as drive mode.
For more details, refer to "Drive
Mode Integrated Control System"
in chapter 5.
AUTO
HOLD
Page 205 of 557
3-116
Convenient features of your vehicle
High beam operation
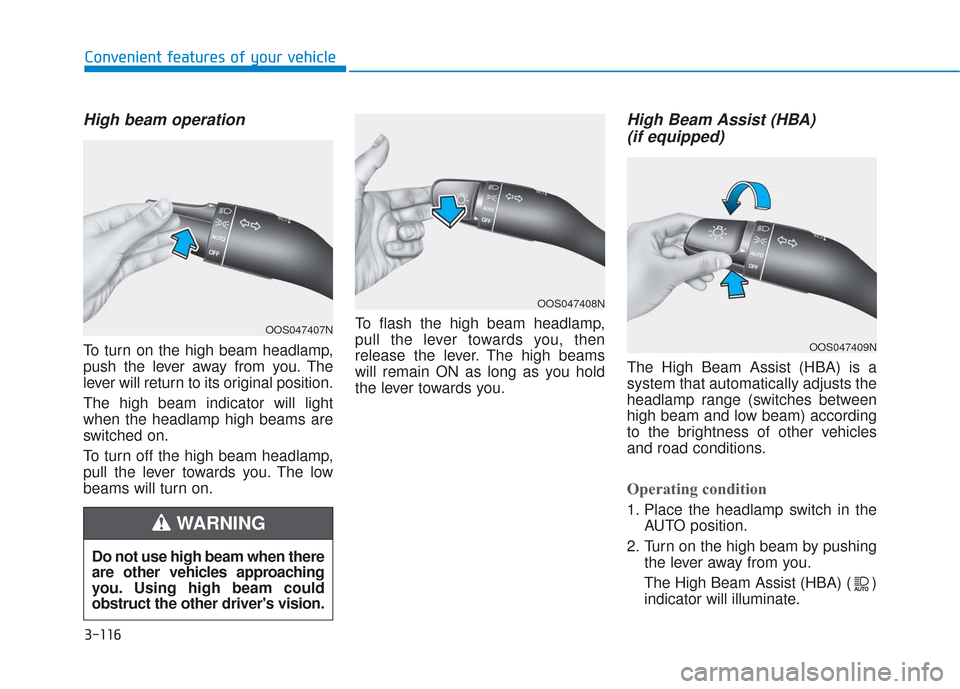
To turn on the high beam headlamp,
push the lever away from you. The
lever will return to its original position.
The high beam indicator will light
when the headlamp high beams are
switched on.
To turn off the high beam headlamp,
pull the lever towards you. The low
beams will turn on.To flash the high beam headlamp,
pull the lever towards you, then
release the lever. The high beams
will remain ON as long as you hold
the lever towards you.
High Beam Assist (HBA)
(if equipped)
The High Beam Assist (HBA) is a
system that automatically adjusts the
headlamp range (switches between
high beam and low beam) according
to the brightness of other vehicles
and road conditions.
Operating condition
1. Place the headlamp switch in the
AUTO position.
2. Turn on the high beam by pushing the lever away from you.
The High Beam Assist (HBA) ( ) indicator will illuminate.
Do not use high beam when there
are other vehicles approaching
you. Using high beam could
obstruct the other driver's vision.
WARNING
OOS047407N
OOS047408N
OOS047409N
Page 275 of 557

Driving your vehicle
5
Before Driving ........................................................5-4
Before Entering the Vehicle ...........................................5-4
Before Starting ..................................................................5-4
Ignition Switch ........................................................5-6
Key Ignition Switch ...........................................................5-6
Engine Start/Stop Button................................................5-9
Automatic Transmission ......................................5-14
Automatic Transmission Operation .............................5-14
Good Driving Practices ..................................................5-18
Braking System ....................................................5-20
Power Brakes ...................................................................5-20
Disc Brakes Wear Indicator ..........................................5-21
Electronic Parking Brake (EPB)...................................5-21
Auto Hold ........................................................................\
..5-27
Anti-lock Brake System (ABS) ....................................5-30
Electronic Stability Control (ESC)................................5-32
Vehicle Stability Management (VSM).........................5-35
Hill-Start Assist Control (HAC) ....................................5-36
Downhill Brake Control (DBC) ......................................5-36
Good Braking Practices .................................................5-39
All Wheel Drive (AWD) ........................................5-40
AWD operation.................................................................5-41
Emergency precautions .................................................5-44
ISG (Idle Stop and Go) System ..........................5-46
To Activate the ISG System ..........................................5-46
To Deactivate the ISG System......................................5-49
ISG System Malfunction ................................................5-49
Battery Sensor Deactivation ........................................5-50
Drive Mode Integrated Control System ............5-51
Drive Mode .......................................................................5\
-51
Smart shift on trip computer .......................................5-53
Forward Collision-Avoidance
Assist (FCA) System ............................................5-54
System Setting and Activation.....................................5-54
FCA Warning Message and System Control ............5-57
FCA Sensor .......................................................................5\
-59
System Malfunction .......................................................5-61
Limitations of the System .............................................5-62
Blind-Spot Collision Warning/Blind-Spot
Collision-Avoidance Assist .................................5-68
System Description .........................................................5-68
System Setting and Activation.....................................5-69
Warning and System Control .......................................5-72
Detecting Sensor (Camera and Radar) ......................5-74
Limitations of the System .............................................5-77
Page 291 of 557
5-17
Driving your vehicle
5
• If the driver presses the lever to + (Up) or - (Down) position, the
transmission may not make the
requested gear change if the next
gear is outside of the allowable
engine rpm range. The driver must
execute upshifts in accordance with
road conditions, taking care to keep
the engine rpms below the red zone.
• When accelerating from a stop on a slippery road, push the shift lever
forward into the + (Up) position.
This allows the transmission to
shift into the 2
ndgear which is bet-
ter for smooth driving on a slippery
road. Push the shift lever to the -
(Down) side to shift back to the 1
st
gear.
• When driving in Manual Shift Mode, slow down before shifting to
a lower gear. Otherwise, the lower
gear may not be engaged if the
engine rpms are outside of the
allowable range.
Shift-lock system
For your safety, the automatic trans-
mission has a shift-lock system
which prevents shifting the transmis-
sion from P (Park) into R (Reverse)
unless the brake pedal is depressed.
To shift the transmission from P
(Park) into R (Reverse):
1. Depress and hold the brake pedal.
2. Start the engine or place the igni-tion switch in the ON position.
3. Move the shift lever.
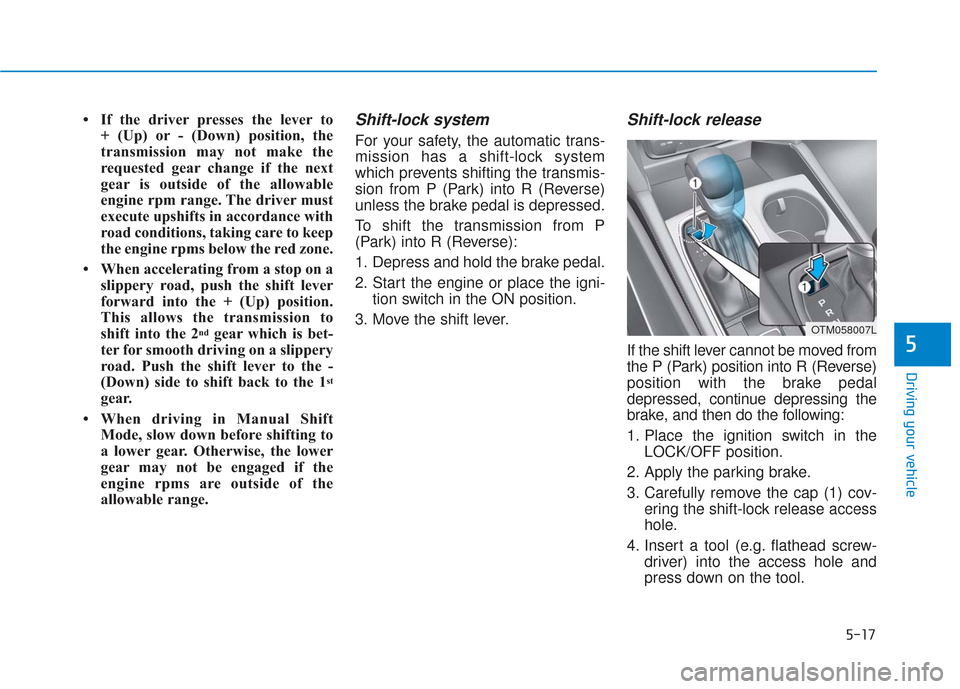
Shift-lock release
If the shift lever cannot be moved from
the P (Park) position into R (Reverse)
position with the brake pedal
depressed, continue depressing the
brake, and then do the following:
1. Place the ignition switch in the LOCK/OFF position.
2. Apply the parking brake.
3. Carefully remove the cap (1) cov- ering the shift-lock release access
hole.
4. Insert a tool (e.g. flathead screw- driver) into the access hole and
press down on the tool.
OTM058007L