2019 Hyundai Kona Warranty
[x] Cancel search: WarrantyPage 5 of 485

F5
1. What are HYUNDAI GenuineParts?
HYUNDAI Genuine Parts are the
same parts used by HYUNDAI
Motor Company to manufacture
vehicles. They are designed and
tested for the optimum safety, per-
formance, and reliability for our
customers. 2. Why should you use genuine
parts?
HYUNDAI Genuine Parts are
engineered and built to meet rigid
manufacturing requirements.
Damage caused by using imita-
tion, counterfeit or used salvage
parts is not covered under the
HYUNDAI New Vehicle Limited
Warranty or any other HYUNDAI
warranty.
In addition, any damage to or fail-
ure of HYUNDAI Genuine Parts
caused by the installation or fail-
ure of an imitation, counterfeit or
used salvage part is not covered
by any HYUNDAI Warranty. 3. How can you tell if you are pur-
chasing HYUNDAI Genuine
Parts?
Look for the HYUNDAI Genuine
Parts Logo on the package (see
below).
HYUNDAI Genuine Parts export-
ed to the U.S. are packaged with
labels written only in English.
HYUNDAI Genuine Parts are only
sold through authorized
HYUNDAI Dealerships.
GUIDE TO HYUNDAI GENUINE PARTS
Page 8 of 485

F8
Introduction
"E85" fuel is an alternative fuel com-
prised of 85 percent ethanol and 15
percent gasoline, and is manufac-
tured exclusively for use in Flexible
Fuel Vehicles. "E85" is not compati-
ble with your vehicle. Use of "E85"
may result in poor engine perform-
ance and damage to your vehicle's
engine and fuel system. HYUNDAI
recommends that customers do not
use fuel with an ethanol content
exceeding 15 percent.
To prevent damage to your vehicle’s
engine and fuel system:
Never use gasohol which con- tains methanol.
Never use gasohol containing more than 15% ethanol.
Never use leaded fuel or leaded gasohol.
Never use "E85" fuel.
Your New Vehicle Limited
Warranty does not cover damage
to the fuel system or any perform-
ance problems caused by the use
of "E85" fuel.
Using Fuel Additives (except Detergent Fuel Additives)
Using fuel additives such as:
- Silicone fuel additive
- Ferrocene (iron-based) fuel additive
- Other metallic-based fuel additives
may result in cylinder misfire, poor
acceleration, engine stalling, dam-
age to the catalyst, or abnormal cor-
rosion, and may cause damage to
the engine resulting in a reduction in
the overall life of the powertrain.
- The Malfunction Indicator Lamp
(MIL) may illuminate.
Damage to the fuel system or per-
formance problem caused by the
use of these fuels or fuel additives
may not be covered by your New
Vehicle Limited Warranty.
Gasoline containing MMT
Some gasoline contains harmful
manganese-based fuel additives
such as
MMT (Methylcyclopentadienyl
Manganese Tricarbonyl
).
HYUNDAI does not recommend the
use of gasoline containing MMT.
This type of fuel can reduce vehicle
performance and affect your emis-
sion control system.
The malfunction indicator lamp on
the cluster may come on.
Detergent Fuel Additives
HYUNDAI recommends that you use
good quality gasolines treated with
detergent additives such as TOP TIER
Detergent Gasoline, which help pre-
vent deposit formation in the engine.
These gasolines will help the engine
run cleaner and enhance performance
of the Emission Control System. For
more information on TOP TIER
Detergent Gasoline, please go to the
website (www
.toptiergas.com).
NOTICE
NOTICE
Page 9 of 485
F9
Introduction
For customers who do not use TOP
Tier Detergent Gasoline regularly,
and have problems starting or the
engine does not run smoothly, deter-
gent-based fuel additives that you
can purchase separately may be
added to the gasoline. If TOP TIER
Detergent Gasoline is not available,
one bottle of additive added to the
fuel tank according to the mainte-
nance schedule is recommended
(refer to the Maintenance Schedule
in chapter 7).
Additives are available from your
authorized HYUNDAI dealer along
with information on how to use them.
Do not mix other additives.
Operation in foreign countries
If you are going to drive your vehicle
in another country, be sure to:
• Observe all regulations regarding registration and insurance.
Determine that acceptable fuel is available. This vehicle should not be modi-
fied. Modification of your vehicle
could affect its performance, safety
or durability and may even violate
governmental safety and emis-
sions regulations.
In addition, damage or perform-
ance problems resulting from any
modification may not be covered
under warranty.
If you use unauthorized electronic devices, it may cause the vehicle to
operate abnormally, wire damage,
battery discharge and fire. For your
safety, do not use unauthorized
electronic devices. By following a few simple precautions
for the first 600 miles (1,000 km) you
may add to the performance, econo-
my and life of your vehicle.
Do not race the engine.
While driving, keep your engine
speed (rpm, or revolutions per
minute) between 2,000 rpm and
4,000 rpm.
Do not maintain a single speed for long periods of time, either fast or
slow. Varying engine speed is need-
ed to properly break-in the engine.
Avoid hard stops, except in emer- gencies, to allow the brakes to seat
properly.
V VE
EH
H I
IC
C L
LE
E
B
B R
RE
EA
A K
K-
-I
IN
N
P
P R
R O
O C
CE
E S
SS
S
V
V E
EH
H I
IC
C L
LE
E
M
M O
OD
DI
IF
F I
IC
C A
A T
TI
IO
O N
NS
S
Page 88 of 485
3-4
Unlocking your vehicle
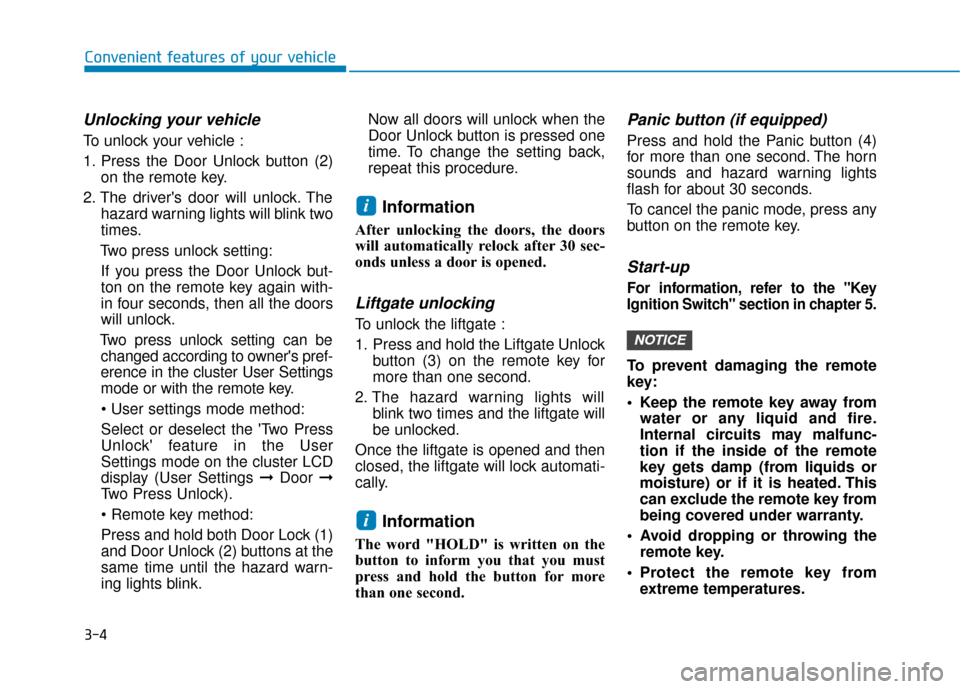
To unlock your vehicle :
1. Press the Door Unlock button (2)on the remote key.
2. The driver's door will unlock. The hazard warning lights will blink two
times.
Two press unlock setting: If you press the Door Unlock but-
ton on the remote key again with-
in four seconds, then all the doors
will unlock.
Two press unlock setting can be changed according to owner's pref-
erence in the cluster User Settings
mode or with the remote key.
• User settings mode method:
Select or deselect the 'Two Press
Unlock' feature in the User
Settings mode on the cluster LCD
display (User Settings ➞ Door ➞
Two Press Unlock).
Press and hold both Door Lock (1)
and Door Unlock (2) buttons at the
same time until the hazard warn-
ing lights blink. Now all doors will unlock when the
Door Unlock button is pressed one
time. To change the setting back,
repeat this procedure.
Information
After unlocking the doors, the doors
will automatically relock after 30 sec-
onds unless a door is opened.
Liftgate unlocking
To unlock the liftgate :
1. Press and hold the Liftgate Unlock
button (3) on the remote key for
more than one second.
2. The hazard warning lights will blink two times and the liftgate will
be unlocked.
Once the liftgate is opened and then
closed, the liftgate will lock automati-
cally.
Information
The word "HOLD" is written on the
button to inform you that you must
press and hold the button for more
than one second.
Panic button (if equipped)
Press and hold the Panic button (4)
for more than one second. The horn
sounds and hazard warning lights
flash for about 30 seconds.
To cancel the panic mode, press any
button on the remote key.
Start-up
For information, refer to the "Key
Ignition Switch" section in chapter 5.
To prevent damaging the remote
key:
• Keep the remote key away from water or any liquid and fire.
Internal circuits may malfunc-
tion if the inside of the remote
key gets damp (from liquids or
moisture) or if it is heated. This
can exclude the remote key from
being covered under warranty.
Avoid dropping or throwing the remote key.
Protect the remote key from extreme temperatures.
NOTICE
i
i
Convenient features of your vehicle
Page 93 of 485
3-9
Convenient features of your vehicle
Information
• The liftgate handle button will onlyoperate when the smart key is with-
in 28 inches (0.7 m) from the liftgate
handle.
• The Liftgate Unlock button (3) will only unlock the liftgate. It will not
release the latch and open the lift-
gate automatically. If the Liftgate
Unlock button is used, someone
must still press the liftgate handle
button to open the liftgate.
Panic button
Press and hold the Panic button (4)
for more than one second. The horn
sounds and hazard warning lights
blink for about 30 seconds. To cancel
the panic mode, press any button on
the Smart Key.
Start-up
You can start the vehicle without
inserting the key.
For information, refer to the
"Engine Start/Stop Button" sec-
tion in chapter 5.
To prevent damaging the smart key:
Keep the smart key in a cool, dryplace to avoid damage or mal-
function. Exposure to moisture
or high temperature may cause
the internal circuit of the smart
key to malfunction which may
not be covered under warranty.
Avoid dropping or throwing the smart key.
Protect the smart key from extreme temperatures.
Mechanical key
If the Smart Key does not operate
normally, you can lock or unlock the
driver's door by using the mechanical
key.
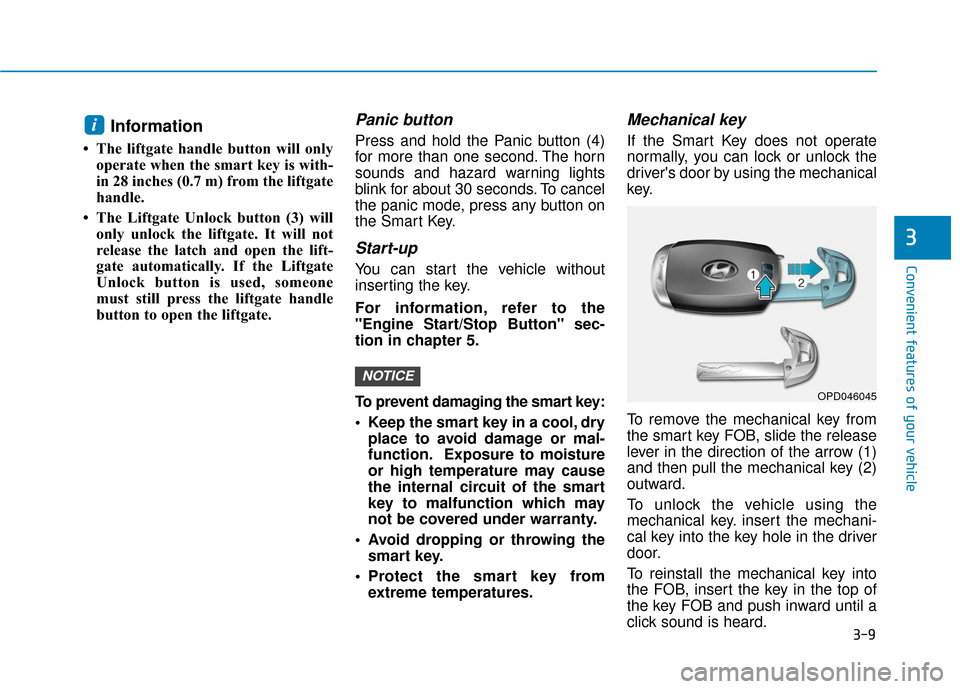
To remove the mechanical key from
the smart key FOB, slide the release
lever in the direction of the arrow (1)
and then pull the mechanical key (2)
outward.
To unlock the vehicle using the
mechanical key. insert the mechani-
cal key into the key hole in the driver
door.
To reinstall the mechanical key into
the FOB, insert the key in the top of
the key FOB and push inward until a
click sound is heard.
NOTICE
i
3
OPD046045
Page 185 of 485
3-101
Convenient features of your vehicle
3
Windshield Washers
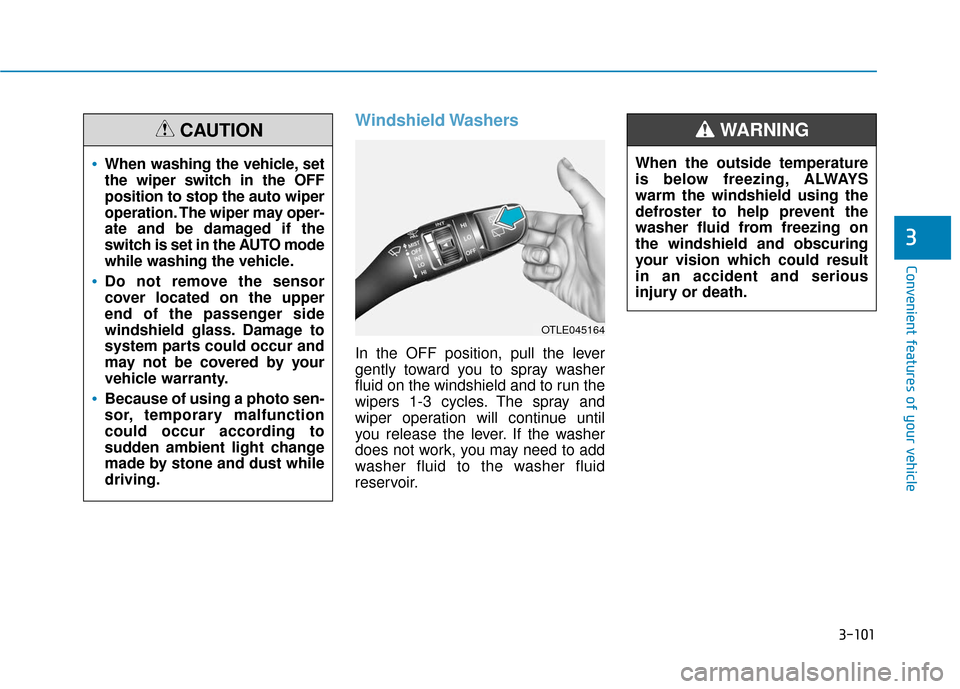
In the OFF position, pull the lever
gently toward you to spray washer
fluid on the windshield and to run the
wipers 1-3 cycles. The spray and
wiper operation will continue until
you release the lever. If the washer
does not work, you may need to add
washer fluid to the washer fluid
reservoir.When the outside temperature
is below freezing, ALWAYS
warm the windshield using the
defroster to help prevent the
washer fluid from freezing on
the windshield and obscuring
your vision which could result
in an accident and serious
injury or death.
WARNING
OTLE045164
When washing the vehicle, set
the wiper switch in the OFF
position to stop the auto wiper
operation. The wiper may oper-
ate and be damaged if the
switch is set in the AUTO mode
while washing the vehicle.
Do not remove the sensor
cover located on the upper
end of the passenger side
windshield glass. Damage to
system parts could occur and
may not be covered by your
vehicle warranty.
Because of using a photo sen-
sor, temporary malfunction
could occur according to
sudden ambient light change
made by stone and dust while
driving.
CAUTION
Page 212 of 485
3-128
Convenient features of your vehicleWhen the Auto Defogging
System operates, the indi-
cator will illuminate.
If a high amount of humidity is
detected in the vehicle, the Auto
Defogging System will be enabled.
The following steps will be performed
automatically:
Step 1) The air intake control will change to Fresh mode.
Step 2) The A/C button will turn ON.
Step 3) The mode will be changed to defrost to direct airflow to the
windshield.
Step 4) The fan speed will be set to MAX.
If the air conditioning is off or recircu-
lated air position is manually select-
ed while Auto Defogging System is
ON, the Auto Defogging System
Indicator will blink 3 times to signal
that the manual operation has been
canceled.
To cancel or reset the
Auto Defogging System
Press the front windshield defroster
button for 3 seconds when the ignition
switch is in the ON position. When the
Auto Defogging System is canceled,
the ADS OFF symbol will blink 3 times
and ADS OFF will be displayed on the
climate control information screen.
When the Auto Defogging System is
reset, the ADS OFF symbol will blink
6 times without a signal.
Information
• When the air conditioning is turned on by Auto defogging system, if you
try to turn off the air conditioning, the
indicator will blink 3 times and the air
conditioning will not be turned off.
• To maintain the effectiveness and efficiency of the Auto Defogging
System, do not select Recirculation
mode while the system is operating.
• When the Auto Defogging System is operating, the fan speed adjustment
knob, the temperature adjustment
knob, and the air intake control but-
ton are all disabled. Do not remove the sensor cover
located on the upper end of the
windshield glass.
Damage to system parts could
occur and may not be covered by
your vehicle warranty.
NOTICE
i
Page 268 of 485
5-36
Driving your vehicle
ESC OFF usage
When Driving
The ESC OFF mode should only be
used briefly to help free the vehicle if
stuck in snow or mud by temporarily
stopping operation of the ESC to
maintain wheel torque.
To turn ESC off while driving, press
the ESC OFF button while driving on
a flat road surface.
To prevent damage to the trans-
mission:
Do not allow wheel(s) of oneaxle to spin excessively while
the ESC, ABS, and parking brake
warning lights are displayed.
The repairs would not be cov-
ered by the vehicle warranty.
Reduce engine power and do
not spin the wheel(s) excessive-
ly while these lights are dis-
played.
When operating the vehicle on a dynamometer, make sure the
ESC is turned off (ESC OFF light
illuminated).
Information
Turning the ESC off does not affect ABS
or standard brake system operation.
Vehicle Stability Management
(VSM)
The Vehicle Stability Management
(VSM) is a function of the Electronic
Stability Control (ESC) system. It
helps ensure the vehicle stays stable
when accelerating or braking sud-
denly on wet, slippery and rough
roads where traction over the four
tires can suddenly become uneven.
VSM operation
VSM ON condition
The VSM operates when:
The Electronic Stability Control(ESC) is on.
Vehicle speed is approximately above 9 mph (15 km/h) on curve
roads.
Vehicle speed is approximately above 12 mph (20 km/h) when the
vehicle is braking on rough roads.
When operating
When you apply your brakes under
conditions which may activate the
ESC, you may hear sounds from the
brakes, or feel a corresponding sen-
sation in the brake pedal. This is nor-
mal and it means your VSM is active.
i
NOTICE
Take the following precautions
when using the Vehicle Stability
Management (VSM):
ALWAYS check the speed and
the distance to the vehicle
ahead. The VSM is not a sub-
stitute for safe driving prac-
tices.
Never drive too fast for the
road conditions. The VSM sys-
tem will not prevent acci-
dents. Excessive speed in bad
weather, slippery and uneven
roads can result in severe
accidents.
WARNING