2019 Hyundai Kona EV Charge
[x] Cancel search: ChargePage 76 of 540

2-61
Safety system of your vehicle
2
ODH035900K
ODH035901K
OOS037066
OOS037067
Do not sit on the passen-
ger seat wearing heavily
padded clothes such as
ski wear and hip protector.
Do not use car seat
accessories such as thick
blankets and cushions
which cover up the car
seat surface.
Do not place electronic
devices such as laptops,
DVD player, or conductive
materials such as water
bottles on the passenger
seat.
Do not use electronic
devices such as laptops
and satellite radios which
use inverter chargers.
If large quantity of liquid
has been spilled on the
passenger seat, the air
bag warning light may
illuminate or malfunction.
Therefore, make sure the
seat has been completely
dried before driving the
vehicle.
Do not place sharp objects on the front passenger seat. These may damage the occupant detection sys-
tem, if they puncture the seat cushion.
Do not place any items under the front passenger seat.
When changing or replacing the seat or seat cover, use original items only. The OCS has been devel-
oped based on using original HYUNDAI car seats only. Altering or changing the authentic parts may
result in system malfunction and increase risk of injury when in collision. Any of the above could inter-
fere with the proper operation of the OCS sensor thereby increasing the risk of an injury in an accident.
Page 86 of 540

Driver Assist System .........................................3-112
Rear View Monitor ......................................................3-112
Parking Distance Warning (Reverse) System ........3-113
Automatic Climate Control System ..................3-117
Automatic Temperature Control Mode ....................3-118
Manual Temperature Control Mode .........................3-119
System Operation .........................................................3-126
System Maintenance....................................................3-128
Windshield Defrosting and Defogging ............3-130
To Defog Inside Windshield .....................................3-130
To Defrost Outside Windshield ..................................3-131
Defogging logic ............................................................3-131
Auto Defogging System ..............................................3-131
Rear Window Defroster ..............................................3-133
Climate Control Additional Features ...............3-134
Cluster ionizer ..............................................................3-134
Automatic Ventilation ...................................................3-134
Sunroof Inside Air Recirculation ...............................3-134
Storage Compartment .......................................3-135
Center Console Storage ..............................................3-135
Glove Box ........................................................................\
3-135
Sunglass Holder ...........................................................3-135
Interior Features ................................................3-137
Cup Holder ......................................................................3-\
137
Sunvisor ........................................................................\
...3-138
Power Outlet ..................................................................3-139
USB Charger .................................................................3-140
Wireless Cellular Phone Charging System..............3-140
Clock ........................................................................\
.........3-142
Coat Hook .......................................................................3\
-143
Floor Mat Anchor(s).....................................................3-143
Luggage Net Holder .....................................................3-144
Cargo Area Cover..........................................................3-145
3
Page 91 of 540

3-7
Convenient features of your vehicle
3
When possible, avoid keeping the
remote key and your mobile phone in
the same location such as a pants or
jacket pocket in order to avoid inter-
ference between the two devices.
Keep the smart key away from
electromagnetic materials that
block electromagnetic waves to
the key surface.
Always have the smart key with
you when leaving the vehicle. If
the smart key is left near the vehi-
cle, the vehicle battery may be dis-
charged.Information
This device complies with Part 15 of
the FCC rules.
Operation is subject to the following
three conditions:
1. This device may not cause harmfulinterference.
2. This device must accept any inter- ference received, including inter-
ference that may cause undesired
operation.
3. Changes or modifications not expressly approved by the party
responsible for compliance could
void the user's authority to operate
the device.
Battery replacement
If the Smart Key is not working prop-
erly, try replacing the battery with a
new one.
Battery Type: CR2032
To replace the battery:
1. Remove the mechanical key.
2. Use a slim tool to pry open therear cover of the smart key.
3. Remove the old battery and insert the new battery. Make sure the
battery position is correct.
4. Reinstall the rear cover of the smart key.
i
NOTICE
NOTICE
OPD046046
Page 121 of 540

3-37
Convenient features of your vehicle
Sunshade
The sunshade can be open and
closed manually using the sunshade
handle. In addition, when you open
the sunroof, if the sunshade is still
closed, the sunshade will open auto-
matically with the glass when the sun-
roof opens. When you close the sun-
roof, you must close the sunshade
manually using the sunshade handle.
The sunroof is made to slide
together with the sunshade. Do
not leave the sunshade closed
while the sunroof is open.
Resetting the Sunroof
The sunroof may need to be reset if
the following conditions occur:
The battery is discharged or dis-connected or the sunroof fuse has
been replaced or disconnected
The sunroof control lever is not operating correctly
To reset the sunroof, perform the fol-
lowing steps:
1. Place the POWER button to the ON position or start the vehicle
( indicator ON). It is recom-
mended to reset the sunroof while
the vehicle is in the ready ( )
mode.
2. Push the control lever forward. The sunroof will close completely or tilt
depending on the condition of the
sunroof.
3. Release the control lever when the sunroof stops moving. 4. Push the control lever forward
about 10 seconds.
- When the sunroof is in the closed position :
The glass will tilt and slightly move up and down.
- When the sunroof is in the tilt position:
The glass will slightly move up and down.
Do not release the lever until the
operation is completed.
If you release the lever during opera-
tion, start the procedure again from
step 2.
5. Within 3 seconds, push and hold the control lever forward until the
sunroof operates as follows:
Tilt down → Slide Open → Slide
Close.
NOTICE
3
OAD045037
Page 122 of 540

3-38
Convenient features of your vehicle
Do not release the lever until the
operation is completed.
If you release the lever during opera-
tion, start the procedure again from
step 2.
6. Release the sunroof control lever after all steps have completed. The
sunroof system has been reset.
Information
• If the sunroof is not reset when thevehicle battery is disconnected or
discharged, or the sunroof fuse is
blown, the sunroof may not operate
normally.
• For more detailed information, con- tact an authorized HYUNDAI dealer.
Sunroof Open Warning
(if equipped)
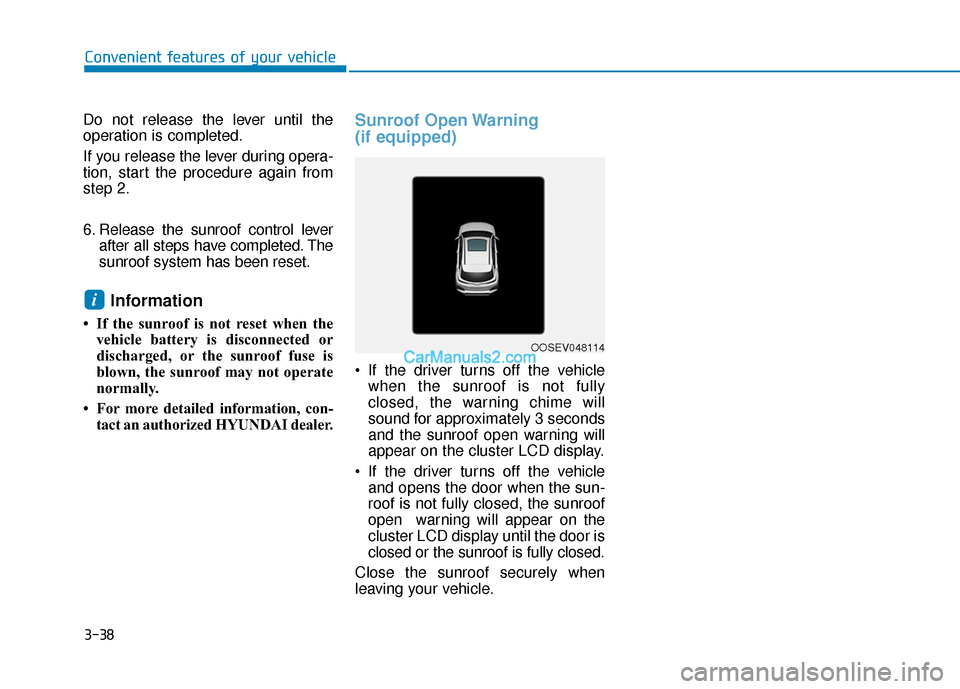
If the driver turns off the vehiclewhen the sunroof is not fully
closed, the warning chime will
sound for approximately 3 seconds
and the sunroof open warning will
appear on the cluster LCD display.
If the driver turns off the vehicle and opens the door when the sun-
roof is not fully closed, the sunroof
open warning will appear on the
cluster LCD display until the door is
closed or the sunroof is fully closed.
Close the sunroof securely when
leaving your vehicle.
i
OOSEV048114
Page 128 of 540

3-44
Convenient features of your vehicle
I
IN
N S
ST
T R
R U
U M
M E
EN
N T
T
C
C L
LU
U S
ST
T E
ER
R
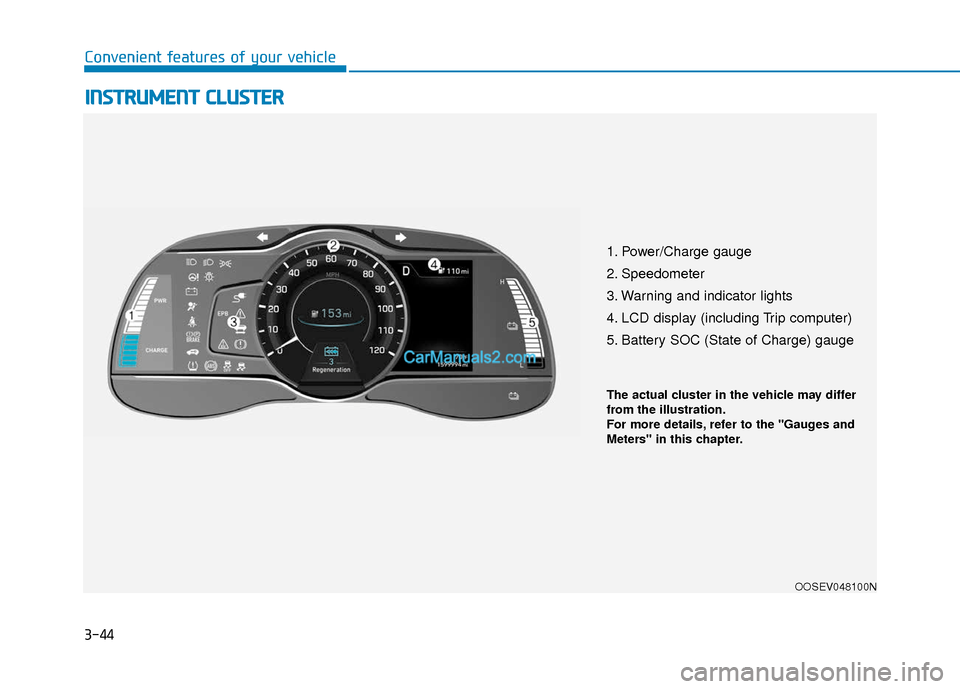
1. Power/Charge gauge
2. Speedometer
3. Warning and indicator lights
4. LCD display (including Trip computer)
5. Battery SOC (State of Charge) gauge
OOSEV048100N
The actual cluster in the vehicle may differ
from the illustration.
For more details, refer to the "Gauges and
Meters" in this chapter.
Page 131 of 540

3-47
Convenient features of your vehicle
3
Toque gauge
The torque gauge shows the real-
time torque value while driving when
SPORT mode is selected by press-
ing the DRIVE MODE button.
Power/Charge gauge
The Power/Charge gauge shows the
energy consumption rate of the vehi-
cle and the charge/discharge status
of the regenerative brakes.
This portion of the gauge indicates
the amount of electrical power sup-
plied to the EV motor while driving.
This portion of the gauge indicates
the amount of charging to the EV
battery when regenerative braking is
applied.
State of Charge (SOC) gauge forhigh voltage battery
The SOC gauge shows the charging
status of the high voltage battery.
"L (Low)" position on the indicator
indicates that there is not enough
energy in the high voltage battery. "H
(High)" position indicates that the
driving battery is fully charged.
When driving your vehicle for long
distances on the highway or in rural
areas, make sure to check that the
State of Charge (SOC) is sufficient to
get to your destination and make
sure to map out useable charging
locations along your route.
OOSEVQ018001
OOSEV048102
OOSEV048192N
Page 132 of 540

3-48
Convenient features of your vehicle
When there are only 2 bars remain-
ing on the gauge, the SOC level is
low. The warning lamp turns ON to
alert you that the battery must be
charged soon.
When the warning lamp turns ON,
the vehicle can drive an additional
12~18 miles (20~30 km) depending
on the driving speed, heater/air con-
ditioner, weather, driving style, and
other factors. Charging is required.
When there are 1-2 gauge bars left
for the high voltage battery, the
vehicle speed is limited and then
eventually the vehicle will turn OFF.
Charge the vehicle immediately.
Outside temperature indicator
The outside temperature is shown in
the lower portion of the cluster LCD
display. The units may be displayed
in Fahrenheit (F) or Celsius (C).
- Temperature range : -40°F ~ 140°F
(-40°C ~ 60°C)
Note that the temperature indicated
on the LCD display may not change
as quickly as the outside tempera-
ture (there may be a slight delay
before the temperature changes.) You can change the temperature unit
from °F to °C or °C to °F in the User
Settings mode in the cluster:
- Go to User Settings Mode
➝Other
➝ Temperature Unit.
For vehicles equipped with Automatic
Climate Control, you can also:
- Press the AUTO button while press- ing the OFF button on the climate
control unit for 3 seconds
Both the temperature unit on the
cluster LCD display and climate con-
trol screen will change.
NOTICE
OOSEV048103
OOSEV048104N