2019 Hyundai Kona EV reset
[x] Cancel search: resetPage 218 of 540

3-134
Convenient features of your vehicle
C
CL
LI
IM
M A
AT
TE
E
C
C O
O N
NT
TR
R O
O L
L
A
A D
DD
DI
IT
T I
IO
O N
NA
AL
L
F
F E
E A
A T
TU
U R
RE
ES
S
Cluster ionizer
When the POWER button is in the
ON position, the clean air function
turns on automatically.
Also, the clean air function turns off
automatically, when the POWER but-
ton is in the OFF position.
Automatic Ventilation
(if equipped)
When the POWER button is in the
ON position or when the vehicle is in
the ready ( ) mode and tempera-
ture is below 59°F (15°C) with the
recirculation mode selected more
than three to five minutes, the air
intake position will automatically
change to fresh mode.
To cancel or reset the Automatic
Ventilation
When the air conditioning system is
on, select Face Level mode and
press the recirculation mode button
five times within three seconds while
pressing A/C button.
When the Automatic Ventilation fea-
ture is enabled, the recirculation but-
ton LED indicator will blink 6 times.
When the Automatic Ventilation fea-
ture is disabled, the recirculation but-
ton LED indicator will blink 3 times.
Sunroof Inside Air
Recirculation (if equipped)
When the heater or air conditioning
system is on with the sunroof
opened, the fresh mode will be auto-
matically selected. If you press the
recirculation mode button when the
sunroof is open, recirculation mode
will activate, but will only remain
enabled for 3 minutes. After 3 min-
utes the air intake control will revert
back to Fresh mode.
When the sunroof is closed, the air
intake position will return to the orig-
inal position that was selected.
Page 232 of 540

Antenna
The shark fin antenna will receive the
AM, FM broadcast signals and trans-
mit data.
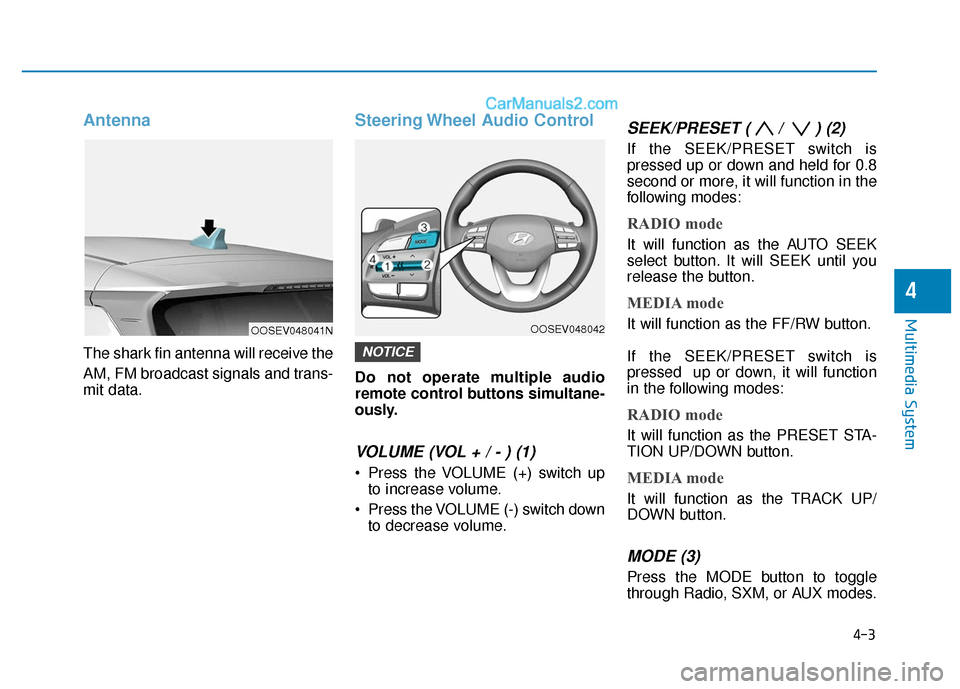
Steering Wheel Audio Control
Do not operate multiple audio
remote control buttons simultane-
ously.
VOLUME (VOL + / - ) (1)
Press the VOLUME (+) switch upto increase volume.
Press the VOLUME (-) switch down to decrease volume.
SEEK/PRESET ( / ) (2)
If the SEEK/PRESET switch is
pressed up or down and held for 0.8
second or more, it will function in the
following modes:
RADIO mode
It will function as the AUTO SEEK
select button. It will SEEK until you
release the button.
MEDIA mode
It will function as the FF/RW button.
If the SEEK/PRESET switch is
pressed up or down, it will function
in the following modes:
RADIO mode
It will function as the PRESET STA-
TION UP/DOWN button.
MEDIA mode
It will function as the TRACK UP/
DOWN button.
MODE (3)
Press the MODE button to toggle
through Radio, SXM, or AUX modes.
NOTICE
4-3
Multimedia System
4
OOSEV048041NOOSEV048042
Page 235 of 540

5
Forward Collision-Avoidance Assist (FCA)
System ...................................................................5-49
System Setting and Activation.....................................5-49
FCA Warning Message and System Control ............5-52
FCA Sensor .......................................................................5\
-54
System Not Operating....................................................5-56
Limitations of the System .............................................5-57
Blind-Spot Collision Warning (BCW) /
Rear Cross-Traffic Collision Warning (RCCW) ..5-62
System Description .........................................................5-62
Blind-Spot Collision Warning (BCW) ..........................5-63
Rear Cross-Traffic Collision Warning (RCCW) .........5-66
Detecting Sensor .............................................................5-68
Limitations of the System .............................................5-69
Lane Keeping Assist (LKA) System ...................5-75
LKA Operation..................................................................5-76
Warning Light and Message.........................................5-78
Limitations of the System .............................................5-81
LKA Function Change.....................................................5-82
Driver Attention Warning (DAW) System .........5-83
System Setting and Activation.....................................5-83
Resetting the System .....................................................5-85
System Standby ...............................................................5-85
System Not Operating....................................................5-85
Cruise Control .......................................................5-88
Cruise Control Operation...............................................5-88
Smart Cruise Control with Stop & Go System .5-93
Smart Cruise Control Switch ........................................5-93
Smart Cruise Control Speed .........................................5-94
Smart Cruise Control Vehicle-to-Vehicle Distance...5-98
Sensor to Detect Distance to the Vehicle Ahead ..5-102
SCC Reaction Setting ...................................................5-104
Conventional Cruise Control Mode ...........................5-104
Limitations of the System...........................................5-105
Special Driving Conditions ................................5-111
Hazardous Driving Conditions....................................5-111
Rocking the Vehicle ......................................................5-111
Smooth Cornering .........................................................5-112
Driving at Night .............................................................5-112
Driving in the Rain ........................................................5-112
Driving in Flooded Areas.............................................5-113
Highway Driving ............................................................5-113
Reducing the Risk of a Rollover ...............................5-114
Page 318 of 540

5-85
Driving your vehicle
5
Resetting the System
The last break time is set to 00:00and the driver's attention level is
set to 5 (very attentive) when the
driver resets the Driver Attention
Warning (DAW) system.
The Driver Attention Warning (DAW) system resets in the follow-
ing situations.
- The vehicle is turned OFF.
- The driver unfastens the seat beltand then opens the driver's door.
- The vehicle is stopped for more than 10 minutes.
The Driver Attention Warning (DAW) system operates again,
when the driver restarts driving.
System Standby
The Driver Attention Warning (DAW)
system enters the ready status and
displays the 'Standby' screen in the
following situations.
- The camera does not detect thelanes.
- Driving speed remains under 40 mph (64 km/h) or over 120 mph
(190 km/h).
System Not Operating
Check Driver Attention Warning
(DAW) system
When the warning message
appears, the system is not working
properly. In this case, have the vehi-
cle inspected by an authorized
HYUNDAI dealer.
OIK057133NOIK057134N
If any other warning sound
such as seat belt warning chime
is already generated, the Driver
Attention Warning (DAW) sys-
tem warning may not sound.
CAUTION
Page 324 of 540

5-91
Driving your vehicle
5
Cruise Control will be canceledwhen:
Depressing the brake pedal.
Pressing the CANCEL button
located on the steering wheel.
The vehicle is shifted into N (Neutral).
Decreasing the vehicle speed to less than approximately 20 mph
(30 km/h).
The ESC (Electronic Stability Control) is operating.
Information
Each of the above actions will cancel
Cruise Control operation (the set
speed on the instrument cluster will go
off), but only pressing the CRUISE
button will turn the system off. If you
wish to resume Cruise Control opera-
tion, push the toggle switch up (RES+)
located on your steering wheel. You
will return to your previously preset
speed, unless the system was turned
off using the CRUISE button.
To resume preset Cruisingspeed
Push the toggle switch (1) up
(RES+). If the vehicle speed is over
20 mph (30 km/h), the vehicle will
resume the preset speed.
i
OOS057056NOOS057055N
Page 381 of 540

7
Maintenance
7
Maintenance
EV Drive Motor Compartment ..............................7-3
Maintenance Services ...........................................7-4
Owner's Responsibility .....................................................7-4
Owner Maintenance Precautions..................................7-4
Owner Maintenance ..............................................7-5
Owner Maintenance Schedule .......................................7-5
Scheduled Maintenance Services........................7-7
Normal Maintenance Schedule ......................................7-8
Maintenance Under Severe Usage Conditions ........7-10
Severe Driving Conditions .............................................7-10
Explanation of Scheduled Maintenance Items ..7-11
Coolant.................................................................\
..7-12
Checking the Coolant Level ..........................................7-12
Changing Coolant ............................................................7-14
Brake Fluid ............................................................7-15
Checking the Brake Fluid Level ...................................7-15
Washer Fluid .........................................................7-16
Checking the Washer Fluid Level................................7-16
Climate Control Air Filter ....................................7-17
Filter Inspection ...............................................................7-17
Wiper Blades.........................................................7-19
Blade Inspection ..............................................................7-19
Blade Replacement .........................................................7-19
12V Auxiliary Battery ..........................................7-23
For Best Battery Service ..............................................7-24
Battery Recharging ........................................................7-24
Reset Features.................................................................7-25
Tires and Wheels .................................................7-26
Tire Care ........................................................................\
....7-26
Recommended Cold Tire Inflation Pressures ...........7-27
Check Tire Inflation Pressure ......................................7-28
Tire Rotation...................................................................\
..7-29
Wheel Alignment and Tire Balance ............................7-30
Tire Replacement ............................................................7-30
Wheel Replacement ........................................................7-31
Tire Traction .....................................................................7-3\
1
Tire Maintenance ............................................................7-31
Tire Sidewall Labeling ....................................................7-31
Tire Terminology and Definitions................................7-35
All Season Tires ...............................................................7-39
Summer Tires ...................................................................7-39
Snow Tires ........................................................................\
7-39
Radial-Ply Tires ...............................................................7-39
7
Page 405 of 540

7-25
7
Maintenance
By jump starting
After a jump start from a good bat-
tery, drive the vehicle for 20-30 min-
utes before it is shutoff. The vehicle
may not restart if you shut it off
before the battery had a chance to
adequately recharge. See "Jump
Starting" in chapter 6 for more infor-
mation on jump starting procedures.
Information
An inappropriately disposedbattery can be harmful to
the environment and human
health. Dispose of the bat-
tery according to your local
law(s) or regulation.
Reset Features
Some items need to be reset after
the battery has been discharged or
the battery has been disconnected.
Power Windows
Trip Computer
Climate Control System
Clock
Audio System
Sunroof
i
Watch the battery during
charging, and stop or reduce
the charging rate if the battery
cells begin boiling violently.
The negative battery cable
must be removed first and
installed last when the battery
is disconnected. Disconnect
the battery charger in the fol-
lowing order:
(1) Turn off the battery charg-
er main switch.
(2) Unhook the negative
clamp from the negative
battery terminal.
(3) Unhook the positive clamp from the positive battery
terminal.
Always use a genuine
HYUNDAI approved battery
when you replace the battery.
Page 410 of 540

7-30
Maintenance
Wheel Alignment and Tire
Balance
The wheels on your vehicle were
aligned and balanced carefully at the
factory to give you the longest tire life
and best overall performance.
In most cases, you will not need to
have your wheels aligned again.
However, if you notice unusual tire
wear or your vehicle pulling one way
or the other, the alignment may need
to be reset.
If you notice your vehicle vibrating
when driving on a smooth road, your
wheels may need to be rebalanced.
Improper wheel weights can dam-
age your vehicle's aluminum
wheels. Use only approved wheel
weights.
Tire Replacement
If the tire is worn evenly, a tread wear
indicator will appear as a solid band
across the tread. This shows there is
less than 1/16 inch (1.6 mm) of tread
left on the tire. Replace the tire when
this happens.
Do not wait for the band to appear
across the entire tread before replac-
ing the tire.
NOTICE
OLMB073027
Tread wear indicatorTo reduce the risk of DEATH or
SERIOUS INJURY:
Replace tires that are worn,
show uneven wear, or are
damaged. Worn tires can
cause loss of braking effec-
tiveness, steering control, and
traction.
Always replace tires with the
same size as each tire that
was originally supplied with
this vehicle. Using tires and
wheels other than the recom-
mended sizes could cause
unusual handling characteris-
tics, poor vehicle control, or
negatively affect your vehi-
cle's Anti-Lock Brake System
(ABS) resulting in a serious
accident.
WARNING