Page 573 of 599
7-65
7
Maintenance
Tail lamp and backup lamp
1. Turn off the engine.
2. Open the tailgate.
3. Remove the service cover using aflat-blade screwdriver. 4. Remove the bulb by pulling it
straight out.
5. Insert a new bulb by inserting it into the socket and rotating it until
it locks into place.
6. Install the socket into the assembly by aligning the tabs on the socket
with the slots in the assembly.
Push the socket into the assembly
and turn the socket clockwise.
7. Reinstall the service cover.
Type B
(1) Tail/Stop lamp
(2) Turn signal lamp
(3) Tail lamp
(4) Backup lamp
Tail/Stop lamp
If the LED lamp does not operate, we
recommended that you have the
vehicle checked by a HYUNDAI
authorised repairer.
OAE076036
OAE076041OAE076042
Backup lamp
Page 574 of 599
7-66
Maintenance
Turn signal lamp
1. Turn off the engine.
2. Open the tailgate.
3. Open the lamp assembly retainingscrew covers.
4. Loosen the lamp assembly retain- ing screws with a cross-tip screw-
driver. 5. Remove the rear combination
lamp assembly from the body of
the vehicle. 6. Remove the socket from the
assembly by turning the socket
counterclockwise until the tabs on
the socket align with the slots on the
assembly.
7. Remove the bulb from the socket by pressing it in and rotating it counter-
clockwise until the tabs on the bulb
align with the slots in the socket.
Pull the bulb out of the socket.
8. Insert a new bulb by inserting it into the socket and rotating it until it
locks into place.
OAE076040OAE076038OAE076037
Page 575 of 599
7-67
7
Maintenance
9. Install the socket into the assemblyby aligning the tabs on the socket
with the slots in the assembly. Push
the socket into the assembly and
turn the socket clockwise.
10. Reinstall the lamp assembly to the body of the vehicle
Backup lamp
1. Turn off the engine.
2. Open the tailgate.
3. Remove the service cover using aflat-blade screwdriver. 4. Remove the socket from the
assembly by turning the socket
counterclockwise until the tabs on
the socket align with the slots on
the assembly.
5. Remove the bulb by pulling it straight out.
6. Insert a new bulb by inserting it into the socket and rotating it until
it locks into place.
7. Install the socket into the assembly by aligning the tabs on the socket
with the slots in the assembly.
Push the socket into the assembly
and turn the socket clockwise.
8. Reinstall the service cover.
OAE076042
Backup lamp
OAE076041
Page 577 of 599
7-69
7
Maintenance
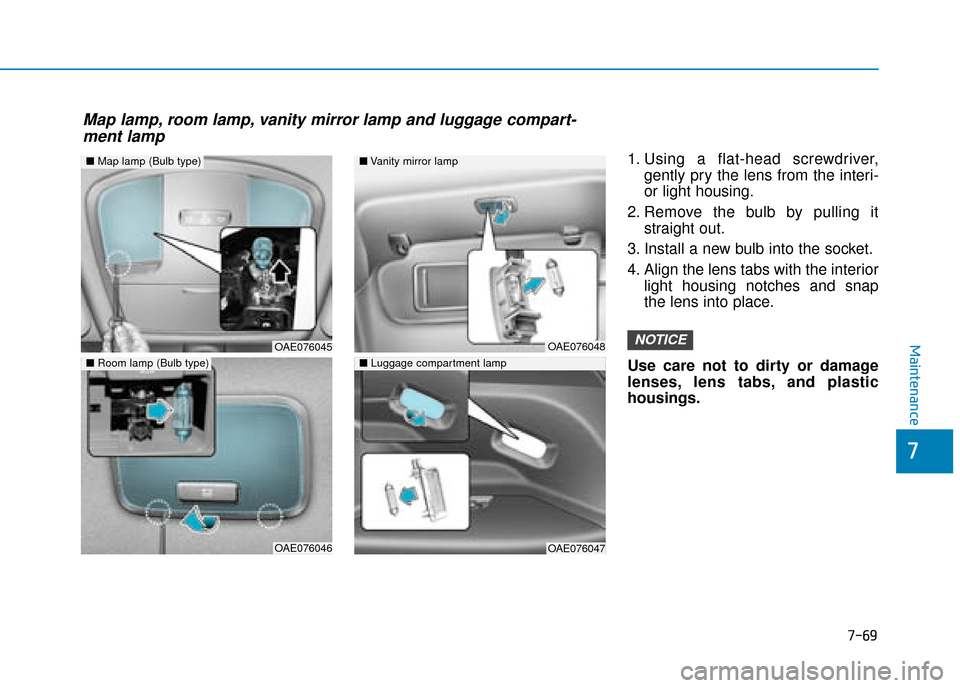
1. Using a flat-head screwdriver,gently pry the lens from the interi-
or light housing.
2. Remove the bulb by pulling it straight out.
3. Install a new bulb into the socket.
4. Align the lens tabs with the interior light housing notches and snap
the lens into place.
Use care not to dirty or damage
lenses, lens tabs, and plastic
housings.
NOTICE
■ Vanity mirror lamp
■ Luggage compartment lamp
OAE076048
OAE076047
■Map lamp (Bulb type)
OAE076045
OAE076046
■Room lamp (Bulb type)
Map lamp, room lamp, vanity mirror lamp and luggage compart-
ment lamp
Page 584 of 599

7-76
Maintenance
Wrinkles or abrasions which appear naturally from usage are
not covered by warranty.
Belts with metallic accessories, zippers or keys inside the back
pocket may damage the seat
fabric.
Make sure not to wet the seat. It may change the nature of natu-
ral leather.
Jeans or clothes which could bleach may contaminate the sur-
face of the seat covering fabric. Caring for the leather seats
- Vacuum the seat periodically toremove dust and sand on the
seat. It will prevent abrasion or
damage of the leather and main-
tain its quality.
- Wipe the natural leather seat cover often with dry or soft cloth.
- Use of a proper leather protector may prevent abrasion of the
cover and helps maintain the
colour. Be sure to read the
instructions and consult a spe-
cialist when using leather coating
or protective agents.
- Light coloured (beige, cream beige) leather is easily contami-
nated and the stain is noticeable.
Clean the seats frequently.
- Avoid wiping with wet cloth. It may cause the surface to crack. Cleaning the leather seats
- Remove all contaminationsinstantly. Refer to instructions
below for removal of each con-
taminant.
- Cosmetic products (sunscreen, foundation, etc.)
Apply cleansing cream on a cloth
and wipe the contaminated spot.
Wipe off the cream with a wet
cloth and remove water with a dry
cloth.
- Beverages(coffee, soft drink, etc.) Apply a small amount of neutral
detergent and wipe until contami-
nations do not smear.
- Oil Remove oil instantly with
absorbable cloth and wipe with
stain remover used only for natu-
ral leather.
- Chewing gum Harden the gum with ice and
remove gradually.
NOTICE
Page 586 of 599

7-78
Maintenance
1. Crankcase emission controlsystem
The positive crankcase ventilation
system is employed to prevent air
pollution caused by blow-by gases
being emitted from the crankcase.
This system supplies fresh filtered air
to the crankcase through the air
intake hose. Inside the crankcase,
the fresh air mixes with blow-by
gases, which then pass through the
PCV valve into the induction system.
2. Evaporative emission controlsystem
The Evaporative Emission Control
System is designed to prevent fuel
vapours from escaping into the
atmosphere.
Canister
Fuel vapours generated inside the
fuel tank are absorbed and stored in
the onboard canister. When the
engine is running, the fuel vapours
absorbed in the canister are drawn
into the surge tank through the purge
control solenoid valve.
Purge Control Solenoid Valve
(PCSV)
The purge control solenoid valve is
controlled by the Engine Control
Module (ECM); when the engine
coolant temperature is low during
idling, the PCSV closes so that evap-
orated fuel is not taken into the
engine. After the engine warms-up
during ordinary driving, the PCSV
opens to introduce evaporated fuel to
the engine.
3. Exhaust emission control system
The Exhaust Emission Control
System is a highly effective system
which controls exhaust emissions
whilst maintaining good vehicle per-
formance.
When the engine starts or fails to
start, excessive attempts to restart
the engine may cause damage to the
emission system.
Engine exhaust
(carbon monoxide) precautions
Carbon monoxide can be present
with other exhaust fumes. If you
smell exhaust fumes of any kind in
your vehicle, drive with all the win-
dows fully open. Have your vehicle
checked and repaired immediately.
Engine exhaust gases contain
carbon monoxide (CO). Though
colourless and odourless, it is
dangerous and could be lethal if
inhaled. Follow the instructions
on this page to avoid CO poi-
soning.
WARNING