2019 Hyundai Ioniq Plug-in Hybrid tow
[x] Cancel search: towPage 256 of 599

3-110
Convenient features of your vehicle
To turn off the high beam headlamp,
pull the lever towards you. The low
beams will turn on.
To flash the high beam headlamp,
pull the lever towards you, then
release the lever. The high beams
will remain ON as long as you hold
the lever towards you.
Turn signals and lane changesignals
To signal a turn, push down on the
lever for a left turn or up for a right
turn in position (A). To signal a lane
change, move the turn signal lever
slightly and hold it in position (B).
The lever will return to the OFF posi-
tion when released or when the turn
is completed.
If an indicator stays on and does not
flash or if it flashes abnormally, one
of the turn signal bulbs may be
burned out and will require replace-
ment.
Do not use high beam when there
are other vehicles approaching
you. Using high beam could
obstruct the other driver's vision.
WARNING
OAE046455L
OAE046457L
Page 266 of 599

3-120
Convenient features of your vehicle
Windscreen washers
In the OFF (O) position, pull the lever
gently toward you to spray washer
fluid on the windscreen and to run the
wipers 1-3 cycles. The spray and
wiper operation will continue until you
release the lever. If the washer does
not work, you may need to add wash-
er fluid to the washer fluid reservoir.When the outside temperature is
below freezing, ALWAYS warm
the windscreen using the
defroster to prevent the washer
fluid from freezing on the wind-
screen and obscuring your
vision which could result in an
accident and serious injury or
death.
WARNING
To prevent possible damage
to the washer pump, do not
operate the washer when the
fluid reservoir is empty.
To prevent possible damage
to the wipers or windscreen,
do not operate the wipers
when the windscreen is dry.
To prevent damage to the
wiper arms and other compo-
nents, do not attempt to move
the wipers manually.
To prevent possible damage
to the wipers and washer sys-
tem, use anti-freezing washer
fluids in the winter season or
cold weather.
CAUTION
OAEE046500R
Page 278 of 599

3-132
Convenient features of your vehicle
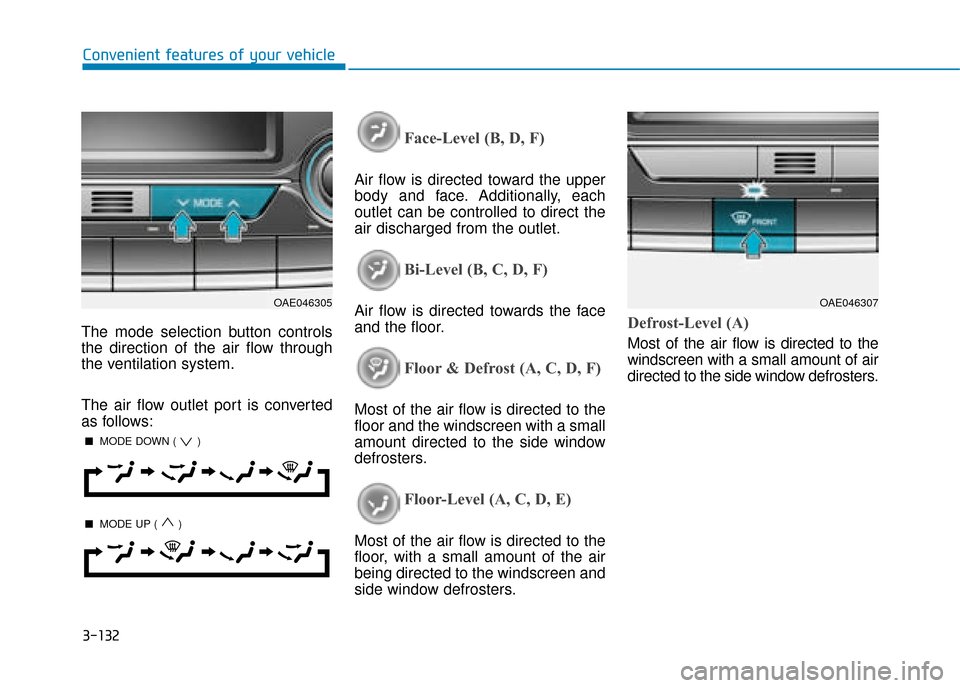
The mode selection button controls
the direction of the air flow through
the ventilation system.
The air flow outlet port is converted
as follows:
Face-Level (B, D, F)
Air flow is directed toward the upper
body and face. Additionally, each
outlet can be controlled to direct the
air discharged from the outlet.
Bi-Level (B, C, D, F)
Air flow is directed towards the face
and the floor.
Floor & Defrost (A, C, D, F)
Most of the air flow is directed to the
floor and the windscreen with a small
amount directed to the side window
defrosters.
Floor-Level (A, C, D, E)
Most of the air flow is directed to the
floor, with a small amount of the air
being directed to the windscreen and
side window defrosters.
Defrost-Level (A)
Most of the air flow is directed to the
windscreen with a small amount of air
directed to the side window defrosters.
OAE046305OAE046307
■ MODE DOWN ( )
■MODE UP ( )
Page 290 of 599

3-144
Convenient features of your vehicle
Auto defogging system
(if equipped)
Auto defogging reduces the possibili-
ty of fogging up the inside of the wind-
screen by automatically sensing the
moisture on inside the windscreen.
The auto defogging system operates
when the heater or air conditioning is
on.
Information
The auto defogging system may not
operate normally, when the outside
temperature is below -10 °C.When the Auto Defogging
System operates, the indi-
cator will illuminate.
If high levels of moisture are sensed
in the vehicle, the Auto Defogging
System will operate in the following
order:
Step 1 : Outside air position
Step 2 : Operating the air conditioning
Step 3 : Blowing air toward the wind- screen
Step 4 : Increasing air flow toward the windscreen
If the air conditioning is off or recircu-
lated air position is manually selected
whilst Auto Defogging System is ON,
the Auto Defogging System Indicator
will blink 3 times to signal that the
manual operation has been can-
celled.To cancel or reset the Auto Defogging
System
Press the front windscreen defroster
button for 3 seconds when the igni-
tion switch is in the ON position. When the Auto Defogging System is
cancelled, the ADS OFF symbol will
blink 3 times and the ADS OFF will
be displayed on the climate control
information screen.
When the Auto Defogging System is
reset, the ADS OFF symbol will blink
6 times without a signal.
Information
• When the air conditioning is turned
on by Auto defogging system, if you
try to turn off the air conditioning, the
indicator will blink 3 times and the air
conditioning will not be turned off.
• For efficiency, do not select recircu- lated air position whilst the Auto
defogging system is operating.
Do not remove the sensor cover
located on the upper end of the
windscreen glass.
Damage to system parts could
occur and may not be covered by
your vehicle warranty.
NOTICE
i
i
OAE046320
Page 307 of 599

Audio : For detailed information,refer to “AUDIO” in this chapter.
AVN : Detailed information for the
Bluetooth® Wireless Technology
hands-free is described in the man-
ual supplied separately.
Audio / Video / Navigation sys-
tem (AVN) (if equipped)
Detailed information for the AVN sys-
tem is described in a separately sup-
plied manual.
How vehicle radio works
FM reception
AM and FM radio signals are broad-
cast from transmitter towers located
around your city. They are intercept-
ed by the radio antenna on your vehi-
cle. This signal is then received by
the radio and sent to your vehicle
speakers.
When a strong radio signal has
reached your vehicle, the precise
engineering of your audio system
ensures the best possible quality
reproduction. However, in some
cases the signal coming to your vehi-
cle may not be strong and clear. This can be due to factors, such as
the distance from the radio station,
closeness of other strong radio sta-
tions or the presence of buildings,
bridges or other large obstructions in
the area.
OJF045308L
4-5
Multimedia System
4
Page 346 of 599

5
Cruise control .......................................................5-77
Cruise Control operation ...............................................5-77
Smart Cruise Control system..............................5-83
Smart Cruise Control speed ..........................................5-85
Smart Cruise Control Vehicle-to-Vehicle
Distance ........................................................................\
.....5-89
Sensor to detect distance to the vehicle ahead .....5-92
To adjust the sensitivity of Smart Cruise Control ..5-94
To convert to Cruise Control mode ............................5-94
Limitations of the system .............................................5-95
Special driving conditions .................................5-100
Hazardous driving conditions ....................................5-100
Rocking the vehicle ......................................................5-100
Smooth cornering .........................................................5-101
Driving at night ..............................................................5-101
Driving in the rain .........................................................5-101
Driving in flooded areas..............................................5-102
Highway driving .............................................................5-102
Winter driving .....................................................5-103
Snow or icy conditions ................................................5-103
Winter Precautions .......................................................5-105
Trailer towing .....................................................5-108
If you decide to pull a trailer?...................................5-109
Trailer towing equipment ............................................5-111
Driving with a trailer ....................................................5-112
Maintenance when towing a trailer .........................5-116
Vehicle weight ....................................................5-117
Overloading ....................................................................5-11\
7
Page 351 of 599

5-7
Driving your vehicle
5
Key ignition switch positions
Switch
PositionActionNotes
LOCK
To turn the ignition switch to the LOCK position, put the key in at
the ACC position and turn the key towards the LOCK position.
The ignition key can be removed in the LOCK position.
The steering wheel locks to protect the vehicle from theft.
(if equipped)
ACC
Electrical accessories are usable.
The steering wheel unlocks.If difficulty is experienced turning the ignition
switch to the ACC position, turn the key
whilst turning the steering wheel right and
left to release.
ON
This is the normal key position when the vehicle has started.
All features and accessories are usable.
The warning lights can be checked when you turn the ignition
switch from ACC to ON.Do not leave the ignition switch in the ON
position when the vehicle is not running to
prevent the battery from discharging.
STARTTo start the vehicle, turn the ignition switch to the START position.
The switch returns to the ON position when you let go of the key.The engine will crank until you release the
key.
Page 352 of 599

5-8
Driving your vehicle
Starting the vehicle1. Make sure the parking brake isapplied.
2. Make sure the shift lever is in P (Park).
3. Depress the brake pedal.
4. Turn the ignition switch to the START position. Hold the key
(maximum of 10 seconds) until the
" " comes on and release it.
Information
• It is best to maintain a moderateengine speed until the vehicle engine
comes up to normal operating tem-
perature. Avoid harsh or abrupt
acceleration or deceleration whilst
the engine is still cold.
• Always start the vehicle with your foot on the brake pedal. Do not
depress the accelerator whilst start-
ing the vehicle. Do not race the
engine whilst warming it up. To prevent damage to the vehicle:
Do not hold the ignition key in
the START position for more
than 10 seconds. Wait 5 to 10
seconds before trying again.
Do not turn the ignition switch to the START position with the
engine running. It may damage
the starter.
If the " " indicator turns off whilst you are in motion, do not
attempt to move the shift lever
to the P (Park) position.
If traffic and road conditions
permit, you may put the shift
lever in the N (Neutral) position
whilst the vehicle is still moving
and turn the ignition switch to
the START position in an
attempt to restart the engine.
Do not push or tow your vehicle to start the vehicle.
NOTICE
i
Always wear appropriate
shoes when operating your
vehicle. Unsuitable shoes,
such as high heels, ski boots,
sandals, flip-flops, etc., may
interfere with your ability to
use the brake and accelerator
pedals.
Do not start the vehicle with the
accelerator pedal depressed.
The vehicle can move which
can lead to an accident.
Wait until the engine rpm is
normal. The vehicle may sud-
denly move if the brake padal
is released when the rpm is
high.
WARNING