2019 Hyundai Ioniq Hybrid bulb
[x] Cancel search: bulbPage 163 of 603

3-71
Convenient features of your vehicle
High Beam Assist(HBA) indicator light(if equipped)
This indicator light illuminates :
• When the high-beam is on with the
light switch in the AUTO light posi-
tion.
If your vehicle detects oncoming or preceding vehicles, the High Beam
Assist (HBA) system will switch the
high beam to low beam automati-
cally.
For more details, refer to "High
Beam Assist (HBA) system" in this
chapter.
Exterior Light Warning Light (if equipped)
This warning light illuminates:
When one of the exterior bulbs
(headlamp, tail lamp, fog lamp, etc.)
is not operating properly. One of the
bulbs may need to be replaced.
Information
Make sure to replace the burned out
bulb with a new one of the same
wattage rating.
LED Headlight WarningLight (if equipped)
This warning light illuminates:
When you place the Engine Start/
Stop button to the ON position.
When there is a malfunction with the LED headlight.
In this case, have the vehicle
inspected by an authorized
HYUNDAI dealer.
This warning light blinks:
When there is a malfunction with aLED headlight related part.
In this case, have the vehicle
inspected by an authorized
HYUNDAI dealer.
Continuous driving with the LED
Headlight Warning Light on or
blinking can reduce LED headlight
life.
NOTICE
i
3
Page 170 of 603

3-78
Wiper
This indicator displays which wiper
speed is selected using the wiper
control.
Check headlight (if equipped)
This message is displayed if the
headlamps are not operating proper-
ly. A headlamp bulb may need to be
replaced.
Information
Make sure to replace the burned out
bulb with a new one of the same wattage
rating.
Check Lane Keeping Assist(LKA) system (if equipped)
Either message is displayed if there
is a problem with the Lane Keeping
Assist (LKA) System. Have the vehi-
cle inspected by an authorized
HYUNDAI dealer.
For more information, refer to
"Lane Keeping Assist (LKA)
System" in chapter 5.
i
Convenient features of your vehicle
OAE046118L
Page 213 of 603
3-121
Convenient features of your vehicle
Turn signals and lane changesignals
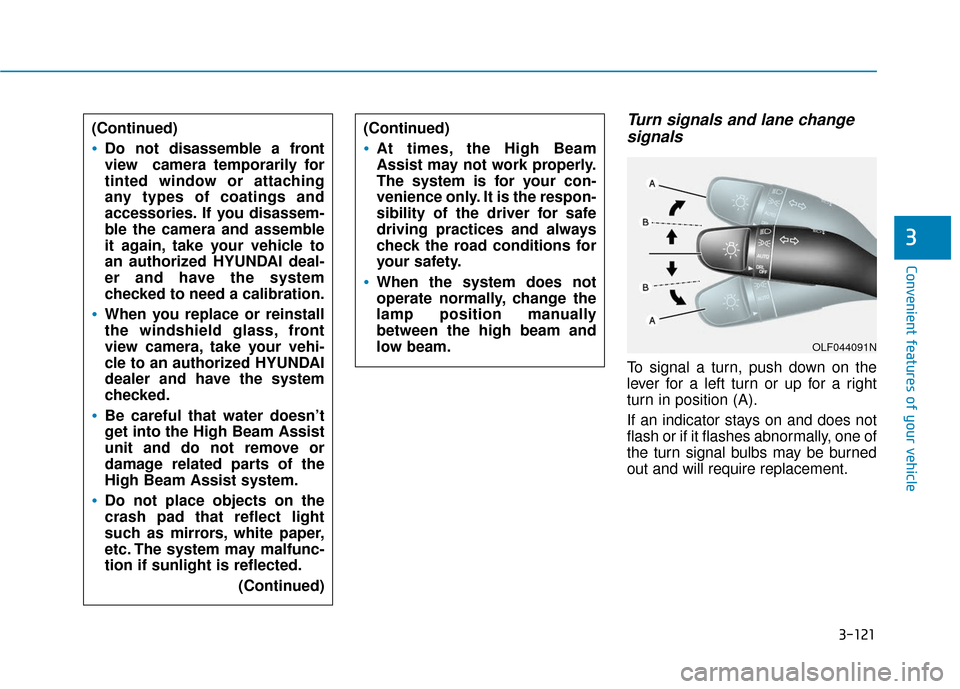
To signal a turn, push down on the
lever for a left turn or up for a right
turn in position (A).
If an indicator stays on and does not
flash or if it flashes abnormally, one of
the turn signal bulbs may be burned
out and will require replacement.
3
(Continued)
Do not disassemble a front
view camera temporarily for
tinted window or attaching
any types of coatings and
accessories. If you disassem-
ble the camera and assemble
it again, take your vehicle to
an authorized HYUNDAI deal-
er and have the system
checked to need a calibration.
When you replace or reinstall
the windshield glass, front
view camera, take your vehi-
cle to an authorized HYUNDAI
dealer and have the system
checked.
Be careful that water doesn’t
get into the High Beam Assist
unit and do not remove or
damage related parts of the
High Beam Assist system.
Do not place objects on the
crash pad that reflect light
such as mirrors, white paper,
etc. The system may malfunc-
tion if sunlight is reflected.
(Continued)
(Continued)
At times, the High Beam
Assist may not work properly.
The system is for your con-
venience only. It is the respon-
sibility of the driver for safe
driving practices and always
check the road conditions for
your safety.
When the system does not
operate normally, change the
lamp position manually
between the high beam and
low beam.
OLF044091N
Page 447 of 603
7
Wheel Replacement ........................................................7-39
Tire Traction .....................................................................7-3\
9
Tire Maintenance ............................................................7-40
Tire Sidewall Labeling ....................................................7-40
Tire Terminology and Definitions................................7-44
All Season Tires ...............................................................7-47
Summer Tires ...................................................................7-47
Snow Tires ........................................................................\
7-47
Radial-Ply Tires ...............................................................7-47
Low Aspect Ratio Tires..................................................7-48
Fuses ......................................................................7-\
49
Instrument Panel Fuse Replacement..........................7-50
Engine Compartment Panel Fuse Replacement.......7-51
Fuse/Relay Panel Description ......................................7-53
Light Bulbs ............................................................7-55
Headlamp, Parking Lamp, Turn Signal Lamp
and Side Marker ..............................................................7-55
Daytime Running Light (DRL).......................................7-60
Side Repeater Lamp Replacement ..............................7-61
Rear Combination Light Bulb Replacement ..............7-61
High Mounted Stop Lamp Replacement ....................7-64
License Plate Light Bulb Replacement ......................7-65
Interior Light Bulb Replacement .................................7-65
Appearance Care..................................................7-67
Exterior Care ....................................................................7-67\
Interior Care .....................................................................7-7\
1
Emission Control System ....................................7-74
Crankcase Emission Control System ..........................7-74
Evaporative Emission Control System Including
Onboard Refueling Vapor Recovery (ORVR)............7-74
Exhaust Emission Control System ..............................7-75
California Perchlorate Notice.............................7-78
Page 500 of 603
7-55
7
Maintenance
L
LI
IG
G H
H T
T
B
B U
U L
LB
B S
S
Consult an authorized HYUNDAI
dealer to replace most vehicle light
bulbs. It is difficult to replace vehicle
light bulbs because other parts of the
vehicle must be removed before you
can get to the bulb. This is especially
true for removing the headlamp
assembly to get to the bulb(s).
Removing/installing the headlamp
assembly can result in damage to
the vehicle.
Information
After heavy driving rain or washing,
lamps could appear frosty. This condi-
tion is caused by the temperature dif-
ference between the lamp inside and
the outside temperature. This is simi-
lar to the condensation on your win-
dows inside your vehicle when raining
and doesn 't indicate a problem with
your vehicle. If the water leaks into
the lamp bulb circuitry, have your
vehicle checked by an authorized
HYUNDAI dealer.
Headlamp, Parking Lamp, Turn
Signal Lamp and Side Marker
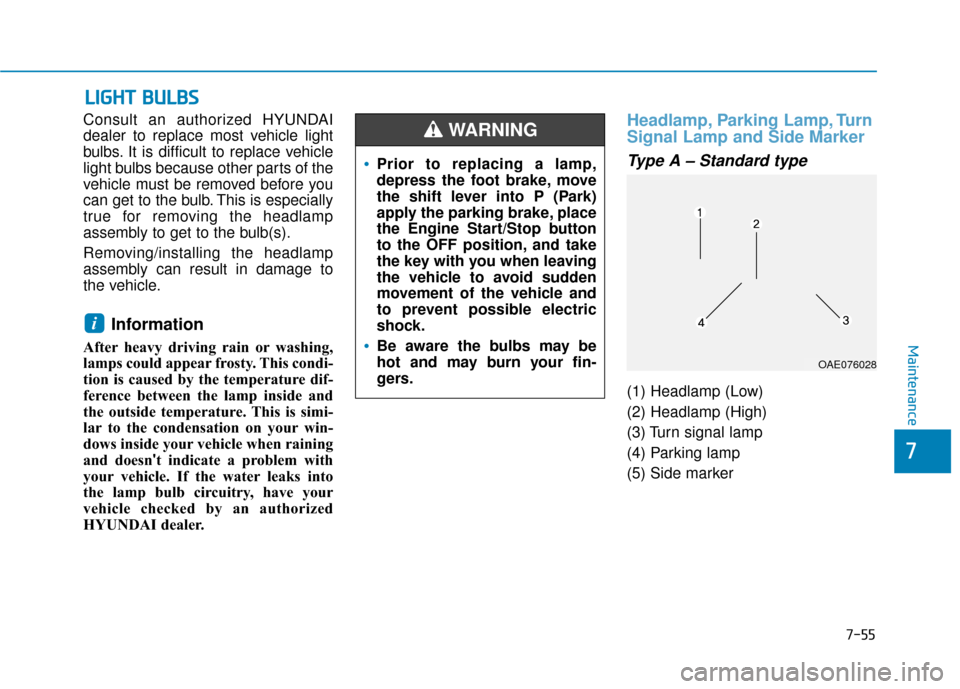
Type A – Standard type
(1) Headlamp (Low)
(2) Headlamp (High)
(3) Turn signal lamp
(4) Parking lamp
(5) Side marker
i
Prior to replacing a lamp,
depress the foot brake, move
the shift lever into P (Park)
apply the parking brake, place
the Engine Start/Stop button
to the OFF position, and take
the key with you when leaving
the vehicle to avoid sudden
movement of the vehicle and
to prevent possible electric
shock.
Be aware the bulbs may be
hot and may burn your fin-
gers.
WARNING
OAE076028
Page 501 of 603
7-56
Maintenance Always handle them carefully, andavoid scratches and abrasions. If
the bulbs are lit, avoid contact with
liquids.
Never touch the glass with bare hands. Residual oil may cause the
bulb to overheat and burst when lit.
A bulb should be operated only when installed in a headlamp.
If a bulb becomes damaged or cracked, replace it immediately
and carefully dispose of it.
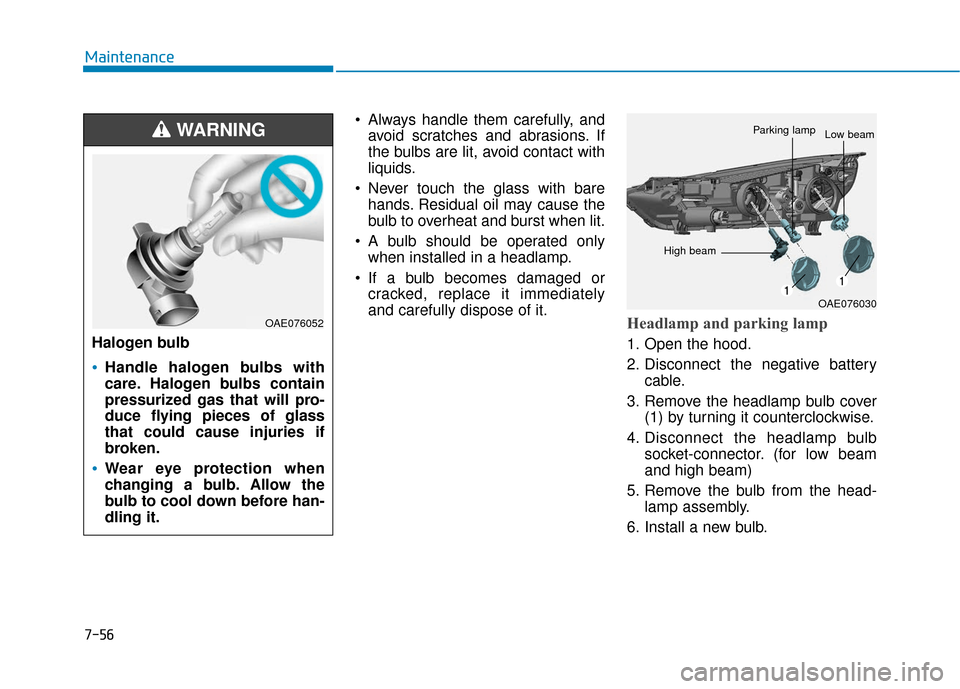
Headlamp and parking lamp
1. Open the hood.
2. Disconnect the negative battery cable.
3. Remove the headlamp bulb cover (1) by turning it counterclockwise.
4. Disconnect the headlamp bulb socket-connector. (for low beam
and high beam)
5. Remove the bulb from the head- lamp assembly.
6. Install a new bulb.
Halogen bulb
Handle halogen bulbs with
care. Halogen bulbs contain
pressurized gas that will pro-
duce flying pieces of glass
that could cause injuries if
broken.
Wear eye protection when
changing a bulb. Allow the
bulb to cool down before han-
dling it.
WARNING
OAE076052
OAE076030
Parking lampLow beam
High beam
Page 502 of 603
7-57
7
Maintenance
7. Connect the headlamp bulb sock-et-connector. (for low beam and
high beam)
8. Install the hbulb cover (1) by turn- ing it clockwise.
Information
The headlamp aiming should be
adjusted after an accident or after the
headlamp assembly is reinstalled at an
authorized HYUNDAI dealer.
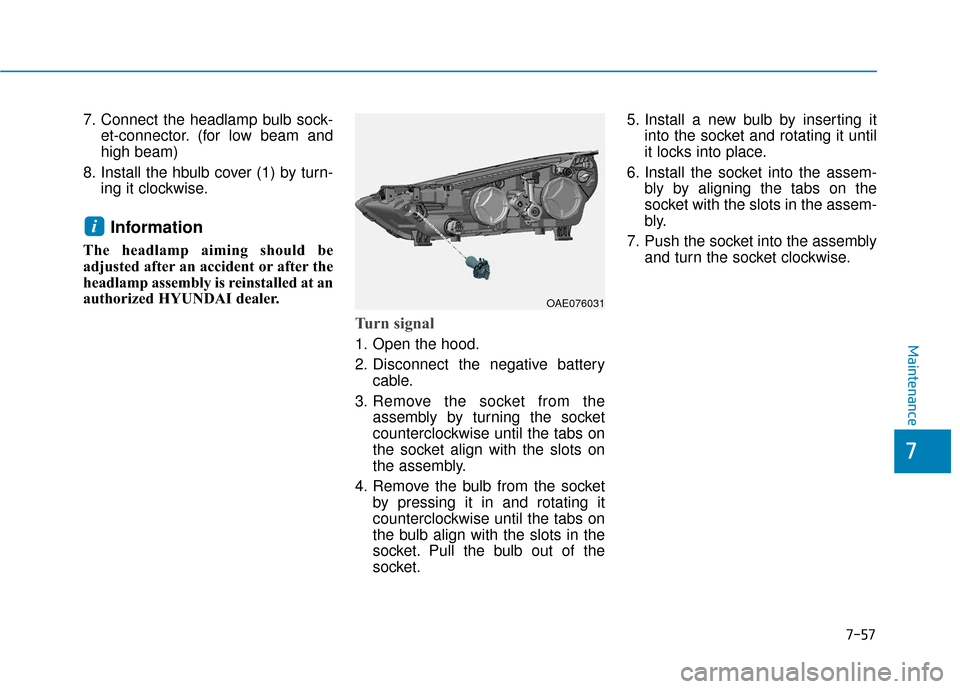
Turn signal
1. Open the hood.
2. Disconnect the negative batterycable.
3. Remove the socket from the assembly by turning the socket
counterclockwise until the tabs on
the socket align with the slots on
the assembly.
4. Remove the bulb from the socket by pressing it in and rotating it
counterclockwise until the tabs on
the bulb align with the slots in the
socket. Pull the bulb out of the
socket. 5. Install a new bulb by inserting it
into the socket and rotating it until
it locks into place.
6. Install the socket into the assem- bly by aligning the tabs on the
socket with the slots in the assem-
bly.
7. Push the socket into the assembly and turn the socket clockwise.
i
OAE076031
Page 503 of 603
7-58
Maintenance
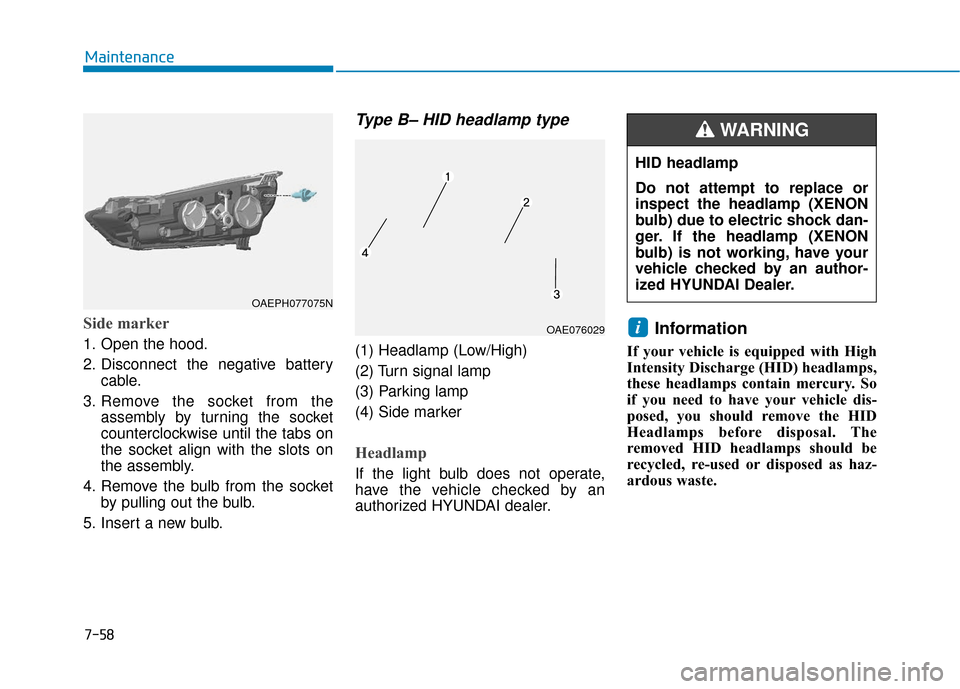
Side marker
1. Open the hood.
2. Disconnect the negative batterycable.
3. Remove the socket from the assembly by turning the socket
counterclockwise until the tabs on
the socket align with the slots on
the assembly.
4. Remove the bulb from the socket by pulling out the bulb.
5. Insert a new bulb.
Type B– HID headlamp type
(1) Headlamp (Low/High)
(2) Turn signal lamp
(3) Parking lamp
(4) Side marker
Headlamp
If the light bulb does not operate,
have the vehicle checked by an
authorized HYUNDAI dealer.
Information
If your vehicle is equipped with High
Intensity Discharge (HID) headlamps,
these headlamps contain mercury. So
if you need to have your vehicle dis-
posed, you should remove the HID
Headlamps before disposal. The
removed HID headlamps should be
recycled, re-used or disposed as haz-
ardous waste.
iOAE076029
HID headlamp
Do not attempt to replace or
inspect the headlamp (XENON
bulb) due to electric shock dan-
ger. If the headlamp (XENON
bulb) is not working, have your
vehicle checked by an author-
ized HYUNDAI Dealer.
WARNING
OAEPH077075N