Page 447 of 555
7-50
Maintenance
Fuse NameFuse RatingProtected Component
MODULE110AData Link Connector, FCA Unit, Driver/Passenger Power Outside Mirror,
Driver/Passenger Smart Key Outside Handle, Driver/Passenger Door Module
DOOR LOCK20ADoor Lock/Unlock Relay, ICM Relay Box (Two Turn Unlcok Relay)
WIPER FRT210AWiper Motor, PCB Block (Front Wiper (Low) Relay) BCM
MODULE67.5ASmart Key Control Module, BCM
S/HEATER RR25ARear Seat Warmer Module
HTD MIRR10ADriver/Passenger Power Outside Mirror, A/C Control Module
RR HTD25ARear Defogger (+) (Upper)
WIPER FRT130AWiper Motor, PCB Block (Front Wiper (Low) Relay), A/C Control Module
Instrument panel fuse panel
Page 449 of 555
7-52
Maintenance
Motor compartment fuse panel
Fuse NameFuse RatingProtected Component
MAIN180AEPCU (Low Voltage DC-DC Converter), E/R Junction Block (Fuse - H/LAMP HI,
POWER OUTLET1, AHB2, AHB1)
MDPS80AMDPS Unit
REAR
HEATED150AE/R Junction Block (Rear Defogger Relay)
BLOWER40AE/R Junction Block (Blower Relay)
B+360AIGPM (Fuse - ARISU (4CH), IPS (1CH/2CH))
B+450AIGPM (Fuse - P/WINDOW LH/RH, TAILGATE OPEN, SUNROOF, AMP, CHARGER, OBC,
S/HEATER FRT, P/SEAT DRV)
C/FAN60AE/R Junction Block (Cooling Fan Relay)
B+260AIGPM (Fuse - S/HEATER RR, ARISU (4CH), IPS (2CH))
IG140AE/R Junction Block (Button Start #1 (ACC) Relay, Button Start #2 (IG1) Relay)
IG240AE/R Junction Block (Button Start #2 (IG2) Relay)
E-SHIFTER40AE/R Junction Block (Fuse - E-SHIFTER2, E-SHIFTER Relay)
B+560APCB Block (Fuse - EPCU1, HORN, B/A HORN, BMS, Main Relay)
Page 450 of 555
7-53
7
Maintenance
Motor compartment fuse panel
Fuse NameFuse RatingProtected Component
B/UP LAMP10AE/R Junction Block (B/UP Lamp Relay), Multipurpose Check Connector
POWER
OUTLET140AE/R Junction Block (Power Outlet Relay)
H/LAMP HI10AE/R Junction Block (Head Lamp (HI) Relay)
AHB130AIBAU, Multipurpose Check Connector
AHB240AIBAU, Multipurpose Check Connector
EPB130AElectric Parking Brake Unit
EPB230AElectric Parking Brake Unit
B+140AIGPM (Fuse - BRAKE SWITCH, MODULE1, DOOR LOCK, PDM1, PDM2,
Fuse Switch, Leak Current Autocut Device)
BATT C/FAN25AE/R Junction Block (Battery C/Fan Relay)
Page 454 of 555

7-57
7
Maintenance
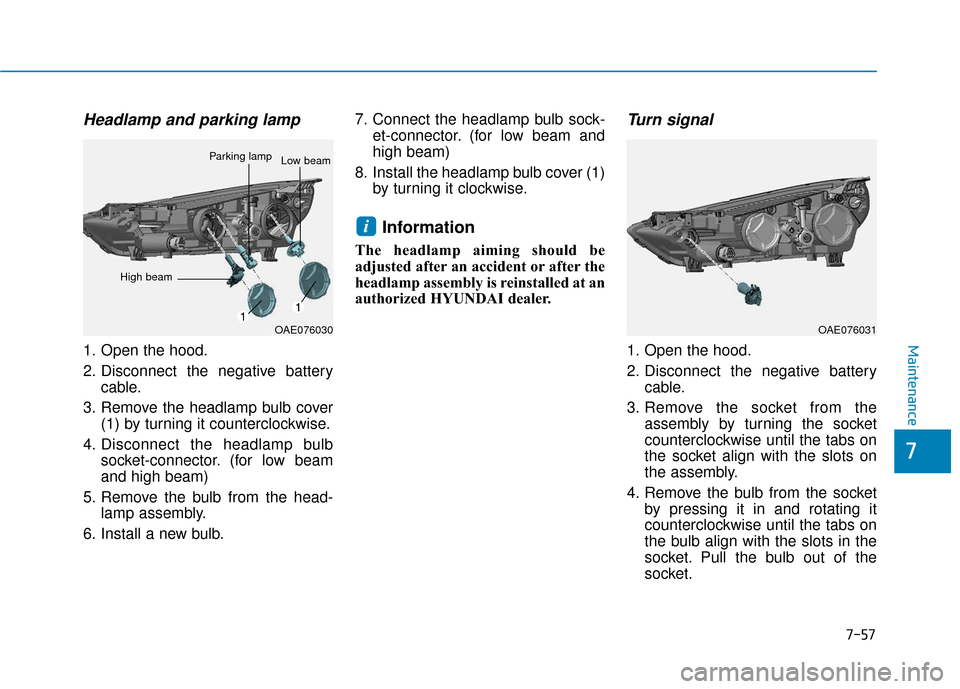
Headlamp and parking lamp
1. Open the hood.
2. Disconnect the negative batterycable.
3. Remove the headlamp bulb cover (1) by turning it counterclockwise.
4. Disconnect the headlamp bulb socket-connector. (for low beam
and high beam)
5. Remove the bulb from the head- lamp assembly.
6. Install a new bulb. 7. Connect the headlamp bulb sock-
et-connector. (for low beam and
high beam)
8. Install the headlamp bulb cover (1) by turning it clockwise.
Information
The headlamp aiming should be
adjusted after an accident or after the
headlamp assembly is reinstalled at an
authorized HYUNDAI dealer.
Turn signal
1. Open the hood.
2. Disconnect the negative batterycable.
3. Remove the socket from the assembly by turning the socket
counterclockwise until the tabs on
the socket align with the slots on
the assembly.
4. Remove the bulb from the socket by pressing it in and rotating it
counterclockwise until the tabs on
the bulb align with the slots in the
socket. Pull the bulb out of the
socket.
i
OAE076030
Parking lampLow beam
OAE076031
High beam
Page 455 of 555
7-58
Maintenance
5. Install a new bulb by inserting it into the socket and rotating it until
it locks into place.
6. Install the socket in the assembly by aligning the tabs on the socket
with the slots in the assembly.
7. Push the socket into the assembly and turn the socket clockwise.
Side marker
1. Open the hood.
2. Disconnect the negative batterycable.
3. Remove the socket from the assembly by turning the socket
counterclockwise until the tabs on
the socket align with the slots on
the assembly.
4. Remove the bulb from the socket by pulling out the bulb.
5. Insert a new bulb. (1) Headlamp (Low)
(2) Headlamp (High)
(3) Parking/Turn signal lamp
(4) Side marker
■ Type B - LED type
Page 457 of 555
7-60
Maintenance
Headlamp (High)
1. Open the hood.
2. Disconnect the negative batterycable.
3. Remove the headlamp bulb cover (1) by turning it counterclockwise.
4. Disconnect the headlamp bulb socket-connector.
5. Remove the bulb from the head- lamp assembly.
6. Install a new bulb.
7. Connect the headlamp bulb sock- et-connector.
8. Install the headlamp bulb cover (1) by turning it clockwise.
Information
The headlamp aiming should be
adjusted after an accident or after the
headlamp assembly is reinstalled at an
authorized HYUNDAI dealer.
Daytime Running Light (DRL)
Your vehicle is equipped with LED
lamps. LED lamps do not have
replaceable bulbs. If the LED lamp
does not operate, have the vehicle
checked by an authorized HYUNDAI
dealer.
i
OAEE076030NOAEE076039
Page 459 of 555

7-62
Maintenance
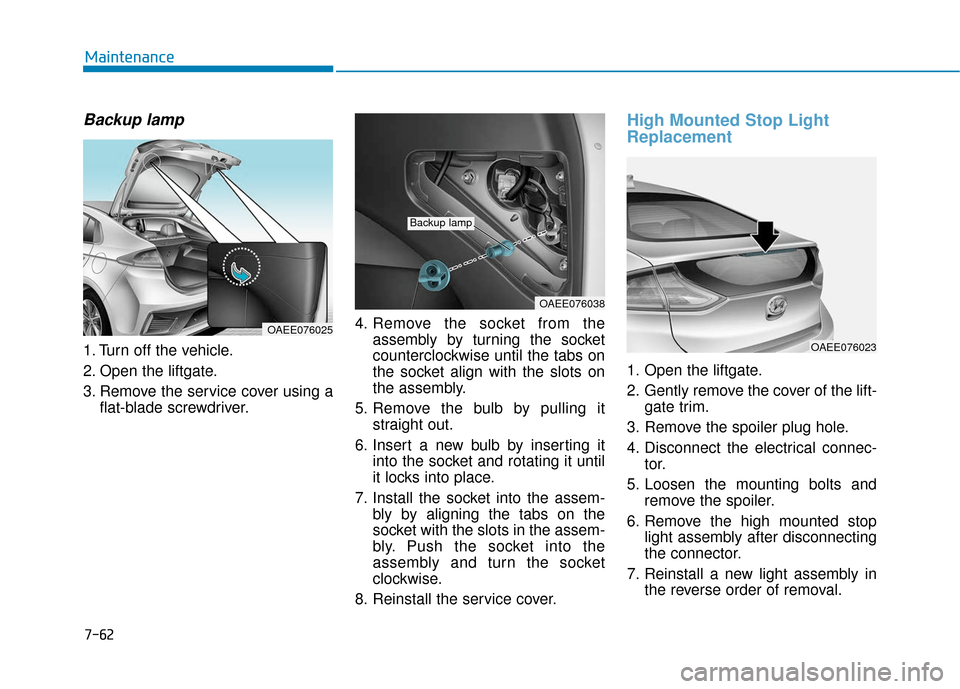
Backup lamp
1. Turn off the vehicle.
2. Open the liftgate.
3. Remove the service cover using aflat-blade screwdriver. 4. Remove the socket from the
assembly by turning the socket
counterclockwise until the tabs on
the socket align with the slots on
the assembly.
5. Remove the bulb by pulling it straight out.
6. Insert a new bulb by inserting it into the socket and rotating it until
it locks into place.
7. Install the socket into the assem- bly by aligning the tabs on the
socket with the slots in the assem-
bly. Push the socket into the
assembly and turn the socket
clockwise.
8. Reinstall the service cover.
High Mounted Stop Light
Replacement
1. Open the liftgate.
2. Gently remove the cover of the lift- gate trim.
3. Remove the spoiler plug hole.
4. Disconnect the electrical connec- tor.
5. Loosen the mounting bolts and remove the spoiler.
6. Remove the high mounted stop light assembly after disconnecting
the connector.
7. Reinstall a new light assembly in the reverse order of removal.
OAEE076038
Backup lamp
OAEE076023
OAEE076025
Page 478 of 555
8-8
Specifications, Consumer information and Reporting safety defects
The tires supplied on your new vehi-
cle are chosen to provide the best
performance for normal driving.
The tire label located on the driver’s
side center pillar gives the tire pres-
sures recommended for your car. The motor number is stamped on the
motor block as shown in the drawing.
The motor number can be seen from
under the vehicle.
The refrigerant label provides infor-
mation such as refrigerant type and
amount.
The label is located on the underside
of the hood.
M M
O
OT
TO
O R
R
N
N U
U M
M B
BE
ER
R R
RE
EF
FR
R I
IG
G E
ER
R A
A N
N T
T
L
L A
A B
BE
EL
L
(
( I
IF
F
E
E Q
Q U
UI
IP
P P
PE
ED
D )
)
T
T
I
IR
R E
E
S
S P
P E
EC
CI
IF
F I
IC
C A
A T
TI
IO
O N
N
A
A N
N D
D
P
P R
R E
ES
SS
SU
U R
RE
E
L
L A
A B
BE
EL
L
OAE086002LOAEE086005N
OAEE086001