Page 592 of 659
7-79
7
Maintenance
Engine compartment fuse panel
Fuse No.Fuse NameSymbolFuse RatingCircuit Protected
F37SENSOR 2S210ACamshaft Position Sensor #1/#2, Purge Control Solenoid Valve,
Oil Control Valve #1/#2, Variable Intake Solenoid Valve,
E/R Junction Block (RLY.1, RLY.2)
F38ECU 2E210AECM
F39ECU 1E120AECM
F40INJECTORINJECTOR15AInjector #1/#2/#3/#4
F41SENSOR 1S115AOxygen Sensor (Up), Oxygen Sensor (Down)
F42IGNITION
COILIGN
COIL20AIgnition Coil #1/#2/#3/#4, Condenser
F43ECU 3E 315AECM
F44A/CON10A-
F45ECU 5E510AECM
F46SENSOR 4S415A-
F47ABS 3310AABS/ESP Control Module, Multipurpose Check Connector
■ Kappa 1.4 MPI
Page 594 of 659
7-81
7
Maintenance
Engine compartment fuse panel
■ Gamma 1.6 MPI
Fuse No.Fuse NameSymbolFuse RatingCircuit Protected
F42IGNITION
COILIGN
COIL20AIgnition Coil #1/#2/#3/#4, Condenser
F43ECU 3E 315AECM/PCM
F44A/CON10A-
F45ECU 5E510AECM/PCM
F46SENSOR 4S415A-
F47ABS 3310AABS/ESP Control Module, Multipurpose Check Connector
F48TCU 2T215ATransaxle Range Switch, E/R Junction Block (Fuse : F34)
F49SENSOR 3S310AE/R Junction Block (RLY.7)
F50ECU 4E415AECM/PCM
F51WIPER25AWiper Relay
F52HORN15AHorn Relay
Page 596 of 659
7-83
7
Maintenance
Fuse No.Fuse NameSymbolFuse RatingCircuit Protected
F47ABS 3310AABS/ESP Control Module, Multipurpose Check Connector
F48TCU 2T215ATCM, Transaxle Range Switch, E/R Junction Block (Fuse : F34)
F49SENSOR 3S310AAir Flow Sensor, Rail Pressure Control Valve, Camshaft Position Sensor,
Oil Pressure Valve, E/R Junction Block (RLY.7)
F50ECU 4E415A-
F51WIPER25AWiper Relay
F52HORN15AHorn Relay
Engine compartment fuse panel
■ U-II 1.6 TCI
Page 600 of 659
7-87
7
Maintenance
Headlamp and position lamp
1. Open the hood.
2. Disconnect the negative batterycable.
3. Remove the bulb cover by turning it counterclockwise. 4. Disconnect the bulb socket-con-
nector. (for low beam and high
beam)
5. Remove the bulb from the head- lamp assembly.
6. Install a new bulb.
7. Connect the bulb socket-connec- tor. (for low beam and high beam)
8. Install the bulb cover by turning it clockwise.
Turn signal lamp
1. Open the hood.
2. Disconnect the negative batterycable.
3.Remove the socket from the assembly by turning the socket
counterclockwise until the tabs on
the socket align with the slots on
the assembly.
4.Remove the bulb from the socket by pressing it in and rotating it
counterclockwise until the tabs on
the bulb align with the slots in the
socket. Pull the bulb out of the
socket.
OPDE076076
OPDE076075
■ Position lamp
■High/Low beam
High
Low
OPDE076077
Page 601 of 659

7-88
Maintenance
5.Insert a new bulb by inserting it into the socket and rotating it until it
locks into place.
6.Install the socket in the assembly by aligning the tabs on the socket
with the slots in the assembly.
7.Push the socket into the assembly and turn the socket clockwise.
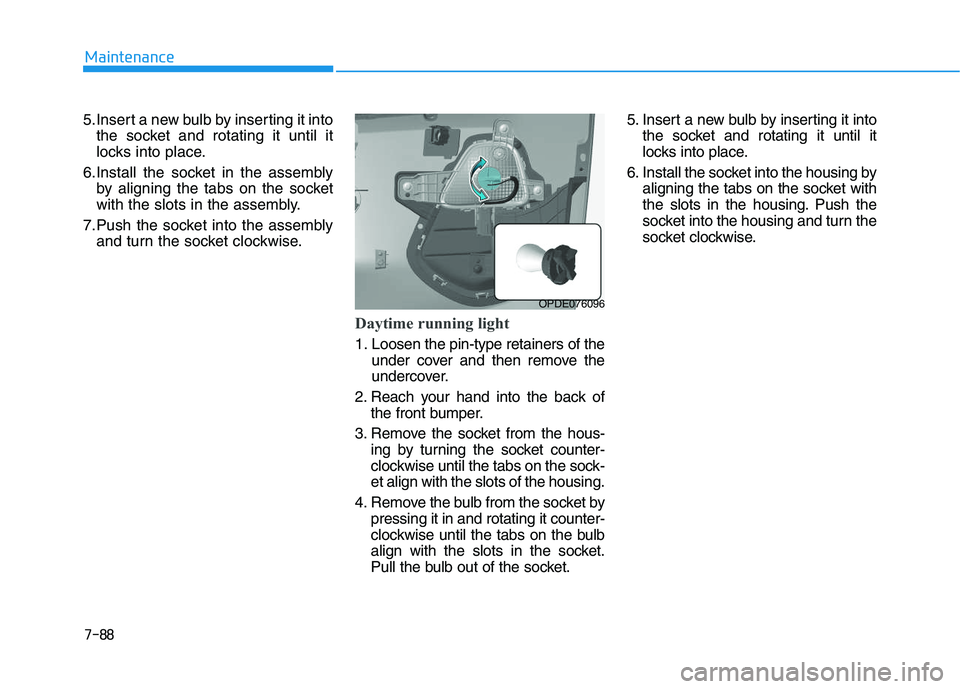
Daytime running light
1. Loosen the pin-type retainers of the under cover and then remove the
undercover.
2. Reach your hand into the back of the front bumper.
3. Remove the socket from the hous- ing by turning the socket counter-
clockwise until the tabs on the sock-
et align with the slots of the housing.
4. Remove the bulb from the socket by pressing it in and rotating it counter-
clockwise until the tabs on the bulb
align with the slots in the socket.
Pull the bulb out of the socket. 5. Insert a new bulb by inserting it into
the socket and rotating it until it
locks into place.
6. Install the socket into the housing by aligning the tabs on the socket with
the slots in the housing. Push the
socket into the housing and turn the
socket clockwise.
OPDE076096
Page 603 of 659

7-90
Maintenance
2. Disconnect the negative battery cable.
3. Remove the bulb cover by turning it counterclockwise.
4. Disconnect the bulb socket-con- nector.
5. Remove the bulb from the head- lamp assembly.
6. Install a new bulb.
7. Connect the bulb socket-connec- tor.
8. Install the bulb cover by turning it clockwise.
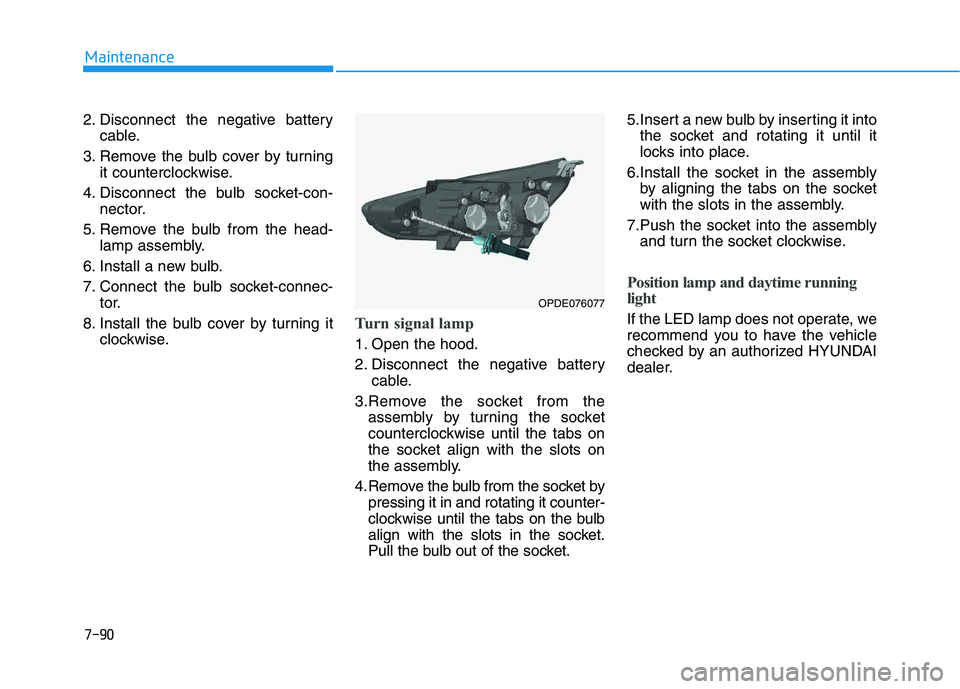
Turn signal lamp
1. Open the hood.
2. Disconnect the negative batterycable.
3.Remove the socket from the assembly by turning the socket
counterclockwise until the tabs on
the socket align with the slots on
the assembly.
4.Remove the bulb from the socket by pressing it in and rotating it counter-
clockwise until the tabs on the bulb
align with the slots in the socket.
Pull the bulb out of the socket. 5.Insert a new bulb by inserting it into
the socket and rotating it until it
locks into place.
6.Install the socket in the assembly by aligning the tabs on the socket
with the slots in the assembly.
7.Push the socket into the assembly and turn the socket clockwise.
Position lamp and daytime running
light
If the LED lamp does not operate, we
recommend you to have the vehicle
checked by an authorized HYUNDAI
dealer.
OPDE076077
Page 604 of 659

7-91
7
Maintenance
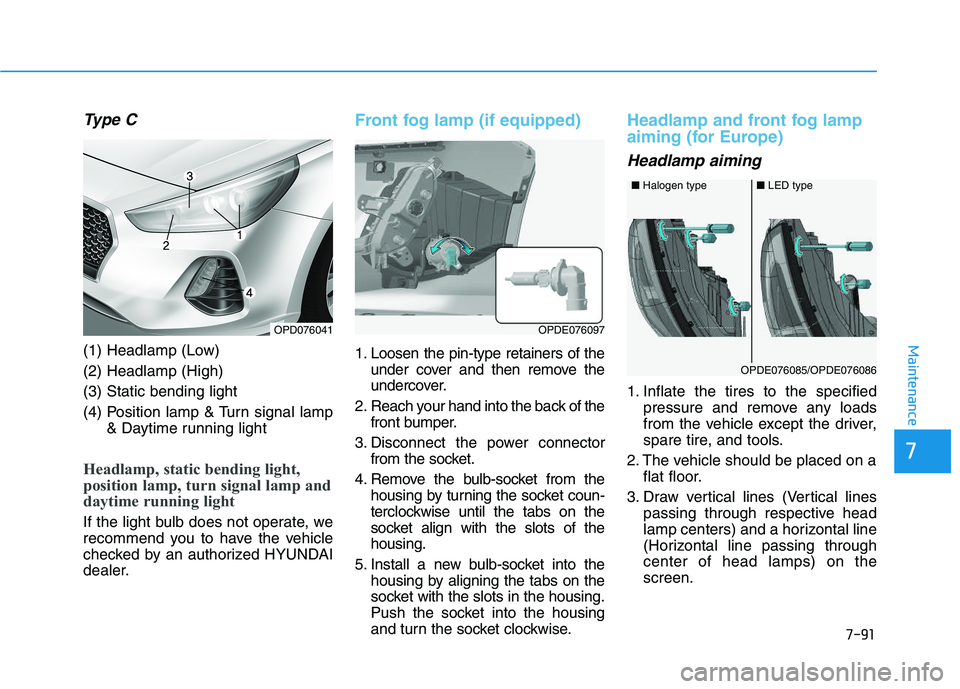
Type C
(1) Headlamp (Low)
(2) Headlamp (High)
(3) Static bending light
(4) Position lamp & Turn signal lamp& Daytime running light
Headlamp, static bending light,
position lamp, turn signal lamp and
daytime running light
If the light bulb does not operate, we
recommend you to have the vehicle
checked by an authorized HYUNDAI
dealer.
Front fog lamp (if equipped)
1. Loosen the pin-type retainers of theunder cover and then remove the
undercover.
2. Reach your hand into the back of the front bumper.
3. Disconnect the power connector from the socket.
4. Remove the bulb-socket from the housing by turning the socket coun-
terclockwise until the tabs on the
socket align with the slots of the
housing.
5. Install a new bulb-socket into the housing by aligning the tabs on the
socket with the slots in the housing.
Push the socket into the housing
and turn the socket clockwise.
Headlamp and front fog lamp
aiming (for Europe)
Headlamp aiming
1. Inflate the tires to the specified pressure and remove any loads
from the vehicle except the driver,
spare tire, and tools.
2. The vehicle should be placed on a flat floor.
3. Draw vertical lines (Vertical lines passing through respective head
lamp centers) and a horizontal line
(Horizontal line passing through
center of head lamps) on the
screen.
OPDE076097
■Halogen type■LED type
OPDE076085/OPDE076086
OPD076041
Page 610 of 659
7-97
7
Maintenance
Side repeater lamp replace-
ment
Type A
If the light bulb does not operate, we
recommend you to have the vehicle
checked by an authorized HYUNDAI
dealer.
Type B
1.Remove the lamp assembly fromthe vehicle by prying the lens and
pulling the assembly out.
2.Disconnect the bulb electrical con- nector.
3.Separate the socket and the lens parts by turning the socket coun-
terclockwise until the tabs on the
socket align with the slots on the
lens part.
4.Remove the bulb by pulling it straight out.
5.Insert a new bulb in the socket. 6.Reassemble the socket and the
lens part.
7.Connect the bulb electrical con- nector.
8.Reinstall the lamp assembly to the body of the vehicle.
OPDE076079
OPD076044