Page 601 of 659

7-88
Maintenance
5.Insert a new bulb by inserting it into the socket and rotating it until it
locks into place.
6.Install the socket in the assembly by aligning the tabs on the socket
with the slots in the assembly.
7.Push the socket into the assembly and turn the socket clockwise.
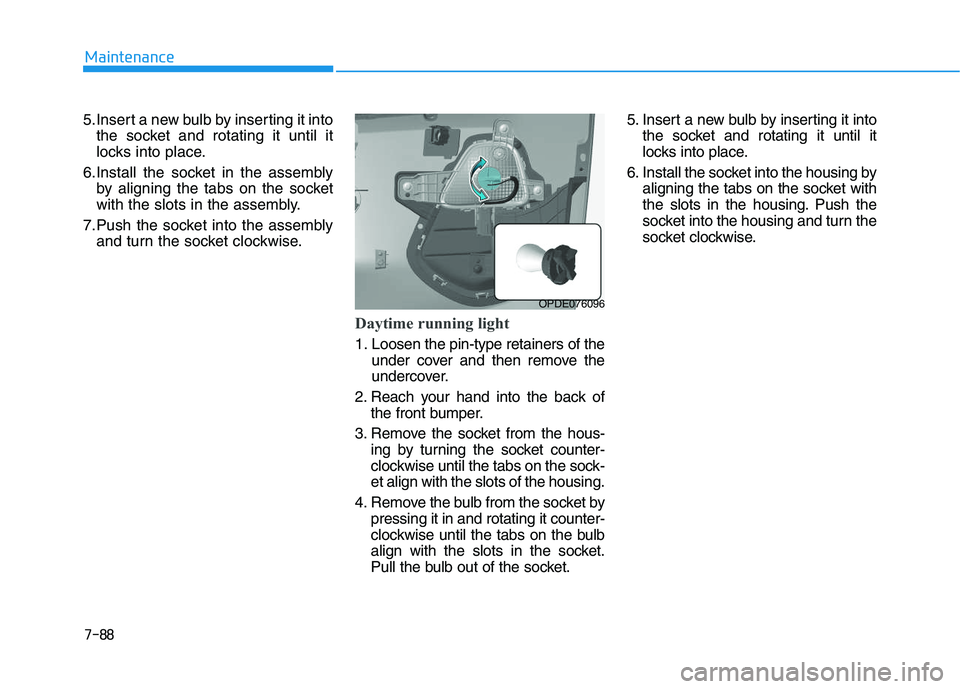
Daytime running light
1. Loosen the pin-type retainers of the under cover and then remove the
undercover.
2. Reach your hand into the back of the front bumper.
3. Remove the socket from the hous- ing by turning the socket counter-
clockwise until the tabs on the sock-
et align with the slots of the housing.
4. Remove the bulb from the socket by pressing it in and rotating it counter-
clockwise until the tabs on the bulb
align with the slots in the socket.
Pull the bulb out of the socket. 5. Insert a new bulb by inserting it into
the socket and rotating it until it
locks into place.
6. Install the socket into the housing by aligning the tabs on the socket with
the slots in the housing. Push the
socket into the housing and turn the
socket clockwise.
OPDE076096
Page 602 of 659
7-89
7
Maintenance
Type B
(1) Headlamp (High)
(2) Headlamp (Low)
(3) Turn signal lamp
(4) Position lamp & Daytime running light
(5) Static bending light
• Always handle them carefully, andavoid scratches and abrasions. If
the bulbs are lit, avoid contact with
liquids.
Never touch the glass with bare hands. Residual oil may cause the
bulb to overheat and burst when lit. A bulb should be operated only
when installed in a headlamp.
If a bulb becomes damaged or cracked, replace it immediately
and carefully dispose of it.
Headlamp lamp and static bending
light
1. Open the hood.
OPDE076076
■
High/Low beam
High
Low
OPDE076090
■
Static bending light
OPD076042Handle halogen bulbs with
care. Halogen bulbs contain
pressurized gas that will pro-
duce flying pieces of glass that
could cause injuries if broken.
Wear eye protection when
changing a bulb. Allow the bulb
to cool down before handling it.
WARNING
OLMB073042L
Page 604 of 659

7-91
7
Maintenance
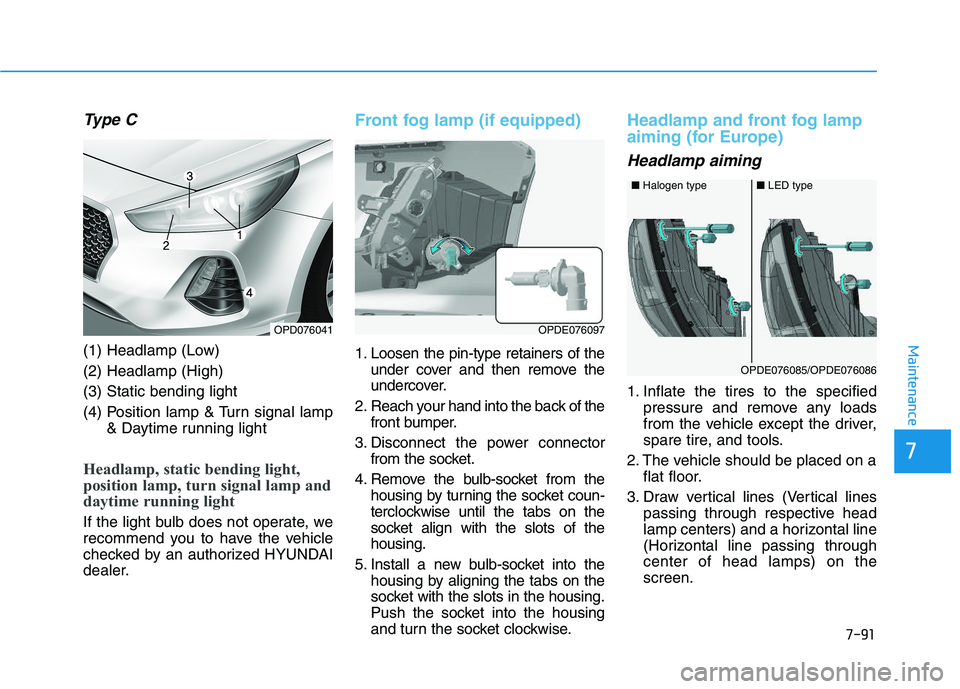
Type C
(1) Headlamp (Low)
(2) Headlamp (High)
(3) Static bending light
(4) Position lamp & Turn signal lamp& Daytime running light
Headlamp, static bending light,
position lamp, turn signal lamp and
daytime running light
If the light bulb does not operate, we
recommend you to have the vehicle
checked by an authorized HYUNDAI
dealer.
Front fog lamp (if equipped)
1. Loosen the pin-type retainers of theunder cover and then remove the
undercover.
2. Reach your hand into the back of the front bumper.
3. Disconnect the power connector from the socket.
4. Remove the bulb-socket from the housing by turning the socket coun-
terclockwise until the tabs on the
socket align with the slots of the
housing.
5. Install a new bulb-socket into the housing by aligning the tabs on the
socket with the slots in the housing.
Push the socket into the housing
and turn the socket clockwise.
Headlamp and front fog lamp
aiming (for Europe)
Headlamp aiming
1. Inflate the tires to the specified pressure and remove any loads
from the vehicle except the driver,
spare tire, and tools.
2. The vehicle should be placed on a flat floor.
3. Draw vertical lines (Vertical lines passing through respective head
lamp centers) and a horizontal line
(Horizontal line passing through
center of head lamps) on the
screen.
OPDE076097
■Halogen type■LED type
OPDE076085/OPDE076086
OPD076041
Page 606 of 659
7-93
7
Maintenance
Unit: mm (in)
Aiming point
H1 : Height between the head lamp bulb center and ground (Low beam)
H2 : Height between the head lamp bulb center and ground (High beam)
H3 : Height between the fog lamp bulb center and ground
W1 : Distance between the two head lamp bulbs centers (Low beam)
W2 : Distance between the two head lamp bulbs centers (High beam)
W3 : Distance between the two fog lamp bulbs centers
OPDE076081
Vehicle
condition Lamp type H1 H2 H3 W1 W2 W3
Without driver Halogen 681 (26.81) 645 (25.39)
344 (13.54)1,440 (56.69) 1,218 (47.95)
1,484 (58.42)
LED 677 (26.65) 631 (24.84) 1,385 (54.52) 1,114 (43.85)
With driver Halogen 676 (26.61) 640 (25.19)
339 (13.34)1,440 (56.69) 1,218 (47.95)
LED 672 (26.45) 626 (24.64) 1,385 (54.52) 1,114 (43.85)
Page 610 of 659
7-97
7
Maintenance
Side repeater lamp replace-
ment
Type A
If the light bulb does not operate, we
recommend you to have the vehicle
checked by an authorized HYUNDAI
dealer.
Type B
1.Remove the lamp assembly fromthe vehicle by prying the lens and
pulling the assembly out.
2.Disconnect the bulb electrical con- nector.
3.Separate the socket and the lens parts by turning the socket coun-
terclockwise until the tabs on the
socket align with the slots on the
lens part.
4.Remove the bulb by pulling it straight out.
5.Insert a new bulb in the socket. 6.Reassemble the socket and the
lens part.
7.Connect the bulb electrical con- nector.
8.Reinstall the lamp assembly to the body of the vehicle.
OPDE076079
OPD076044
Page 611 of 659
7-98
Maintenance
Rear combination lamp bulb
replacement
Type A
(1) Stop/Tail lamp
(2) Turn signal lamp
(3) Tail lamp
(4) Backup lamp
Stop/Tail lamp and turn signal lamp
1. Turn off the engine.
2. Open the tailgate.
3. Open the lamp assembly retainingscrew covers.
4. Loosen the lamp assembly retain- ing screws with a cross-tip screw-
driver. 5. Remove the rear combination
lamp assembly from the body of
the vehicle.
OPD076048
OPD076045
OPD076047
Page 613 of 659
7-100
Maintenance
4. Remove the socket from the assembly by turning the socket
counterclockwise until the tabs on
the socket align with the slots on
the assembly.
5. Remove the bulb by pulling it straight out.
6. Insert a new bulb by inserting it into the socket and rotating it until
it locks into place.
7. Install the socket into the assembly by aligning the tabs on the socket
with the slots in the assembly.
Push the socket into the assembly
and turn the socket clockwise.
8. Reinstall the service cover.
Type B
(1) Stop/Tail lamp
(2) Turn signal lamp
(3) Backup lamp
Stop/Tail lamp
If the LED lamp does not operate,
have the vehicle checked by an
authorized HYUNDAI dealer.
Turn signal lamp
1. Turn off the engine.
2. Open the tailgate.
3. Open the lamp assembly retaining screw covers.
4. Loosen the lamp assembly retain- ing screws with a cross-tip screw-
driver.
OPD076046
OPD076052
Backup lamp
Tail lamp
OPD076047
Page 615 of 659

7-102
Maintenance
4. Remove the bulb by pulling it straight out.
5. Insert a new bulb by inserting it into the socket and rotating it until
it locks into place.
6. Install the socket into the assembly by aligning the tabs on the socket
with the slots in the assembly.
Push the socket into the assembly
and turn the socket clockwise.
7. Reinstall the service cover.
Rear fog lamp
1. Loosen the pin-type retainers and screws of the rear wheel guard and
then detach it from the rear bumper.
2. Reach your hand into the back of the rear bumper.
3. Remove the socket from the hous- ing by turning the socket counter-
clockwise until the tabs on the sock-
et align with the slots of the housing.
4. Remove the bulb from the socket by pressing it in and rotating it counter-
clockwise until the tabs on the bulb
align with the slots in the socket.
Pull the bulb out of the socket. 5. Insert a new bulb by inserting it into
the socket and rotating it until it
locks into place.
6. Install the socket into the housing by aligning the tabs on the socket with
the slots in the housing. Push the
socket into the housing and turn the
socket clockwise.
OPD076053
Backup lamp
OPDE076095