Page 302 of 534
5-61
Driving your vehicle
5
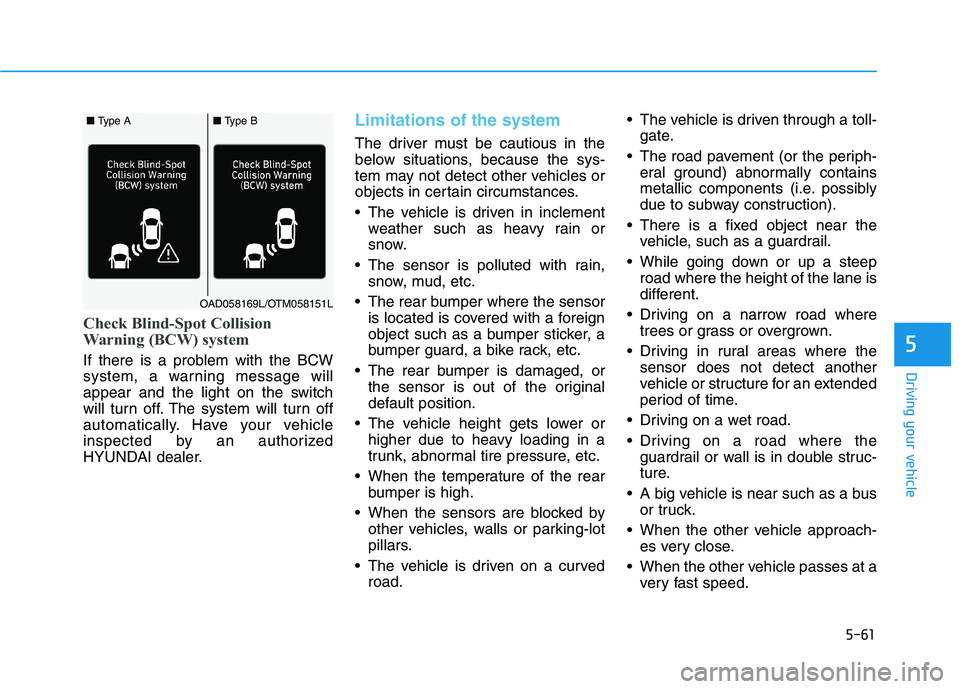
Check Blind-Spot Collision
Warning (BCW) system
If there is a problem with the BCW
system, a warning message will
appear and the light on the switch
will turn off. The system will turn off
automatically. Have your vehicle
inspected by an authorized
HYUNDAI dealer.
Limitations of the system
The driver must be cautious in the
below situations, because the sys-
tem may not detect other vehicles or
objects in certain circumstances.
The vehicle is driven in inclementweather such as heavy rain or
snow.
The sensor is polluted with rain, snow, mud, etc.
The rear bumper where the sensor is located is covered with a foreign
object such as a bumper sticker, a
bumper guard, a bike rack, etc.
The rear bumper is damaged, or the sensor is out of the original
default position.
The vehicle height gets lower or higher due to heavy loading in a
trunk, abnormal tire pressure, etc.
When the temperature of the rear bumper is high.
When the sensors are blocked by other vehicles, walls or parking-lot
pillars.
The vehicle is driven on a curved road. The vehicle is driven through a toll-
gate.
The road pavement (or the periph- eral ground) abnormally contains
metallic components (i.e. possibly
due to subway construction).
There is a fixed object near the vehicle, such as a guardrail.
While going down or up a steep road where the height of the lane is
different.
Driving on a narrow road where trees or grass or overgrown.
Driving in rural areas where the sensor does not detect another
vehicle or structure for an extended
period of time.
Driving on a wet road.
Driving on a road where the guardrail or wall is in double struc-
ture.
A big vehicle is near such as a bus or truck.
When the other vehicle approach- es very close.
When the other vehicle passes at a very fast speed.
OAD058169L/OTM058151L
■ Type A■ Type B
Page 311 of 534
5-70
Driving your vehicle
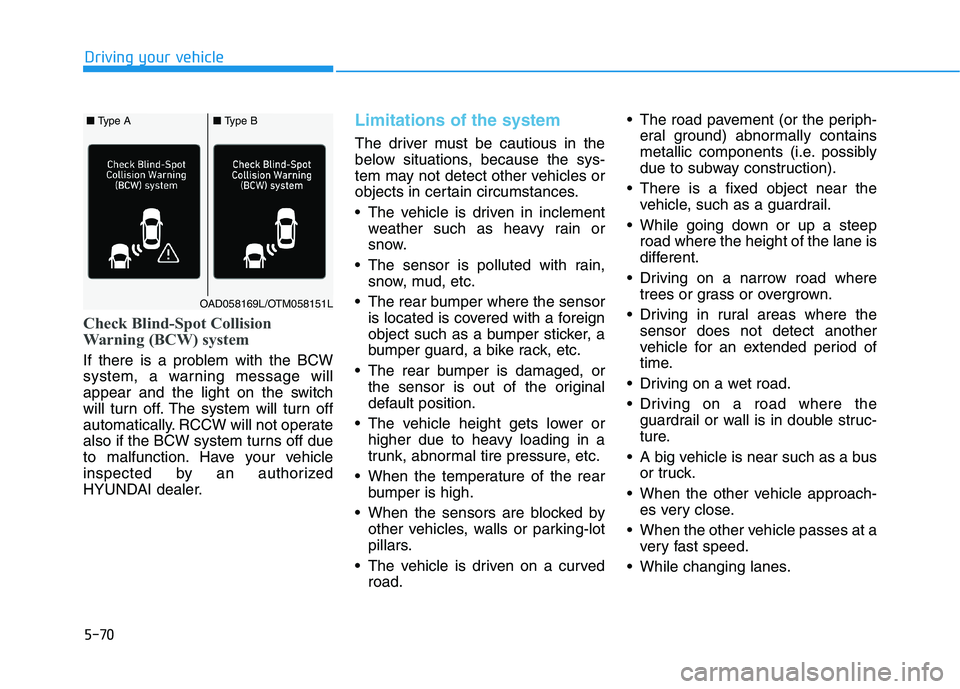
Check Blind-Spot Collision
Warning (BCW) system
If there is a problem with the BCW
system, a warning message will
appear and the light on the switch
will turn off. The system will turn off
automatically. RCCW will not operate
also if the BCW system turns off due
to malfunction. Have your vehicle
inspected by an authorized
HYUNDAI dealer.
Limitations of the system
The driver must be cautious in the
below situations, because the sys-
tem may not detect other vehicles or
objects in certain circumstances.
The vehicle is driven in inclementweather such as heavy rain or
snow.
The sensor is polluted with rain, snow, mud, etc.
The rear bumper where the sensor is located is covered with a foreign
object such as a bumper sticker, a
bumper guard, a bike rack, etc.
The rear bumper is damaged, or the sensor is out of the original
default position.
The vehicle height gets lower or higher due to heavy loading in a
trunk, abnormal tire pressure, etc.
When the temperature of the rear bumper is high.
When the sensors are blocked by other vehicles, walls or parking-lot
pillars.
The vehicle is driven on a curved road. The road pavement (or the periph-
eral ground) abnormally contains
metallic components (i.e. possibly
due to subway construction).
There is a fixed object near the vehicle, such as a guardrail.
While going down or up a steep road where the height of the lane is
different.
Driving on a narrow road where trees or grass or overgrown.
Driving in rural areas where the sensor does not detect another
vehicle for an extended period of
time.
Driving on a wet road.
Driving on a road where the guardrail or wall is in double struc-
ture.
A big vehicle is near such as a bus or truck.
When the other vehicle approach- es very close.
When the other vehicle passes at a very fast speed.
While changing lanes.
OAD058169L/OTM058151L
■ Type A■ Type B
Page 421 of 534
6-32
What to do in an emergency
Removable Towing Hook
1. Open the trunk, and remove thetowing hook from the tool case. 2. Remove the hole cover pressing
the lower part of the cover on the
front bumper.
3. Install the towing hook by turning it clockwise into the hole until it isfully secured.
4. Remove the towing hook and install the cover after use.
Emergency Towing
If towing is necessary, we recom-
mend you have it done by an author-
ized HYUNDAI dealer or a commer-
cial tow truck service.
If towing service is not available in an
emergency, your vehicle may be
temporarily towed using a cable or
chain secured to the emergency tow-
ing hook at the front of the vehicle.
Use extreme caution when towing
the vehicle with a cable or chain. A
driver must be in the vehicle to steer
it and operate the brakes.
OAD068041N
OAD068018N
■Front
OAD068019N
Page 485 of 534
7-60
Maintenance
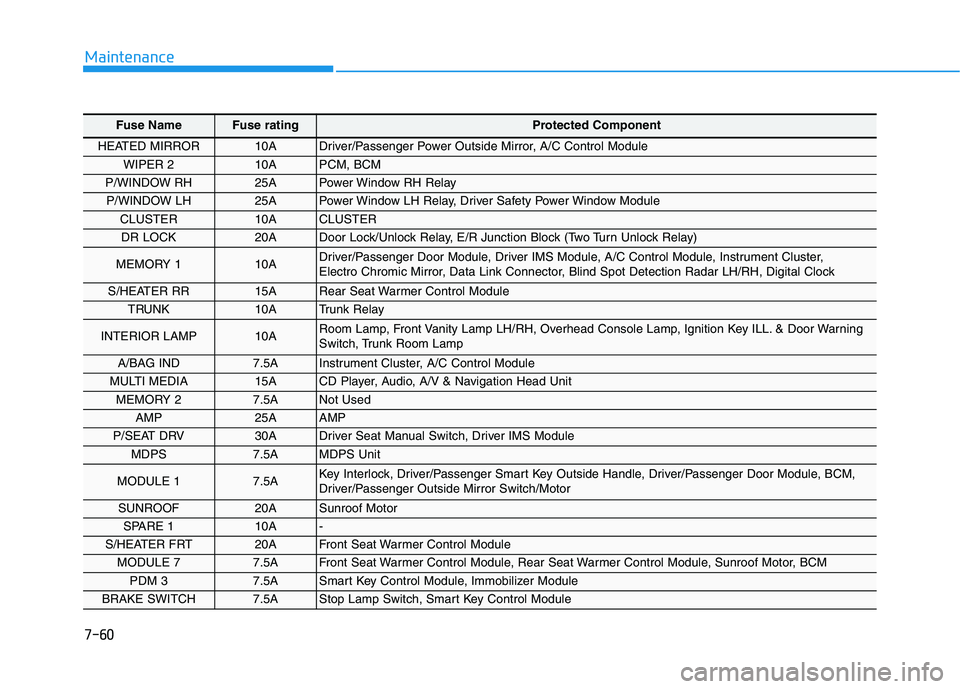
Fuse Name Fuse rating Protected Component
HEATED MIRROR 10A Driver/Passenger Power Outside Mirror, A/C Control Module
WIPER 2 10A PCM, BCM
P/WINDOW RH 25A Power Window RH Relay
P/WINDOW LH 25A Power Window LH Relay, Driver Safety Power Window Module
CLUSTER 10A CLUSTER
DR LOCK 20A Door Lock/Unlock Relay, E/R Junction Block (Two Turn Unlock Relay)
MEMORY 1 10A Driver/Passenger Door Module, Driver IMS Module, A/C Control Module, Instrument Cluster,
Electro Chromic Mirror, Data Link Connector, Blind Spot Detection Radar LH/RH, Digital Clock
S/HEATER RR 15A Rear Seat Warmer Control Module
TRUNK 10A Trunk Relay
INTERIOR LAMP 10A Room Lamp, Front Vanity Lamp LH/RH, Overhead Console Lamp, Ignition Key ILL. & Door Warning
Switch, Trunk Room Lamp
A/BAG IND 7.5A Instrument Cluster, A/C Control Module
MULTI MEDIA 15A CD Player, Audio, A/V & Navigation Head Unit
MEMORY 2 7.5A Not Used
AMP 25A AMP
P/SEAT DRV 30A Driver Seat Manual Switch, Driver IMS Module
MDPS 7.5A MDPS Unit
MODULE 1 7.5A Key Interlock, Driver/Passenger Smart Key Outside Handle, Driver/Passenger Door Module, BCM,
Driver/Passenger Outside Mirror Switch/Motor
SUNROOF 20A Sunroof Motor
SPARE 1 10A -
S/HEATER FRT 20A Front Seat Warmer Control Module
MODULE 7 7.5A Front Seat Warmer Control Module, Rear Seat Warmer Control Module, Sunroof Motor, BCM
PDM 3 7.5A Smart Key Control Module, Immobilizer Module
BRAKE SWITCH 7.5A Stop Lamp Switch, Smart Key Control Module
Page 488 of 534
7-63
7
Maintenance
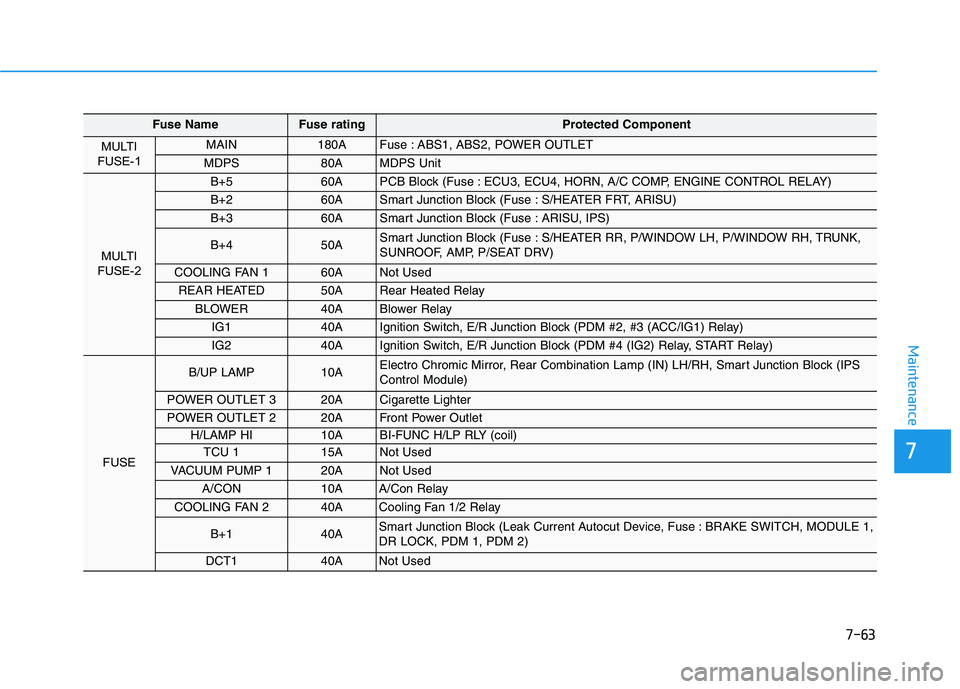
Fuse NameFuse rating Protected Component
MULTI
FUSE-1 MAIN 180A Fuse : ABS1, ABS2, POWER OUTLET
MDPS 80A MDPS Unit
MULTI
FUSE-2
B+5 60A PCB Block (Fuse : ECU3, ECU4, HORN, A/C COMP, ENGINE CONTROL RELAY)
B+2 60A Smart Junction Block (Fuse : S/HEATER FRT, ARISU)
B+3 60A Smart Junction Block (Fuse : ARISU, IPS)
B+4 50A Smart Junction Block (Fuse : S/HEATER RR, P/WINDOW LH, P/WINDOW RH, TRUNK,
SUNROOF, AMP, P/SEAT DRV)
COOLING FAN 1 60A Not Used
REAR HEATED 50A Rear Heated Relay
BLOWER 40A Blower Relay
IG1 40A Ignition Switch, E/R Junction Block (PDM #2, #3 (ACC/IG1) Relay)
IG2 40A Ignition Switch, E/R Junction Block (PDM #4 (IG2) Relay, START Relay)
FUSE
B/UP LAMP 10A Electro Chromic Mirror, Rear Combination Lamp (IN) LH/RH, Smart Junction Block (IPS Control Module)
POWER OUTLET 3 20A Cigarette Lighter
POWER OUTLET 2 20A Front Power Outlet
H/LAMP HI 10A BI-FUNC H/LP RLY (coil)
TCU 1 15A Not Used
VACUUM PUMP 1 20A Not Used
A/CON 10A A/Con Relay
COOLING FAN 2 40A Cooling Fan 1/2 Relay
B+1 40A Smart Junction Block (Leak Current Autocut Device, Fuse : BRAKE SWITCH, MODULE 1, DR LOCK, PDM 1, PDM 2)
DCT1 40A Not Used
Page 490 of 534
7-65
7
Maintenance
LLIIGG HH TT BB UU LLBB SS
Consult an authorized HYUNDAI
dealer to replace most vehicle light
bulbs. It is difficult to replace vehicle
light bulbs because other parts of the
vehicle must be removed before you
can get to the bulb. This is especially
true for removing the headlamp
assembly to get to the bulb(s).
Removing/installing the headlamp
assembly can result in damage to
the vehicle.
Information
After heavy driving, rain or washing,
headlamp and trunk lenses could
appear frosty. This condition is caused
by the temperature difference
between the lamp inside and the out-
side temperature. This is similar to the
condensation on your windows inside
your vehicle during the rain and does-
n ’t indicate a problem with your vehi-
cle. If the water leaks into the lamp
bulb circuitry, have your vehicle
checked by an authorized HYUNDAI
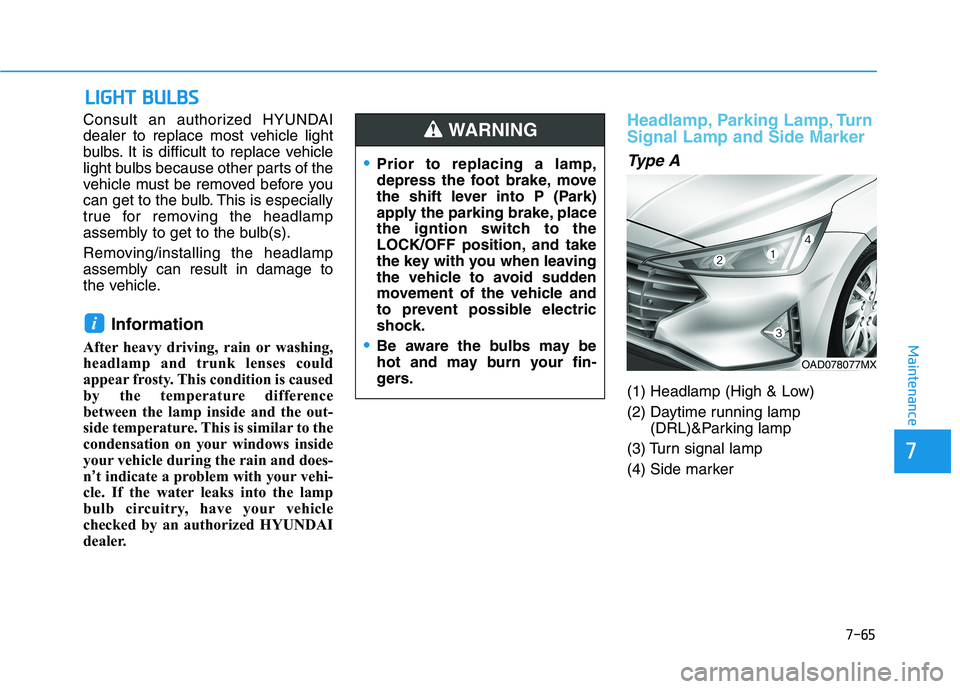
dealer.Headlamp, Parking Lamp, Turn Signal Lamp and Side Marker
Type A
(1) Headlamp (High & Low)
(2) Daytime running lamp (DRL)&Parking lamp
(3) Turn signal lamp
(4) Side marker
i
Prior to replacing a lamp,
depress the foot brake, move
the shift lever into P (Park)
apply the parking brake, place
the igntion switch to the
LOCK/OFF position, and take
the key with you when leaving
the vehicle to avoid sudden
movement of the vehicle and
to prevent possible electric
shock.
Be aware the bulbs may be
hot and may burn your fin-
gers.
WARNING
OAD078077MX
Page 495 of 534
7-70
Maintenance
Rear Combination Light Bulb Replacement
Ty p e A
(1) Tail lamp
(2) Stop/Tail lamp
(3) Turn signal lamp
(4) Side marker
(5) Back-up lampType B(1) Stop (LED)
(2) Tail lamp (LED)
(3) Turn signal lamp
(4) Side marker (LED)
(5) Back-up lamp
Outside lamp
1. Open the trunk lid.
2. Remove the service cover by
pulling out the service cover.OAD078036N
■Type A
OAD078124N
■Type B
OAD075049
Page 497 of 534
7-72
Maintenance
Stop/Tail light and Side marker
(Type A)
5. Remove the socket from theassembly by turning the socket
counterclockwise until the tabs on
the socket align with the slots on
the assembly.
6. Remove the bulb by pulling it out.
7. Inset a new bulb by insetring it into the socket.
8. Install the socket in the assembly by aligning the tabs on the socket
with the slots in the assembly.
Push the socket into the assembly
and turn the socket clockwise.
Stop/Tail light and Side marker
(Type B)
Your vehicle is equipped with LED
lamps. LED lamps do not have
replaceable bulbs. If the LED lamp
does not operate, have the vehicle
checked by an authorized HYUNDAI
dealer.
Inside lamp
Tail light (Type A)
1. Open the trunk.
2. Loosen the retaining screw of thetrunk lid cover and then remove
the cover. 3. Disconnect the connector and
then remove the nuts by turning
the nuts counter clockwise.
OAD075055
OAD078052N