Page 485 of 534
7-60
Maintenance
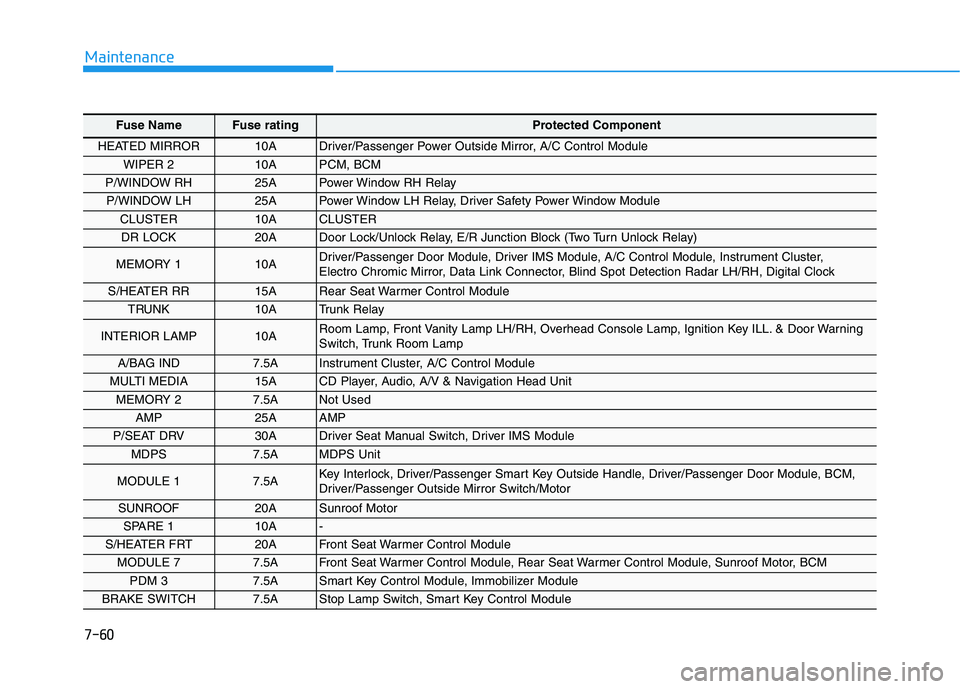
Fuse Name Fuse rating Protected Component
HEATED MIRROR 10A Driver/Passenger Power Outside Mirror, A/C Control Module
WIPER 2 10A PCM, BCM
P/WINDOW RH 25A Power Window RH Relay
P/WINDOW LH 25A Power Window LH Relay, Driver Safety Power Window Module
CLUSTER 10A CLUSTER
DR LOCK 20A Door Lock/Unlock Relay, E/R Junction Block (Two Turn Unlock Relay)
MEMORY 1 10A Driver/Passenger Door Module, Driver IMS Module, A/C Control Module, Instrument Cluster,
Electro Chromic Mirror, Data Link Connector, Blind Spot Detection Radar LH/RH, Digital Clock
S/HEATER RR 15A Rear Seat Warmer Control Module
TRUNK 10A Trunk Relay
INTERIOR LAMP 10A Room Lamp, Front Vanity Lamp LH/RH, Overhead Console Lamp, Ignition Key ILL. & Door Warning
Switch, Trunk Room Lamp
A/BAG IND 7.5A Instrument Cluster, A/C Control Module
MULTI MEDIA 15A CD Player, Audio, A/V & Navigation Head Unit
MEMORY 2 7.5A Not Used
AMP 25A AMP
P/SEAT DRV 30A Driver Seat Manual Switch, Driver IMS Module
MDPS 7.5A MDPS Unit
MODULE 1 7.5A Key Interlock, Driver/Passenger Smart Key Outside Handle, Driver/Passenger Door Module, BCM,
Driver/Passenger Outside Mirror Switch/Motor
SUNROOF 20A Sunroof Motor
SPARE 1 10A -
S/HEATER FRT 20A Front Seat Warmer Control Module
MODULE 7 7.5A Front Seat Warmer Control Module, Rear Seat Warmer Control Module, Sunroof Motor, BCM
PDM 3 7.5A Smart Key Control Module, Immobilizer Module
BRAKE SWITCH 7.5A Stop Lamp Switch, Smart Key Control Module
Page 486 of 534
7-61
Maintenance
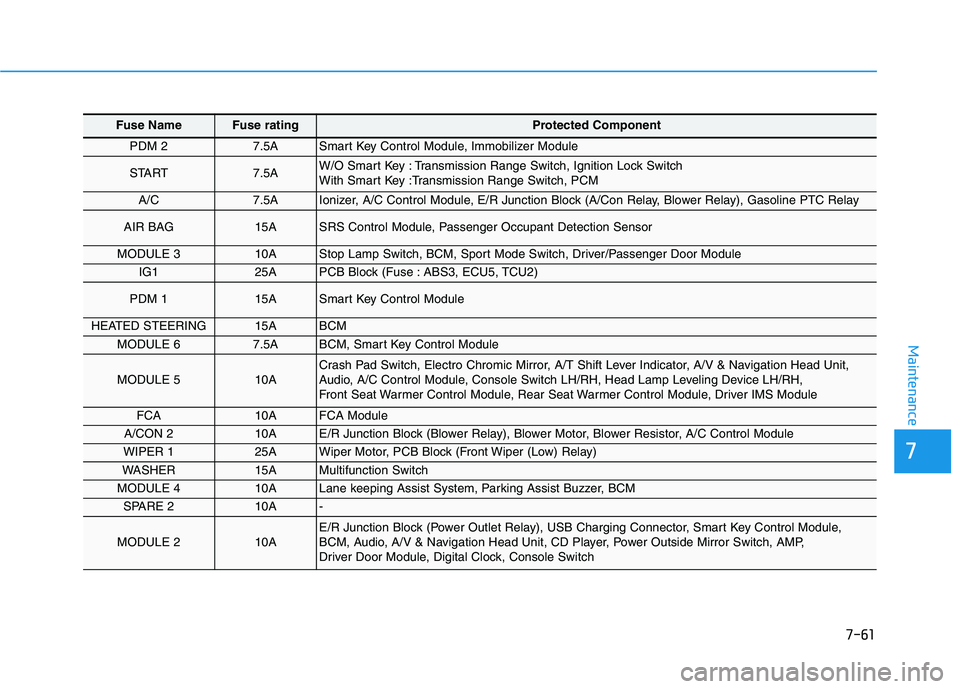
Fuse Name Fuse rating Protected Component
PDM 2 7.5A Smart Key Control Module, Immobilizer Module
START 7.5A W/O Smart Key : Transmission Range Switch, Ignition Lock Switch
With Smart Key :Transmission Range Switch, PCM
A/C7.5A Ionizer, A/C Control Module, E/R Junction Block (A/Con Relay, Blower Relay), Gasoline PTC Relay
AIR BAG 15A SRS Control Module, Passenger Occupant Detection Sensor
MODULE 3 10A Stop Lamp Switch, BCM, Sport Mode Switch, Driver/Passenger Door Module
IG1 25A PCB Block (Fuse : ABS3, ECU5, TCU2)
PDM 1 15A Smart Key Control Module
HEATED STEERING 15A BCM
MODULE 6 7.5A BCM, Smart Key Control Module
MODULE 5 10A Crash Pad Switch, Electro Chromic Mirror, A/T Shift Lever Indicator, A/V & Navigation Head Unit,
Audio, A/C Control Module, Console Switch LH/RH, Head Lamp Leveling Device LH/RH,
Front Seat Warmer Control Module, Rear Seat Warmer Control Module, Driver IMS Module
FCA10A FCA Module
A/CON 2 10A E/R Junction Block (Blower Relay), Blower Motor, Blower Resistor, A/C Control Module
WIPER 1 25A Wiper Motor, PCB Block (Front Wiper (Low) Relay)
WASHER 15A Multifunction Switch
MODULE 4 10A Lane keeping Assist System, Parking Assist Buzzer, BCM
SPARE 2 10A -
MODULE 2 10A E/R Junction Block (Power Outlet Relay), USB Charging Connector, Smart Key Control Module,
BCM, Audio, A/V & Navigation Head Unit, CD Player, Power Outside Mirror Switch, AMP,
Driver Door Module, Digital Clock, Console Switch
7
Page 491 of 534
7-66
Maintenance
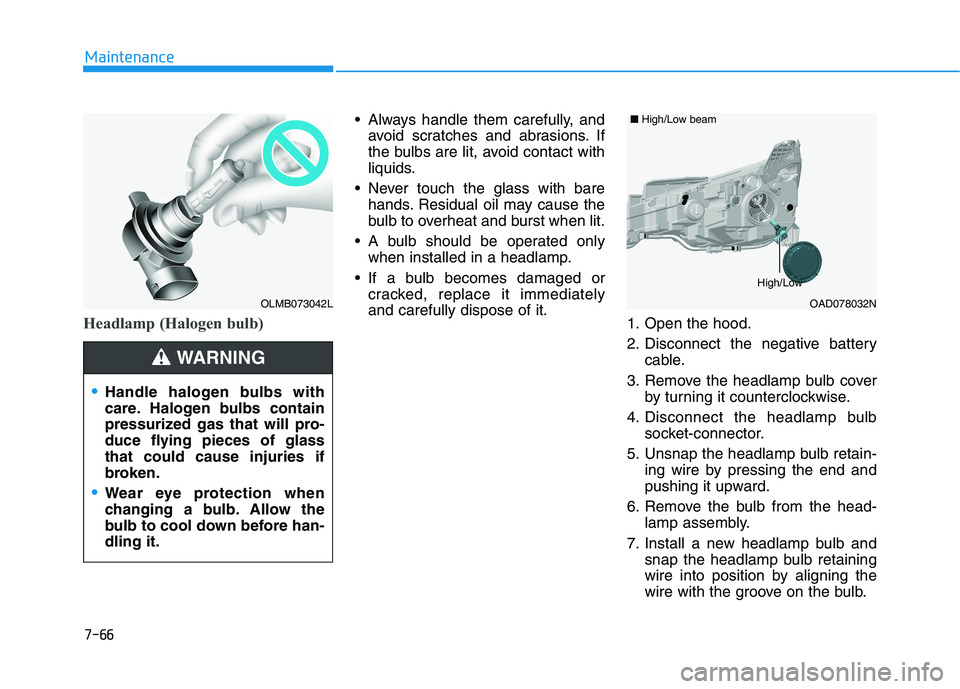
Headlamp (Halogen bulb)
Always handle them carefully, andavoid scratches and abrasions. If
the bulbs are lit, avoid contact with
liquids.
Never touch the glass with bare hands. Residual oil may cause the
bulb to overheat and burst when lit.
A bulb should be operated only when installed in a headlamp.
If a bulb becomes damaged or cracked, replace it immediatelyand carefully dispose of it. 1. Open the hood.
2. Disconnect the negative battery
cable.
3. Remove the headlamp bulb cover by turning it counterclockwise.
4. Disconnect the headlamp bulb socket-connector.
5. Unsnap the headlamp bulb retain- ing wire by pressing the end and
pushing it upward.
6. Remove the bulb from the head- lamp assembly.
7. Install a new headlamp bulb and snap the headlamp bulb retaining
wire into position by aligning the
wire with the groove on the bulb.
OLMB073042L
Handle halogen bulbs with
care. Halogen bulbs contain
pressurized gas that will pro-
duce flying pieces of glassthat could cause injuries if
broken.
Wear eye protection when
changing a bulb. Allow the
bulb to cool down before han-dling it.
WARNING
OAD078032N
■High/Low beam
High/Low
Page 492 of 534
7-67
7
Maintenance
8. Connect the headlamp bulb sock-et-connector.
9. Install the headlamp bulb cover by turning it clockwise.
Information
The headlamp aiming should be
adjusted after an accident or after the
headlamp assembly is reinstalled at an
authorized HYUNDAI dealer.
Parking lamp/Daytime running
lamp (LED type)
Your vehicle is equipped with LED
lamps. LED lamps do not have
replaceable bulbs. If the LED lamp
does not operate, have the vehicle
checked by an authorized HYUNDAI
dealer.
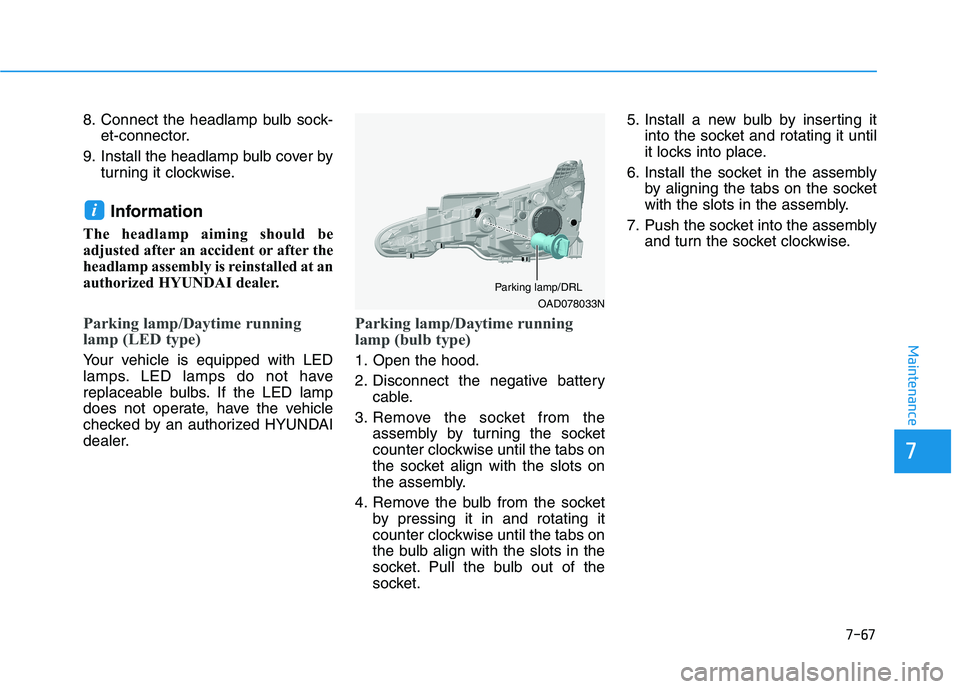
Parking lamp/Daytime running
lamp (bulb type)
1. Open the hood.
2. Disconnect the negative battery cable.
3. Remove the socket from the assembly by turning the socket
counter clockwise until the tabs on
the socket align with the slots on
the assembly.
4. Remove the bulb from the socket by pressing it in and rotating it
counter clockwise until the tabs on
the bulb align with the slots in the
socket. Pull the bulb out of the
socket. 5. Install a new bulb by inserting it
into the socket and rotating it until
it locks into place.
6. Install the socket in the assembly by aligning the tabs on the socket
with the slots in the assembly.
7. Push the socket into the assembly and turn the socket clockwise.
i
OAD078033N
Parking lamp/DRL
Page 496 of 534
7-71
7
Maintenance
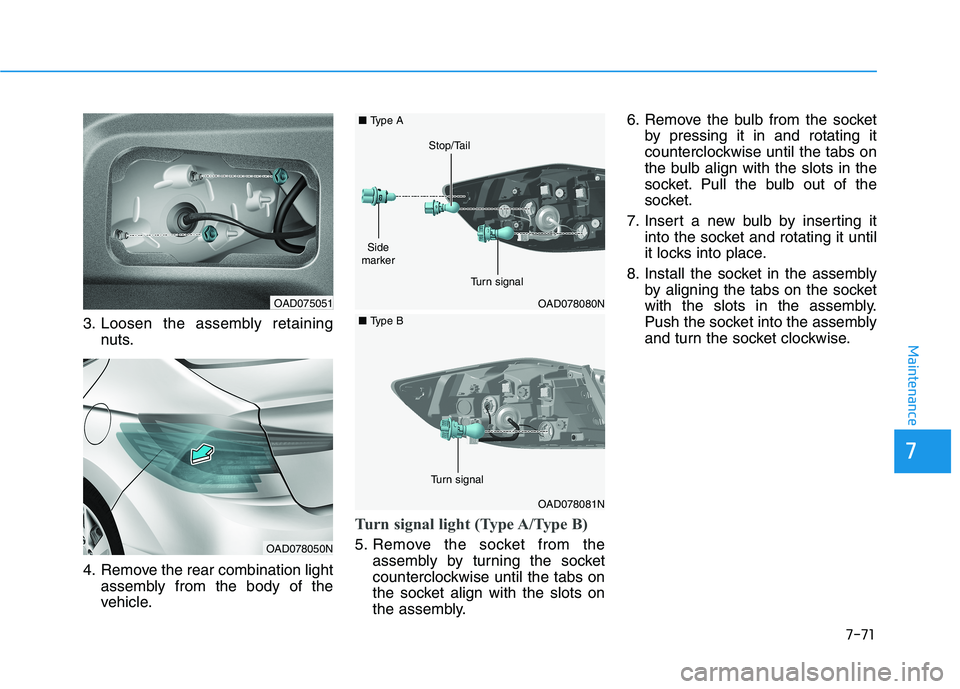
3. Loosen the assembly retainingnuts.
4. Remove the rear combination light assembly from the body of the
vehicle.
Turn signal light (Type A/Type B)
5. Remove the socket from theassembly by turning the socket
counterclockwise until the tabs on
the socket align with the slots on
the assembly. 6. Remove the bulb from the socket
by pressing it in and rotating it
counterclockwise until the tabs on
the bulb align with the slots in the
socket. Pull the bulb out of the
socket.
7. Insert a new bulb by inserting it into the socket and rotating it until
it locks into place.
8. Install the socket in the assembly by aligning the tabs on the socket
with the slots in the assembly.
Push the socket into the assembly
and turn the socket clockwise.
OAD075051
OAD078050N
OAD078080N
■Type A
OAD078081N
■Type B
Turn signal
Stop/Tail
Turn signal
Side
marker
Page 497 of 534
7-72
Maintenance
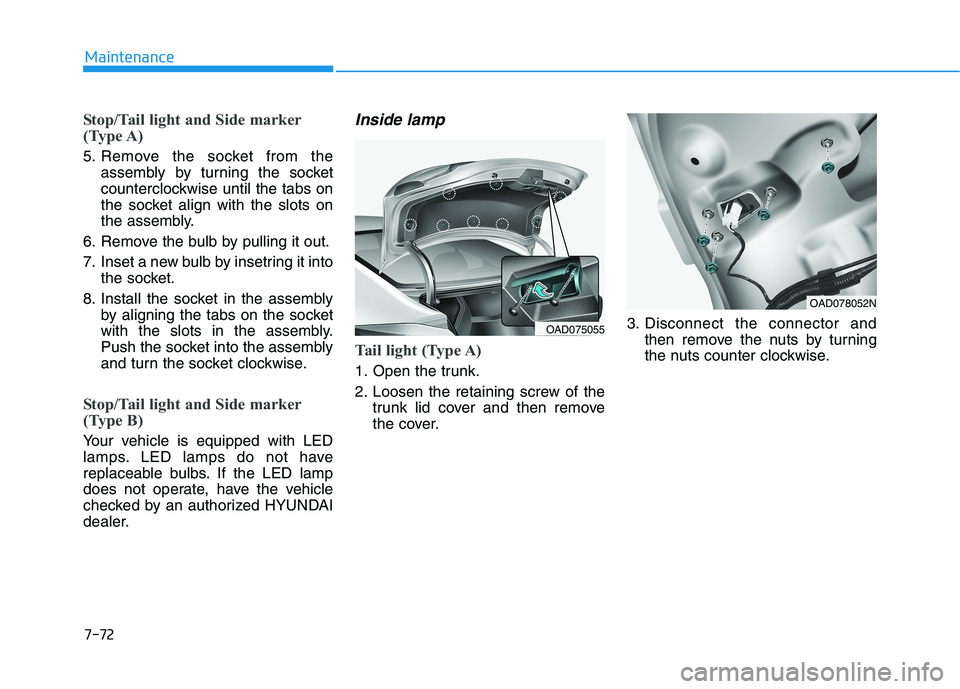
Stop/Tail light and Side marker
(Type A)
5. Remove the socket from theassembly by turning the socket
counterclockwise until the tabs on
the socket align with the slots on
the assembly.
6. Remove the bulb by pulling it out.
7. Inset a new bulb by insetring it into the socket.
8. Install the socket in the assembly by aligning the tabs on the socket
with the slots in the assembly.
Push the socket into the assembly
and turn the socket clockwise.
Stop/Tail light and Side marker
(Type B)
Your vehicle is equipped with LED
lamps. LED lamps do not have
replaceable bulbs. If the LED lamp
does not operate, have the vehicle
checked by an authorized HYUNDAI
dealer.
Inside lamp
Tail light (Type A)
1. Open the trunk.
2. Loosen the retaining screw of thetrunk lid cover and then remove
the cover. 3. Disconnect the connector and
then remove the nuts by turning
the nuts counter clockwise.
OAD075055
OAD078052N
Page 498 of 534
7-73
7
Maintenance
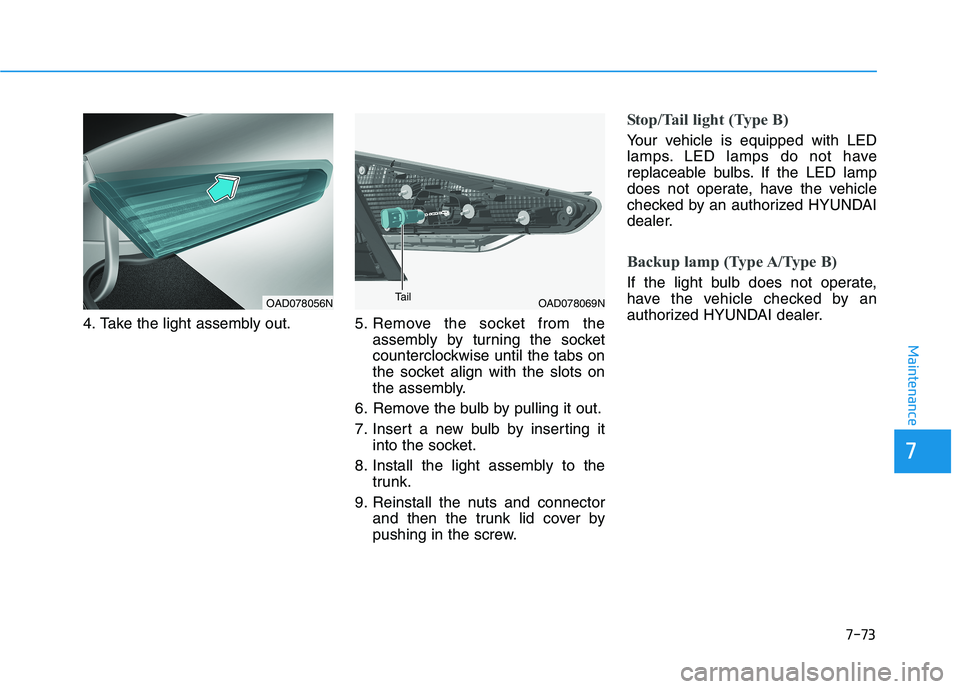
4. Take the light assembly out. 5.Remove the socket from the
assembly by turning the socket
counterclockwise until the tabs on
the socket align with the slots on
the assembly.
6. Remove the bulb by pulling it out.
7. Insert a new bulb by inserting it into the socket.
8. Install the light assembly to the trunk.
9. Reinstall the nuts and connector and then the trunk lid cover by
pushing in the screw.
Stop/Tail light (Type B)
Your vehicle is equipped with LED
lamps. LED lamps do not have
replaceable bulbs. If the LED lamp
does not operate, have the vehicle
checked by an authorized HYUNDAI
dealer.
Backup lamp (Type A/Type B)
If the light bulb does not operate,
have the vehicle checked by an
authorized HYUNDAI dealer.
OAD078056NOAD078069NTail
Page 499 of 534
7-74
Maintenance
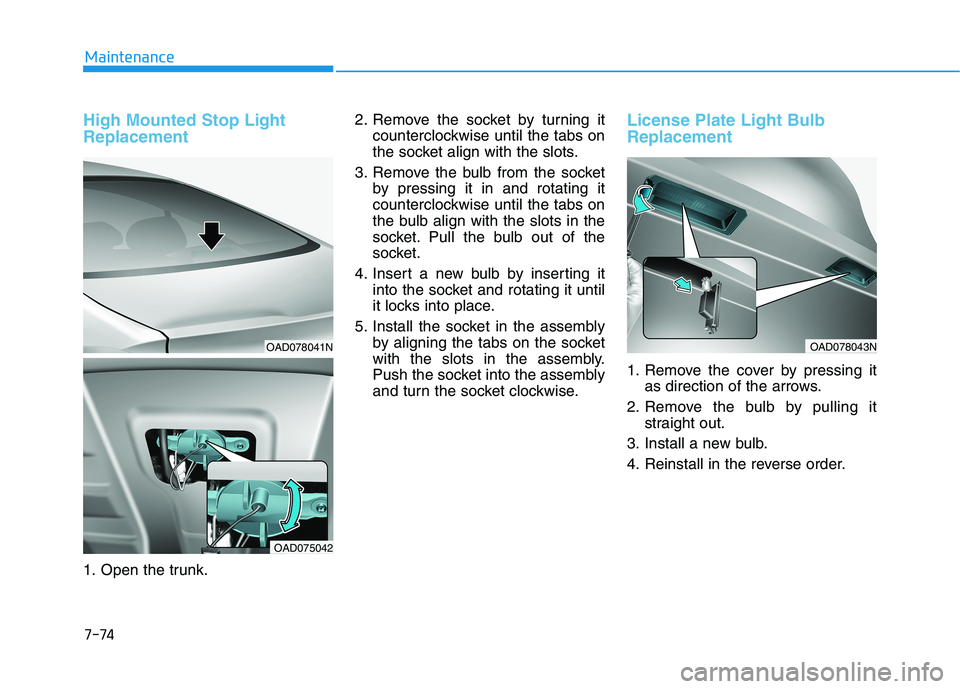
High Mounted Stop Light Replacement
1. Open the trunk.2. Remove the socket by turning it
counterclockwise until the tabs on
the socket align with the slots.
3. Remove the bulb from the socket by pressing it in and rotating it
counterclockwise until the tabs on
the bulb align with the slots in the
socket. Pull the bulb out of the
socket.
4. Insert a new bulb by inserting it into the socket and rotating it until
it locks into place.
5. Install the socket in the assembly by aligning the tabs on the socket
with the slots in the assembly.
Push the socket into the assembly
and turn the socket clockwise.
License Plate Light Bulb Replacement
1. Remove the cover by pressing itas direction of the arrows.
2. Remove the bulb by pulling it straight out.
3. Install a new bulb.
4. Reinstall in the reverse order.
OAD078043NOAD078041N
OAD075042