Page 153 of 472
3-68
Convenient features of your vehicle
LCD modesCannot edit settings while driving
This warning message appears if
you try to adjust the User Settings
while driving.
For safety, change the User Settings
after parking the vehicle and engaging
the parking brake (manual transaxle)
or moving the shift lever to P (Park)
position (automatic transaxle).
Modes SymbolExplanation
Trip Computer
This mode displays information related to
driving such as tripmeter, fuel economy,
etc.
For more information, refer to "Trip
Computer" in this chapter.
InformationThis mode displays information such
service intervals, warning messages, etc.
User SettingsIn this mode, you can change settings of
the doors, lamps, etc.
or or
OGS045140/OGS045139
■Automatic transaxle■Manual transaxle
Page 155 of 472
3-70
Convenient features of your vehicle
Service in OFF
If the service interval is not set,
"Service in Off" message is dis-
played on the LCD display.
Information
If any of the following conditions
occur, the mileage and number of days
to service may be incorrect.
- The battery cable is disconnected.
- The fuse switch is turned off.
- The battery is discharged.
Warning Message
If one of followings occurs, warning
messages will be displayed on the
information mode for several seconds.
- Low fuel etc.i
OGS045107
Page 160 of 472

3-75
Convenient features of your vehicle
3
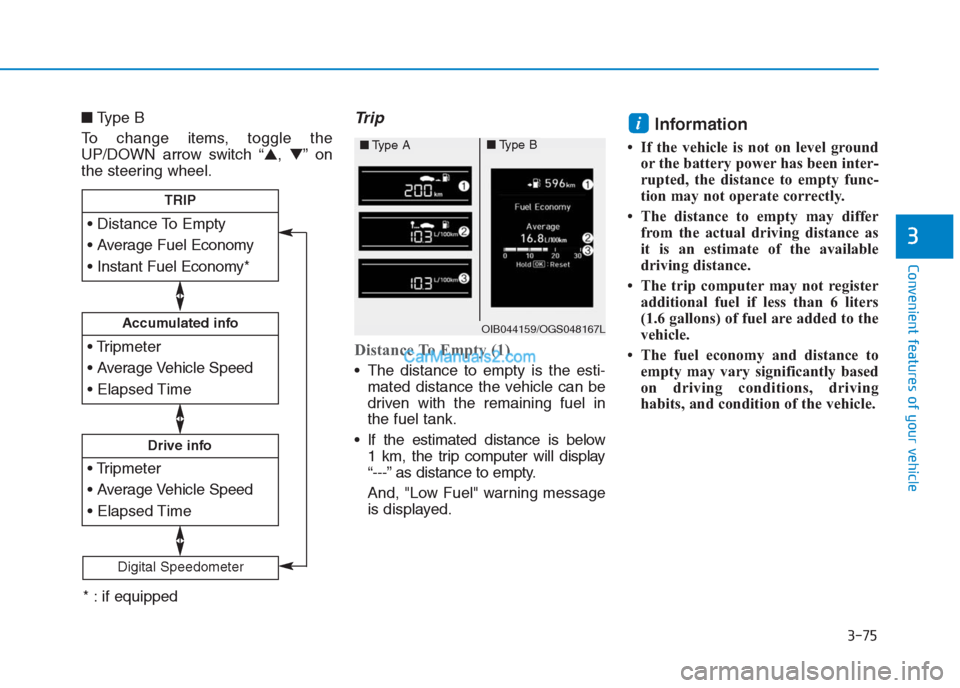
■Type B
To change items, toggle the
UP/DOWN arrow switch “▲,▼”on
the steering wheel.Trip
Distance To Empty (1)
The distance to empty is the esti-
mated distance the vehicle can be
driven with the remaining fuel in
the fuel tank.
If the estimated distance is below
1 km, the trip computer will display
“---” as distance to empty.
And, "Low Fuel" warning message
is displayed.
Information
• If the vehicle is not on level ground
or the battery power has been inter-
rupted, the distance to empty func-
tion may not operate correctly.
• The distance to empty may differ
from the actual driving distance as
it is an estimate of the available
driving distance.
• The trip computer may not register
additional fuel if less than 6 liters
(1.6 gallons) of fuel are added to the
vehicle.
• The fuel economy and distance to
empty may vary significantly based
on driving conditions, driving
habits, and condition of the vehicle.
i
Accumulated info
Drive info
TRIP
Digital Speedometer
OIB044159/OGS048167L
■Type A■Type B
* : if equipped
Page 165 of 472

3-80
Convenient features of your vehicle
Even with the AUTO light feature in
operation, it is recommended to
manually turn ON the lights when
driving at night or in a fog, or when
you enter dark areas, such as tun-
nels and parking facilities.
• Do not cover or spill anything on
the sensor (1) located on the
instrument panel.
Do not clean the sensor using a
window cleaner, the cleanser may
leave a light film which could
interfere with sensor operation.
If your vehicle has window tint
or other types of metallic coat-
ing on the front windshield, the
AUTO light system may not work
properly.
High beam operation
To turn on the high beam headlamp,
push the lever away from you. The
lever will return to its original position.The high beam indicator will light
when the headlamp high beams are
switched on.
To turn off the high beam headlamp,
pull the lever towards you. The low
beams will turn on.
NOTICE
Do not use high beam when there
are other vehicles approaching
you. Using high beam could
obstruct the other driver's vision.
WARNING
OLF044192R
OLF044192L
■Right Hand Drive
■Left Hand Drive
Page 170 of 472

Headlamp leveling device
To adjust the headlamp beam level
according to the number of the pas-
sengers and loading weight in the
luggage area, turn the beam leveling
switch.The higher the number of the switch
position, the lower the headlamp
beam level. Always keep the head-
lamp beam at the proper leveling
position, or headlights may dazzle
other road users.
Listed below are the examples of
proper switch settings. For loading
conditions other than those listed
below, adjust the switch position so
that the beam level may be the near-
est as the condition obtained accord-
ing to the list.
Interior lights
Do not use the interior lights for
extended periods when the engine
is turned off or the battery will dis-
charge.
Interior lamp AUTO cut
The interior lamps will automatically
go off approximately 20 minutes after
the engine is turned off and the
doors closed. If a door is opened, the
lamp will go off 40 minutes after the
engine is turned off. If the doors are
locked by the remote key or smart
key and the vehicle enters the armed
stage of the theft alarm system, the
lamps will go off five seconds later.
NOTICE
3-85
Convenient features of your vehicle
3
OGS045064L
Loading condition Switch position
Driver only 0
Driver + Front passenger 0
Full passengers
(including driver)1
Full passengers (including
driver) + Maximum permis-
sible loading2
Driver + Maximum permis-
sible loading 3
Do not use the interior lights
when driving in the dark. The
interior lights may obscure your
view and cause an accident.
WARNING
Page 174 of 472

3-89
Convenient features of your vehicle
3
Windshield wipers
Operates as follows when the igni-
tion switch is in the ON position.
MIST : For a single wiping cycle,
move the lever to or MIST
position and release. The
wipers will operate continu-
ously if the lever is held in this
position.
OFF : Wiper is not in operation.
INT : Wiper operates intermittently at
the same wiping intervals. To
vary the speed setting, move
the speed control lever.
Information
If there is heavy accumulation of snow
or ice on the windshield, defrost the
windshield for about 10 minutes, or
until the snow and/or ice is removed
before using the windshield wipers to
ensure proper operation.
If you do not remove the snow and/or
ice before using the wiper and washer,
it may damage the Wiper and washer
system.
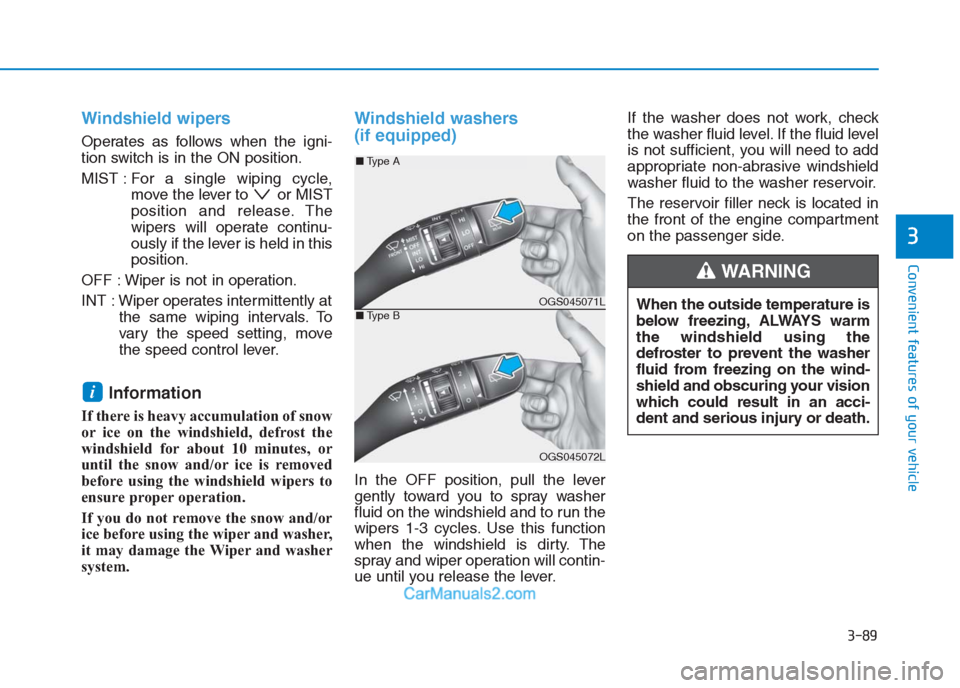
Windshield washers
(if equipped)
In the OFF position, pull the lever
gently toward you to spray washer
fluid on the windshield and to run the
wipers 1-3 cycles. Use this function
when the windshield is dirty. The
spray and wiper operation will contin-
ue until you release the lever.If the washer does not work, check
the washer fluid level. If the fluid level
is not sufficient, you will need to add
appropriate non-abrasive windshield
washer fluid to the washer reservoir.
The reservoir filler neck is located in
the front of the engine compartment
on the passenger side.
i
OGS045071L
OGS045072L
■Type A
■Type B
When the outside temperature is
below freezing, ALWAYS warm
the windshield using the
defroster to prevent the washer
fluid from freezing on the wind-
shield and obscuring your vision
which could result in an acci-
dent and serious injury or death.
WARNING
Page 176 of 472
3-91
Convenient features of your vehicle
3
Rear view camera (if equipped)
The Rear View Camera will activate
when the engine is running and the
shift lever is in the R (Reverse) posi-
tion.Whenever the vehicle ignition is
cycled off and on, the rear view cam-
era will turn on when the shift lever is
put into R (Reverse).Always keep the camera lens
clean. The camera may not work
normally if the lens is covered
with dirt or snow.
NOTICE
D DR
RI
IV
VE
ER
R
A
AS
SS
SI
IS
ST
T
S
SY
YS
ST
TE
EM
M
Never rely solely on the Rear
View Camera when backing up.
ALWAYS look around your
vehicle to make sure there are
no objects or obstacles before
moving the vehicle in any
direction to prevent a collision.
Always pay close attention
when the vehicle is driven
close to objects, particularly
pedestrians, and especially
children.
WARNING
OGS055009L
OGS048175L
Page 177 of 472

3-92
Convenient features of your vehicle
Rear parking assist system
(if equipped)
The Rear Parking Assist System
aids the driver during reverse move-
ment of the vehicle by chiming if any
object is sensed within the distance
of about 120 cm (47 in.) behind the
vehicle.This is a supplemental system that
senses objects within the range and
location of the sensors, it cannot
detect objects in other areas where
sensors are not installed.
Operation of the rear parking
assist system
Operation condition
This system will activate when
backing up with the engine running.
Sensing distance when backing up
is approximately 120 cm (47 in.)
when you are driving less than 10
km/h (6 mph).
When more than two objects are
sensed at the same time, the clos-
est one will be recognized first.
ALWAYS look around your
vehicle to make sure there are
no objects or obstacles before
moving the vehicle in any
direction to prevent a collision.
Always pay close attention
when the vehicle is driven
close to objects, particularly
pedestrians, and especially
children.
Be aware that some objects
may not be detected by the
sensors, due to the objects
distance, size or material, all
of which can limit the effec-
tiveness of the sensor.
WARNING
OGS048176LSensors