Page 193 of 624
191
uuClimate Control System*uUsing Automatic Climate Control
Controls
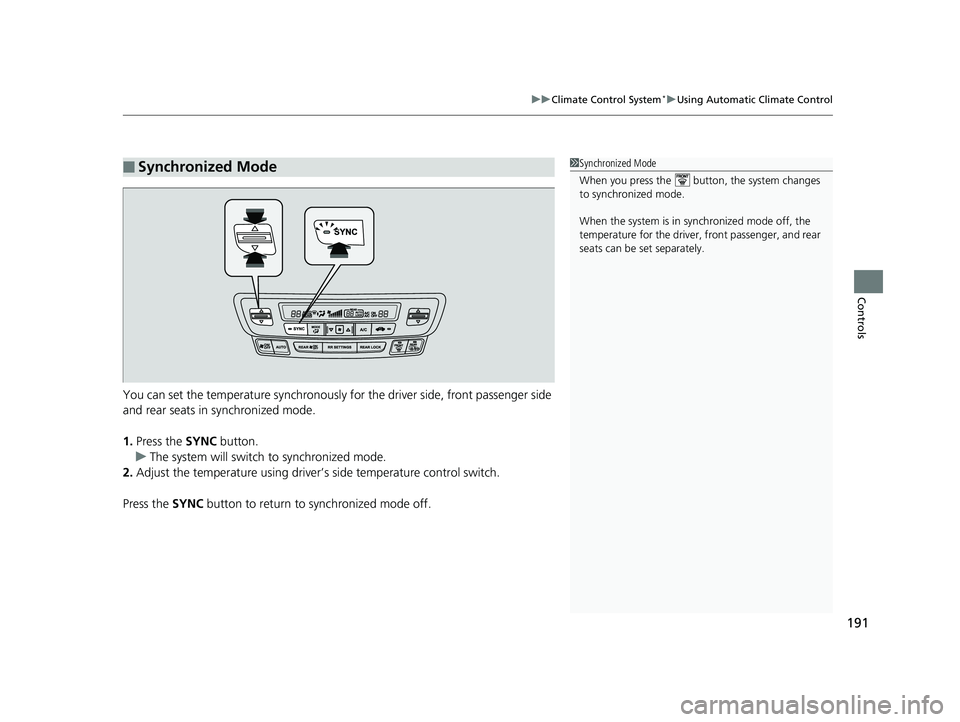
You can set the temperature synchronously for the driver side, front passenger side
and rear seats in synchronized mode.
1. Press the SYNC button.
u The system will switch to synchronized mode.
2. Adjust the temperature using driver’s side temperature control switch.
Press the SYNC button to return to synchronized mode off.
■Synchronized Mode1Synchronized Mode
When you press the button, the system changes
to synchronized mode.
When the system is in synchronized mode off, the
temperature for the driver, front passenger, and rear
seats can be set separately.
Page 341 of 624
339
uuCustomized Features u
Continued
Features
*1:Default SettingSetup
Group Customizable Features Descri
ption Selectable Settings
VehicleDriving
Position
Setup
Easy Entry/Exit
Moves the seat rearward when you get in/get out of
the vehicle. Changes the setting for this feature. On
*1/
Off
Memory Position Link
*Turns the driving position memory system on and off. On*1/Off
Keyless
Access
Setup Door Unlock Mode
Changes which doors unlock when you grab the
driver’s door handle. Driver Door Only
*1/
All Doors
Keyless Access Light Flash Causes some exterior lights
to flash when you unlock/
lock the doors. On
*1/
Off
Keyless Access Beep Causes the beeper to sound when you unlock/lock the
doors. On
*1/
Off
Remote Start System On/
Off Turns the remote engine start feature on and off.
On
*1/Off
Walk Away Auto Lock Changes the settings for th
e automatic locking the
doors when you walk away from the vehicle while
carrying the smart entry remote. Enable
/Disable
*1
* Not available on all models
Page 420 of 624
418
uuBefore Driving uCarrying Cargo
Driving
Carrying Cargo
Your vehicle can carry a large amount of cargo in the pickup bed.
However, the pickup bed is not in tended for carrying passengers.
People who ride in the pickup bed can be ve ry seriously injured or killed in a crash.
• When loading and unloading cargo, make sure all passengers or any objects are
clear of the tailgate before opening or cl osing it. The tailgate should be closed
securely before driving when it is not used as the extended pickup bed.
• The maximum allowable loading weight for the trunk is 300 lbs (136 kg).
Do not exceed this weight limi t, or you may damage the trunk.
• The maximum allowable loading weight on the pickup bed is 1,100 lbs (500 kg).
Do not exceed the load limit.
2 Maximum Load Limit P. 415
•Distribute cargo evenly on the pickup bed. Place the heaviest items on the bottom
and as far forward as possible of the rear axle. Tie down and secure all items that
could be thrown out of the vehicle during a crash or sudden stop.
• If you stack items higher than the bed si des, tailgate, or back window, secure
them with a net or cover.
This will reduce the risk of items being thrown out of the pickup bed during a
crash or sudden stop.
• When the tailgate is dropped open, it ca n be used as an extended pickup bed.
The maximum allowable weight on the tailgate while driving is 300 lbs (136 kg).
Exceeding this limit could damage the tailgate.
• Carrying heavy cargo in the pickup bed will raise your vehicle’s center of gravity.
This can affect handling and performance. Drive more slowly and cautiously, and
allow extra time and distance for braking.
■Carrying Cargo in the Pickup Bed1Carrying Cargo
3WARNING
Allowing passengers to ride in the pickup
bed or on the tailgate can result in death or
serious injury in a crash.
Make sure all passengers ride in a seat and
wear a seat belt properly.
3WARNING
Never let passengers ride in the pickup bed,
in the trunk space, or on the bed rails. This
could cause very serious injuries or death.
No one should ride in any position on your
vehicle that is not eq uipped with seats and
seat belts.
Exceeding load limits or improperly loading
cargo on the vehicle can cause a crash in
which you can be seriously injured or killed.
Load the cargo carefully before starting to
drive.
Page 440 of 624
uuWhen Driving uStarting the Engine
438
Driving
■To stop the engine1Remote Engine Start*
While the engine is running, the vehicle will
automatically preconditi on inside the vehicle.
When it is warm outside:
•The heating and cooling system*/climate control
system* is activated in recirculation mode.
•The seat ventilation* is activated.
When it is cold outside:
•The defroster is activated at a moderately warm
temperature.
•The rear defogger and door mirror heaters* are
activated.
•The seat heaters* and heated steering wheel* are
activated. 2Heated Steering Wheel
* P. 180
2 Front Seat Heaters and Seat
Ventilation
* P. 182, 183
Press and hold the
button for one second.Go within the range, and try again.
Some exterior lights will not flash when the remote is out of
the keyless access system range.
The engine will not stop.
Some exterior lights flash once if the engine stops
successfully.
* Not available on all models
Page 545 of 624
543
uuReplacing Light Bulbs uRear Turn Signal and Back-Up Light Bulbs
Maintenance
Rear Turn Signal and Back-Up Light Bulbs
When replacing, use the following bulbs.
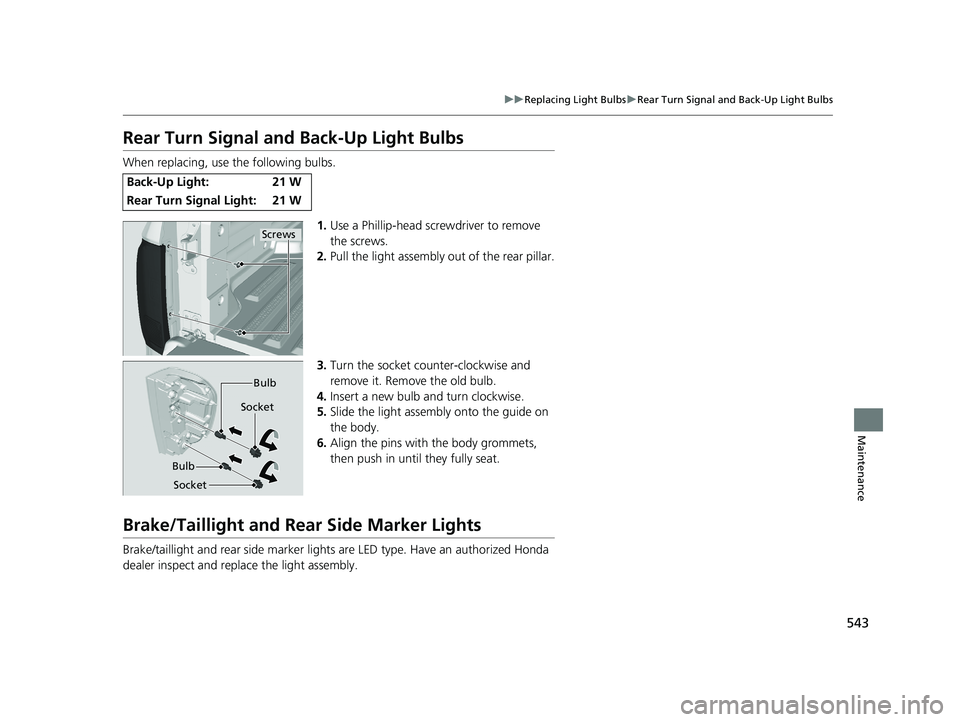
1.Use a Phillip-head screwdriver to remove
the screws.
2. Pull the light assembly out of the rear pillar.
3. Turn the socket counter-clockwise and
remove it. Remove the old bulb.
4. Insert a new bulb and turn clockwise.
5. Slide the light assembly onto the guide on
the body.
6. Align the pins with the body grommets,
then push in until they fully seat.
Brake/Taillight and Rear Side Marker Lights
Brake/taillight and rear side marker lights are LED type. Have an authorized Honda
dealer inspect and replace the light assembly.
Back-Up Light: 21 W
Rear Turn Signal Light: 21 W
Screws
Bulb
Socket Bulb
Socket
Page 561 of 624
559Continued
Maintenance
Cleaning
Interior Care
Use a damp cloth with a mixture of mild detergent and warm water to remove dirt.
Use a clean cloth to remove detergent residue.
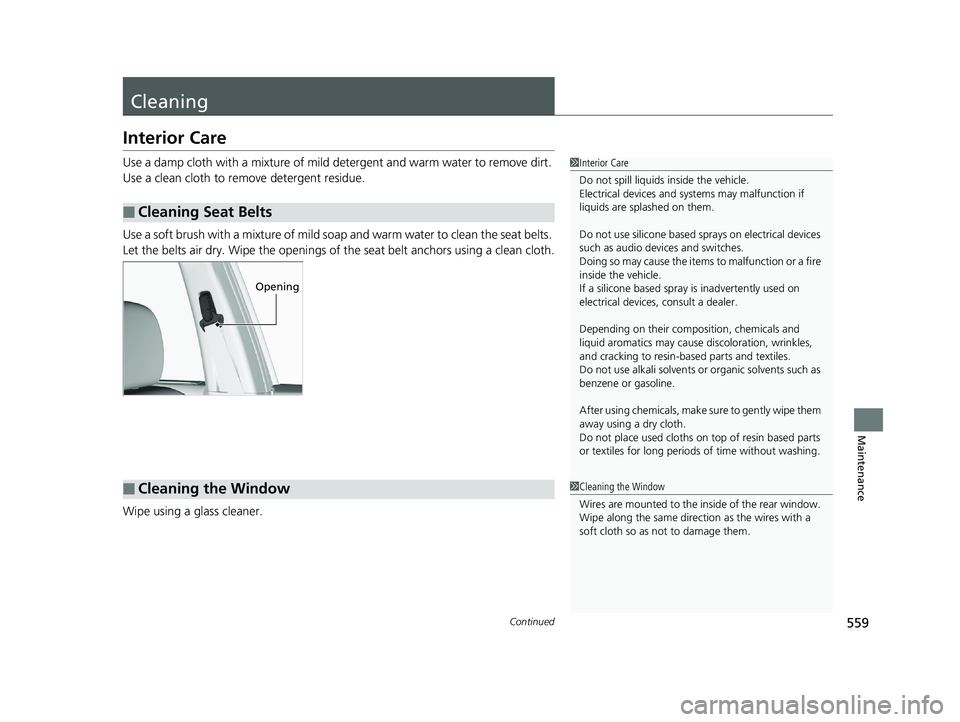
Use a soft brush with a mixture of mild soap and warm water to clean the seat belts.
Let the belts air dry. Wipe the openings of the seat belt anchors using a clean cloth.
Wipe using a glass cleaner.
■Cleaning Seat Belts
1 Interior Care
Do not spill liquids inside the vehicle.
Electrical devices and sy stems may malfunction if
liquids are splashed on them.
Do not use silicone based sp rays on electrical devices
such as audio devices and switches.
Doing so may cause the items to malfunction or a fire
inside the vehicle.
If a silicone based spray is inadvertently used on
electrical devices, consult a dealer.
Depending on their compos ition, chemicals and
liquid aromatics may cause discoloration, wrinkles,
and cracking to resin-ba sed parts and textiles.
Do not use alkali solvents or organic solvents such as
benzene or gasoline.
After using chemical s, make sure to gently wipe them
away using a dry cloth.
Do not place used cloths on top of resin based parts
or textiles for long periods of time without washing.
Opening
■Cleaning the Window1Cleaning the Window
Wires are mounted to the in side of the rear window.
Wipe along the same direct ion as the wires with a
soft cloth so as not to damage them.
Page 562 of 624
uuCleaning uInterior Care
560
Maintenance
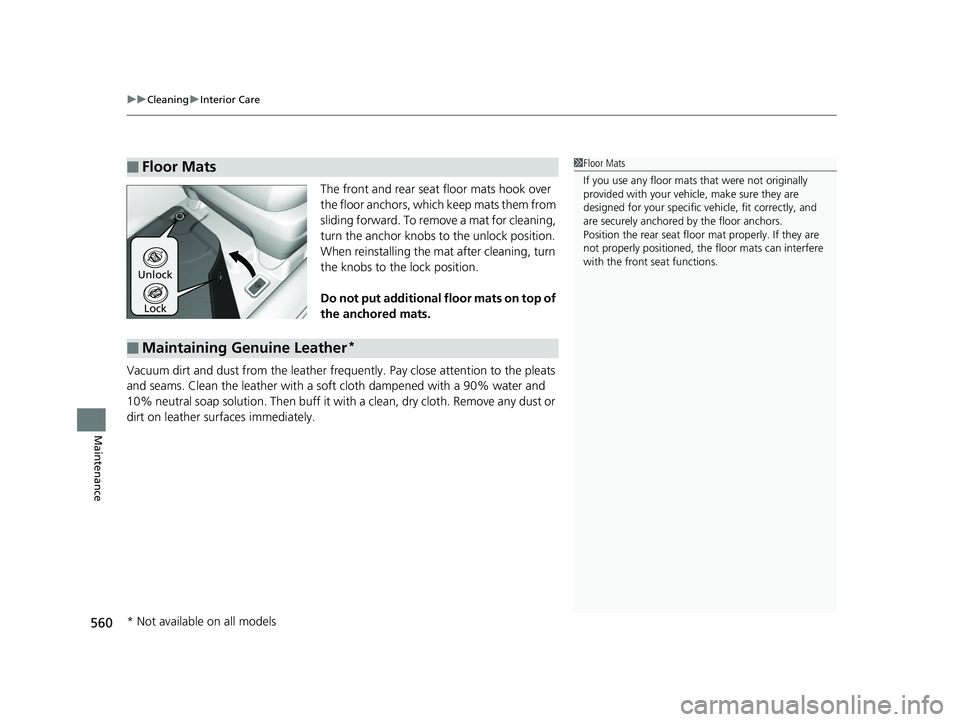
The front and rear seat floor mats hook over
the floor anchors, which keep mats them from
sliding forward. To remove a mat for cleaning,
turn the anchor knobs to the unlock position.
When reinstalling the mat after cleaning, turn
the knobs to the lock position.
Do not put additional floor mats on top of
the anchored mats.
Vacuum dirt and dust from the leather freq uently. Pay close attention to the pleats
and seams. Clean the leather with a so ft cloth dampened with a 90% water and
10% neutral soap solution. Then buff it with a clean, dry cloth. Remove any dust or
dirt on leather surfaces immediately.
■Floor Mats1 Floor Mats
If you use any floor mats that were not originally
provided with your vehicle, make sure they are
designed for your specific ve hicle, fit correctly, and
are securely anchored by the floor anchors.
Position the rear seat floor mat properly. If they are
not properly positioned, the floor mats can interfere
with the front seat functions.
Lock
Unlock
■Maintaining Genuine Leather*
* Not available on all models
Page 596 of 624

594
uuFuses uFuse Locations
Handling the Unexpected
Located under the dashboard.
Fuse locations are shown on the label on
the side panel.
Locate the fuse in question by the fuse
number and label number.
■Interior Fuse Box
Fuse Box
Fuse Label
■Circuit protected and fuse rating
Circuit ProtectedAmps
1DR P/W20 A
2DOOR LOCK20 A
3SMART7.5 A
4AS P/W20 A
5FR ACC SOCKET20 A
6FUEL PUMP20 A
7ACG15 A
8FRONT WIPER7.5 A
9ABS/VSA7.5 A
10SRS10 A
11REAR LEFT P/W20 A
12BACK P/W(20 A)
13REAR RIGHT P/W20 A
14S/R FUEL LID20 A
15DR P/SEAT (REC)(20 A)
16CARGO LT7.5 A
17FR SEAT HEATER(20 A)
18INTR LT7.5 A
19DR REAR DOOR UNLOCK10 A
20AS SIDE DOOR UNLOCK10 A
21DRL7.5 A
22KEY LOCK7.5 A
23A/C7.5 A
24IG1a FEED BACK7.5 A
25INST PANEL LIGHTS7.5 A
26LUMBAR SUPPORT(7.5 A)
27PARKING LIGHTS7.5 A
28OPTION10 A
29METER7.5 A
30−−
31MISS SOL7.5 A
32SRS7.5 A
33AS SIDE DOOR LOCK10 A
34DR DOOR LOCK10 A
35DR DOOR UNLOCK10 A
36DR P/SEAT (SLIDE)(20 A)
37RIGHT H/L HI10 A
38LEFT H/L HI10 A
39IG1b FEED BACK7.5 A
40ACC7.5 A
41DR REAR DOOR LOCK10 A
42−−
Circuit ProtectedAmps