Page 127 of 624
125
uuLocking and Unlocking the Doors uCustomizing the Auto Door Locking/Unlocking Setting*
Continued
Controls
Customizing the Auto Door Locking/Unlocking Setting*
You can customize the auto door locking/unlocking setting to your liking using the master door lock switch.
■Auto door locking
■Auto door unlocking
*1:Default setting
■List of the Auto Door Locking/Unlocking Customizable Options
ModeDescription
Drive Lock Mode*1All doors lock when the vehicle’s speed reaches about 10 mph (15 km/h).
OffThe auto door locking is deactivated all the time.
ModeDescription
Driver’s Door Open
Mode*1All doors unlock when the driver’s door is opened.
Park Unlock ModeAll doors unlock when the shift lever is moved into (P with the brake pedal depressed.
OffThe auto door unlocking is deactivated all the time.
* Not available on all models
Page 128 of 624
126
uuLocking and Unlocking the Doors uCustomizing the Auto Door Locking/Unlocking Setting*
Controls
*1:Default setting
■Customizing Flow for Auto Door Locking Options
StepsDrive Lock Mode*1Off
1Apply the parking brake.Apply the parking brake.
2Close the driver’s door.Open the driv er’s door.
3Set the power mode to ON.Set the power mode to ON.
4
Press and hold the lock side of the master door lock switch on the driver’s door
for more than five seconds. Release th e switch after you hear a click twice.Press and hold the lock side of the master door
lock switch on the driver ’s door for more than
five seconds. Release the switch after you hear
one click.
5Set the power mode to ACC ESSORY within 20 seconds.
u Customization is completed.
Page 129 of 624
127
uuLocking and Unlocking the Doors uCustomizing the Auto Door Locking/Unlocking Setting*
Controls
*1:Default setting
■Customizing Flow for Auto Door Unlocking Options
StepsDriver’s Door Open Mode*1Park Unlock ModeOff
1Apply the parking brake.
Move the shift lever out of
(P.
Apply the parking brake.
Move the shift lever to
(P.
Apply the parking brake.
Move the shift lever to
(P.
2Close the driver’s door.Open the driver’s door.
3Set the power mode to ON.Set the power mode to ON.
4
Press and hold the unlock side of the master door lock switch on the driver’s door for more than five seconds. Release the switch
after you hear a click twice.
5Set the power mode to ACCESSORY within 20 seconds. u Customization is completed.
Page 144 of 624

142
Controls
Operating the Switches Around the Steering Wheel
ENGINE START/STOP Button
*1:Canadian models
*2:U.S. models
■Changing the Power Mode1ENGINE START/STOP Button
ENGINE START/STOP Button Operating Range
You can start the engine when the smart entry
remote is inside the vehicle.
If the smart entry remote battery is weak, beeper
sounds and the To Start, Hold Remote Near Start
Button message appears on the multi-information
display. 2 If the Smart Entry Remote Battery is Weak
P. 579
The engine may also run if the smart entry remote is
close to the door or window, ev en if it is outside the
vehicle.
ON mode:
The ENGINE START/STOP button is red when the
engine is running.
Operating Range
VEHICLE OFF (LOCK)
The button is off.
The steering wheel is locked
*1.
The power to all electrical components is turned
off.
ACCESSORY
The button blinks (in red).
Operate the audio system and other accessories
in this position.
ON
The button is on in red.
All electrical components can be used.
Press the button.
Without
pressing the
brake pedal
Shift to
(P*2. Press the button without the
shift lever in
(
P.
Shift to
( P, then press the
button.
*2
Page 152 of 624
150
uuOperating the Switches Around the Steering Wheel uDaytime Running Lights
Controls
Daytime Running Lights
The daytime running lights come on when the following conditions have been met:
• The power mode is in ON.
• The headlight switch is off.
• The parking brake is released.
The daytime running lights are off once the headlight switch is turned on, or when
the head light switch is in AUTO and it is getting darker outside.
Page 161 of 624

159
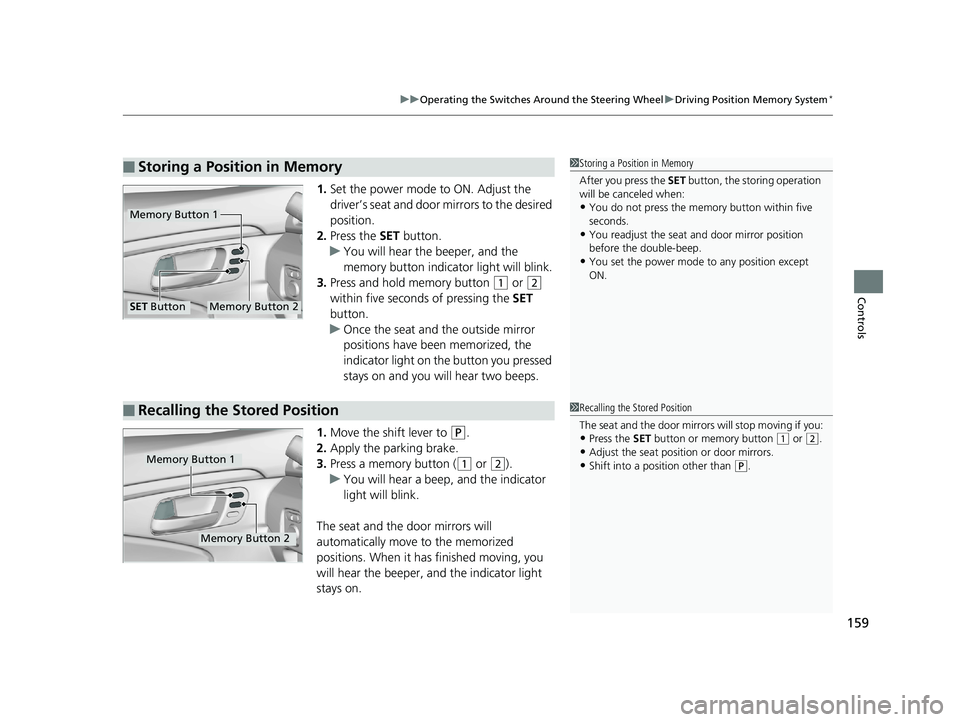
uuOperating the Switches Around the Steering Wheel uDriving Position Memory System*
Controls
1. Set the power mode to ON. Adjust the
driver’s seat and door mirrors to the desired
position.
2. Press the SET button.
u You will hear the beeper, and the
memory button indicator light will blink.
3. Press and hold memory button
(1 or (2
within five seconds of pressing the SET
button.
u Once the seat and the outside mirror
positions have been memorized, the
indicator light on the button you pressed
stays on and you will hear two beeps.
1. Move the shift lever to
(P.
2. Apply the parking brake.
3. Press a memory button (
(1 or (2).
u You will hear a beep, and the indicator
light will blink.
The seat and the door mirrors will
automatically move to the memorized
positions. When it has finished moving, you
will hear the beeper, and the indicator light
stays on.
■Storing a Position in Memory1 Storing a Position in Memory
After you press the SET button, the storing operation
will be canceled when:
•You do not press the memory button within five
seconds.
•You readjust the seat and door mirror position
before the double-beep.
•You set the power mode to any position except
ON.
Memory Button 1
Memory Button 2SET Button
■Recalling the Stored Position1 Recalling the Stored Position
The seat and the door mirrors will stop moving if you:
•Press the SET button or memory button (1 or (2.•Adjust the seat position or door mirrors.
•Shift into a position other than (P.Memory Button 1
Memory Button 2
Page 413 of 624

411
Driving
This chapter discusses driving and refueling.
Before Driving................................... 412
Towing a Trailer ................................ 420
Off-Highway Driving Guidelines ..... 432
When Driving Starting the Engine .......................... 434
Precautions While Driving................. 440
Automatic Transmission ................... 441
Shifting ............................................ 442
ECON Button ................................... 444
Intelligent Traction Management...... 445
Cruise Control
*................................ 447
Front Sensor Camera*...................... 450Road Departure Mi tigation (RDM)
System*...................................... 452
Adaptive Cruise Control (ACC)*....... 457
Lane Keeping Assist System (LKAS)*.... 470Vehicle Stability Assist ® (VSA ®), aka Electronic
Stability Control (ESC), System ............. 478
Agile Handling Assist ....................... 480
Intelligent Variable Torque ManagementTM
(i-VTM4TM) AWD System*............... 481
TPMS with Tire Fill Assist .................. 482
Tire Pressure Monitoring System (TPMS) -
Required Federal Explanation ......... 484
Blind spot inform ation (BSI) System
*.... 486
LaneWatchTM*.................................. 488 Braking
Brake System ................................... 490
Anti-lock Brake System (ABS) ........... 492
Brake Assist System ......................... 493
Collision Mitigation Braking System
TM
(CMBSTM)*..................................... 494
Parking Your Vehicle When Stopped ................................ 503
Parking Sensor System
*................... 504
Cross Traffic Monitor*..................... 508
Multi-View Rear Camera .................. 512
Refueling Fuel Information .............................. 514
How to Refuel ................................. 515
Fuel Economy and CO
2 Emissions .... 517
* Not available on all models
Page 415 of 624

Continued413
uuBefore Driving uDriving Preparation
Driving
• Store or secure all items on board properly.
u Carrying too much cargo, or improperly storing it, can affect your vehicle’s
handling, stability, sto pping distance, and tires, and make it unsafe.
2Maximum Load Limit P. 415
•Do not pile items higher than the seat height.
u They can block your view and may be thrown forward in the event of sudden
braking.
• Do not place anything in the front seat footwells. Make sure to secure the floor
mat.
u An object or unsecured floor mat can in terfere with your brake and accelerator
pedal operation while driving.
• If you have any animals on board, do not let them move around in the vehicle.
u They may interfere with driv ing and a crash could occur.
• Securely close and lock all doors.
2 Locking/Unlocking the Doors from the Inside P. 121
•Adjust your seating position properly.
u Adjust the head restraint, too.
2Adjusting the Seats P. 163
2 Adjusting the front head restraint positions P. 168
•Adjust the mirrors and steering wh eel properly for your driving.
u Adjust them while sitting in the proper driving position.
2 Adjusting the Steering Wheel P. 160
2 Adjusting the Mirrors P. 161
■Interior Checks1Interior Checks
The headlight aim is set by the factory, and does not
need to be adjusted. Howeve r, if you regularly carry
heavy items in the cargo area or tow a trailer, have
the aiming readjusted at a dealer or by a qualified
technician.