2019 HONDA ODYSSEY check engine light
[x] Cancel search: check engine lightPage 715 of 767
713Continued
Handling the Unexpected
Jump Starting
Turn off the power to electric devices, such as audio and lights. Turn off the engine,
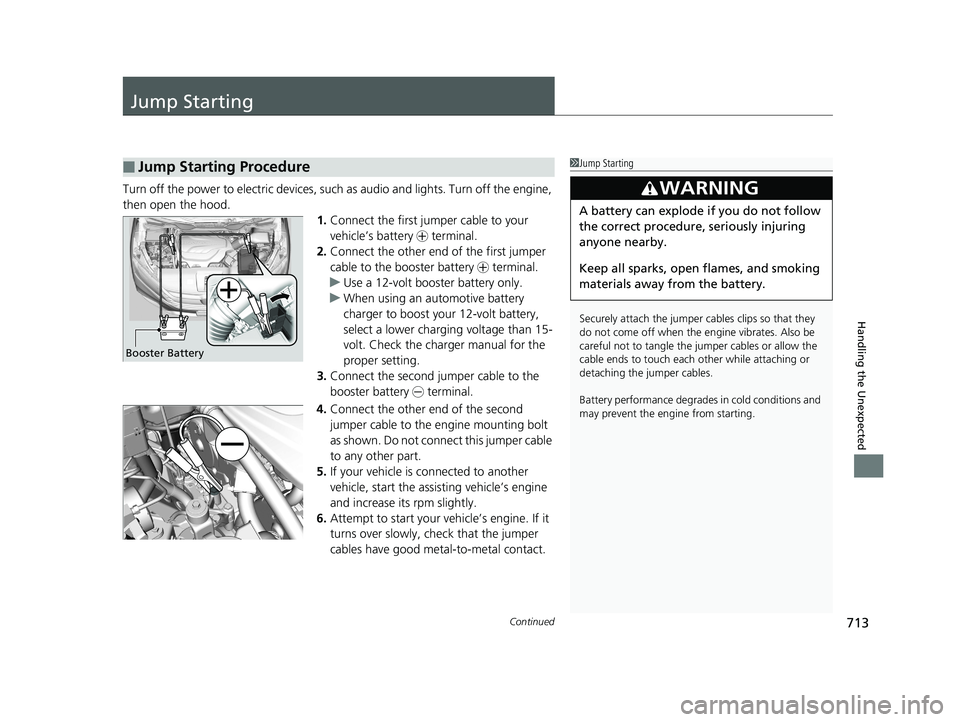
then open the hood. 1.Connect the first jumper cable to your
vehicle’s battery + terminal.
2. Connect the other end of the first jumper
cable to the booster battery + terminal.
u Use a 12-volt booster battery only.
u When using an automotive battery
charger to boost your 12-volt battery,
select a lower charging voltage than 15-
volt. Check the charger manual for the
proper setting.
3. Connect the second jumper cable to the
booster battery - terminal.
4. Connect the other end of the second
jumper cable to the engine mounting bolt
as shown. Do not connect this jumper cable
to any other part.
5. If your vehicle is connected to another
vehicle, start the assisting vehicle’s engine
and increase its rpm slightly.
6. Attempt to start your ve hicle’s engine. If it
turns over slowly, check that the jumper
cables have good metal-to-metal contact.
■Jump Starting Procedure1 Jump Starting
Securely attach the jumper cables clips so that they
do not come off when the e ngine vibrates. Also be
careful not to tangle the ju mper cables or allow the
cable ends to touch each other while attaching or
detaching the jumper cables.
Battery performance degrades in cold conditions and
may prevent the engi ne from starting.
3WARNING
A battery can explode if you do not follow
the correct procedure, seriously injuring
anyone nearby.
Keep all sparks, open flames, and smoking
materials away from the battery.
Booster Battery
19 ODYSSEY-31THR6120.book 713 ページ 2018年12月6日 木曜日 午後4時35分
Page 720 of 767
718
Handling the Unexpected
Indicator, Coming On/Blinking
If the Low Oil Pressure Symbol Appears
■Reasons for the symbol to appear
Appears when the engine oil pressure is low.
■What to do as soon as the symbol appears
1. Immediately park the vehicle on level ground in a safe place.
2. If necessary, turn the ha zard warning lights on.
■What to do after parking the vehicle
1. Stop the engine and let it sit for about three minutes.
2. Open the hood and check the oil level.
u Add oil as necessary.
2 Oil Check P. 651
3.Start the engine and check the low oil pressure symbol.
u The symbol disappears: Start driving again.
u The symbol does not disappear within 10 seconds: Stop the engine
and contact a dealer for repairs immediately.
If the Charging System Indicator Comes On
■Reasons for the indicator to come on
Comes on when the battery is not being charged.
■What to do when the indicator comes on
Turn off the climate con trol system, rear defogger, and other electrical
systems, and immediately contact a dealer for repairs.
1 If the Low Oil Pressure Symbol Appears
NOTICE
Running the engine with low oil pressure can cause
serious mechanical damage almost immediately.
1If the Charging System Indicator Comes On
If you need to stop temporarily, do not turn off the
engine. Restarting the engi ne may rapidly discharge
the battery.
19 ODYSSEY-31THR6120.book 718 ページ 2018年12月6日 木曜日 午後4時35分
Page 722 of 767
720
uuIndicator, Coming On/Blinking uIf the Brake System Indicator (Red) Comes On or Blinks
Handling the Unexpected
If the Brake System Indicator (Red) Comes On or
Blinks
■Reasons for the indicator to come on
• The brake fluid is low.
• There is a malfunction in the brake system.
■What to do when the indicator comes on while driving
Depress the brake pedal lightly to check pedal pressure.
• If normal, check the brake fluid level the next time you stop.
• If abnormal, take immediate action . If necessary, downshift the
transmission to slow the vehicle using engine braking.
■Reason for the indicator to blink
• There is a problem with the electric parking brake system.
■What to do when the indicator blinks
• Avoid using the parking brake and ha ve your vehicle checked by a
dealer immediately.
1 If the Brake System Indicator (Red) Comes On or Blinks
Have your vehicle re paired immediately.
It is dangerous to drive with low brake fluid. If there
is no resistance from the brake pedal, stop
immediately in a safe plac e. If necessary downshift
the gears.
If the brake system indicator and ABS indicator come
on simultaneously, the elec tronic brake distribution
system is not working. Th is can result in vehicle
instability under sudden braking.
Have your vehicle inspecte d by a dealer immediately.
If the brake system indicator (red) blinks at the same
time when the brake system indicator (amber) comes
on, the parking br ake may not work.
Avoid using the parking brak e and have your vehicle
checked by a dealer immediately.
2 If the Brake System Indicator (Red) Comes
On or Blinks at the Same Time When the
Brake System Indicator (Amber) Comes On
P. 721
If you repeatedly operate th e electric parking brake in
a short period of time, the brake stops operating to
prevent heating of the system.
It returns to its original state in approximately one
minute.
U.S.
Canada
(Red)
19 ODYSSEY-31THR6120.book 720 ページ 2018年12月6日 木曜日 午後4時35分
Page 725 of 767
723
uuIndicator, Coming On/BlinkinguIf the Transmission System Indicator Blinks along with the Warning Message
Handling the Unexpected
If the Transmission System Indicator Blinks along
with the Warning Message
■Reasons for the indicator to blink
The transmission is malfunctioning.
■What to do when the indicator blinks
• Immediately have your vehicle inspected by a dealer.
• Change the gear position to
(N after starting the engine.
u Check if the
(N position in the instrume nt panel and the indicator
on the
(N button light/blink.
2 Starting the Engine P. 538
1If the Transmission System In dicator Blinks along with the
Warning Message
You may not be able to turn on the engine.
Make sure to set the parking brake when parking
your vehicle.
Call a professional towing service if you need to tow
your vehicle. 2 Emergency Towing P. 731
19 ODYSSEY-31THR6120.book 723 ページ 2018年12月6日 木曜日 午後4時35分
Page 726 of 767
724
Handling the Unexpected
Fuses
Fuse Locations
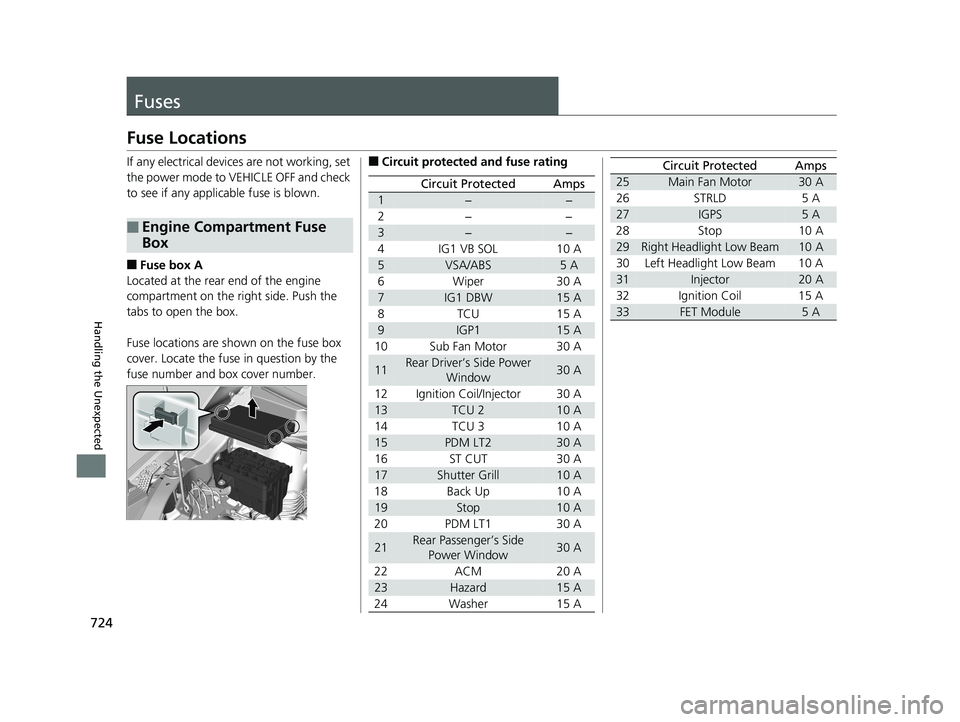
If any electrical devices are not working, set
the power mode to VEHICLE OFF and check
to see if any applic able fuse is blown.
■Fuse box A
Located at the rear end of the engine
compartment on the ri ght side. Push the
tabs to open the box.
Fuse locations are shown on the fuse box
cover. Locate the fuse in question by the
fuse number and box cover number.
■Engine Compartment Fuse
Box
■Circuit protected and fuse rating
Circuit ProtectedAmps
1−−
2− −
3−−
4 IG1 VB SOL 10 A
5VSA/ABS5 A
6 Wiper 30 A
7IG1 DBW15 A
8TCU 15A
9IGP115 A
10 Sub Fan Motor 30 A
11Rear Driver’s Side Power Window30 A
12 Ignition Coil/Injector 30 A
13TCU 210 A
14 TCU 3 10 A
15PDM LT230 A
16ST CUT 30 A
17Shutter Grill10 A
18 Back Up 10 A
19Stop10 A
20 PDM LT1 30 A
21Rear Passenger’s Side Power Window30 A
22 ACM 20 A
23Hazard15 A
24 Washer 15 A
25Main Fan Motor30 A
26 STRLD 5 A
27IGPS5 A
28 Stop 10 A
29Right Headlight Low Beam10 A
30 Left Headlight Low Beam 10 A
31Injector20 A
32 Ignition Coil 15 A
33FET Module5 A
Circuit ProtectedAmps
19 ODYSSEY-31THR6120.book 724 ページ 2018年12月6日 木曜日 午後4時35分
Page 732 of 767
730
uuFuses uInspecting and Changing Fuses
Handling the Unexpected
Inspecting and Changing Fuses
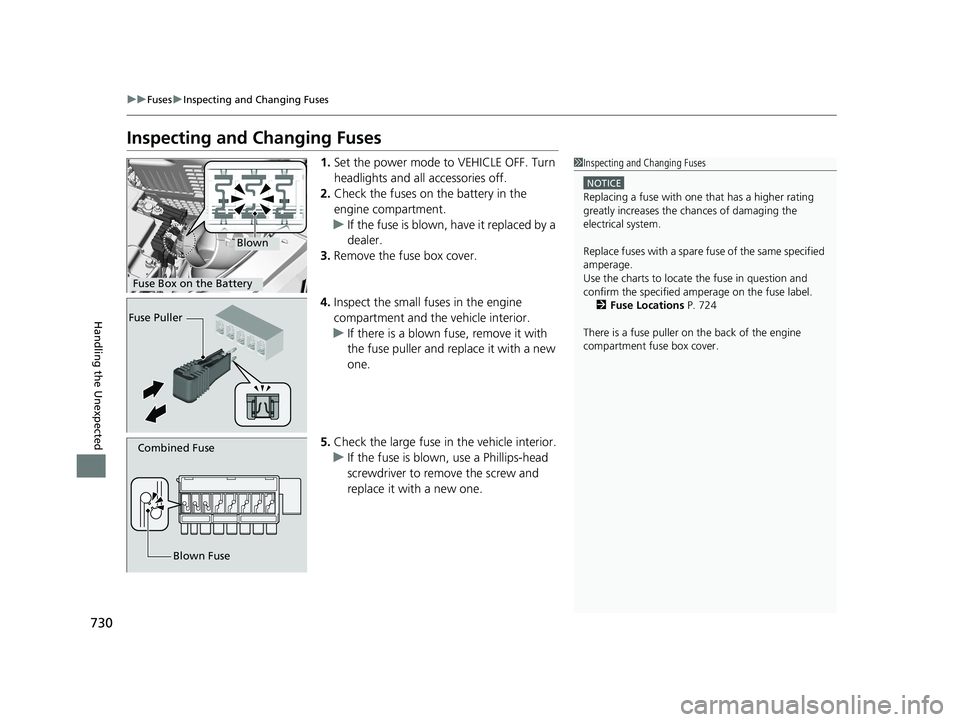
1. Set the power mode to VEHICLE OFF. Turn
headlights and all accessories off.
2. Check the fuses on the battery in the
engine compartment.
u If the fuse is blown, have it replaced by a
dealer.
3. Remove the fuse box cover.
4. Inspect the small fuses in the engine
compartment and the vehicle interior.
u If there is a blown fuse, remove it with
the fuse puller and replace it with a new
one.
5. Check the large fuse in the vehicle interior.
u If the fuse is blown, use a Phillips-head
screwdriver to remo ve the screw and
replace it with a new one.1 Inspecting and Changing Fuses
NOTICE
Replacing a fuse with on e that has a higher rating
greatly increases the chances of damaging the
electrical system.
Replace fuses with a spare fuse of the same specified
amperage.
Use the charts to locate the fuse in question and
confirm the specified amperage on the fuse label. 2 Fuse Locations P. 724
There is a fuse puller on the back of the engine
compartment fuse box cover.
Blown
Fuse Box on the Battery
Fuse Puller
Combined Fuse
Blown Fuse
19 ODYSSEY-31THR6120.book 730 ページ 2018年12月6日 木曜日 午後4時35分
Page 757 of 767
755
Index
Emergency................................................ 731
Emergency Engine Stop ........................... 712
Emissions Testing (Readiness Codes) ...... 746
Engine ....................................................... 742
Coolant .................................................. 655
Jump Starting ......................................... 713
Oil .......................................................... 650
Starting................................................... 538
Engine Coolant ........................................ 655
Adding to the Radiator ........................... 656
Adding to the Reserve Tank .................... 655
Overheating ............................................ 715
Temperature Gauge ................................ 119
Engine Oil ................................................. 650
Adding ................................................... 652
Checking ................................................ 651
Displaying Maintenance Minder Information ........................................... 642
Low Oil Pressure Symbol ......................... 718
Recommended Engine Oil ....................... 650
ENGINE START/STOP Button .................... 186
Exhaust Gas Hazard (Carbon Monoxide) .. 80
Exterior Care (Cleaning) .......................... 693
Exterior Mirrors ........................................ 207
F
Features.................................................... 259
File Manager ............................................ 306
Filters
Dust and Pollen....................................... 689 Oil ........................................................... 653
Flat Tire ..................................................... 701
Floor Mats ................................................. 691
Fluids Automatic Transmission ........................... 657
Brake ....................................................... 658
Engine Coolant ........................................ 655
Windshield Washer .................................. 659
FM/AM Radio .................................... 274, 318
Fog Light Indicator ..................................... 93
Folding Down the Rear Seats .................. 222
Foot Brake ................................................. 605
Front Airbags (SRS) ..................................... 50
Front Knee Airbags .................................... 54
Front Seat Heaters .................................... 242
Front Seat Heaters and Seat Ventilation .............................................. 243
Front Seats ................................................ 209
Adjusting ................................................. 209
Fuel ...................................................... 26, 632
Economy ................................................. 635
Gauge ..................................................... 119
Instant Fuel Economy ............................... 125
Low Fuel Indicator ..................................... 89
Range ...................................................... 125
Recommendation .................................... 632
Refueling ................................................. 632
Fuel Economy ............................................ 635
Fuel Fill Door ....................................... 26, 633
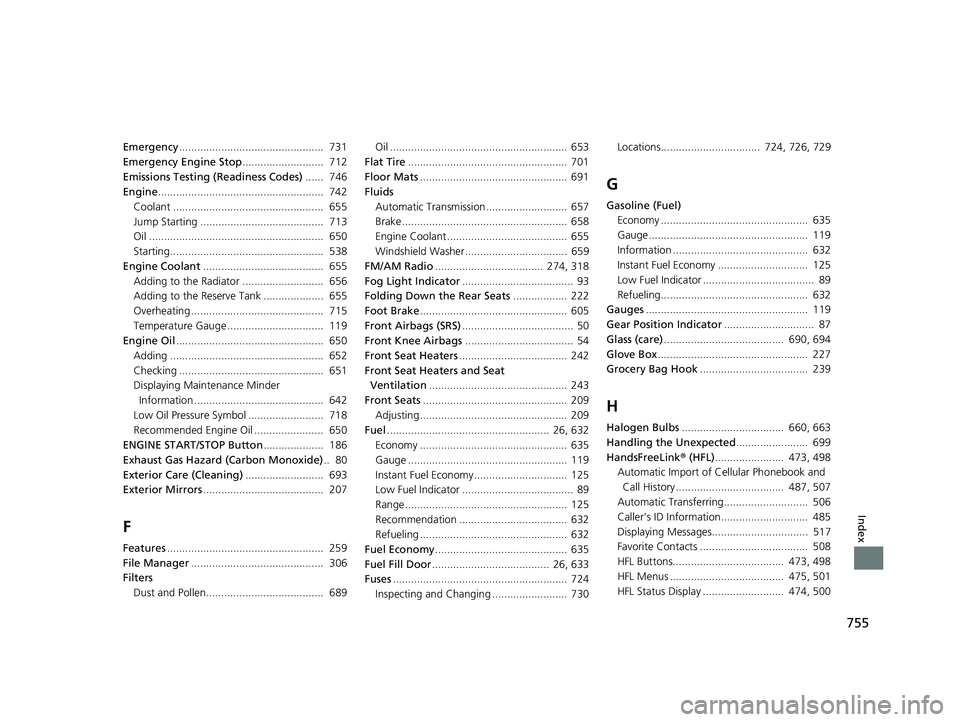
Fuses .......................................................... 724
Inspecting and Changing ......................... 730 Locations................................. 724, 726, 729
G
Gasoline (Fuel)
Economy ................................................. 635
Gauge ..................................................... 119
Information ............................................. 632
Instant Fuel Economy .............................. 125
Low Fuel Indicator ..................................... 89
Refueling................................................. 632
Gauges ...................................................... 119
Gear Position Indicator .............................. 87
Glass (care) ........................................ 690, 694
Glove Box .................................................. 227
Grocery Bag Hook .................................... 239
H
Halogen Bulbs.................................. 660, 663
Handling the Unexpected ........................ 699
HandsFreeLink ® (HFL) ....................... 473, 498
Automatic Import of Cellular Phonebook and
Call History .................................... 487, 507
Automatic Transferring............................ 506
Caller’s ID Information............................. 485
Displaying Messages................................ 517
Favorite Contacts .................................... 508
HFL Buttons..................................... 473, 498
HFL Menus ...................................... 475, 501
HFL Status Display ........................... 474, 500
19 ODYSSEY-31THR6120.book 755 ページ 2018年12月6日 木曜日 午後4時35分