2019 HONDA CLARITY PLUG IN HYBRID dead battery
[x] Cancel search: dead batteryPage 38 of 591

36
Quick Reference Guide Handling the Unexpected (P 523)
Flat Tire (P 524)
● Park in a safe location and repair the flat
tire using the temporary tire repair kit.
Indicators Come On (P 547)
● Identify the indicator and consult the
owner’s manual. Power System Won’t Start (P 537)
● If the 12-volt battery is dead, jump start
using a booster battery.
Blown Fuse
(P 555)
● Check for a blown fuse if an electrical
device does not operate.Overheating (P 544)
● Park in a safe location. If you do not see
steam under the hood, open the hood,
and let the power system cool down.
Emergency Towing (P 563)
● Call a professional towing service if you
need to tow your vehicle.19 CLARITY PHEV-31TRW6100.book 36 ページ 2018年10月25日 木曜日 午後2時29分
Page 145 of 591
Continued
143uu Locking and Unlocking the Doors u Locking/Unlocking the Doors from the Outside
Controls
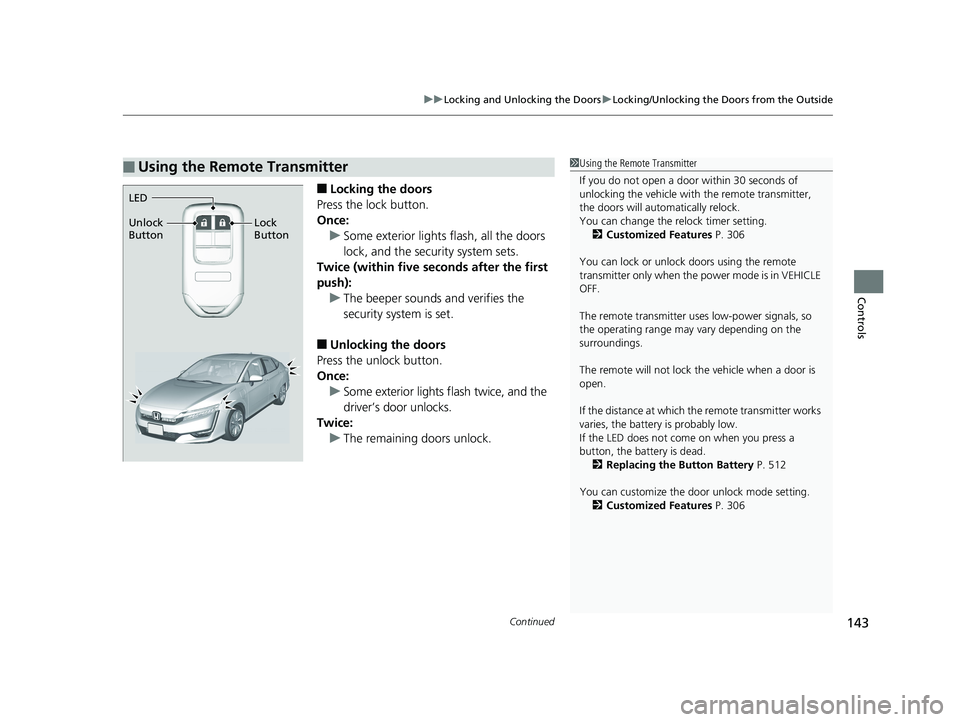
■ Locking the doors
Press the lock button.
Once:
u Some exterior lights flash, all the doors
lock, and the security system sets.
Twice (within five se conds after the first
push):
u The beeper sounds and verifies the
security system is set.
■ Unlocking the doors
Press the unlock button.
Once:
u Some exterior lights flash twice, and the
driver’s door unlocks.
Twice:
u The remaining doors unlock.■ Using the Remote Transmitter 1 Using the Remote Transmitter
If you do not open a door within 30 seconds of
unlocking the vehicle with the remote transmitter,
the doors will auto matically relock.
You can change the relock timer setting.
2 Customized Features P. 306
You can lock or unlock doors using the remote
transmitter only when the power mode is in VEHICLE
OFF.
The remote transmitter us es low-power signals, so
the operating range may vary depending on the
surroundings.
The remote will not lock th e vehicle when a door is
open.
If the distance at which the remote transmitter works
varies, the batter y is probably low.
If the LED does not come on when you press a
button, the battery is dead.
2 Replacing the Button Battery P. 512
You can customize the door unlock mode setting.
2 Customized Features P. 306LED
Unlock
Button Lock
Button19 CLARITY PHEV-31TRW6100.book 143 ページ 2018年10月25日 木曜日 午後2時29分
Page 156 of 591
uu Security System u Security System Alarm
154
Controls ■ Setting the security system alarm
The security system alarm automatically sets when th e following conditions have
been met:
• The power mode is set to VEHICLE OFF (LOCK).
• The hood is closed.
• All doors and the trunk are locked from outside with the key , remote transmitter
or smart entry system.
■ When the security system alarm sets
The security system alarm indicator in the instrument panel blinks. When the
blinking interval changes after about 15 seconds, the security system alarm is set.
■ To cancel the security system alarm
The security system alarm is canceled when the vehicle is unloc ked using the remote
transmitter, smart entry system, or the power mode is set to ON. The security system
alarm indicator goes off at the same time. 1 Security System Alarm
Do not set the security system alarm when someone
is in the vehicle or a window is open. The system can
accidentally activate when:
• Unlocking the door with the lock tab.
• Opening the trunk with the trunk opener or the
emergency trunk opener.
• Opening the hood with the hood release.
If the 12-volt battery goes dead after you have set the
security system alarm, the security alarm may go off
once the 12-volt battery is recharged or replaced.
If this occurs, deactivate the security system alarm by
unlocking a door using the key, remote transmitter or
smart entry system.19 CLARITY PHEV-31TRW6100.book 154 ページ 2018年10月25日 木曜日 午後2時29分
Page 208 of 591
206 uu Audio System u Audio System Theft Protection
Features Audio System Theft Protection The audio system is disabled when it is di sconnected from the power source, such as
when the 12-volt battery is disconnected or goes dead. In certain conditions, the
system may display a code entry screen. If this occurs, reactivate the audio system.
■ Reactivating the audio system
1. Set the power mode to ON.
2. Turn on the audio system.
3. Select and hold the audio system power icon for more than two seconds.
u The audio system is reac tivated when the audio co ntrol unit establishes a
connection with the vehicle control unit. If the control unit fails to recognize
the audio unit, you must go to an authorized Honda Clarity Plug-In Hybrid
dealer and have the audio unit checked.19 CLARITY PHEV-31TRW6100.book 206 ページ 2018年10月25日 木曜日 午後2時29分
Page 436 of 591
434
Driving Braking Brake System Use the parking brake to keep the vehicl e stationary when parked. When the
parking brake is applied, you can ma nually or automatically release it.
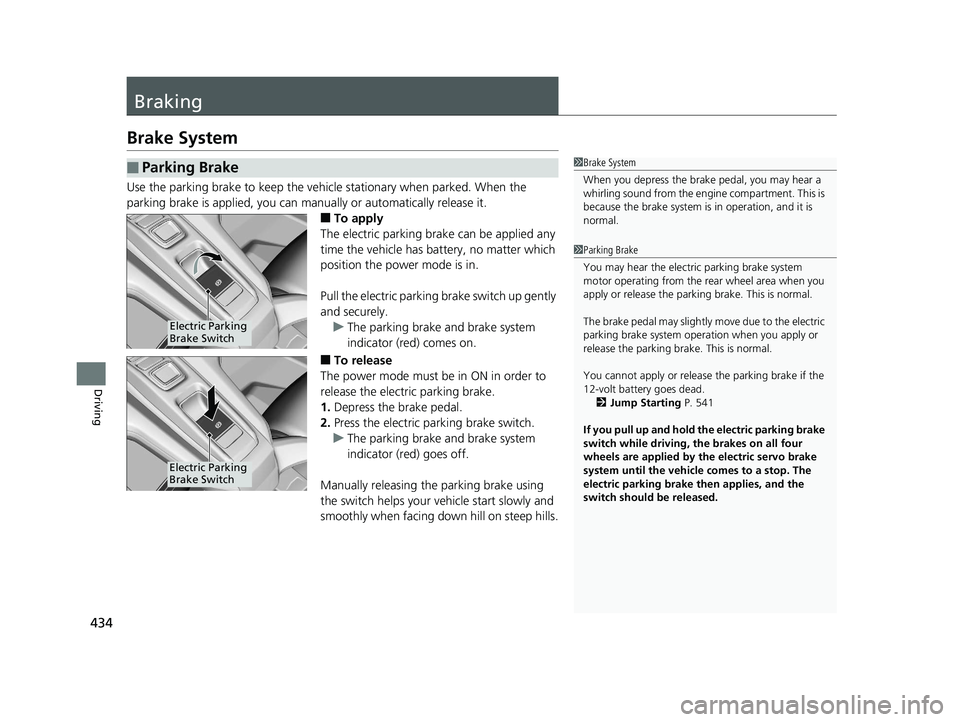
■ To apply
The electric parking brake can be applied any
time the vehicle has battery, no matter which
position the power mode is in.
Pull the electric parkin g brake switch up gently
and securely.
u The parking brake and brake system
indicator (red) comes on.
■ To release
The power mode must be in ON in order to
release the electric parking brake.
1. Depress the brake pedal.
2. Press the electric parking brake switch.
u The parking brake and brake system
indicator (red) goes off.
Manually releasing the parking brake using
the switch helps your ve hicle start slowly and
smoothly when facing down hill on steep hills.■ Parking Brake 1 Brake System
When you depress the brak e pedal, you may hear a
whirling sound from the engine compartment. This is
because the brake system is in operation, and it is
normal.
1 Parking Brake
You may hear the electric parking brake system
motor operating from the re ar wheel area when you
apply or release the parki ng brake. This is normal.
The brake pedal may slightly move due to the electric
parking brake system opera tion when you apply or
release the parking br ake. This is normal.
You cannot apply or release the parking brake if the
12-volt battery goes dead.
2 Jump Starting P. 541
If you pull up and hold the electric parking brake
switch while driving, the brakes on all four
wheels are applied by the electric servo brake
system until the vehicle comes to a stop. The
electric parking brake then applies, and the
switch should be released.Electric Parking
Brake Switch
Electric Parking
Brake Switch19 CLARITY PHEV-31TRW6100.book 434 ページ 2018年10月25日 木曜日 午後2時29分
Page 512 of 591
510
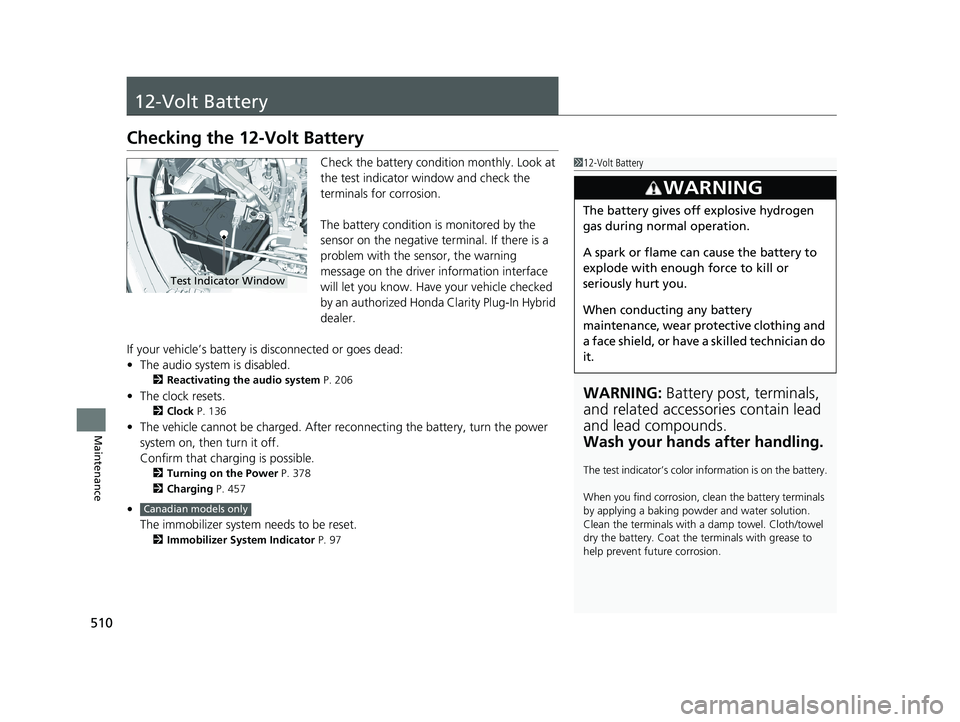
Maintenance 12-Volt Battery Checking the 12-Volt Battery Check the battery condition monthly. Look at
the test indicator window and check the
terminals for corrosion.
The battery condition is monitored by the
sensor on the negative terminal. If there is a
problem with the sensor, the warning
message on the driver information interface
will let you know. Have your vehicle checked
by an authorized Honda Clarity Plug-In Hybrid
dealer.
If your vehicle’s battery is disconnected or goes dead:
• The audio system is disabled. 2 Reactivating the audio system P. 206
• The clock resets. 2 Clock P. 136
• The vehicle cannot be charged. After re connecting the batte ry, turn the power
system on, then turn it off.
Confirm that charging is possible. 2 Turning on the Power P. 378
2 Charging P. 457
•
The immobilizer system needs to be reset. 2 Immobilizer System Indicator P. 97 1 12-Volt Battery
WARNING: Battery post, terminals,
and related accessories contain lead
and lead compounds.
Wash your hands after handling. The test indicator’s color in formation is on the battery.
When you find corrosion, cl ean the battery terminals
by applying a baking powder and water solution.
Clean the terminals with a damp towel. Cloth/towel
dry the battery. Coat the terminals with grease to
help prevent future corrosion.3
WARNING The battery gives off explosive hydrogen
gas during normal operation.
A spark or flame can cause the battery to
explode with enough force to kill or
seriously hurt you.
When conducting any battery
maintenance, wear prot ective clothing and
a face shield, or have a skilled technician do
it.Test Indicator Window
Canadian models only19 CLARITY PHEV-31TRW6100.book 510 ページ 2018年10月25日 木曜日 午後2時29分
Page 575 of 591
573
Information
Emissions Testing Testing of Readiness Codes Your vehicle has readiness codes as part of the onboard self diagnostic system.
Some states use these codes for testing to verify whether your vehicle’s emissions
components are working properly.
The codes may not be read properly if te sting is performed just after the 12-volt
battery has gone dead or been disconnected.
To check if they are set, set the powe r mode to ON, without turning the power
system on. The malfunction indicator lamp will come on for several seconds. If it
then goes off, the readiness co des are set. If it blinks fi ve times, the readiness codes
are not set.
If you are required to have your vehicle te sted before the readiness codes are ready,
prepare the vehicle for retest ing by doing the following:
1. Fill the gas tank to approximately 3/4 full.
2. Park the vehicle and leave the power system off for 6 hours or more.
3. Make sure the ambient temperature is between 40°F and 95°F (4°C and 35°C).
4. Turn the power system on.
5. Use the HV button to select HV or HV Charge.2 HV Button P. 16
6. Select a nearby, lightly traveled major hi ghway where you can maintain a speed
of 50 mph (80 km/h) over for at least 20 minutes. Drive on the highway in ( D
with SPORT mode. Do not use cruise control.
7. Drive in city or suburban traffic for at l east 10 minutes. When traffic conditions
allow, let the vehicle coast for several se conds without using the accelerator pedal
or the brake pedal.
8. Park the vehicle and leave the po wer system off for 40 minutes. 1 Testing of Readiness Codes
The readiness codes are erased when the 12-volt
battery is disconnected, and set again only after
several days of driving unde r a variety of conditions.
If a testing facility determines that the readiness
codes are not set, you may be requested to return at
a later date to complete the test.
If the testing facility determines the readiness codes
are still not set, see an au thorized Honda Clarity Plug-
In Hybrid dealer.19 CLARITY PHEV-31TRW6100.book 573 ページ 2018年10月25日 木曜日 午後2時29分
Page 584 of 591
582
Index Collision Mitigation Braking System TM
(CMBS TM
) .................................................. 442
Console Compartment ............................. 186
Control Box ............................................... 464
Controls ..................................................... 135
Coolant (Engine) ....................................... 490
Adding to the Radiator ............................ 491
Adding to the Reserve Tank ..................... 490
Overheating............................................. 544
Coolant (High Voltage Battery and
Inverter) ................................................... 492
Creeping (Transmission) ........................... 383
Cup Holders ............................................... 187
Customer Service Information ................. 578
Customized Features ........................ 133, 306
D Daytime Running Lights ........................... 165
Dead Battery (12-Volt) ............................. 541
Deceleration Paddle Selector ................... 392
Deceleration Paddle Sele ctor Indicator ....... 91
Defrosting the Windshield and
Windows .................................................. 197
Devices that Emit Radio Waves ................ 571
Dimming
Headlights ............................................... 162
Rearview Mirror ....................................... 173
Dipstick (Engine Oil) ................................. 485
Directional Signals (Turn Signal) .............. 161
Display Button .......................................... 211 Door Mirrors ............................................. 174
Doors ......................................................... 137
Auto Door Locking .................................. 149
Auto Door Unlocking .............................. 149
Door Open Message.................................. 46
Keys ........................................................ 137
Locking/Unlocking the Doors from the
Inside .............................................. 25, 146
Locking/Unlocking the Doors from the
Outside ................................................. 139
Lockout Prevention System ...................... 145
DOT Tire Quality Grading ........................ 504
Drive Cycle Score/Lifetime Points ............ 131
Driver Information Interface ................... 124
Driver’s Knee Airbag .................................. 61
Driving ...................................................... 371
Braking ................................................... 434
Shifting Gear ........................................... 384
Transmission ........................................... 383
Turning on the Power.............................. 378
Driving Position Memory System ............ 170
Dust and Pollen Filter ............................... 514
E Eco Assist ® System ...................................... 20
Eco Drive Display ...................................... 130
ECON Mode .............................................. 390
Elapsed Time ............................................. 127
Electric Power Steering (EPS) System
Indicator.................................................... 94 Electronic Stability Control (ESC) ............ 425
Emergency ................................................ 563
Emissions Testing (Readiness Codes) ...... 573
Energy Flow Screen .................................. 215
Engine
Coolant .................................................. 490
Oil .......................................................... 484
Engine Coolant ........................................ 490
Adding to the Radiator ........................... 491
Adding to the Reserve Tank .................... 490
Overheating ............................................ 544
Engine Oil ................................................. 484
Adding ................................................... 486
Checking ................................................ 485
Recommended Engine Oil ....................... 484
EPS (Electric Power Steering) System ........ 94
EV Indicator ................................................ 89
Exhaust Gas Hazard (Carbon Monoxide) .. 82
Expanded View Driver’s Mirror ............... 174
Exterior Care (Cleaning) .......................... 517
Exterior Mirrors ........................................ 174
F Features .................................................... 203
Filters
Dust and Pollen....................................... 514
Oil .......................................................... 487
Flat Tire ..................................................... 524
Floor Mats ................................................ 51619 CLARITY PHEV-31TRW6100.book 582 ページ 2018年10月25日 木曜日 午後2時29分