2019 HONDA CLARITY FUEL CELL transmission
[x] Cancel search: transmissionPage 430 of 551
uuBraking uBrake System
428
Driving
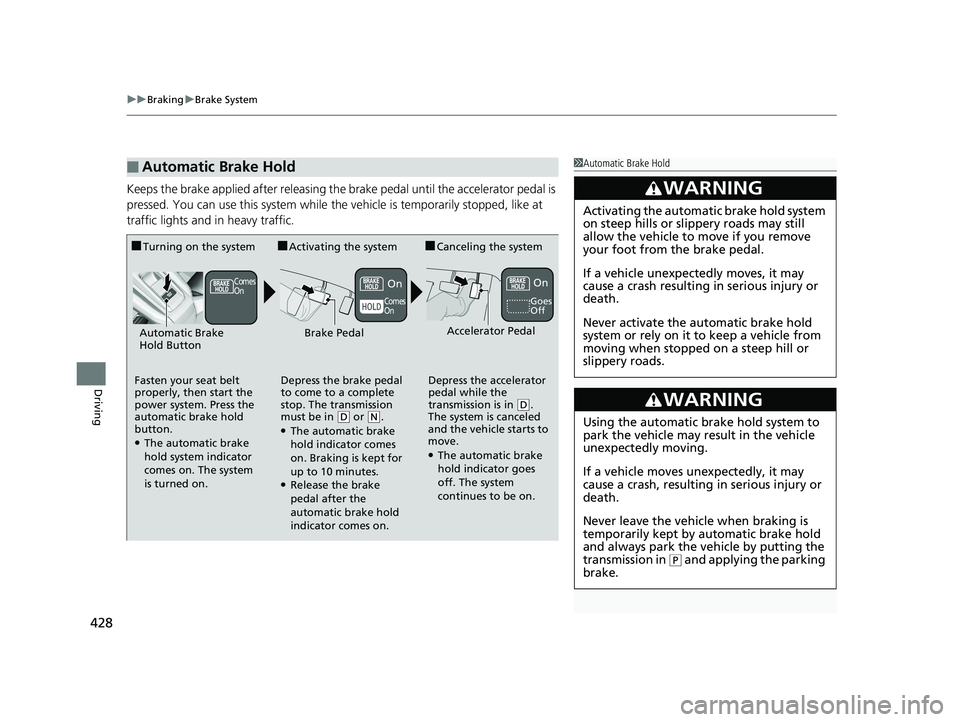
Keeps the brake applied after releasing the br ake pedal until the accelerator pedal is
pressed. You can use this system while th e vehicle is temporarily stopped, like at
traffic lights and in heavy traffic.
■Automatic Brake Hold1 Automatic Brake Hold
3WARNING
Activating the automatic brake hold system
on steep hills or slippery roads may still
allow the vehicle to move if you remove
your foot from the brake pedal.
If a vehicle unexpectedly moves, it may
cause a crash resulting in serious injury or
death.
Never activate the automatic brake hold
system or rely on it to keep a vehicle from
moving when stopped on a steep hill or
slippery roads.
3WARNING
Using the automatic brake hold system to
park the vehicle may result in the vehicle
unexpectedly moving.
If a vehicle moves unexpectedly, it may
cause a crash, resulting in serious injury or
death.
Never leave the vehicle when braking is
temporarily kept by automatic brake hold
and always park the vehicle by putting the
transmission in
( P and applying the parking
brake.
■Turning on the system
Fasten your seat belt
properly, then start the
power system. Press the
automatic brake hold
button.
●The automatic brake
hold system indicator
comes on. The system
is turned on.
■Activating the system
Depress the brake pedal
to come to a complete
stop. The transmission
must be in
( D or (N.●The automatic brake
hold indicator comes
on. Braking is kept for
up to 10 minutes.
●Release the brake
pedal after the
automatic brake hold
indicator comes on.
■Canceling the system
Depress the accelerator
pedal while the
transmission is in
( D.
The system is canceled
and the vehicle starts to
move.
●The automatic brake
hold indicator goes
off. The system
continues to be on.
Accelerator PedalBrake PedalAutomatic Brake
Hold Button
Goes
Off
On OnComes
On
Comes
On
19 CLARITY FCV CSS-31TRT6200.book 428 ページ 2019年1月17日 木曜日 午前11 時54分
Page 444 of 551
442
Driving
Multi-View Rear Camera
About Your Multi-View Rear Camera
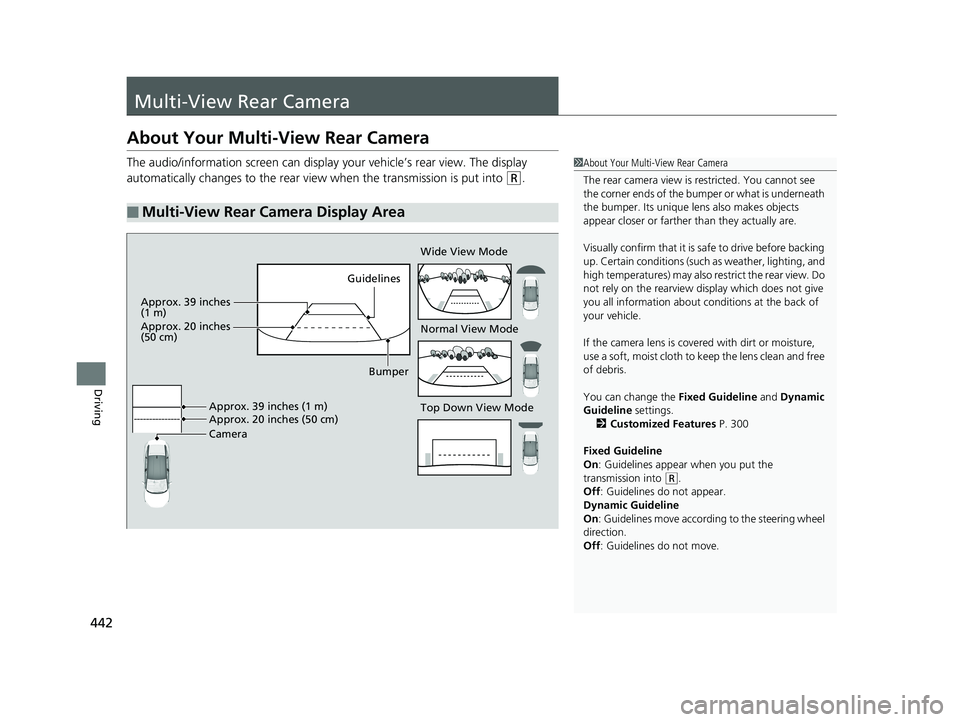
The audio/information screen can display your vehicle’s rear view. The display
automatically changes to the rear view when the transmission is put into
(R.
■Multi-View Rear Camera Display Area
1About Your Multi-View Rear Camera
The rear camera view is restricted. You cannot see
the corner ends of the bum per or what is underneath
the bumper. Its unique le ns also makes objects
appear closer or farther than they actually are.
Visually confirm that it is safe to drive before backing
up. Certain conditions (such as weather, lighting, and
high temperatures) may also re strict the rear view. Do
not rely on the rearview display which does not give
you all information about conditions at the back of
your vehicle.
If the camera lens is cove red with dirt or moisture,
use a soft, moist cloth to keep the lens clean and free
of debris.
You can change the Fixed Guideline and Dynamic
Guideline settings.
2 Customized Features P. 300
Fixed Guideline
On : Guidelines appear when you put the
transmission into
( R.
Off : Guidelines do not appear.
Dynamic Guideline
On : Guidelines move according to the steering wheel
direction.
Off : Guidelines do not move.
Top Down View Mode Normal View Mode Wide View Mode
Guidelines
Bumper
Camera Approx. 39 inches (1 m)
Approx. 20 inches (50 cm)
Approx. 39 inches
(1 m)
Approx. 20 inches
(50 cm)
19 CLARITY FCV CSS-31TRT6200.book 442 ページ 2019年1月17日 木曜日 午前11 時54分
Page 445 of 551
443
uuMulti-View Rear Camera uAbout Your Multi-View Rear Camera
Driving
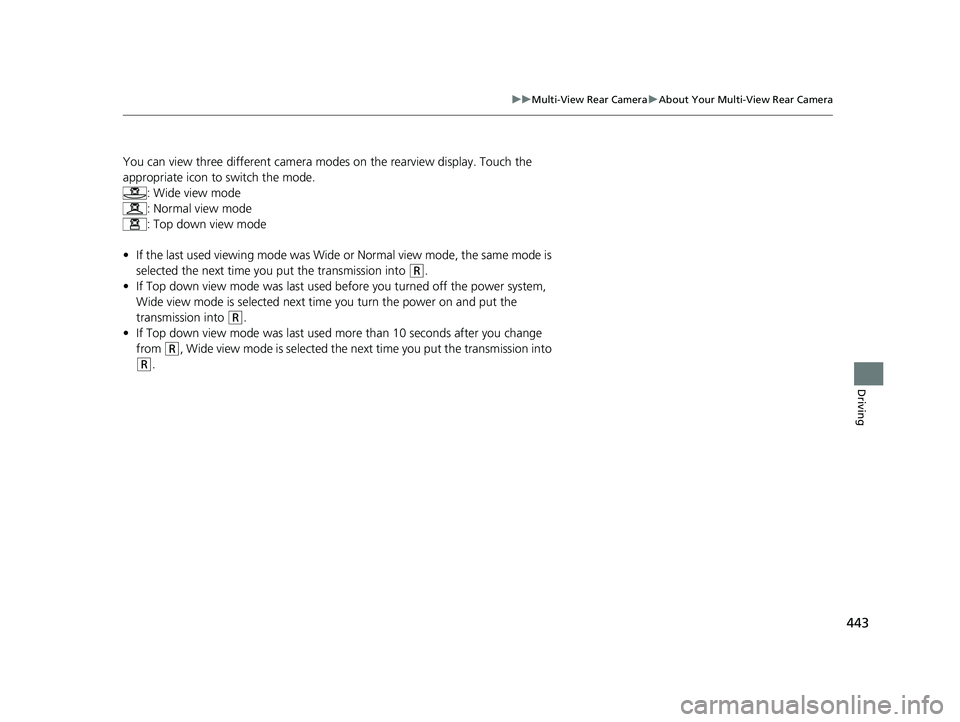
You can view three different camera modes on the rearview display. Touch the
appropriate icon to switch the mode.
: Wide view mode
: Normal view mode
: Top down view mode
• If the last used viewing mode was Wide or Normal view mode, the same mode is
selected the next time you put the transmission into
(R.
• If Top down view mode was last used before you turned off the power system,
Wide view mode is selected next ti me you turn the power on and put the
transmission into
(R.
• If Top down view mode was last used more than 10 seconds after you change
from
(R, Wide view mode is selected the next time you put the transmission into
(R.
19 CLARITY FCV CSS-31TRT6200.book 443 ページ 2019年1月17日 木曜日 午前11 時54分
Page 451 of 551
449
Maintenance
This chapter discusses basic maintenance.
Before Performing MaintenanceInspection and Maintenance ............ 450
Safety When Performing Maintenance...451
Parts and Fluids Used in Maintenance Service ........................................... 452
Maintenance Minder
TM..................... 453
Maintenance Under the Hood Maintenance Items Under the Hood .. 457
Opening the Hood ........................... 458
Inverter Coolant ............................... 459
Transmission Fluid ............................ 461
Brake Fluid ....................................... 461 Refilling Window Washer Fluid......... 462
Replacing Light Bulbs ....................... 463
Checking and Maintaining Wiper
Blades .......................................... 465
Checking and Maintaining Tires
Checking Tires ................................. 468
Tire and Loading Information Label .. 469
Tire Labeling .................................... 469
DOT Tire Quality Grading (U.S. Vehicles).. 471
Wear Indicators................................ 473
Tire Service Life ................................ 473
Tire and Wheel Replacement............ 474 Tire Rotation .................................... 475
Winter Tires ..................................... 476
12-Volt Battery ................................. 477
Remote Transmitter Care Replacing the Button Battery ........... 479
Climate Control System Maintenance.. 480
CleaningInterior Care .................................... 481
Exterior Care.................................... 483
Accessories and Modifications ........ 487
19 CLARITY FCV CSS-31TRT6200.book 449 ページ 2019年1月17日 木曜日 午前11 時54分
Page 457 of 551
455
uuMaintenance MinderTMuTo Use Maintenance MinderTM
Continued
Maintenance
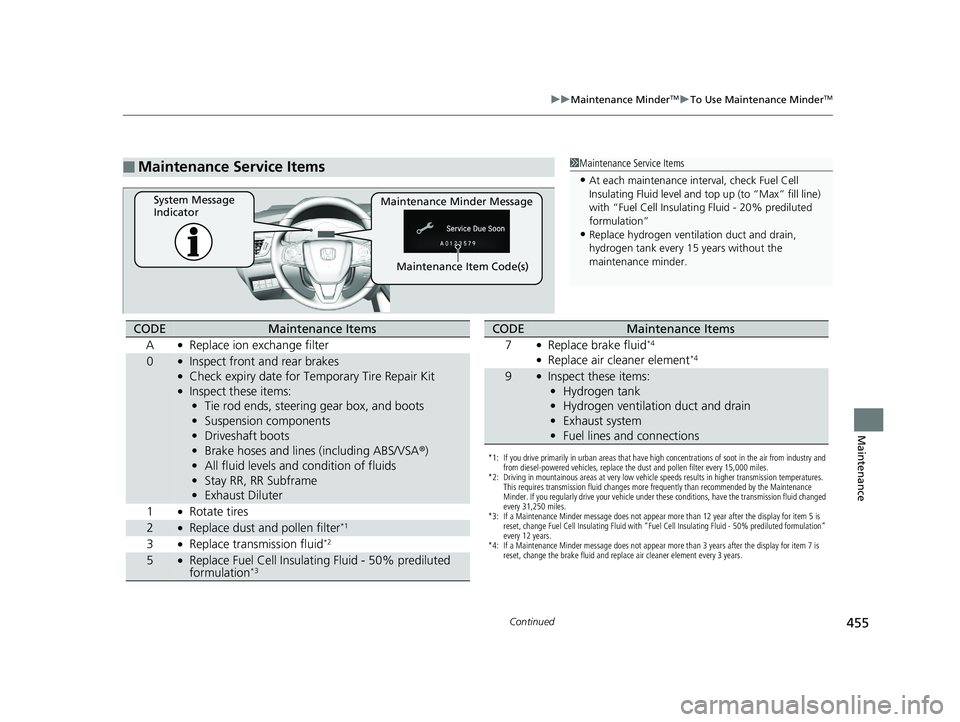
■Maintenance Service Items1Maintenance Service Items
•At each maintenance interval, check Fuel Cell
Insulating Fluid level and top up (to “Max” fill line)
with “Fuel Cell Insulating Fluid - 20% prediluted
formulation”
•Replace hydrogen ventil ation duct and drain,
hydrogen tank every 15 years without the
maintenance minder.
Maintenance Minder Message
System Message
Indicator
Maintenance Item Code(s)
CODEMaintenance Items
A
●Replace ion exchange filter
0●Inspect front and rear brakes●Check expiry date for Temporary Tire Repair Kit●Inspect these items: • Tie rod ends, steering gear box, and boots
• Suspension components
• Driveshaft boots
• Brake hoses and lines (including ABS/VSA ®)
• All fluid levels and condition of fluids
• Stay RR, RR Subframe
• Exhaust Diluter
1
●Rotate tires
2●Replace dust and pollen filter*1
3●Replace transmission fluid*2
5●Replace Fuel Cell Insulati ng Fluid - 50% prediluted
formulation*3
*1: If you drive primarily in urban areas that have high concentrations of soot in the air from industry and
from diesel-powered vehicles, replace the dust and pollen filter every 15,000 miles.
*2: Driving in mountainous areas at very low vehicle speeds results in higher transmission temperatures. This requires transmission fluid changes more frequently than recommended by the Maintenance
Minder. If you regularly drive your vehicle under these conditions, have the transmission fluid changed
every 31,250 miles.
*3: If a Maintenance Minder message does not appear more than 12 year after the display for item 5 is reset, change Fuel Cell Insulating Fluid with “Fuel Cell Insulating Fluid - 50% prediluted formulation”
every 12 years.
*4: If a Maintenance Minder message does not appear more than 3 years after the display for item 7 is reset, change the brake fluid and replace air cleaner element every 3 years.
CODEMaintenance Items
7
●Replace brake fluid*4
●Replace air cleaner element*4
9●Inspect these items: • Hydrogen tank
• Hydrogen ventilation duct and drain
• Exhaust system
• Fuel lines and connections
19 CLARITY FCV CSS-31TRT6200.book 455 ページ 2019年1月17日 木曜日 午前11 時54分
Page 463 of 551
461
uuMaintenance Under the Hood uTransmission Fluid
Maintenance
Transmission Fluid
Have an authorized Honda Clarity Fuel Cell dealer check the fluid level and replace
if necessary.
Do not attempt to check or change the transmission fluid yourself.
Brake Fluid
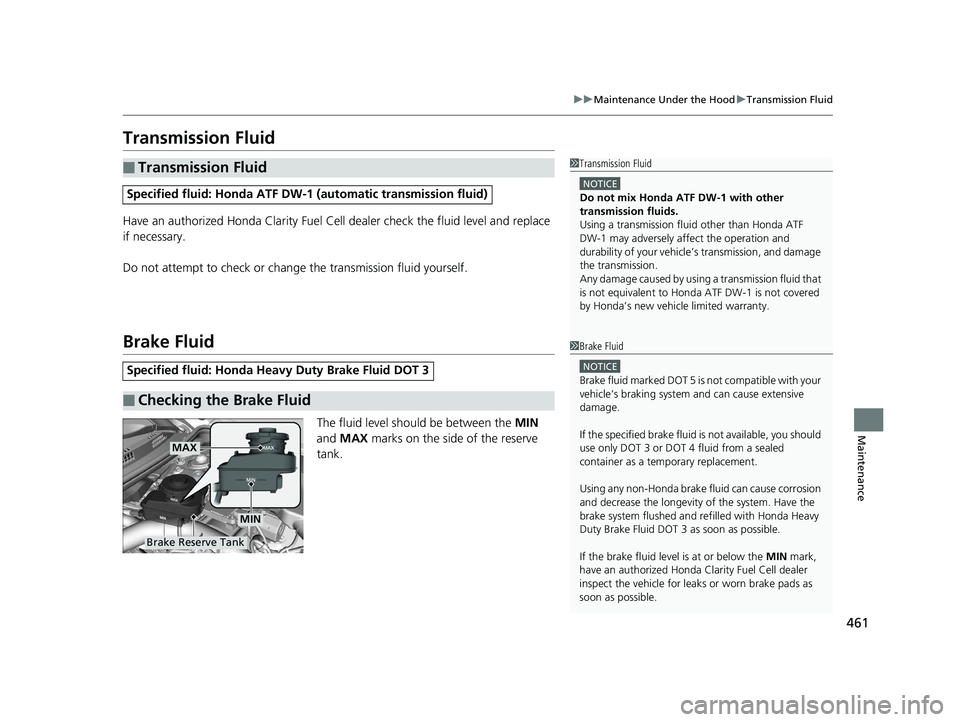
The fluid level should be between the MIN
and MAX marks on the side of the reserve
tank.
■Transmission Fluid
Specified fluid: Honda ATF DW-1 (automatic transmission fluid)
Specified fluid: Honda Heav y Duty Brake Fluid DOT 3
■Checking the Brake Fluid
1Transmission Fluid
NOTICE
Do not mix Honda ATF DW-1 with other
transmission fluids.
Using a transmission flui d other than Honda ATF
DW-1 may adversely af fect the operation and
durability of your vehicle’ s transmission, and damage
the transmission.
Any damage caused by usi ng a transmission fluid that
is not equivalent to Honda ATF DW-1 is not covered
by Honda’s new vehi cle limited warranty.
1Brake Fluid
NOTICE
Brake fluid marked DOT 5 is not compatible with your
vehicle’s braking system and can cause extensive
damage.
If the specified brake fluid is not available, you should
use only DOT 3 or DOT 4 fluid from a sealed
container as a temporary replacement.
Using any non-Honda brake fluid can cause corrosion
and decrease the longevity of the system. Have the
brake system flushed and re filled with Honda Heavy
Duty Brake Fluid DOT 3 as soon as possible.
If the brake fluid level is at or below the MIN mark,
have an authorized Honda Clarity Fuel Cell dealer
inspect the vehicle for leaks or worn brake pads as
soon as possible.
Brake Reserve Tank
MAX
MIN
19 CLARITY FCV CSS-31TRT6200.book 461 ページ 2019年1月17日 木曜日 午前11 時54分
Page 485 of 551
483
uuCleaning uExterior Care
Continued
Maintenance
Exterior Care
Dust off the vehicle body after you drive.
Regularly inspect your vehi cle for scratches on painted surfaces. A scratch on a
painted surface can result in body rust. If you find a scratch, promptly repair it.
Wash the vehicle regularly. Wash more frequently when driving in the following
conditions:
• If driving on roads with road salt.
• If driving in coastal areas.
• If tar, soot, bird droppings, insects, or tree sap are stuck to painted surfaces.
• Make sure to follow the instructions indicated on the automated car wash.
• Fold in the door mirrors.
• For models equipped with automatic inte rmittent wipers, turn the wipers off.
■Washing the Vehicle
■Using an Automated Car Wash
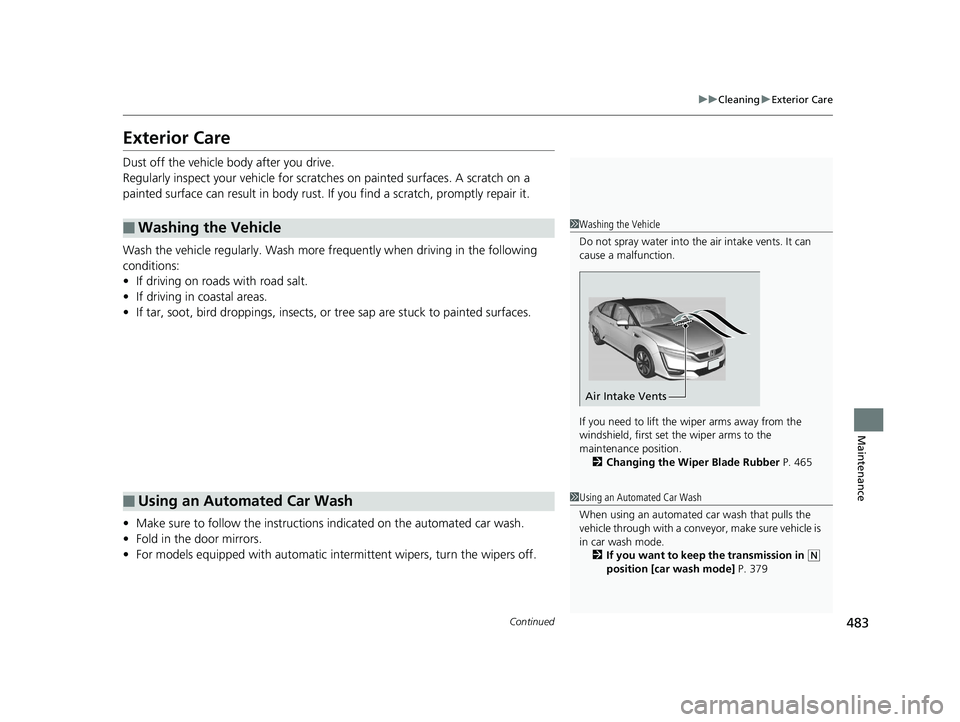
1Washing the Vehicle
Do not spray water into the air intake vents. It can
cause a malfunction.
If you need to lift the wiper arms away from the
windshield, first set the wiper arms to the
maintenance position. 2 Changing the Wiper Blade Rubber P. 465
Air Intake Vents
1Using an Automated Car Wash
When using an automated car wash that pulls the
vehicle through with a convey or, make sure vehicle is
in car wash mode. 2 If you want to keep the transmission in
(N
position [car wash mode] P. 379
19 CLARITY FCV CSS-31TRT6200.book 483 ページ 2019年1月17日 木曜日 午前11 時54分
Page 491 of 551
489
Handling the Unexpected
This chapter explains how to handle unexpected troubles.
If a Tire Goes FlatTemporarily Repairi ng a Flat Tire....... 490
Handling of the Jack ......................... 502
Power System Won’t Start Checking the Procedure ................... 503
If the Smart Entry Remote Battery is Weak .......................................... 504
Emergency Power System Off........... 505
Jump Starting .................................... 506
Overheating How to Handle Overheating ............. 509
If Hydrogen Gas is Leaking .............. 511Indicator, Coming On/Blinking
If the 12-Volt Battery Charging System Indicator Comes On ....................... 513
If the Brake System Indicator (Red) Comes On or Blinks ....................................... 514
If the Electric Power Steering (EPS) System Indicator Comes On ........................... 514If the Brake System Indicator (Red) Comes On or Blinks at the Same Time
When the Brake System Indicator
(Amber) Comes On ...................... 515
If the Low Tire Pressure/TPMS Indicator
Comes On or Blinks ....................... 516
If the Transmission System Indicator Blinks along with the Warning Message .... 517
Fuses Fuse Locations ................................. 518
Inspecting and Changing Fuses ........ 525
Emergency Towing ........................... 526
When You Cannot Unlock the Hydrogen Fuel Lid .............................................. 527
When You Cannot Open the Trunk .. 528
19 CLARITY FCV CSS-31TRT6200.book 489 ページ 2019年1月17日 木曜日 午前11 時54分