2019 HONDA CLARITY ELECTRIC jump cable
[x] Cancel search: jump cablePage 518 of 559

516
Handling the Unexpected
Jump Starting
Turn off the power to electric devices, such as audio and lights. Turn off the power
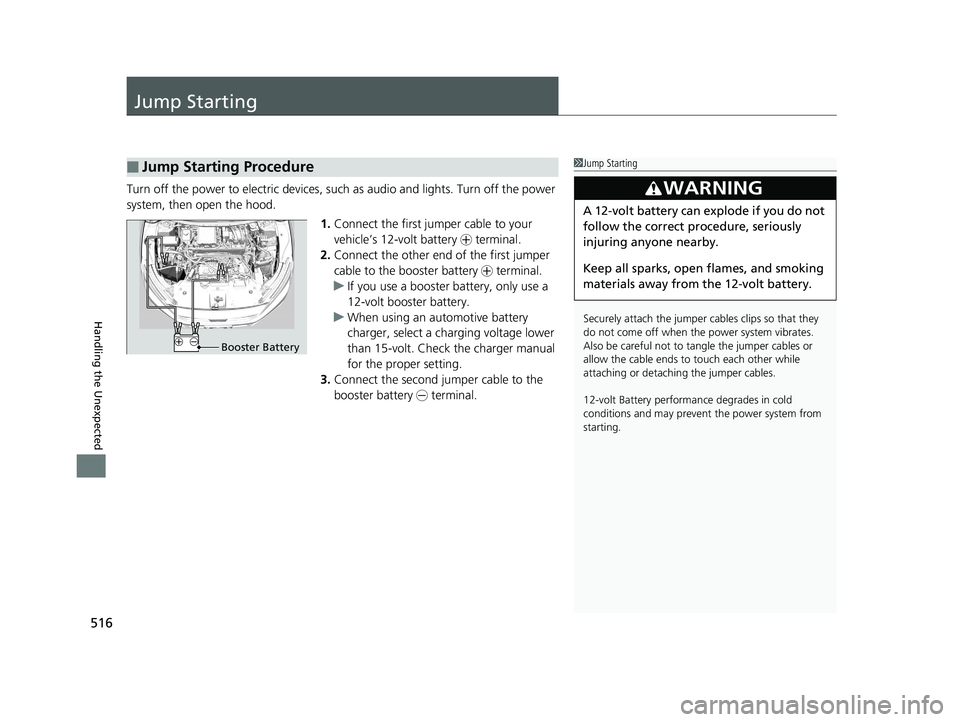
system, then open the hood.1.Connect the first jump er cable to your
vehicle’s 12-volt battery + terminal.
2. Connect the other end of the first jumper
cable to the booster battery + terminal.
u If you use a booster battery, only use a
12-volt booster battery.
u When using an automotive battery
charger, select a charging voltage lower
than 15-volt. Check the charger manual
for the proper setting.
3. Connect the second jumper cable to the
booster battery - terminal.
■Jump Starting Procedure1Jump Starting
Securely attach the jumper cables clips so that they
do not come off when the power system vibrates.
Also be careful not to ta ngle the jumper cables or
allow the cable ends to touch each other while
attaching or detaching the jumper cables.
12-volt Battery performa nce degrades in cold
conditions and may prevent the power system from
starting.
3WARNING
A 12-volt battery can explode if you do not
follow the correct procedure, seriously
injuring anyone nearby.
Keep all sparks, open flames, and smoking
materials away from the 12-volt battery.
Booster Battery
19 CLARITY BEV-31TRV6200.book 516 ページ 2018年10月29日 月曜日 午前10時54分
Page 519 of 559

517
uuJump Starting u
Continued
Handling the Unexpected
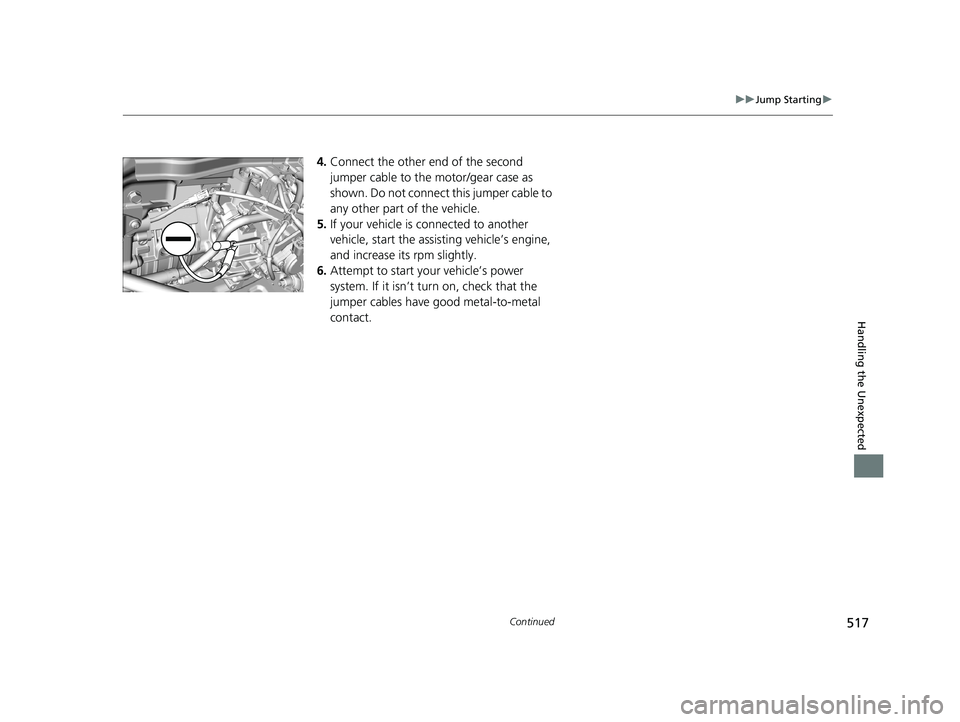
4.Connect the other end of the second
jumper cable to the motor/gear case as
shown. Do not connect this jumper cable to
any other part of the vehicle.
5. If your vehicle is connected to another
vehicle, start the assisting vehicle’s engine,
and increase its rpm slightly.
6. Attempt to start your vehicle’s power
system. If it isn’t turn on, check that the
jumper cables have good metal-to-metal
contact.
19 CLARITY BEV-31TRV6200.book 517 ページ 2018年10月29日 月曜日 午前10時54分
Page 520 of 559

uuJump Starting u
518
Handling the Unexpected
Once your vehicle’s power system has sta rted, remove the jumper cables in the
following order.
1. Disconnect the jumper cable from your vehicle’s ground.
2. Disconnect the other end of the jumper cable from the booster battery -
terminal.
3. Disconnect the jumper cable from your vehicle’s 12-volt battery + terminal.
4. Disconnect the other end of the jumper cable from the booster battery +
terminal.
Have your vehicle inspected by a nearby service station or an authorized Honda
Clarity Electric dealer.
■What to Do After the Power System Starts1 What to Do After the Power System Starts
The indicators for the Vehicle Stability Assist ® (VSA ®)
system, VSA ® OFF, Collision Mitigation Braking
System
TM (CMBSTM), and low tire pressure/Tire
Pressure Monitoring System (TPMS) may come on
along with a message in the driver information
interface when you turn the power system on after
reconnecting the battery.
Drive a short distance at 12 mph (20 km/h). The
indicator should go off. If it does not, have your
vehicle checked by an authorized Honda Clarity
Electric dealer.
19 CLARITY BEV-31TRV6200.book 518 ページ 2018年10月29日 月曜日 午前10時54分
Page 551 of 559

549
Index
Charging ................................................ 442
Charging (12-Volt Battery) ...................... 487
Energy Economy ..................................... 458
High Voltage........................................... 455
Jump Starting ......................................... 516
Maintenance (Checking the 12-Volt Battery) ................................................. 486
Maintenance (Replacing) ......................... 488
Safety Checklist ...................................... 442
Belts (Seat) .................................................. 44
Beverage Holders ..................................... 180
Bluetooth ® Audio ..................................... 257
Bluetooth ® HandsFreeLink ®.................... 327
Booster Seats (For Children) ...................... 79
Brake System ............................................ 422
Anti-lock Brake System (ABS) .................. 428
Automatic Brake Hold ............................. 426
Brake Assist System................................. 429
Fluid ....................................................... 470
Foot Brake .............................................. 425
Indicator (Amber) .............................. 84, 523
Indicator (Red) .................... 82, 83, 521, 523
Parking Brake.......................................... 422
Bulb Replacement .................................... 472
Front Turn Signal and Front Side Marker
Lights .................................................... 472
Headlights .............................................. 472
High-Mount Brake Light.......................... 473
Parking/Daytime Running Lights .............. 472
Rear License Plate Lights ......................... 473
Taillights and Back-Up Lights................... 473 Taillights/Rear Side
Marker, Brake and
Rear Turn Signal Lights .......................... 473
Bulb Specifications ................................... 538
C
Carrying Cargo.................................. 363, 365
Certification Label .................................... 540
Changing Bulbs ......................................... 472
Charge Lid ......................................... 445, 447
Charge Lid Release Button ............... 444, 446
Charge Timer Setting ............................... 456
Charging ................................................... 442
120V AC (AC Level 1) .............................. 444
240V AC (AC Level 2) .............................. 446
Cannot Start Charging ............................ 452
Charge Indicator (vehicle side) ................. 454
Charge Lid ....................................... 445, 447
Charging Connector ................ 445, 447, 449
Control Box ............................................. 450
DC Charge .............................................. 448
High Voltage Battery ............................... 455
Timer ....................................................... 456
Unable to Disengage the Charging Connector ............................................. 535
Charging Cable Bag .................................. 444
Charging Connector ................. 445, 447, 449
Charging System Indicator ................. 86, 520
Child Safety ................................................. 67
Childproof Door Locks ............................. 142 Child Seat
.................................................... 67
Booster Seats ............................................ 79
Child Seat for Infants................................. 69
Child Seat for Small Children ..................... 70
Installing a Child Seat with a Lap/
Shoulder Seat Belt ................................... 74
Larger Children ......................................... 78
Rear-facing Child Seat ............................... 69
Selecting a Child Seat ................................ 71
Using a Tether ........................................... 76
Childproof Door Locks ............................. 142
Cleaning the Exterior ............................... 492
Cleaning the Interior ................................ 490
Climate Control System ............................ 186
Changing the Mode ................................ 188
Defrosting the Windshield and Windows ............................................... 190
Dust and Pollen Filter............................... 489
Sensors ................................................... 194
Using Automatic Climate Control ............ 186
Clock .......................................................... 130
CMBS
TM (Collision Mitigation Braking
SystemTM) ................................................. 430
Coat Hook ................................................. 183
Collision Mitigation Braking System
TM
(CMBSTM) ................................................. 430
Console Compartment ............................. 179
Controls ..................................................... 129
Cooling System ......................................... 469
Coolant ................................................... 469
Overheating ............................................ 519
19 CLARITY BEV-31TRV6200.book 549 ページ 2018年10月29日 月曜日 午前10時54分