Page 256 of 559
254
uuAudio System Basic Operation uPlaying a USB Flash Drive
Features
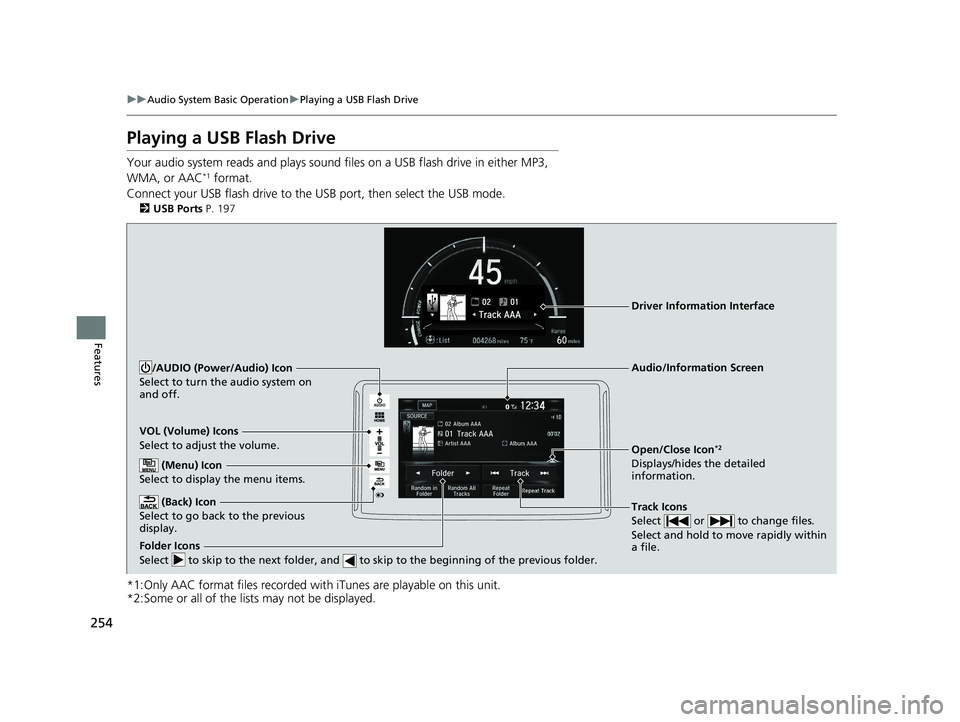
Playing a USB Flash Drive
Your audio system reads and plays sound fi les on a USB flash drive in either MP3,
WMA, or AAC*1 format.
Connect your USB flash drive to the USB port, then select the USB mode.
2USB Ports P. 197
*1:Only AAC format files recorded with iTunes are playable on this unit.
*2:Some or all of the lists may not be displayed.
VOL (Volume) Icons
Select to adjust the volume.
(Back) Icon
Select to go back to the previous
display.
Track Icons
Select or to change files.
Select and hold to move rapidly within
a file.
/AUDIO (Power/Audio) Icon
Select to turn the audio system on
and off.
Open/Close Icon*2
Displays/hides the detailed
information.
(Menu) Icon
Select to display the menu items.
Folder Icons
Select to skip to the next folder, and to skip to the beginning of the previous folder.
Audio/Information Screen
Driver Information Interface
19 CLARITY BEV-31TRV6200.book 254 ページ 2018年10月29日 月曜日 午前10時54分
Page 258 of 559
uuAudio System Basic Operation uPlaying a USB Flash Drive
256
Features
You can select scan, repeat, and random modes when playing a file.
■Scan
1. Select .
2. Select Scan.
3. Select a play mode.
■Random/Repeat
Select a play mode.
■To turn off a play mode
To turn off Scan, select or Cancel.
To turn off Random/Repeat , select the mode again.
■How to Select a Play Mode1How to Select a Play Mode
Play Mode Menu Items
Scan
Scan Folders : Provides 10-second sampling of the
first file in each of the main folders.
Scan Tracks : Provides 10-second sa mpling of all files
in the current folder.
Random/Repeat
Random in Folder : Plays all files in the current
folder in random order.
Random All Tracks : Plays all files in random order.
Repeat Folder : Repeats all files in the current folder.
Repeat Track: Repeats the current file.
19 CLARITY BEV-31TRV6200.book 256 ページ 2018年10月29日 月曜日 午前10時54分
Page 260 of 559
uuAudio System Basic Operation uPlaying Bluetooth ® Audio
258
Features
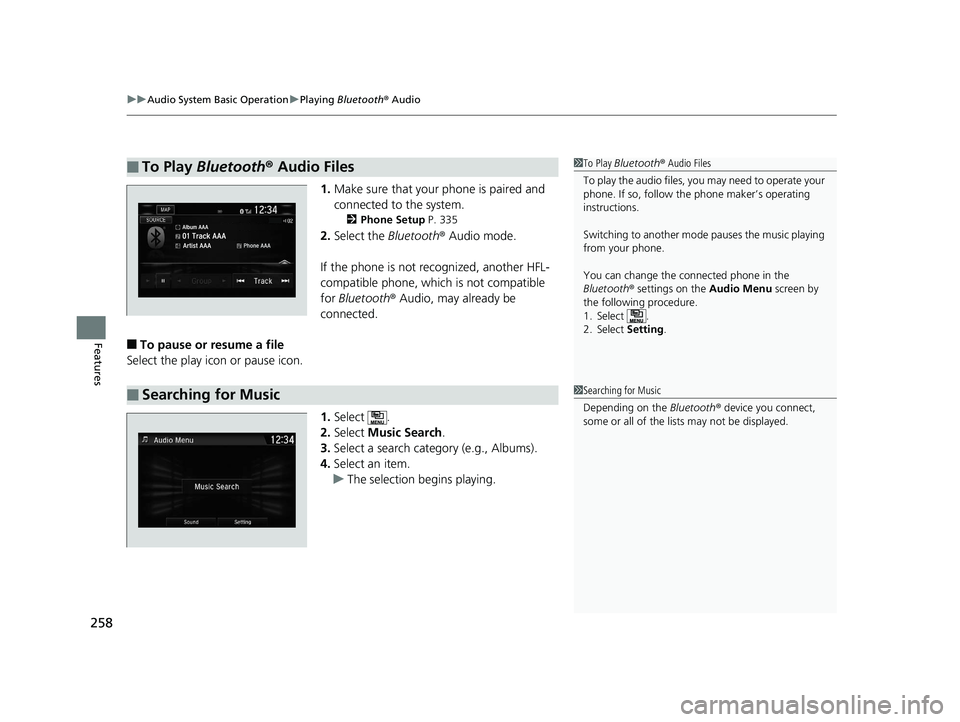
1. Make sure that your phone is paired and
connected to the system.
2 Phone Setup P. 335
2.Select the Bluetooth® Audio mode.
If the phone is not recognized, another HFL-
compatible phone, which is not compatible
for Bluetooth ® Audio, may already be
connected.
■To pause or resume a file
Select the play icon or pause icon.
1.Select .
2. Select Music Search.
3. Select a search cate gory (e.g., Albums).
4. Select an item.
u The selection begins playing.
■To Play Bluetooth® Audio Files1To Play Bluetooth ® Audio Files
To play the audio files, y ou may need to operate your
phone. If so, follow the phone maker’s operating
instructions.
Switching to another mode pauses the music playing
from your phone.
You can change the connected phone in the
Bluetooth ® settings on the Audio Menu screen by
the following procedure.
1. Select .
2. Select Setting .
■Searching for Music1Searching for Music
Depending on the Bluetooth® device you connect,
some or all of the list s may not be displayed.
19 CLARITY BEV-31TRV6200.book 258 ページ 2018年10月29日 月曜日 午前10時54分
Page 282 of 559
280
uuGeneral Information on the Audio System uCompatible iPod, iPhone, and USB Flash Drives
Features
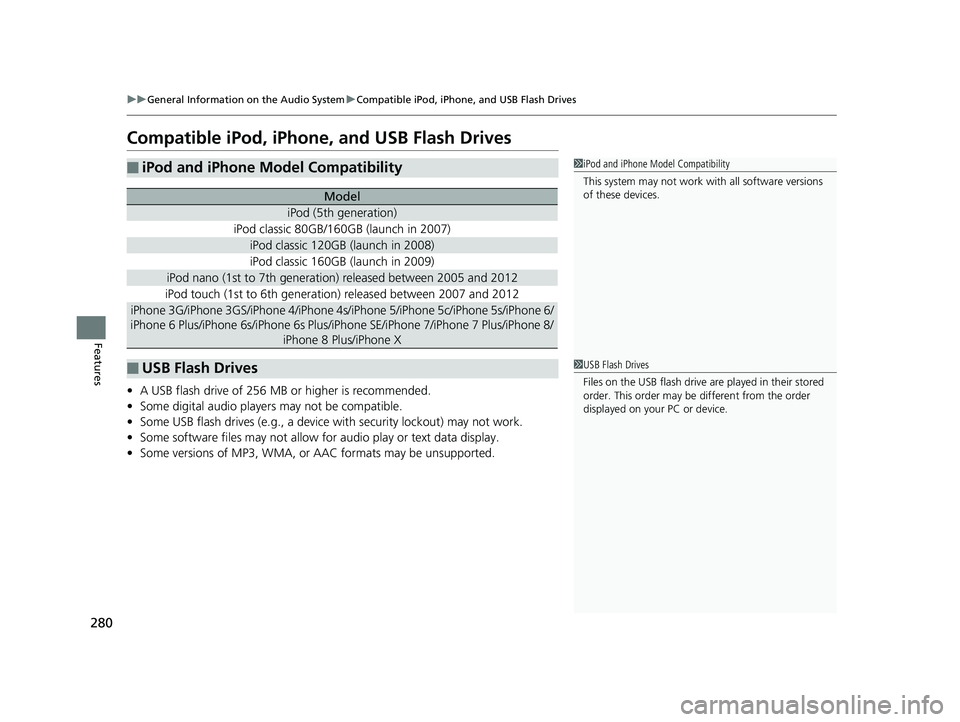
Compatible iPod, iPhone, and USB Flash Drives
• A USB flash drive of 256 MB or higher is recommended.
• Some digital audio players may not be compatible.
• Some USB flash drives (e.g., a device with security lockout) may not work.
• Some software files may not allow for audio play or text data display.
• Some versions of MP3, WMA, or AAC formats may be unsupported.
■iPod and iPhone Model Compatibility
Model
iPod (5th generation)
iPod classic 80GB/160GB (launch in 2007)
iPod classic 120GB (launch in 2008)
iPod classic 160GB (launch in 2009)
iPod nano (1st to 7th generation) released between 2005 and 2012
iPod touch (1st to 6th generation) released between 2007 and 2012
iPhone 3G/iPhone 3GS/iPhone 4/iPhone 4s /iPhone 5/iPhone 5c/iPhone 5s/iPhone 6/
iPhone 6 Plus/iPhone 6s/iPhone 6s Plus/iPhone SE/iPhone 7/iPhone 7 Plus/iPhone 8/
iPhone 8 Plus/iPhone X
■USB Flash Drives
1iPod and iPhone Model Compatibility
This system may not work with all software versions
of these devices.
1USB Flash Drives
Files on the USB flash drive are played in their stored
order. This order may be different from the order
displayed on your PC or device.
19 CLARITY BEV-31TRV6200.book 280 ページ 2018年10月29日 月曜日 午前10時54分
Page 323 of 559
321
uuCustomized Features u
Continued
Features
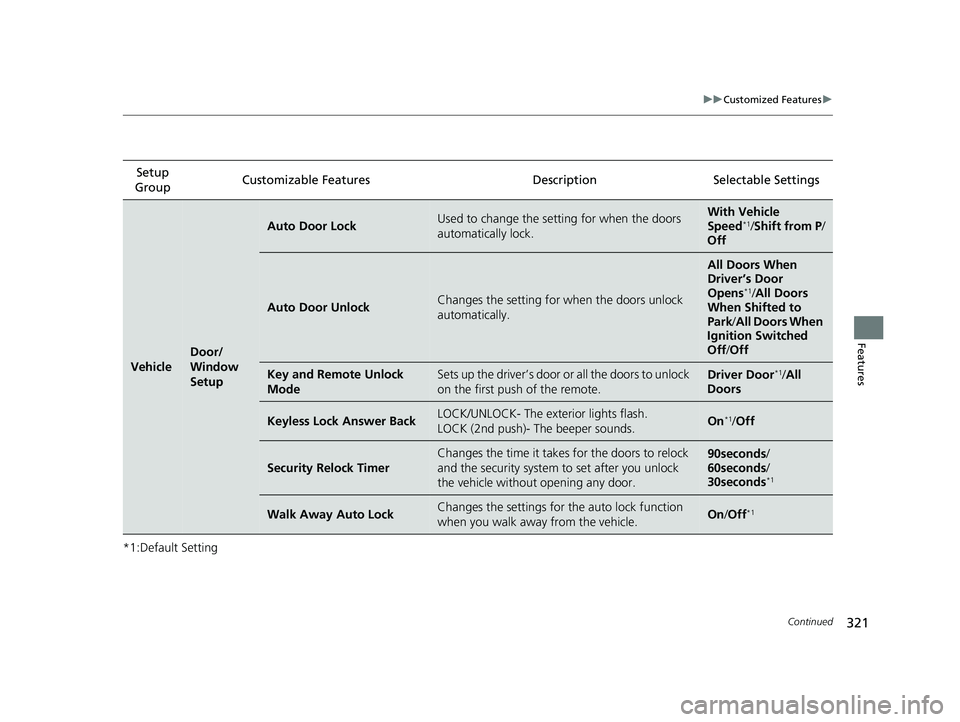
*1:Default SettingSetup
Group Customizable Features Desc
ription Selectable Settings
Vehicle
Door/
Window
Setup
Auto Door LockUsed to change the setting for when the doors
automatically lock.With Vehicle
Speed*1/ Shift from P /
Off
Auto Door UnlockChanges the setting for when the doors unlock
automatically.
All Doors When
Driver’s Door
Opens
*1/ All Doors
When Shifted to
Park /All Doors When
Ignition Switched
Off /Off
Key and Remote Unlock
ModeSets up the driver’s door or all the doors to unlock
on the first push of the remote.Driver Door*1/ All
Doors
Keyless Lock Answer BackLOCK/UNLOCK- The exterior lights flash.
LOCK (2nd push)- The beeper sounds.On*1/ Off
Security Relock Timer
Changes the time it takes for the doors to relock
and the security system to set after you unlock
the vehicle withou t opening any door.90seconds/
60seconds /
30seconds
*1
Walk Away Auto LockChanges the settings for the auto lock function
when you walk away from the vehicle.On /Off*1
19 CLARITY BEV-31TRV6200.book 321 ページ 2018年10月29日 月曜日 午前10時54分
Page 363 of 559
361
Driving
This chapter discusses driving and charging.
Before Driving................................... 362
Towing a Trailer ................................ 367
When Driving Turning on the Power ...................... 368
Precautions While Driving................. 371
Transmission .................................... 372
Shifting ............................................ 373
ECON Mode .................................... 379
SPORT Mode.................................... 380
Deceleration Paddle Selector ............ 381
Acoustic Vehicle Al erting System ...... 384
Front Sensor Camera ....................... 385
Road Departure Mi tigation (RDM)
System ........................................ 387
Adaptive Cruise Control (ACC) with Low
Speed Follow (LSF) ......................... 391
Lane Keeping Assist System (LKAS)...... 406Vehicle Stability Assist ® (VSA ®), aka
Electronic Stability Control (ESC),
System ....................................... 413
Agile Handling Assist ....................... 415Tire Pressure Monitoring System (TPMS) .. 416Tire Pressure Monitoring System (TPMS) -
Required Federal Explanation ......... 418
LaneWatchTM....................................... 420Braking Brake System ................................... 422
Anti-lock Brake System (ABS) ........... 428 Brake Assist System ......................... 429
Collision Mitigation Braking System
TM
(CMBSTM) ....................................... 430
Parking Your Vehicle When Stopped ................................ 438
Multi-View Rear Camera .................. 440
Charging ............................................ 442
Before Charging .............................. 442
Charge the High Voltage battery using a
Level 1, 2 or SAE J1772 DC charger ...443
Control Box ..................................... 450
High Voltage Battery........................ 455
Using a Timer .................................. 456
Energy Economy ............................... 458
19 CLARITY BEV-31TRV6200.book 361 ページ 2018年10月29日 月曜日 午前10時54分
Page 373 of 559
371
uuWhen Driving uPrecautions While Driving
Continued
Driving
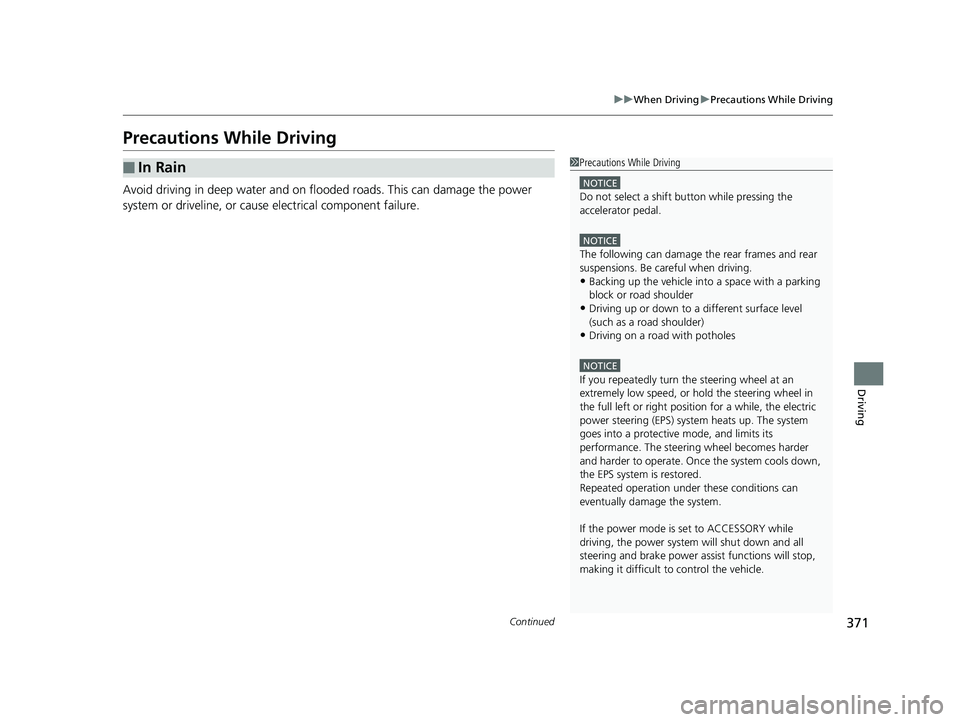
Precautions While Driving
Avoid driving in deep water and on flooded roads. This can damage the power
system or driveline, or caus e electrical component failure.
■In Rain1Precautions While Driving
NOTICE
Do not select a shift button while pressing the
accelerator pedal.
NOTICE
The following can damage the rear frames and rear
suspensions. Be careful when driving.
•Backing up the vehicle into a space with a parking
block or road shoulder
•Driving up or down to a different surface level
(such as a road shoulder)
•Driving on a road with potholes
NOTICE
If you repeatedly turn the steering wheel at an
extremely low speed, or hold the steering wheel in
the full left or right position for a while, the electric
power steering (EPS) system heats up. The system
goes into a protective mode, and limits its
performance. The steering wheel becomes harder
and harder to operate. Once the system cools down,
the EPS system is restored.
Repeated operation under these conditions can
eventually damage the system.
If the power mode is set to ACCESSORY while
driving, the power system will shut down and all
steering and brake power a ssist functions will stop,
making it difficult to control the vehicle.
19 CLARITY BEV-31TRV6200.book 371 ページ 2018年10月29日 月曜日 午前10時54分
Page 379 of 559
![HONDA CLARITY ELECTRIC 2019 Owners Manual (in English) Continued377
uuWhen Driving uShifting
Driving
■If you want to keep the transmission in (N position [car wash mode]
With the power system on:
1. Depress the brake pedal.
2. Make sure the READY indic HONDA CLARITY ELECTRIC 2019 Owners Manual (in English) Continued377
uuWhen Driving uShifting
Driving
■If you want to keep the transmission in (N position [car wash mode]
With the power system on:
1. Depress the brake pedal.
2. Make sure the READY indic](/manual-img/13/34490/w960_34490-378.png)
Continued377
uuWhen Driving uShifting
Driving
■If you want to keep the transmission in (N position [car wash mode]
With the power system on:
1. Depress the brake pedal.
2. Make sure the READY indicator is on.
3. Press
(N. Within six seconds press and hold (N for two seconds.
u This puts the vehicle in car wash mode which must be used when your vehicle
is pulled through a conveyor type automatic car wash where you or an
attendant do not remain in the vehicle.
If you want to cancel car wash mode, select a position other than
(N.
If you want to reduced energy consumption in car wash mode:
Press the POWER button during car wash mode.
u Make sure the READY indicator is off.
u The gear position remains in
(N with the power mode in ACCESSORY for 15
minutes, then, it auto matically changes to
(P and the power mode changes to
OFF.
Manually changing to
(P cancels ACCESSORY mode. The (P indicator comes on
and the power mode changes to OFF. You must always shift to
(P when car wash
mode is no longer needed.
1 If you want to keep the transmission in (N position [car wash
mode]
To keep the vehicle in
(N position, you can also
follow this procedure:
While the power system is on, select
( N, and then
within five seconds, press the POWER button.
Note that the transmiss ion may not stay in
(N
position while any of the following indicators is on:
•POWER SYSTEM indicator
•Transmission system indicator
•12-volt battery charging system indicator
19 CLARITY BEV-31TRV6200.book 377 ページ 2018年10月29日 月曜日 午前10時54分