2019 HONDA CLARITY ELECTRIC remote control
[x] Cancel search: remote controlPage 326 of 559
324
Features
HomeLink® Universal Transceiver
The HomeLink ® Universal Transceiver can be pr ogrammed to operate up to three
remote controlled devices around your home, such as garage doors, lighting, or
home security systems.
Refer to the safety information that came wi th your garage door opener to test that
the safety features are functioning properly. If you do not have the safety
information, contact the manufacturer.
Before programming HomeLink, make sure that people and objects are out of the
way of the garage or gate to prevent potential injury or damage.
When programming a garage door opener, park just outside the garage door’s
path.
■Important Safety Precautions
1 HomeLink ® Universal Transceiver
Before programming HomeLi nk to operate a garage
door opener, confirm that the opener has an external
entrapment protection system, such as an “electronic
eye,” or other safety and reverse stop features. If it
does not, HomeLink may not be able to operate it.
19 CLARITY BEV-31TRV6200.book 324 ページ 2018年10月29日 月曜日 午前10時54分
Page 328 of 559
uuHomeLink ® Universal Transceiver uTraining HomeLink
326
Features
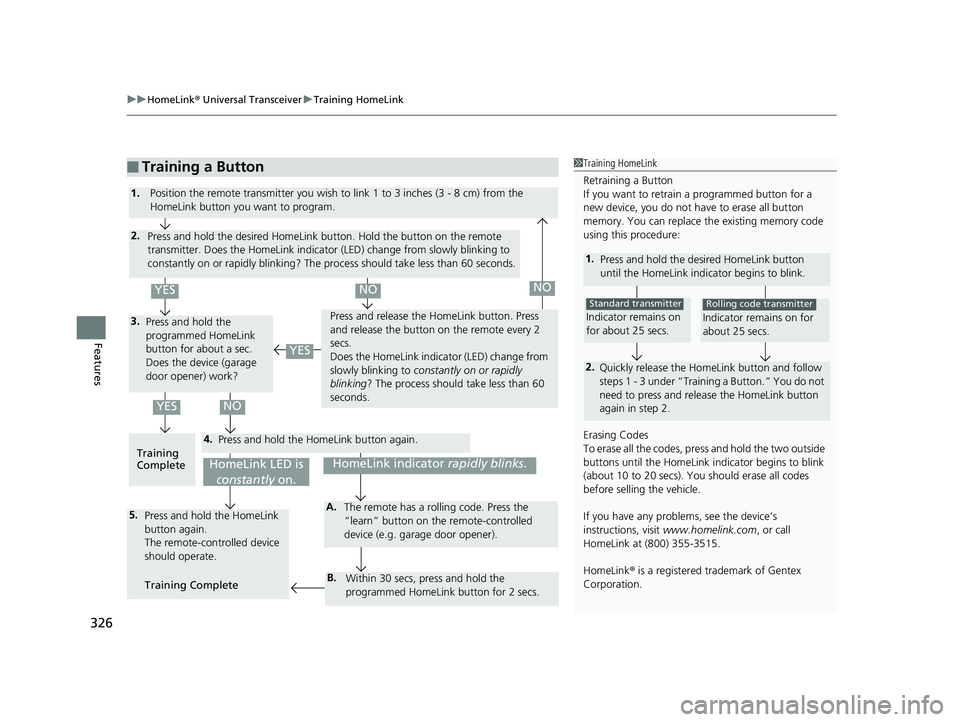
■Training a Button1Training HomeLink
Retraining a Button
If you want to retrain a programmed button for a
new device, you do not ha ve to erase all button
memory. You can replace the existing memory code
using this procedure:
1. Press and hold the desired HomeLink button
until the HomeLink indi cator begins to blink.
2.
Quickly release the Home Link button and follow
steps 1 - 3 under “Training a Button.” You do not
need to press and rele ase the HomeLink button
again in step 2.
Indicator remains on
for about 25 secs.
Standard transmitter
Indicator remains on for
about 25 secs.
Rolling code transmitter
Erasing Codes
To erase all the codes, press and hold the two outside
buttons until the HomeLink i ndicator begins to blink
(about 10 to 20 secs). You should erase all codes
before selling the vehicle.
If you have any problems, see the device’s
instructions, visit www.homelink.com , or call
HomeLink at (800) 355-3515.
HomeLink® is a registered tra demark of Gentex
Corporation.4.
3.
2.
5.A.
B.
1. Position the remote transmitter you wish to link 1 to 3 inches (3 - 8 cm) from the
HomeLink button you want to program.
Press and hold the desired HomeLink button. Hold the button on the remote
transmitter. Does the HomeLink indicato r (LED) change from slowly blinking to
constantly on or rapidly blinking? The pr ocess should take less than 60 seconds.
Press and hold the
programmed HomeLink
button for about a sec.
Does the device (garage
door opener) work? Press and release the Ho
meLink button. Press
and release the button on the remote every 2
secs.
Does the HomeLink indicator (LED) change from
slowly blinking to constantly on or rapidly
blinking ? The process should take less than 60
seconds.
Training
Complete Press and hold the HomeLink button again.
Press and hold the HomeLink
button again.
The remote-controlled device
should operate.
Training Complete The remote has a ro
lling code. Press the
“learn” button on the remote-controlled
device (e.g. garage door opener).
Within 30 secs, press and hold the
programmed HomeLink button for 2 secs.
HomeLink indicator rapidly blinks.HomeLink LED is
constantly on.
YESNO
YES
YESNONO
19 CLARITY BEV-31TRV6200.book 326 ページ 2018年10月29日 月曜日 午前10時54分
Page 329 of 559
327Continued
Features
Bluetooth® HandsFreeLink ®
Bluetooth® HandsFreeLink ® (HFL) allows you to place and receive phone calls using
your vehicle’s audio system, without handling your cell phone.
Using HFL
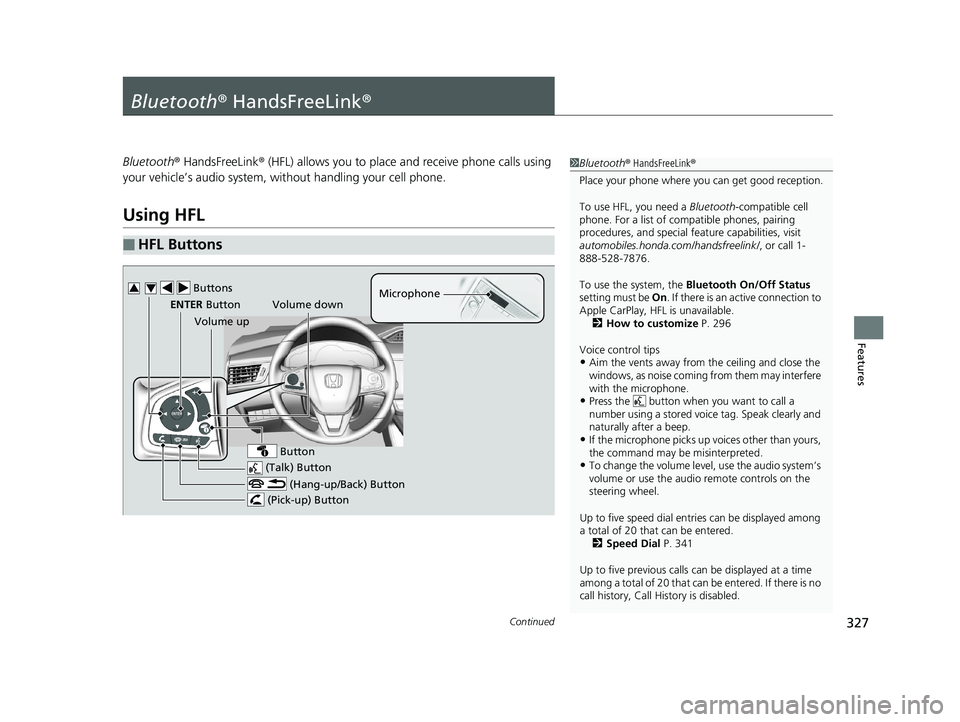
■HFL Buttons
1 Bluetooth ® HandsFreeLink ®
Place your phone where y ou can get good reception.
To use HFL, you need a Bluetooth-compatible cell
phone. For a list of compatible phones, pairing
procedures, and special fe ature capabilities, visit
automobiles.honda.com /handsfreelink/, or call 1-
888-528-7876.
To use the system, the Bluetooth On/Off Status
setting must be On . If there is an active connection to
Apple CarPlay, H FL is unavailable.
2 How to customize P. 296
Voice control tips
•Aim the vents away from the ceiling and close the
windows, as noise coming fr om them may interfere
with the microphone.
•Press the button when you want to call a
number using a stored voic e tag. Speak clearly and
naturally after a beep.
•If the microphone picks up vo ices other than yours,
the command may be misinterpreted.
•To change the volume level, use the audio system’s
volume or use the audio remote controls on the
steering wheel.
Up to five speed dial entries can be displayed among
a total of 20 that can be entered.
2 Speed Dial P. 341
Up to five previous calls can be displayed at a time
among a total of 20 that can be entered. If there is no
call history, Call History is disabled. (Talk) Button
Volume up Microphone
(Hang-up/Back) Button
(Pick-up) Button
ENTER Button
Button
Buttons34
Volume down
19 CLARITY BEV-31TRV6200.book 327 ページ 2018年10月29日 月曜日 午前10時54分
Page 449 of 559
Continued447
uuCharging uCharge the High Voltage battery using a Level 1, 2 or SAE J1772 DC charger
Driving
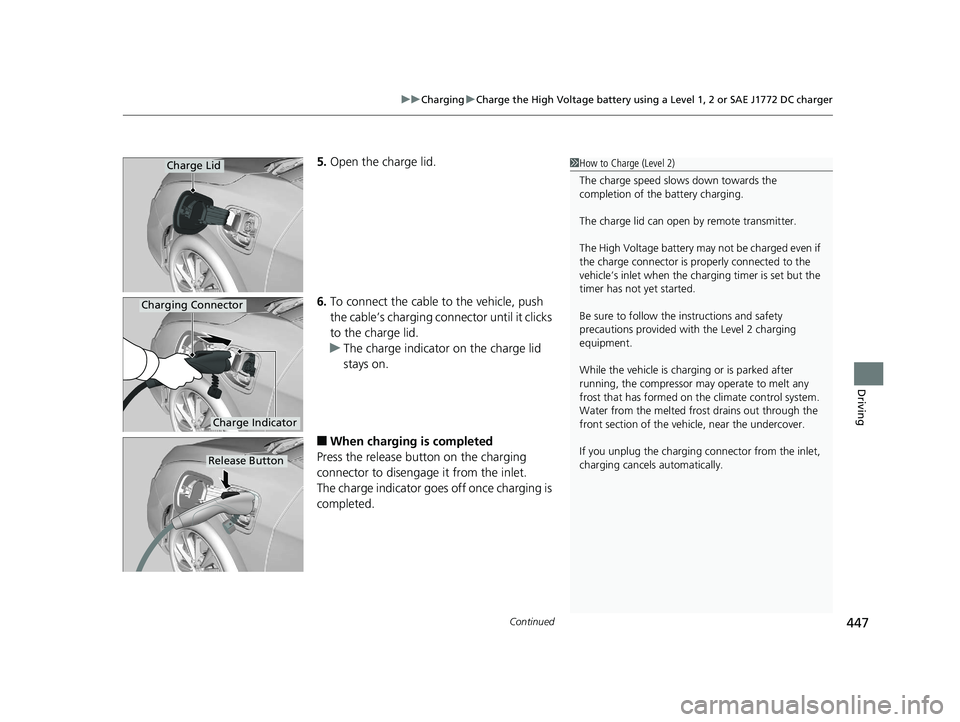
5. Open the charge lid.
6. To connect the cable to the vehicle, push
the cable’s charging conn ector until it clicks
to the charge lid.
u The charge indicator on the charge lid
stays on.
■When charging is completed
Press the release button on the charging
connector to disengag e it from the inlet.
The charge indicator goes off once charging is
completed.
1 How to Charge (Level 2)
The charge speed slows down towards the
completion of the battery charging.
The charge lid can open by remote transmitter.
The High Voltage battery may not be charged even if
the charge connector is properly connected to the
vehicle’s inlet when the charging timer is set but the
timer has not yet started.
Be sure to follow the instructions and safety
precautions provided with the Level 2 charging
equipment.
While the vehicle is charging or is parked after
running, the compressor may operate to melt any
frost that has formed on the climate control system.
Water from the melt ed frost drains out through the
front section of the vehi cle, near the undercover.
If you unplug the charging connector from the inlet,
charging cancels automatically.Charge Lid
Charge Indicator
Charging Connector
Release Button
19 CLARITY BEV-31TRV6200.book 447 ページ 2018年10月29日 月曜日 午前10時54分
Page 450 of 559
uuCharging uCharge the High Voltage battery using a Level 1, 2 or SAE J1772 DC charger
448
Driving
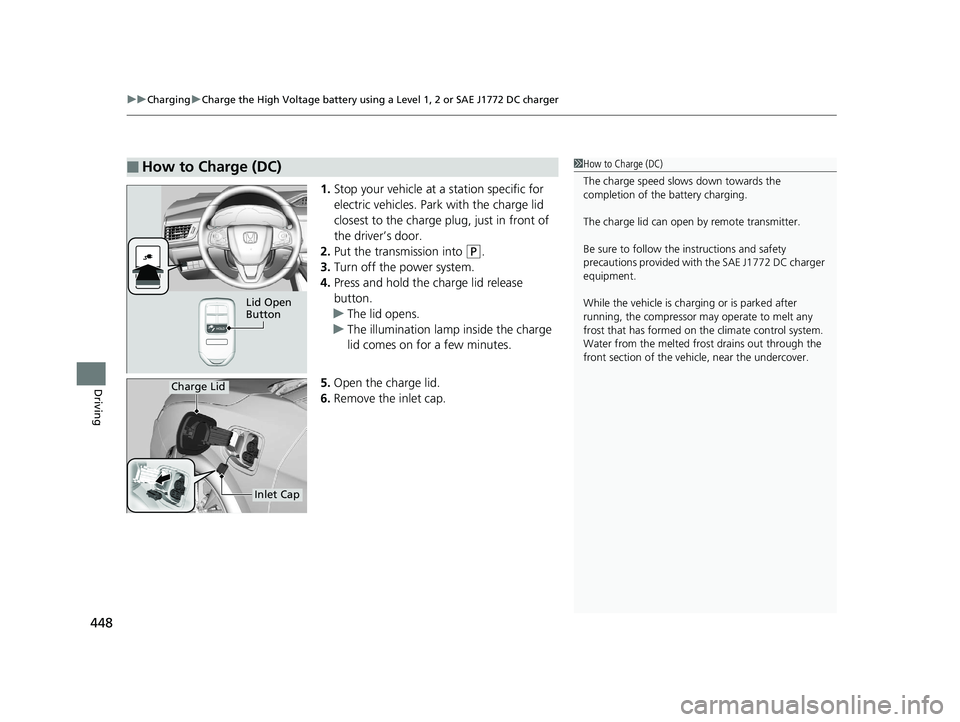
1. Stop your vehicle at a station specific for
electric vehicles. Park with the charge lid
closest to the charge plug, just in front of
the driver’s door.
2. Put the transmission into
(P.
3. Turn off the power system.
4. Press and hold the charge lid release
button.
u The lid opens.
u The illumination lamp inside the charge
lid comes on for a few minutes.
5. Open the charge lid.
6. Remove the inlet cap.
■How to Charge (DC)1How to Charge (DC)
The charge speed slows down towards the
completion of the battery charging.
The charge lid can open by remote transmitter.
Be sure to follow the instructions and safety
precautions provided with the SAE J1772 DC charger
equipment.
While the vehicle is charging or is parked after
running, the compressor may operate to melt any
frost that has formed on the climate control system.
Water from the melt ed frost drains out through the
front section of the vehi cle, near the undercover.
Lid Open
Button
Charge Lid
Inlet Cap
19 CLARITY BEV-31TRV6200.book 448 ページ 2018年10月29日 月曜日 午前10時54分
Page 454 of 559
452
uuCharging uControl Box
Driving
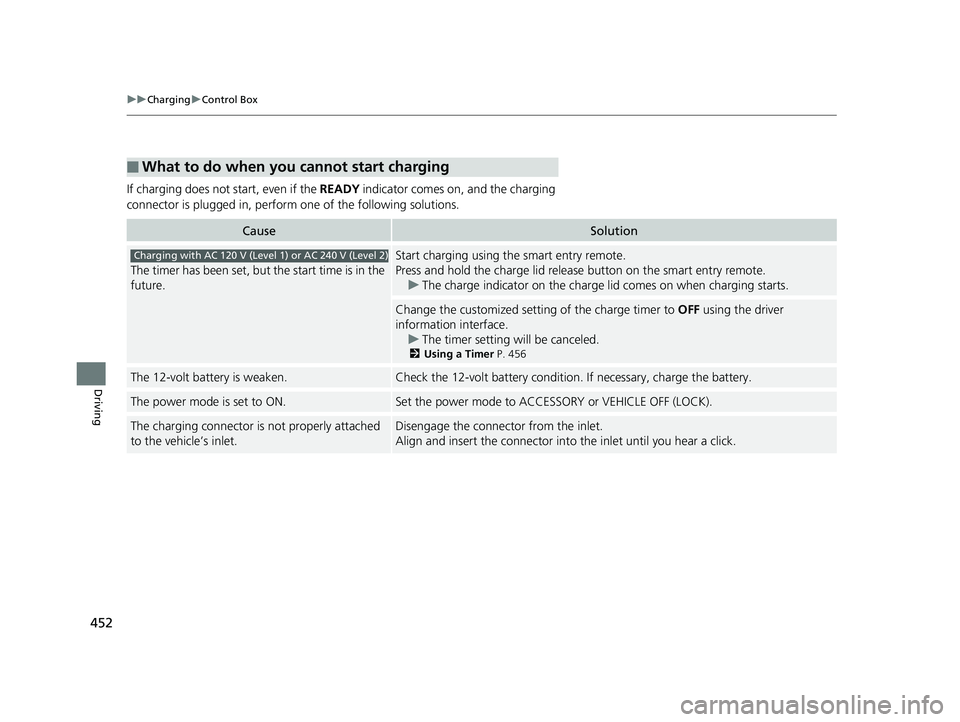
If charging does not start, even if the READY indicator comes on, and the charging
connector is plugged in, perform one of the following solutions.
■What to do when you cannot start charging
CauseSolution
The timer has been set, but the start time is in the
future.
Start charging using the smart entry remote.
Press and hold the charge lid releas e button on the smart entry remote.
u The charge indicator on the charge lid comes on when charging starts.
Change the customized setting of the charge timer to OFF using the driver
information interface.
u The timer setting will be canceled.
2Using a Timer P. 456
The 12-volt battery is weaken.Check the 12-volt battery condition. If necessary, charge the battery.
The power mode is set to ON.Set the power mode to ACCESSORY or VEHICLE OFF (LOCK).
The charging connector is not properly attached
to the vehicle’s inlet.Disengage the connector from the inlet.
Align and insert the connector into the inlet until you hear a click.
Charging with AC 120 V (Level 1) or AC 240 V (Level 2)
19 CLARITY BEV-31TRV6200.book 452 ページ 2018年10月29日 月曜日 午前10時54分
Page 456 of 559
454
uuCharging uControl Box
Driving
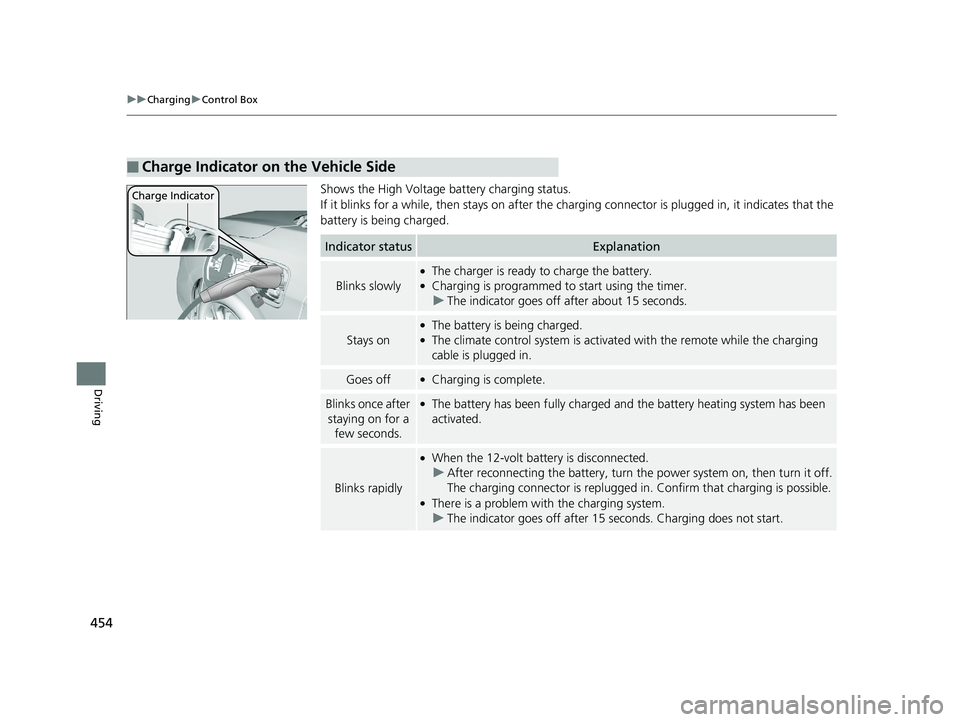
Shows the High Voltage battery charging status.
If it blinks for a while, then st ays on after the charging connector is plugged in, it indicates that the
battery is being charged.
■Charge Indicator on the Vehicle Side
Charge Indicator
Indicator statusExplanation
Blinks slowly
●The charger is ready to charge the battery.●Charging is programmed to start using the timer. u The indicator goes off after about 15 seconds.
Stays on
●The battery is being charged.●The climate control system is activate d with the remote while the charging
cable is plugged in.
Goes off●Charging is complete.
Blinks once after
staying on for a few seconds.●The battery has been fully charged and the battery heating system has been
activated.
Blinks rapidly
●When the 12-volt batte ry is disconnected.
u After reconnecting the batt ery, turn the power system on, then turn it off.
The charging connector is replugged in . Confirm that charging is possible.
●There is a problem with the charging system.
u The indicator goes off after 15 seconds. Charging does not start.
19 CLARITY BEV-31TRV6200.book 454 ページ 2018年10月29日 月曜日 午前10時54分
Page 461 of 559
459
Maintenance
This chapter discusses basic maintenance.
Before Performing MaintenanceInspection and Maintenance ............ 460
Safety When Performing Maintenance...461
Parts and Fluids Used in Maintenance Service ........................................... 462
Maintenance Minder
TM..................... 463
Maintenance Under the Hood Maintenance Items Under the Hood .. 467
Opening the Hood ........................... 468
Cooling System ................................ 469
Transmission Fluid ............................ 470
Brake Fluid ....................................... 470 Refilling Window Washer Fluid......... 471
Replacing Light Bulbs ....................... 472
Checking and Maintaining Wiper
Blades .......................................... 474
Checking and Maintaining Tires
Checking Tires ................................. 477
Tire and Loading Information Label .. 478
Tire Labeling .................................... 478
DOT Tire Quality Grading (U.S. Vehicles).. 480
Wear Indicators................................ 482
Tire Service Life ................................ 482
Tire and Wheel Replacement............ 483 Tire Rotation .................................... 484
Winter Tires ..................................... 485
12-Volt Battery ................................. 486
Remote Transmitter Care Replacing the Button Battery ........... 488
Climate Control System Maintenance.. 489
CleaningInterior Care .................................... 490
Exterior Care.................................... 492
Accessories and Modifications ........ 496
19 CLARITY BEV-31TRV6200.book 459 ページ 2018年10月29日 月曜日 午前10時54分