Page 388 of 559
uuWhen Driving uFront Sensor Camera
386
Driving
1Front Sensor Camera
If the Some Driver Assist Systems Cannot
Operate: Camera Temperature Too High message
appears:
•Use the climate control system to cool down the
interior and, if necessary, also use defroster mode
with the airflow directed towards the camera.
•Start driving the vehicle to lower the windshield
temperature, which cool s down the area around
the camera.
If the Some Driver Assist Systems Cannot
Operate: Clean Front Windshield message
appears:
•Park your vehicle in a sa fe place, and clean the
windshield. If the message does not disappear after
you have cleaned the winds hield and driven for a
while, have your vehicle checked by an authorized
Honda Clarity Electric dealer.
19 CLARITY BEV-31TRV6200.book 386 ページ 2018年10月29日 月曜日 午前10時54分
Page 449 of 559
Continued447
uuCharging uCharge the High Voltage battery using a Level 1, 2 or SAE J1772 DC charger
Driving
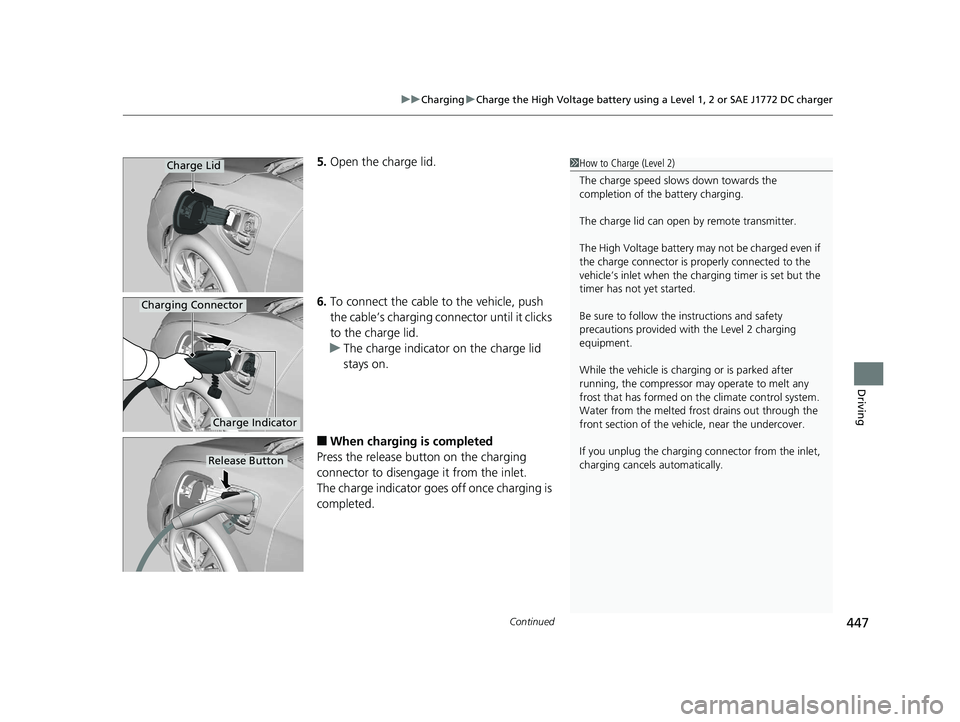
5. Open the charge lid.
6. To connect the cable to the vehicle, push
the cable’s charging conn ector until it clicks
to the charge lid.
u The charge indicator on the charge lid
stays on.
■When charging is completed
Press the release button on the charging
connector to disengag e it from the inlet.
The charge indicator goes off once charging is
completed.
1 How to Charge (Level 2)
The charge speed slows down towards the
completion of the battery charging.
The charge lid can open by remote transmitter.
The High Voltage battery may not be charged even if
the charge connector is properly connected to the
vehicle’s inlet when the charging timer is set but the
timer has not yet started.
Be sure to follow the instructions and safety
precautions provided with the Level 2 charging
equipment.
While the vehicle is charging or is parked after
running, the compressor may operate to melt any
frost that has formed on the climate control system.
Water from the melt ed frost drains out through the
front section of the vehi cle, near the undercover.
If you unplug the charging connector from the inlet,
charging cancels automatically.Charge Lid
Charge Indicator
Charging Connector
Release Button
19 CLARITY BEV-31TRV6200.book 447 ページ 2018年10月29日 月曜日 午前10時54分
Page 450 of 559
uuCharging uCharge the High Voltage battery using a Level 1, 2 or SAE J1772 DC charger
448
Driving
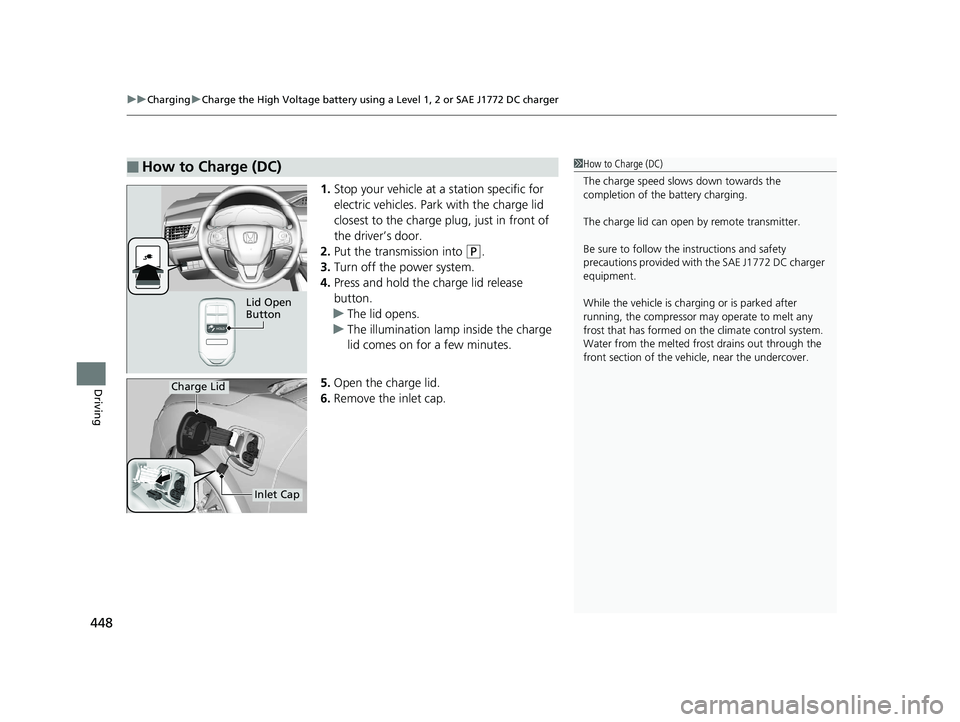
1. Stop your vehicle at a station specific for
electric vehicles. Park with the charge lid
closest to the charge plug, just in front of
the driver’s door.
2. Put the transmission into
(P.
3. Turn off the power system.
4. Press and hold the charge lid release
button.
u The lid opens.
u The illumination lamp inside the charge
lid comes on for a few minutes.
5. Open the charge lid.
6. Remove the inlet cap.
■How to Charge (DC)1How to Charge (DC)
The charge speed slows down towards the
completion of the battery charging.
The charge lid can open by remote transmitter.
Be sure to follow the instructions and safety
precautions provided with the SAE J1772 DC charger
equipment.
While the vehicle is charging or is parked after
running, the compressor may operate to melt any
frost that has formed on the climate control system.
Water from the melt ed frost drains out through the
front section of the vehi cle, near the undercover.
Lid Open
Button
Charge Lid
Inlet Cap
19 CLARITY BEV-31TRV6200.book 448 ページ 2018年10月29日 月曜日 午前10時54分
Page 456 of 559
454
uuCharging uControl Box
Driving
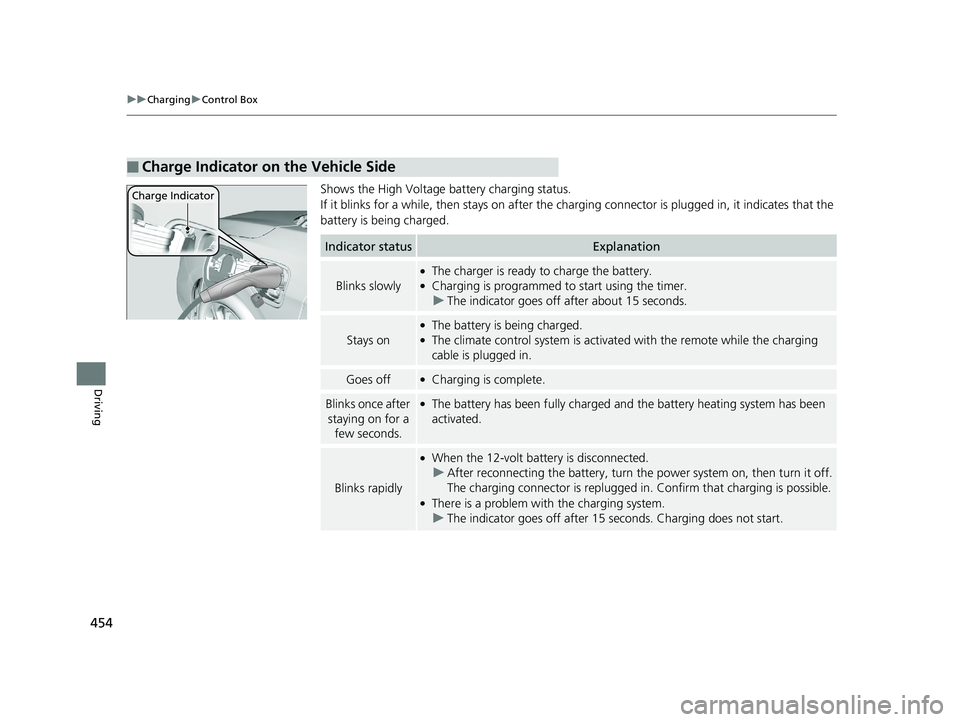
Shows the High Voltage battery charging status.
If it blinks for a while, then st ays on after the charging connector is plugged in, it indicates that the
battery is being charged.
■Charge Indicator on the Vehicle Side
Charge Indicator
Indicator statusExplanation
Blinks slowly
●The charger is ready to charge the battery.●Charging is programmed to start using the timer. u The indicator goes off after about 15 seconds.
Stays on
●The battery is being charged.●The climate control system is activate d with the remote while the charging
cable is plugged in.
Goes off●Charging is complete.
Blinks once after
staying on for a few seconds.●The battery has been fully charged and the battery heating system has been
activated.
Blinks rapidly
●When the 12-volt batte ry is disconnected.
u After reconnecting the batt ery, turn the power system on, then turn it off.
The charging connector is replugged in . Confirm that charging is possible.
●There is a problem with the charging system.
u The indicator goes off after 15 seconds. Charging does not start.
19 CLARITY BEV-31TRV6200.book 454 ページ 2018年10月29日 月曜日 午前10時54分
Page 461 of 559
459
Maintenance
This chapter discusses basic maintenance.
Before Performing MaintenanceInspection and Maintenance ............ 460
Safety When Performing Maintenance...461
Parts and Fluids Used in Maintenance Service ........................................... 462
Maintenance Minder
TM..................... 463
Maintenance Under the Hood Maintenance Items Under the Hood .. 467
Opening the Hood ........................... 468
Cooling System ................................ 469
Transmission Fluid ............................ 470
Brake Fluid ....................................... 470 Refilling Window Washer Fluid......... 471
Replacing Light Bulbs ....................... 472
Checking and Maintaining Wiper
Blades .......................................... 474
Checking and Maintaining Tires
Checking Tires ................................. 477
Tire and Loading Information Label .. 478
Tire Labeling .................................... 478
DOT Tire Quality Grading (U.S. Vehicles).. 480
Wear Indicators................................ 482
Tire Service Life ................................ 482
Tire and Wheel Replacement............ 483 Tire Rotation .................................... 484
Winter Tires ..................................... 485
12-Volt Battery ................................. 486
Remote Transmitter Care Replacing the Button Battery ........... 488
Climate Control System Maintenance.. 489
CleaningInterior Care .................................... 490
Exterior Care.................................... 492
Accessories and Modifications ........ 496
19 CLARITY BEV-31TRV6200.book 459 ページ 2018年10月29日 月曜日 午前10時54分
Page 470 of 559
468
uuMaintenance Under the Hood uOpening the Hood
Maintenance
Opening the Hood
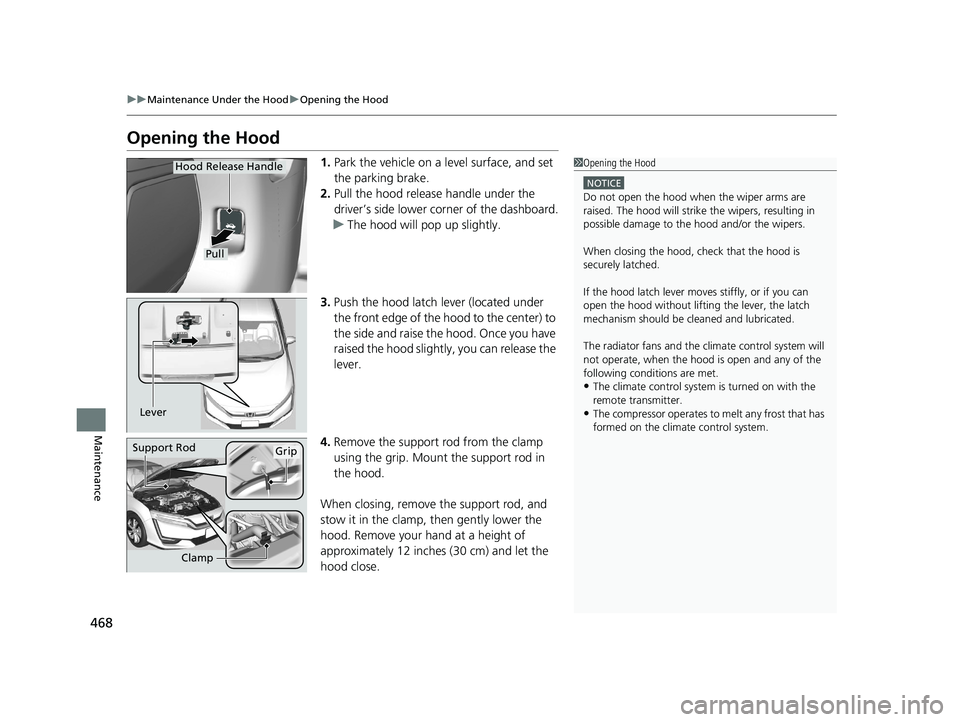
1. Park the vehicle on a level surface, and set
the parking brake.
2. Pull the hood release handle under the
driver’s side lower co rner of the dashboard.
u The hood will pop up slightly.
3. Push the hood latch lever (located under
the front edge of the hood to the center) to
the side and raise the hood. Once you have
raised the hood slight ly, you can release the
lever.
4. Remove the support rod from the clamp
using the grip. Mount the support rod in
the hood.
When closing, remove the support rod, and
stow it in the clamp, then gently lower the
hood. Remove your hand at a height of
approximately 12 inches (30 cm) and let the
hood close.1 Opening the Hood
NOTICE
Do not open the hood when the wiper arms are
raised. The hood will strike the wipers, resulting in
possible damage to the hood and/or the wipers.
When closing the hood, check that the hood is
securely latched.
If the hood latch lever moves stiffly, or if you can
open the hood without lifti ng the lever, the latch
mechanism should be cl eaned and lubricated.
The radiator fans and the climate control system will
not operate, when the hood is open and any of the
following conditions are met.
•The climate control system is turned on with the
remote transmitter.
•The compressor operates to melt any frost that has
formed on the climate control system.
Pull
Hood Release Handle
Lever
Support RodGrip
Clamp
19 CLARITY BEV-31TRV6200.book 468 ページ 2018年10月29日 月曜日 午前10時54分
Page 482 of 559
480
uuChecking and Maintaining Tires uDOT Tire Quality Grading (U.S. Vehicles)
Maintenance
DOT Tire Quality Grading (U.S. Vehicles)
The tires on your vehicle meet all U.S. Federal Safety
Requirements. All tires are also graded for treadwear, traction,
and temperature performance a ccording to Department of
Transportation (DOT) standards. The following explains these
gradings.
Quality grades can be found where applicable on the tire sidewall
between tread shoulder an d maximum section width.
The treadwear grade is a comparative rating based on the wear
rate of the tire when tested un der controlled conditions on a
specified government test course. For example, a tire graded 150
would wear one and one-half (1 1/2) times as well on the
government course as a tire graded 100. The relative performance
of tires depends upon the actual conditions of their use, however,
and may depart significantly from the norm due to variations in
driving habits, service practices and differences in road
characteristics and climate.
■Uniform Tire Quality Grading
■Treadwear
1 Uniform Tire Quality Grading
For example:
Treadwear 200
Traction AA
Temperature A
All passenger car tires must conform
to Federal Safety Requirements in
addition to these grades.
19 CLARITY BEV-31TRV6200.book 480 ページ 2018年10月29日 月曜日 午前10時54分
Page 491 of 559
489
Maintenance
Climate Control System Maintenance
Air Conditioning
To ensure proper and safe operation, the Society of Automotive Engineers (SAE
J2845) recommends that the refrigerant system only be serviced by trained and
certified technicians.
Never repair or replace the air conditio ning evaporator (cooling coil) with one
removed from a used or salvaged vehicle.
New replacement mobile air conditioning evaporators must be certified (and
labeled) as meeting SAE Standard J2842.
Dust and Pollen Filter
The climate control system is equipped with a dust and pollen filter that collects
pollen, dust, and other debris in the air. The Maintenance MinderTM messages will let
you know when to replace the filter.
We recommend that you replace the dust an d pollen filter sooner when using your
vehicle in areas with high concentrations of dust.
1 Climate Control System Maintenance
NOTICE
Vented refrigerant is harmful to the environment.
To avoid refrigerant from venting, never replace the
evaporator with one re moved from a used or
salvaged vehicle.
Refrigerant in your vehicle’s air conditioning system is
flammable and can be igni ted during servicing if
proper procedures are not followed.
The air conditioner labe l is found under the hood:
2 Safety Labels P. 80
2 Specifications P. 538
1Dust and Pollen Filter
If the airflow from the climate control system
deteriorates noticeably, and the windows fog up
easily, the filter may need to be replaced. Please
contact an authorized Honda Clarity Electric dealer
for replacement.
19 CLARITY BEV-31TRV6200.book 489 ページ 2018年10月29日 月曜日 午前10時54分