2019 HONDA ACCORD SEDAN run flat
[x] Cancel search: run flatPage 4 of 727

Contents
This owner’s manual should be considered a permanent part of the
vehicle and should remain with the vehicle when it is sold.
This owner’s manual covers all models of your vehicle. You may find
descriptions of equipment and features that are not on your
particular model.
Images throughout this owner’s manual (including the front cover)
represent features and equipment that are available on some, but
not all, models. Your particular mo del may not have some of these
features.
This owner’s manual is for vehicles sold in the United States and
Canada.
The information and specifications in cluded in this publication were
in effect at the time of approval for printing. Honda Motor Co., Ltd.
reserves the right, however, to discontinue or change specifications
or design at any time without notice and without incurring any
obligation.2 Safe Driving P. 33
For Safe Driving P. 34 Seat Belts P. 38 Airbags P. 45
2Instrument Panel P. 77
Indicators P. 78 Gauges and Displays P. 137
2Controls P. 163
Clock P. 164 Locking and Unlocking the Doors P. 166
Opening and Closing the Moonroof* P. 189
Adjusting the Seats P. 210
2 Features P. 243
Audio System P. 244 Audio System Basic Operation P. 252, 273
Customized Features P. 370, 381 HomeLink® Universal Transceiver* P. 400
2Driving P. 453
Before Driving P. 454 Towing a Trailer P. 459
Multi-View Rear Camera P. 594 Refueling P. 597
2Maintenance P. 603
Before Performing Maintenance P. 604 Maintenance MinderTM P. 607
Checking and Maintaining Wiper Blades P. 639
Climate Control System Maintenance P. 654
2Handling the Unexpected P. 663
Tools P. 664 If a Tire Goes Flat P. 665
Overheating P. 679 Indicator, Coming On/Blinking P. 681
When You Cannot Op en the Trunk P. 695
2Information P. 699
Specifications P. 700 Identification Numbers P. 704
Emissions Testing P. 707 Warranty Coverages P. 709
Page 30 of 727
28
Quick Reference Guide
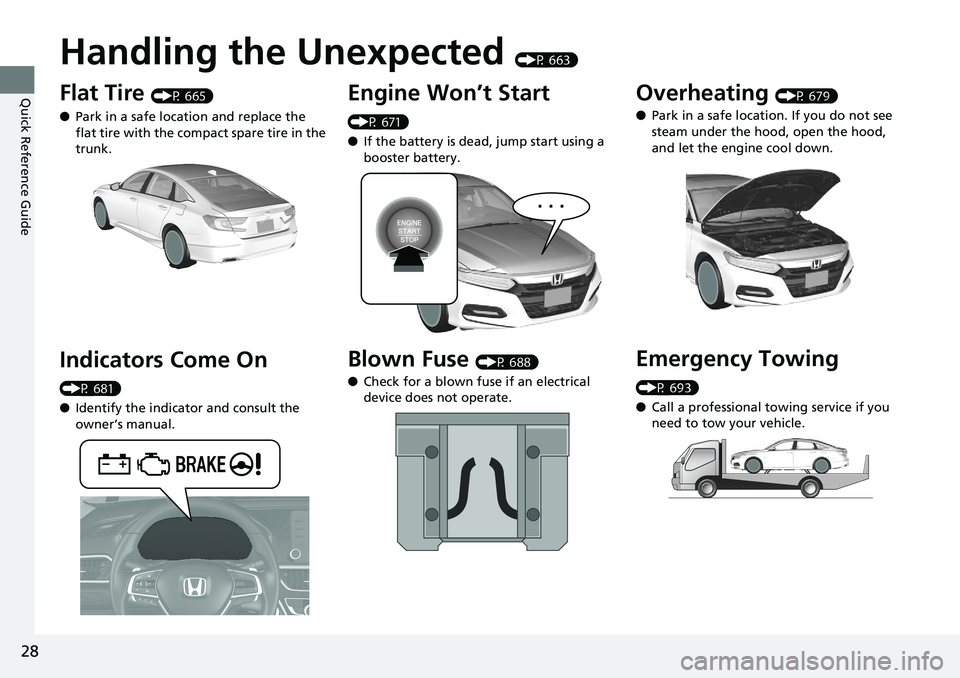
Handling the Unexpected (P 663)
Flat Tire (P 665)
● Park in a safe location and replace the
flat tire with the compact spare tire in the
trunk.
Indicators Come On
(P 681)
●Identify the indicator and consult the
owner’s manual.
Engine Won’t Start
(P 671)
● If the battery is dead, jump start using a
booster battery.
Blown Fuse (P 688)
● Check for a blown fuse if an electrical
device does not operate.
Overheating (P 679)
● Park in a safe location. If you do not see
steam under the hood, open the hood,
and let the engine cool down.
Emergency Towing
(P 693)
●Call a professional towing service if you
need to tow your vehicle.
Page 518 of 727
516
uuHonda Sensing ®u Collision Mitigation Braking SystemTM (CMBSTM)
Driving
• When there is a group of people in front of your vehicle walking together side by
side.
• Surrounding conditions or belongings of the pedestrian alter the pedestrian’s
shape, preventing the system from recogn izing that the person is a pedestrian.
• When the pedestrian is shorter than about 3.3 feet (1 meter) or taller than about
6.6 feet (2 meters) in height.
• When a pedestrian blends in with the background.
• When a pedestrian is bent over or squa tting, or when their hands are raised or
they are running.
• When several pedestrians are walking ahead in a group.
• When the camera cannot correctly identify that a pedestrian is present due to an
unusual shape (holding luggage, body position, size).
■Automatic shutoff
The CMBSTM may automatically shut itself o ff and the safety support indicator
(amber) comes and stays on when:
• The temperature inside the system is high.
• You drive off-road or on a mountain ro ad, or curved and winding road for an
extended period.
• An abnormal tire condition is detected (wrong tire size, flat tire, etc.).
• The camera behind the rearview mirror, or the area around the camera, including
the windshield, gets dirty.
Once the conditions that caused the CMBS
TM to shut off improve or are addressed
(e.g., cleaning), the system comes back on.
Limitations applicable to pedestrian detection only
Page 542 of 727

uuHonda Sensing ®u Adaptive Cruise Control (ACC)*
540
Driving
The system may automatically shut off and the ACC indicator will come on under
certain conditions. Some examples of th ese conditions are listed below. Other
conditions may reduce some of the ACC functions.
■Environmental conditions
• Driving in bad weather (rain, fog, snow, etc.).
■Roadway conditions
• Driving on a snowy or wet roadway (obscured lane marking, vehicle tracks,
reflected lights, road spray, high contrast).
■Vehicle conditions
• The outside of the windshie ld is blocked by dirt, mud, leaves, wet snow, etc.
• An abnormal tire or wheel condition (Wrong sized, varied size or construction,
improperly inflated, comp act spare tire, etc.).
• The camera temperature gets too high.
• The parking brake is applied.
• When the radar sensor cover is dirty.
• When the front of the vehicle tilts up due to heavy cargo in the trunk or rear seats.
• When tire chains
* are installed.
■ACC Conditions and Limitations1ACC Conditions and Limitations
For directions on the prop er handling of the radar
sensor, refer to the following page. 2 Radar Sensor P. 570
You can read about handling information for the
camera equipped with this system. 2 Front Sensor Camera P. 568
Always keep the radar sensor cover clean.
Never use chemical solvents or polishing powder for
cleaning the sensor cover. Clean it with water or a
mild detergent.
Do not put a sticker on the radar sensor cover or
replace the radar sensor cover.
If you need the radar sensor to be repaired, or
removed, or the radar se nsor cover is strongly
impacted, turn off the system by pressing the MAIN
button and take your vehicle to a dealer.
Have your vehicle checked by a dealer if you find any
unusual behavior of the system (e.g., the warning
message appears too frequently).
If the front of the vehicle is impacted in any of the
following situations, the ra dar sensor may not work
properly. Have your vehi cle checked by a dealer:
•The vehicle mounted onto a bump, curb, chock,
embankment, etc.
•You drive the vehicle where the water is deep.•Your vehicle has a frontal collision.
* Not available on all models
Page 665 of 727
663
Handling the Unexpected
This chapter explains how to handle unexpected troubles.
ToolsTypes of Tools .................................. 664
If a Tire Goes Flat
Changing a Flat Tire ......................... 665
Engine Does Not Start Checking the Engine ........................ 671
If the Remote Battery is Weak ....... 672Emergency Engine Stop ................... 673
Jump Starting .................................... 674
Shift Lever Does Not Move .............. 677
Overheating How to Handle Overheating ............. 679 Indicator, Coming On/Blinking
If the Low Oil Pressure Warning Appears ... 681If the Charging System Indicator Comes
On ................................................. 681
If the Malfunction Indicator Lamp Comes On or Blinks ................................... 682
If the Brake System Indicator (Red) Comes
On or Blinks ................................... 683
If the Brake System Indicator (Red) Comes On
or Blinks at the Same Time When the Brake
System Indicator (Amber) Comes On.... 684
If the Electric Power Steering (EPS) System Indicator Comes On ....................... 685 If the Low Tire Pressure/TPMS Indicator
Comes On or Blinks ....................... 686
If the Transmission I ndicator Blinks along
with the Warning Message ............ 687
Fuses Fuse Locations ................................. 688
Inspecting and Changing Fuses ........ 692
Emergency Towing ........................... 693
When You Cannot Unlock the Fuel Fill Door ................................................. 694
When You Cannot Open the Trunk ... 695
Refueling ........................................... 697
Page 668 of 727
666
uuIf a Tire Goes Flat uChanging a Flat Tire
Handling the Unexpected
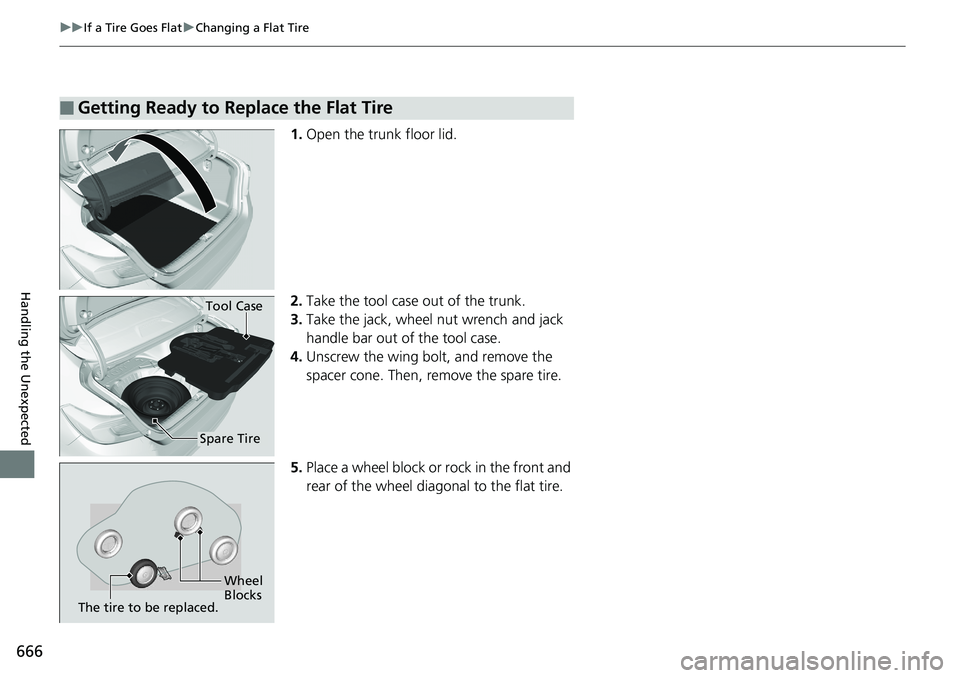
1. Open the trunk floor lid.
2. Take the tool case out of the trunk.
3. Take the jack, wheel nut wrench and jack
handle bar out of the tool case.
4. Unscrew the wing bolt, and remove the
spacer cone. Then, remove the spare tire.
5. Place a wheel block or rock in the front and
rear of the wheel diagonal to the flat tire.
■Getting Ready to Replace the Flat Tire
Tool Case
Spare Tire
Wheel
Blocks
The tire to be replaced.
Page 670 of 727
uuIf a Tire Goes Flat uChanging a Flat Tire
668
Handling the Unexpected
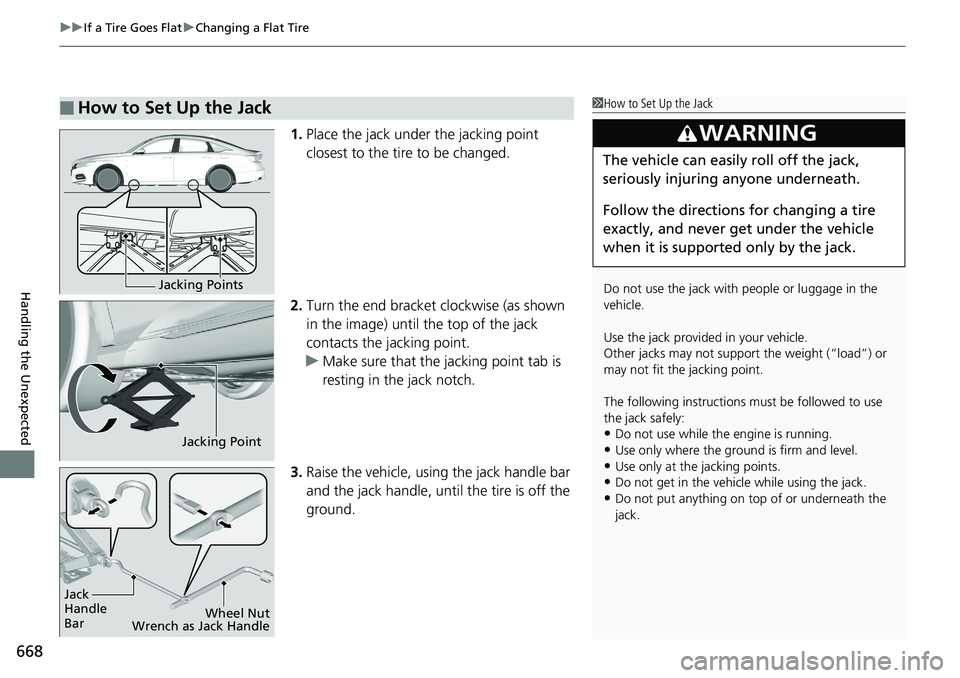
1. Place the jack under the jacking point
closest to the tire to be changed.
2. Turn the end bracket clockwise (as shown
in the image) until the top of the jack
contacts the jacking point.
u Make sure that the jacking point tab is
resting in the jack notch.
3. Raise the vehicle, using the jack handle bar
and the jack handle, until the tire is off the
ground.
■How to Set Up the Jack1How to Set Up the Jack
Do not use the jack with people or luggage in the
vehicle.
Use the jack provided in your vehicle.
Other jacks may not support the weight (“load”) or
may not fit the jacking point.
The following instructions must be followed to use
the jack safely:
•Do not use while the engine is running.
•Use only where the ground is firm and level.
•Use only at the jacking points.•Do not get in the vehicl e while using the jack.
•Do not put anything on top of or underneath the
jack.
3WARNING
The vehicle can easily roll off the jack,
seriously injuring anyone underneath.
Follow the directions for changing a tire
exactly, and never get under the vehicle
when it is supported only by the jack.
Jacking Points
Jacking Point
Jack
Handle
Bar Wheel Nut
Wrench as Jack Handle
Page 672 of 727
uuIf a Tire Goes Flat uChanging a Flat Tire
670
Handling the Unexpected
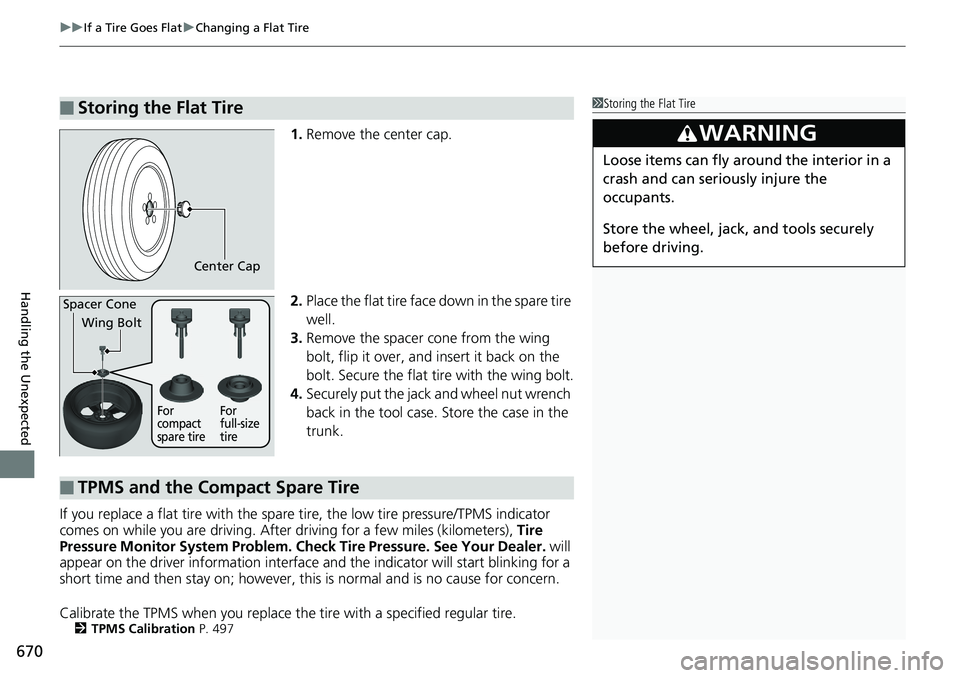
1. Remove the center cap.
2. Place the flat tire face down in the spare tire
well.
3. Remove the spacer cone from the wing
bolt, flip it over, and insert it back on the
bolt. Secure the flat tire with the wing bolt.
4. Securely put the jack and wheel nut wrench
back in the tool case. Store the case in the
trunk.
If you replace a flat tire with the spare tire, the low tire pressure/TPMS indicator
comes on while you are driving. Afte r driving for a few miles (kilometers), Tire
Pressure Monitor System Problem. Ch eck Tire Pressure. See Your Dealer. will
appear on the driver information interface and the indicator will start blinking for a
short time and then stay on; however, this is normal and is no cause for concern.
Calibrate the TPMS when you replace the tire with a specified regular tire.
2TPMS Calibration P. 497
■Storing the Flat Tire1Storing the Flat Tire
3WARNING
Loose items can fly around the interior in a
crash and can seriously injure the
occupants.
Store the wheel, jack, and tools securely
before driving.
Center Cap
Spacer Cone
Wing Bolt
For
compact
spare tire For
full-size
tire
■TPMS and the Compact Spare Tire