Page 240 of 727

uuInterior Lights/Interior Convenience Items uInterior Convenience Items
238
Controls
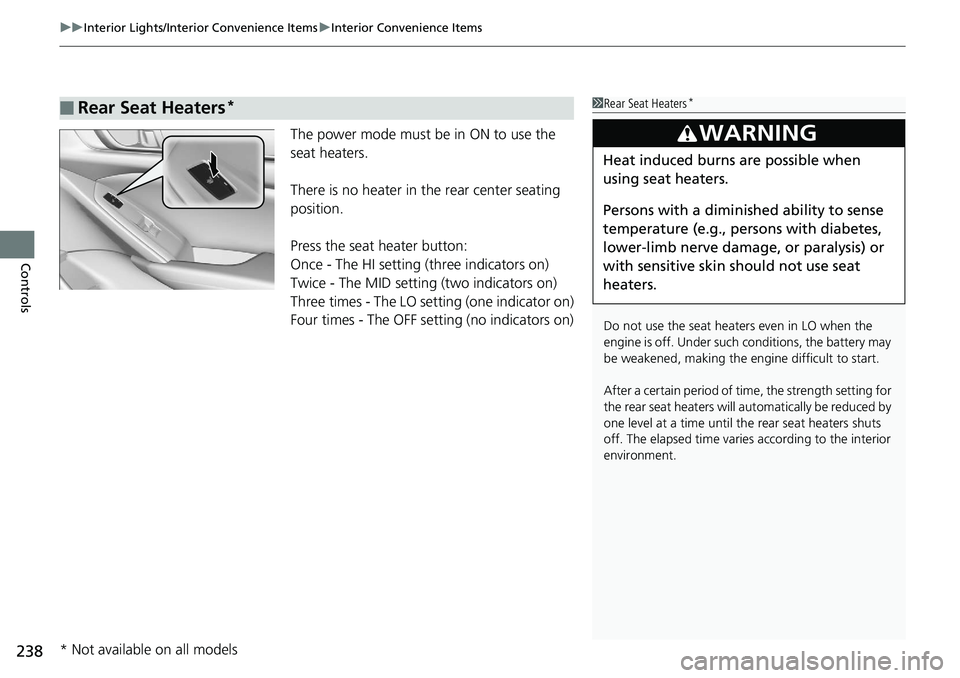
The power mode must be in ON to use the
seat heaters.
There is no heater in the rear center seating
position.
Press the seat heater button:
Once - The HI setting (three indicators on)
Twice - The MID setting (two indicators on)
Three times - The LO setting (one indicator on)
Four times - The OFF se tting (no indicators on)
■Rear Seat Heaters*1Rear Seat Heaters*
Do not use the seat heaters even in LO when the
engine is off. Under such conditions, the battery may
be weakened, making the engine difficult to start.
After a certain period of time, the strength setting for
the rear seat heaters will automatically be reduced by
one level at a time until the rear seat heaters shuts
off. The elapsed time varies according to the interior
environment.
3WARNING
Heat induced burns are possible when
using seat heaters.
Persons with a diminished ability to sense
temperature (e.g., persons with diabetes,
lower-limb nerve damage, or paralysis) or
with sensitive skin should not use seat
heaters.
* Not available on all models
Page 379 of 727

377
uuCustomized Features u
Continued
Features
*1:Default Setting
Setup
GroupCustomizable FeaturesDescriptionSelectable Settings
SettingsVehicle
SettingsMeter Setup
Language
SelectionChanges the displayed language.English*1/ Français /Español
Adjust
Outside
Temp.
Display
Adjusts the temperature reading by a few
degrees.-5°F ~ ±0°F*1 ~ +5°F
“Trip A”
Reset
TimingChanges the setting of how to reset trip meter
A and average fuel economy A.When Fully Refueled /IGN
Off /Manually Reset*1
“Trip B”
Reset
TimingChanges the setting of how to reset trip meter
B and average fuel economy B.When Fully Refueled /IGN
Off /Manually Reset*1
Adjust
Alarm
VolumeChanges the alarm volume, such as buzzers,
warnings, turn signal sound, and so on.High /Mid*1/Low
Fuel
Efficiency
Backlight
Turns the ambient meter feature on and off.On*1/Off
Speed/
Distance
Units
Selects the trip computer units.mph · miles*1/ km/h · km
TachometerSelects whether the tachometer come on the
driver information interface.On /Off*1
Page 384 of 727
382
uuCustomized Features u
Features
■Customization flow
Select Settings .
Automatic Date &
Time
Set Date
Set Time
System
Press the button.
Automatic Time Zone*
Time Format
Time Zone
Set Date & Time
Touch Panel Sensitivity
System Volumes
Config. of
Instrument Panel
Security
Day & Time
(Select time zone)
Language
Auto Daylight Saving Time
Date Format
Verbal Reminder
System Volumes
Reading/Warning
Unknown sources
Password
Select configuration
* Not available on all models
Page 387 of 727
385
uuCustomized Features u
Continued
Features
Vehicle
Meter Setup
Adjust Outside Temp. Display
“Trip A” Reset Timing
“Trip B” Reset Timing
Reverse Alert Tone*
Config. of Instrument Panel
Adjust Alarm Volume
Turn By Turn Auto Display
Fuel Efficiency Backlight
TPMS Calibration
Driver Assist
System SetupBlind Spot Info*
Head-up Warning*
Traffic Sign Recognition System
Forward Collision Warning Distance
ACC Forward Vehicle Detect Beep
Lane Keeping Assist Suspend Beep
Road Departure Mitigation Setting
Driver Attention Monitor
Speed/Distance Units
Tachometer
Language Selection
* Not available on all models
Page 471 of 727

Continued469
uuWhen Driving uStarting the Engine
Driving
You can remotely start the engine using the button on the remote.
■To start the engine
When started remotely, the engine automati cally shuts off after 10 minutes of idling
and/or the brake pedal and ENGINE START/STOP button have not been pressed
simultaneously.
To extend the run time for another 10 mi nutes during the first run, press the
button, then press an d hold the button.
u Some exterior lights flash six times if a 10-minute extension request was
transmitted successfully.
■Remote Engine Start with Vehicle Feedback*1 Remote Engine Start with Vehicle Feedback*
The remote engine start may violate local laws.
Before using the remote e ngine start, check your
local laws.
If there are buildings an d obstacles between your
vehicle and the remote, th e range will be reduced.
The range may be less when the vehicle is running.
This distance may vary by external electrical
interference.
The engine may not start by the remote engine start
if:
•You have disabled a remo te engine start setting
using the audio/information screen.
•The power mode is not in VEHICLE OFF.•The transmission is in a position other than ( P.
•The hood is open, or any door or the trunk is
unlocked.
3WARNING
Engine exhaust contains toxic carbon
monoxide.
Breathing carbon monoxide can kill you or
cause unconsciousness.
Never use the remote engine starter when
the vehicle is parked in a garage or other
area with limited ventilation.
Press the button, th en press and hold
the button.
Some exterior lights flash once.
Go within the range,
and try again.
LED: Blinks when any button is pressed.
Some exterior lights flash six
times if the engine runs
successfully. Some exterior lights will not
flash if the engine runs
unsuccessfully.
* Not available on all models
Page 507 of 727

505
uuWhen Driving uLaneWatchTM*
Continued
Driving
LaneWatchTM*
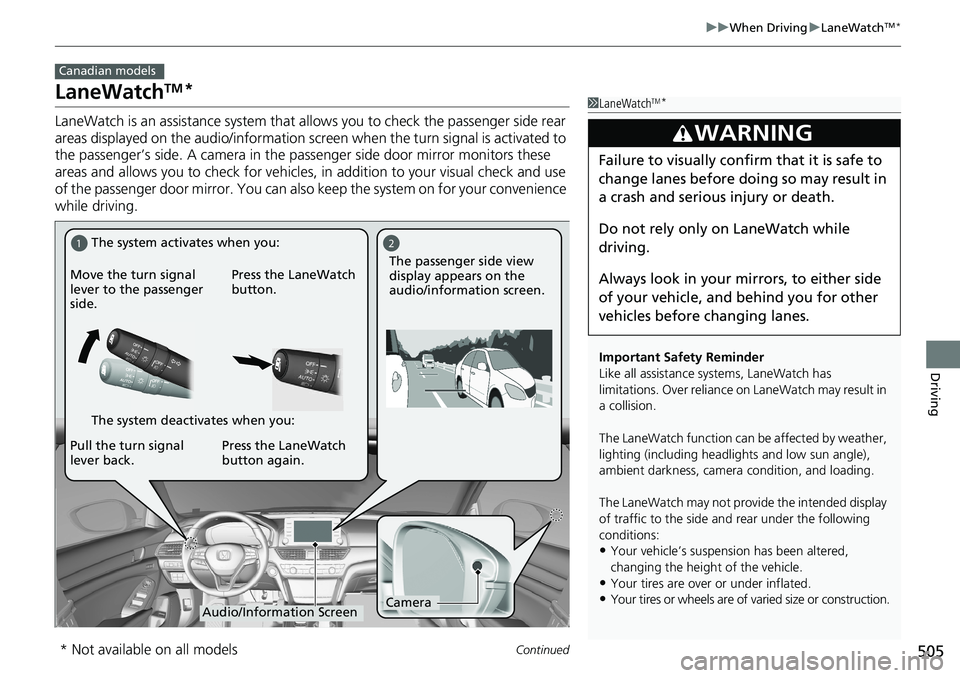
LaneWatch is an assistance system that al lows you to check the passenger side rear
areas displayed on the audio/information screen when the turn signal is activated to
the passenger’s side. A camera in the pa ssenger side door mirror monitors these
areas and allows you to check for vehicles, in addition to your visual check and use
of the passenger door mirror. You can also keep the system on for your convenience
while driving.
Canadian models
1 LaneWatchTM*
Important Safety Reminder
Like all assistance systems, LaneWatch has
limitations. Over reliance on LaneWatch may result in
a collision.
The LaneWatch func tion can be affected by weather,
lighting (including headli ghts and low sun angle),
ambient darkness, camera condition, and loading.
The LaneWatch may not prov ide the intended display
of traffic to the side and rear under the following
conditions:
•Your vehicle’s suspension has been altered,
changing the height of the vehicle.
•Your tires are over or under inflated.
•Your tires or wheels are of varied size or construction.
3WARNING
Failure to visually confirm that it is safe to
change lanes before doing so may result in
a crash and serious injury or death.
Do not rely only on LaneWatch while
driving.
Always look in your mi rrors, to either side
of your vehicle, and behind you for other
vehicles before changing lanes.
12
CameraAudio/Information Screen
Move the turn signal
lever to the passenger
side.
Press the LaneWatch
button.
Pull the turn signal
lever back. Press the LaneWatch
button again. The passenger side view
display appears on the
audio/information screen.
The system activates when you:
The system deactivates when you:
* Not available on all models
Page 513 of 727

Continued511
uuHonda Sensing ®u Collision Mitigation Braking SystemTM (CMBSTM)
Driving
■When the system activates
At system’s earliest collision alert st age, you can change the distance (Long/
Normal /Short ) between vehicles at which alerts will come on through audio/
information screen setting options.
2 Customized Features P. 370, 381
1Collision Mitigation Braking SystemTM (CMBSTM)
The camera in the CMBS
TM is also designed to detect
pedestrians.
However, this pedestrian detection feature may not
activate or may not detect a pedestrian in front of
your vehicle under certain conditions.
Refer to the ones indicating the pedestrian detection
limitations from the list. 2 CMBS
TM Conditions and Limitations P. 514
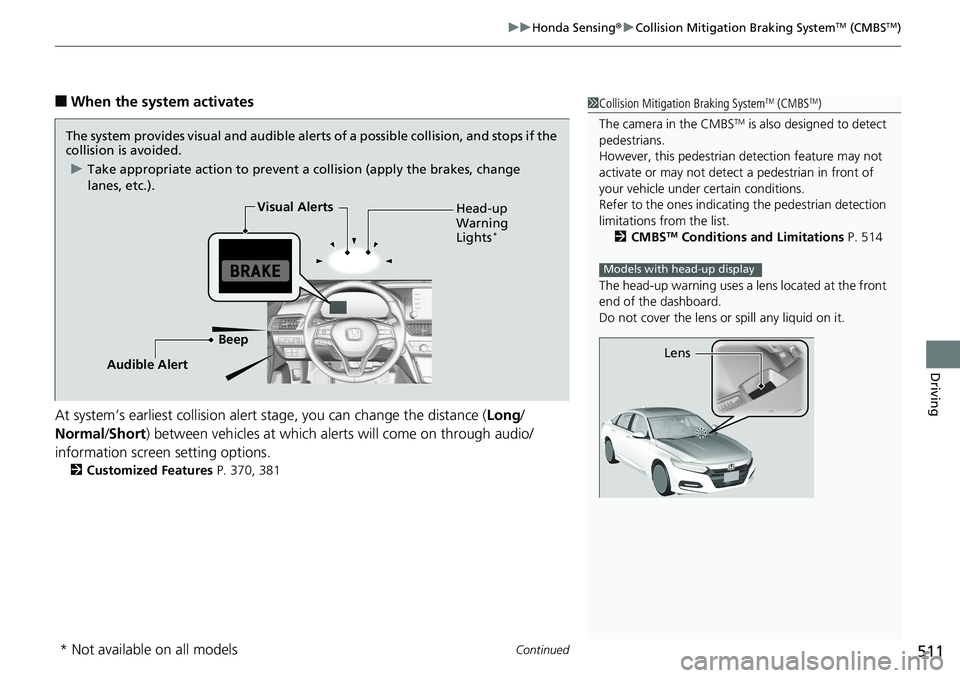
The head-up warning uses a lens located at the front
end of the dashboard.
Do not cover the lens or spill any liquid on it.
Models with head-up display
Lens
The system provides visual and audible alerts of a possible collisi on, and stops if the
collision is avoided.
u Take appropriate action to prevent a collision (apply the brakes, change
lanes, etc.).
Beep Head-up
Warning
Lights
*
Visual Alerts
Audible Alert
* Not available on all models
Page 514 of 727
512
uuHonda Sensing ®u Collision Mitigation Braking SystemTM (CMBSTM)
Driving
The system has three alert stages for a possible collision. However, depending on circumstances, the CMBSTM may not go through all of
the stages before initiating the last stage.
■Collision Alert Stages
Distance between vehiclesCMBSTM
The radar sensor detects a vehicleAudible & Visual WARNINGSBraking
Stage oneThere is a risk of a collision with the
vehicle ahead of you.
When in Long , visual and audible alerts come
on at a longer distance from a vehicle ahead
than in Normal setting, and in Short, at a
shorter distance than in Normal.
—
Stage
twoThe risk of a collision has increased,
time to respond is reduced.
Visual and audible alerts.
Lightly
applied
Stage
three The CMBSTM determines that a
collision is unavoidable.Forcefully applied
Your Vehicle Vehicle
Ahead
Normal
Short
Long
Your
Vehicle Vehicle
Ahead
Your
VehicleVehicle
Ahead