2019 GMC YUKON light
[x] Cancel search: lightPage 101 of 450

GMC Yukon/Yukon XL/Denali Owner Manual (GMNA-Localizing-U.S./
Canada/Mexico-12460267) - 2019 - crc - 9/11/18
100 Seats and Restraints
When the passenger sensing
system has allowed the airbag to be
enabled, the ON indicator will light
and stay lit as a reminder that the
airbag is active.
For some children, including
children in child restraints, and for
very small adults, the passenger
sensing system may or may not turn
off the front outboard passenger
frontal airbag, depending upon the
person's seating posture and body
build. Everyone in the vehicle who
has outgrown child restraints should
wear a seat belt properly—whether
or not there is an airbag for that
person.
{Warning
If the airbag readiness light ever
comes on and stays on, it means
that something may be wrong
with the airbag system. To help
avoid injury to yourself or others,
have the vehicle serviced right
away. See Airbag Readiness
(Continued)
Warning (Continued)
Light0151 for more information,
including important safety
information.
If the On Indicator Is Lit for a
Child Restraint
The passenger sensing system is
designed to turn off the front
outboard passenger frontal airbag if
the system determines that an infant
is present in a child restraint. If a
child restraint has been installed
and the ON indicator is lit:
1. Turn the vehicle off.
2. Remove the child restraint from the vehicle.
3. Remove any additional items from the seat such as blankets,
cushions, seat covers, seat
heaters, or seat massagers.
4. Reinstall the child restraint following the directions
provided by the child restraint
manufacturer and refer to Securing Child Restraints (With
the Seat Belt in the Center
Front Seat)
0122 orSecuring
Child Restraints (With the Seat
Belt in the Rear Seat) 0120 or
Securing Child Restraints (With
the Seat Belt in the Front
Passenger Seat) 0123.
Make sure the seat belt
retractor is locked by pulling
the shoulder belt all the way
out of the retractor when
installing the child restraint,
even if the child restraint is
equipped with a seat belt lock
off. When the retractor lock is
set, the belt can be tightened
but not pulled out of the
retractor.
5. If, after reinstalling the child restraint and restarting the
vehicle, the ON indicator is still
lit, turn the vehicle off. Then
slightly recline the vehicle
seatback and adjust the seat
cushion, if adjustable, to make
sure that the vehicle seatback
is not pushing the child
restraint into the seat cushion.
Page 105 of 450

GMC Yukon/Yukon XL/Denali Owner Manual (GMNA-Localizing-U.S./
Canada/Mexico-12460267) - 2019 - crc - 9/11/18
104 Seats and Restraints
Airbag System Check
The airbag system does not need
regularly scheduled maintenance or
replacement. Make sure the airbag
readiness light is working. See
Airbag Readiness Light0151.
Caution
If an airbag covering is damaged,
opened, or broken, the airbag
may not work properly. Do not
open or break the airbag
coverings. If there are any
opened or broken airbag
coverings, have the airbag
covering and/or airbag module
replaced. For the location of the
airbags, see Where Are the
Airbags? 093. See your dealer
for service.
Replacing Airbag System
Parts after a Crash
{Warning
A crash can damage the airbag
systems in the vehicle.
A damaged airbag system may
not properly protect you and your
passenger(s) in a crash, resulting
in serious injury or even death. To
help make sure the airbag
systems are working properly
after a crash, have them
inspected and any necessary
replacements made as soon as
possible.
If an airbag inflates, you will need to
replace airbag system parts. See
your dealer for service.
If the airbag readiness light stays on
after the vehicle is started or comes
on when you are driving, the airbag
system may not work properly. Have
the vehicle serviced right away. See
Airbag Readiness Light 0151.
Child Restraints
Older Children
Older children who have outgrown
booster seats should wear the
vehicle’s seat belts.
Page 125 of 450

GMC Yukon/Yukon XL/Denali Owner Manual (GMNA-Localizing-U.S./
Canada/Mexico-12460267) - 2019 - crc - 9/11/18
124 Seats and Restraints
When using the lap-shoulder belt to
secure the child restraint in this
position, follow the instructions that
came with the child restraint and the
following instructions:1. Move the seat as far back as it will go before securing the
forward-facing child restraint.
Move the seat upward or the
seatback to an upright position,
if needed, to get a tight
installation of the child
restraint.
When the passenger sensing
system has turned off the front
outboard passenger frontal
airbag, the OFF indicator on
the passenger airbag status
indicator should light and stay
lit when you start the vehicle.
See Passenger Airbag Status
Indicator 0152.
2. Put the child restraint on the seat. 3. Pick up the latch plate, and run
the lap and shoulder portions
of the vehicle's seat belt
through or around the child
restraint. The child restraint
instructions will show you how.
Tilt the latch plate to adjust the
belt, if needed.
4. Push the latch plate into the
buckle until it clicks.
Position the release button on
the buckle, away from the child
restraint, so that the seat belt
could be quickly unbuckled if
necessary.
Page 132 of 450

GMC Yukon/Yukon XL/Denali Owner Manual (GMNA-Localizing-U.S./
Canada/Mexico-12460267) - 2019 - crc - 9/11/18
Instruments and Controls 131
Instruments and
Controls
Controls
Steering Wheel Adjustment . . . 132
Steering Wheel Controls . . . . . . 133
Heated Steering Wheel . . . . . . . 133
Horn . . . . . . . . . . . . . . . . . . . . . . . . . . 133
Windshield Wiper/Washer . . . . 133
Rear Window Wiper/Washer . . . . . . . . . . . . . . . . . . . . . 135
Compass . . . . . . . . . . . . . . . . . . . . . 136
Clock . . . . . . . . . . . . . . . . . . . . . . . . . 136
Power Outlets . . . . . . . . . . . . . . . . 137
Wireless Charging . . . . . . . . . . . . 139
Warning Lights, Gauges, and
Indicators
Warning Lights, Gauges, and Indicators . . . . . . . . . . . . . . . . . . . 142
Instrument Cluster . . . . . . . . . . . . 143
Speedometer . . . . . . . . . . . . . . . . . 146
Odometer . . . . . . . . . . . . . . . . . . . . . 146
Trip Odometer . . . . . . . . . . . . . . . . 146
Tachometer . . . . . . . . . . . . . . . . . . . 146
Fuel Gauge . . . . . . . . . . . . . . . . . . . 147
Engine Oil Pressure
Gauge . . . . . . . . . . . . . . . . . . . . . . 147 Engine Coolant Temperature
Gauge . . . . . . . . . . . . . . . . . . . . . . 148
Transmission Temperature Gauge . . . . . . . . . . . . . . . . . . . . . . 149
Voltmeter Gauge . . . . . . . . . . . . . 150
Seat Belt Reminders . . . . . . . . . 150
Airbag Readiness Light . . . . . . . 151
Passenger Airbag Status
Indicator . . . . . . . . . . . . . . . . . . . . 152
Charging System Light . . . . . . . 152
Malfunction Indicator Lamp (Check Engine Light) . . . . . . . . 153
Brake System Warning Light . . . . . . . . . . . . . . . . . . . . . . . . 155
Antilock Brake System (ABS) Warning Light . . . . . . . . . . . . . . . 155
Four-Wheel-Drive Light . . . . . . . 156
Tow/Haul Mode Light . . . . . . . . . 156
Lane Keep Assist (LKA) Light . . . . . . . . . . . . . . . . . . . . . . . . 156
Vehicle Ahead Indicator . . . . . . 157
Traction Off Light . . . . . . . . . . . . . 157
StabiliTrak OFF Light . . . . . . . . . 157
Traction Control System (TCS)/ StabiliTrak Light . . . . . . . . . . . . . 158
Engine Coolant Temperature Warning Light . . . . . . . . . . . . . . . 158
Tire Pressure Light . . . . . . . . . . . 158
Engine Oil Pressure Light . . . . 159
Low Fuel Warning Light . . . . . . 159 Security Light . . . . . . . . . . . . . . . . . 160
High-Beam On Light . . . . . . . . . . 160
Front Fog Lamp Light . . . . . . . . . 160
Lamps On Reminder . . . . . . . . . 160
Cruise Control Light . . . . . . . . . . 161
Door Ajar Light . . . . . . . . . . . . . . . 161
Information Displays
Driver Information
Center (DIC) . . . . . . . . . . . . . . . . 161
Head-Up Display (HUD) . . . . . . 164
Vehicle Messages
Vehicle Messages . . . . . . . . . . . . 168
Engine Power Messages . . . . . 168
Vehicle Speed Messages . . . . . 169
Vehicle Personalization
Vehicle Personalization . . . . . . . 169
Universal Remote System
Universal Remote System . . . . 177
Universal Remote System Programming . . . . . . . . . . . . . . . 177
Universal Remote System Operation . . . . . . . . . . . . . . . . . . . 180
Page 134 of 450

GMC Yukon/Yukon XL/Denali Owner Manual (GMNA-Localizing-U.S./
Canada/Mexico-12460267) - 2019 - crc - 9/11/18
Instruments and Controls 133
Steering Wheel Controls
The infotainment system can be
operated by using the steering
wheel controls. See“Steering Wheel
Controls” in the infotainment
manual.
Heated Steering Wheel
(: If equipped, press to turn the
heated steering wheel on or off.
A light next to the button displays
when the feature is turned on.
The steering wheel takes about
three minutes to start heating.
Horn
To sound the horn, pressaon the
steering wheel.
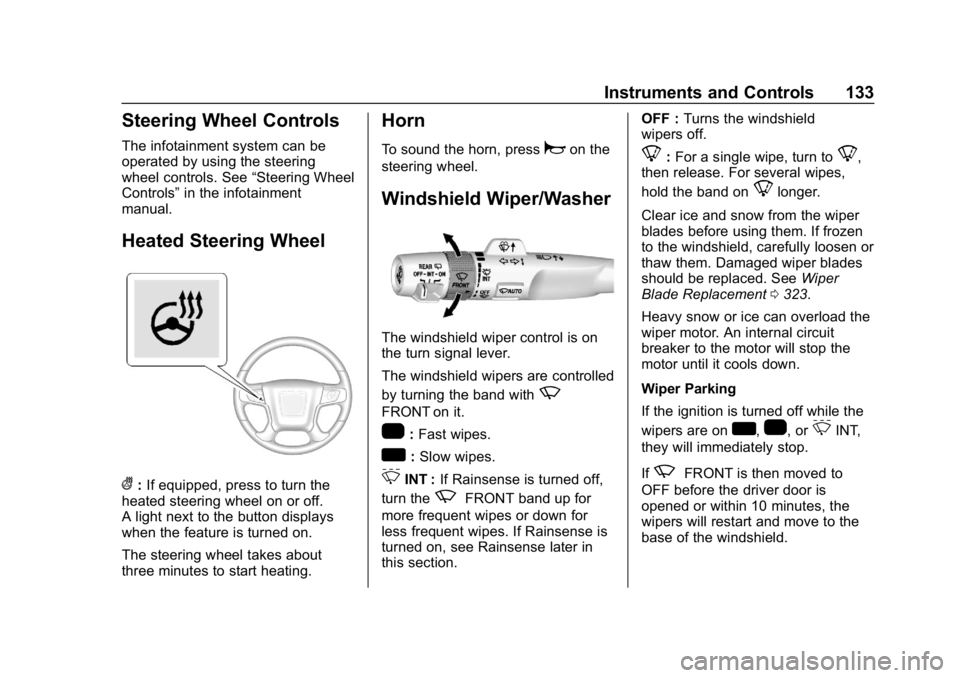
Windshield Wiper/Washer
The windshield wiper control is on
the turn signal lever.
The windshield wipers are controlled
by turning the band with
z
FRONT on it.
1: Fast wipes.
w:Slow wipes.
3INT : If Rainsense is turned off,
turn the
zFRONT band up for
more frequent wipes or down for
less frequent wipes. If Rainsense is
turned on, see Rainsense later in
this section. OFF :
Turns the windshield
wipers off.
8: For a single wipe, turn to8,
then release. For several wipes,
hold the band on
8longer.
Clear ice and snow from the wiper
blades before using them. If frozen
to the windshield, carefully loosen or
thaw them. Damaged wiper blades
should be replaced. See Wiper
Blade Replacement 0323.
Heavy snow or ice can overload the
wiper motor. An internal circuit
breaker to the motor will stop the
motor until it cools down.
Wiper Parking
If the ignition is turned off while the
wipers are on
w,1, or3INT,
they will immediately stop.
If
zFRONT is then moved to
OFF before the driver door is
opened or within 10 minutes, the
wipers will restart and move to the
base of the windshield.
Page 140 of 450

GMC Yukon/Yukon XL/Denali Owner Manual (GMNA-Localizing-U.S./
Canada/Mexico-12460267) - 2019 - crc - 9/11/18
Instruments and Controls 139
For vehicles with bench seats, the
110/120-volt power outlet is on the
center stack below the climate
controls.
An indicator light on the outlet turns
on to show it is in use. The light
comes on when the ignition is on,
equipment requiring less than 150
watts is plugged into the outlet, and
no system fault is detected.
The indicator light does not come on
when the ignition is off or if the
equipment is not fully seated into
the outlet.
If equipment is connected using
more than 150 watts or a system
fault is detected, a protection circuit
shuts off the power supply and the
indicator light turns off. To reset the
circuit, unplug the item and plug it
back in or turn the ignition off and
then back to on. The power restarts
when equipment using 150 watts or
less is plugged into the outlet and a
system fault is not detected.The power outlet is not designed for
the following, and may not work
properly if they are plugged in:
.
Equipment with high initial peak
wattage, such as
compressor-driven refrigerators
and electric power tools
. Other equipment requiring an
extremely stable power supply,
such as
microcomputer-controlled
electric blankets and touch
sensor lamps
. Medical equipment
Wireless Charging
The vehicle may have wireless
charging on top of the center
console. See Center Console
Storage 0128. The system
operates at 145 kHz and wirelessly
charges one Qi compatible
smartphone. The power output of
the system is capable of charging at
a rate up to 1 amp (5W), as
requested by the compatible
smartphone. See Radio Frequency
Statement 0421.
{Warning
Wireless charging can affect the
operation of an implanted
pacemaker or other medical
devices. If you have one, it is
recommended to consult with
your doctor before using the
wireless charging system.
The vehicle must be on, in ACC/
ACCESSORY, or Retained
Accessory Power (RAP) must be
active. The wireless charging
feature may not correctly indicate
charging when the vehicle is in RAP.
See Retained Accessory Power
(RAP) 0224.
The operating temperature is −20 °C
(−4 °F) to 60 °C (140 °F) for the
charging system and 0 °C (32 °F) to
35 °C (95 °F) for the smartphone.
Page 143 of 450

GMC Yukon/Yukon XL/Denali Owner Manual (GMNA-Localizing-U.S./
Canada/Mexico-12460267) - 2019 - crc - 9/11/18
142 Instruments and Controls
Warning Lights,
Gauges, and
Indicators
Warning lights and gauges can
signal that something is wrong
before it becomes serious enough
to cause an expensive repair or
replacement. Paying attention to the
warning lights and gauges could
prevent injury.Some warning lights come on briefly
when the engine is started to
indicate they are working. When
one of the warning lights comes on
and stays on while driving, or when
one of the gauges shows there may
be a problem, check the section that
explains what to do. Waiting to do
repairs can be costly and even
dangerous.
Page 146 of 450

GMC Yukon/Yukon XL/Denali Owner Manual (GMNA-Localizing-U.S./
Canada/Mexico-12460267) - 2019 - crc - 9/11/18
Instruments and Controls 145
Cluster Menu
There is an interactive display area
in the center of the instrument
cluster.
Use the right steering wheel control
to open and scroll through the
different items and displays.
Press
oto access the cluster
applications. Use
worxto scroll
through the list of available
applications. Not all applications will
be available on all vehicles. .
Info App. This is where the
selected Driver Information
Center (DIC) displays can be
viewed. See Driver Information
Center (DIC) 0161.
. Audio
. Phone
. Navigation
. Options
Audio
Press
Vto select the Audio app,
then press
pto enter the Audio
menu. In the Audio menu browse for
music, select from the favorites,
or change the audio source. Use
w
orxto change the station or go to
the next or previous track.
Phone
Press
Vto select the Phone app,
then press
pto enter the Phone
menu. In the Phone menu, if there is
no active phone call, view recent
calls, or scroll through contacts. If there is an active call, mute the
phone or switch to handset
operation.
Navigation
Press
Vto select the Navigation
app, then press
pto enter the
Navigation menu. If there is no
active route, you can resume the
last route and turn the voice
prompts on/off. If there is an active
route, press
Vto cancel or resume
route guidance or turn the voice
prompts on or off.
Options
Press
Vto select the Options app,
then press
pto enter the Options
menu. Use
worxto scroll
through items in the Options menu.
Units : Press
pwhile Units is
displayed to enter the Units menu.
Choose English or Metric units by
pressing
Vwhile the desired item is
highlighted. A checkmark will be
displayed next to the selected item.