2019 GMC SIERRA ECU
[x] Cancel search: ECUPage 311 of 477

GMC Sierra/Sierra Denali Owner Manual (GMNA-Localizing-U.S./Canada/
Mexico-1500-11698638) - 2019 - CRC - 5/14/19
310 Driving and Operating
Settings View
Within the Trailering App, touch the
Settings tab to modify the following
settings:
.Trailer Detection Alert
. Maintenance Alerts
. Security Alert
. Tow/Haul Mode Reminder
Trailer Detection Alert
The Trailer Detection Alert setting
will be on by default. Turn it off to
disable the Trailer Detection pop-up
from displaying when a trailer is
connected. The Guest Trailer Profile
will become the active Trailer
Profile, unless another Trailer Profile
is selected manually through the
Trailering App. If this setting is
disabled while a Custom Trailer
Profile is active, that Trailer Profile
will remain the active profile until the
trailer is disconnected.
Maintenance Alerts
Touch Maintenance Alerts to view
the Maintenance Alerts settings
page. These alerts are based on the
Trailer Profile, so the settings for
each Trailer Profile must be turned
on or off. Touch a profile to view
more information or adjust the
setting for that profile.
The setting will be on by default for
each profile. All Maintenance Alerts
for that active Trailer Profile will be
received.
Turn a setting off to not receive any
of the Maintenance Alerts when that
Trailer Profile is active.
Security Alert
A security alert can be set if a trailer
is connected and the alert is
enabled. When the trailer is
disconnected and the vehicle is off,
an alarm will sound. Touch Security Alert in Settings to
view the Security Alert settings
page. These alerts are based on the
Trailer Profile, so the settings for
each Trailer Profile must be turned
on or off. Touch a profile to view
more information or adjust the
setting for that profile.
This setting will be off by default for
each Trailer Profile, including the
Guest Trailer Profile.
A smartphone will receive a
notification that the trailer related to
the selected Trailer Profile is
disconnected from the vehicle, if the
setting is on for the active Trailer
Profile, the vehicle has an OnStar or
connected service plan and the
smartphone number has been
added to the account for this
notification.
If the setting is turned off for a given
Trailer Profile, the smartphone will
not receive this security notification
even if the Trailer Profile is active.
Page 314 of 477

GMC Sierra/Sierra Denali Owner Manual (GMNA-Localizing-U.S./Canada/
Mexico-1500-11698638) - 2019 - CRC - 5/14/19
Driving and Operating 313
.Make sure the weight on the
front and rear axles does not
exceed the axle rating for each.
. For the front axle, if more cargo
or passengers must be carried,
appropriate counter ballast must
be installed rear of the rear axle.
Counter ballast must be properly
secured so it will not move
during driving.
. Rear ballast may be required to
ensure a proper front and rear
weight distribution ratio, even
though the actual weight at the
front axle may be less than the
front axle rating.
. The snow plow manufacturer or
installer can assist in
determining the amount of rear
ballast required, to help make
sure the snow plow/vehicle
combination does not exceed
the GVW rating, the front and
rear axle ratings, and the front
and rear weight distribution ratio.
. The total vehicle must not
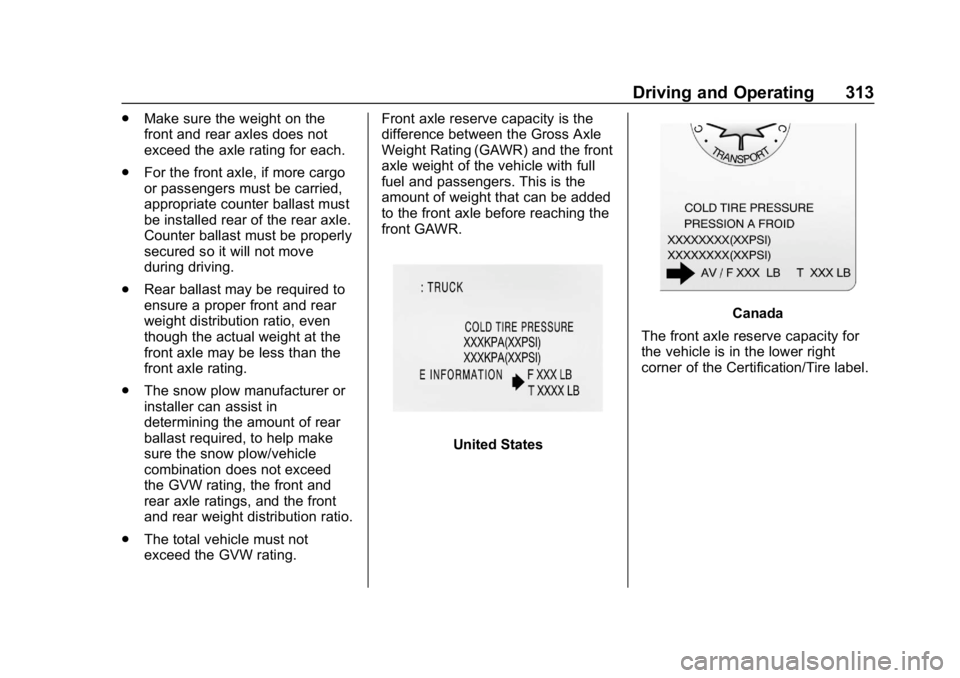
exceed the GVW rating. Front axle reserve capacity is the
difference between the Gross Axle
Weight Rating (GAWR) and the front
axle weight of the vehicle with full
fuel and passengers. This is the
amount of weight that can be added
to the front axle before reaching the
front GAWR.
United States
Canada
The front axle reserve capacity for
the vehicle is in the lower right
corner of the Certification/Tire label.
Page 337 of 477

GMC Sierra/Sierra Denali Owner Manual (GMNA-Localizing-U.S./Canada/
Mexico-1500-11698638) - 2019 - CRC - 5/14/19
336 Vehicle Care
Caution
Failure to follow the specific
coolant fill procedure could cause
the engine to overheat and could
cause system damage. If coolant
is not visible in the surge tank,
contact your dealer.
If no coolant is visible in the surge
tank, add coolant.
1. Remove the coolant surge tank pressure cap when the cooling
system, including the coolant
surge tank pressure cap and
upper radiator hose, is no
longer hot. Turn the pressure cap slowly
counterclockwise about one full
turn. If a hiss is heard, wait for
that to stop. A hiss means
there is still some pressure left.
2. Keep turning the pressure cap slowly, and remove it.
3. Fill the coolant surge tank with the proper mixture to the full
cold mark.
4. With the coolant surge tank pressure cap off, start the
engine and let it run until the
engine coolant temperature
gauge indicates approximately
90 °C (195 °F).
By this time, the coolant level
inside the coolant surge tank
may be lower. If the level is
lower, add more of the proper
mixture to the coolant surge
tank until the level reaches the
indicated mark.
5. Replace the pressure cap tightly. 6. Verify coolant level after the
engine is shut off and the
coolant is cold. If necessary,
repeat coolant fill procedure
Steps 1–6.
Caution
If the pressure cap is not tightly
installed, coolant loss and engine
damage may occur. Be sure the
cap is properly and tightly
secured.
Engine Overheating
If the vehicle has the Duramax
diesel engine, see the Duramax
diesel supplement.
Caution
Do not run the engine if there is a
leak in the engine cooling system.
This can cause a loss of all
coolant and can damage the
system and vehicle. Have any
leaks fixed right away.
Page 345 of 477

GMC Sierra/Sierra Denali Owner Manual (GMNA-Localizing-U.S./Canada/
Mexico-1500-11698638) - 2019 - CRC - 5/14/19
344 Vehicle Care
For vehicles equipped with the Stop/
Start system:
1. Loosen and remove thenegative battery cable nut (1)
at the battery sensor
connection.
2. Remove the negative battery cable (2) from the battery
sensor stud.
3. Cover the negative battery cable terminal, battery sensor
stud, and negative battery post
with a non-conductive material
to prevent any contact with the
negative battery cable. For vehicles not equipped with the
Stop/Start system:1. Loosen the negative battery
cable nut (1).
2. Remove the negative battery cable clamp (2) from the
negative battery post.
3. Cover the negative battery cable clamp, and negative
battery post with a
non-conductive material to
prevent any contact with the
negative battery cable.
Negative Battery Cable
Reconnection
Caution
When reconnecting the battery:. Use the original nut from the
vehicle to secure the
negative battery cable. Do
not use a different nut.
If you need a replacement
nut, see your dealer.
. Tighten the nut with a hand
tool. Do not use an impact
wrench or power tools to
tighten the nut.
The vehicle could be damaged if
these guidelines are not followed.
Caution
Do not use paints, lubricants,
or corrosion inhibitors on the nut
that secures the negative battery
cable to the vehicle. This could
damage the vehicle.
Page 389 of 477

GMC Sierra/Sierra Denali Owner Manual (GMNA-Localizing-U.S./Canada/
Mexico-1500-11698638) - 2019 - CRC - 5/14/19
388 Vehicle Care
Warning (Continued)
suspension, or other vehicle
parts. The area damaged by the
tire chains could cause you to
lose control of the vehicle and
you or others may be injured in a
crash.
Use another type of traction
device only if its manufacturer
recommends it for use on the
vehicle and tire size combination
and road conditions. Follow that
manufacturer's instructions. To
help avoid damage to the vehicle,
drive slowly, readjust, or remove
the device if it is contacting the
vehicle, and do not spin the
vehicle's wheels.
If you do find traction devices that
will fit, install them on the rear
tires.
Caution
Use tire chains only where legal
and only when necessary. Use
chains that are the proper size for
the tires. If the vehicle has
265/70R17 or 265/65R18 size
tires, they may be installed on the
tires of the rear axle only. If the
vehicle has 255/70R17 size tires,
they may be installed on the tires
of the front and rear axle. Tighten
them as tightly as possible with
the ends securely fastened. Drive
slowly and follow the chain
manufacturer's instructions. If you
can hear the chains contacting
the vehicle, stop and retighten
them. If the contact continues,
slow down until it stops. Driving
too fast or spinning the wheels
with chains on will damage the
vehicle.
If a Tire Goes Flat
It is unusual for a tire to blowout
while driving, especially if the tires
are maintained properly. If air goes
out of a tire, it is much more likely to
leak out slowly. But if there ever is a
blowout, here are a few tips about
what to expect and what to do:
If a front tire fails, the flat tire
creates a drag that pulls the vehicle
toward that side. Take your foot off
the accelerator pedal and grip the
steering wheel firmly. Steer to
maintain lane position, and then
gently brake to a stop, well off the
road, if possible.
A rear blowout, particularly on a
curve, acts much like a skid and
may require the same correction as
used in a skid. Stop pressing the
accelerator pedal and steer to
straighten the vehicle. It may be
very bumpy and noisy. Gently brake
to a stop, well off the road,
if possible.
Page 397 of 477

GMC Sierra/Sierra Denali Owner Manual (GMNA-Localizing-U.S./Canada/
Mexico-1500-11698638) - 2019 - CRC - 5/14/19
396 Vehicle Care
Caution (Continued)
torque specification. See
Capacities and Specifications
0435 for the wheel nut torque
specification.
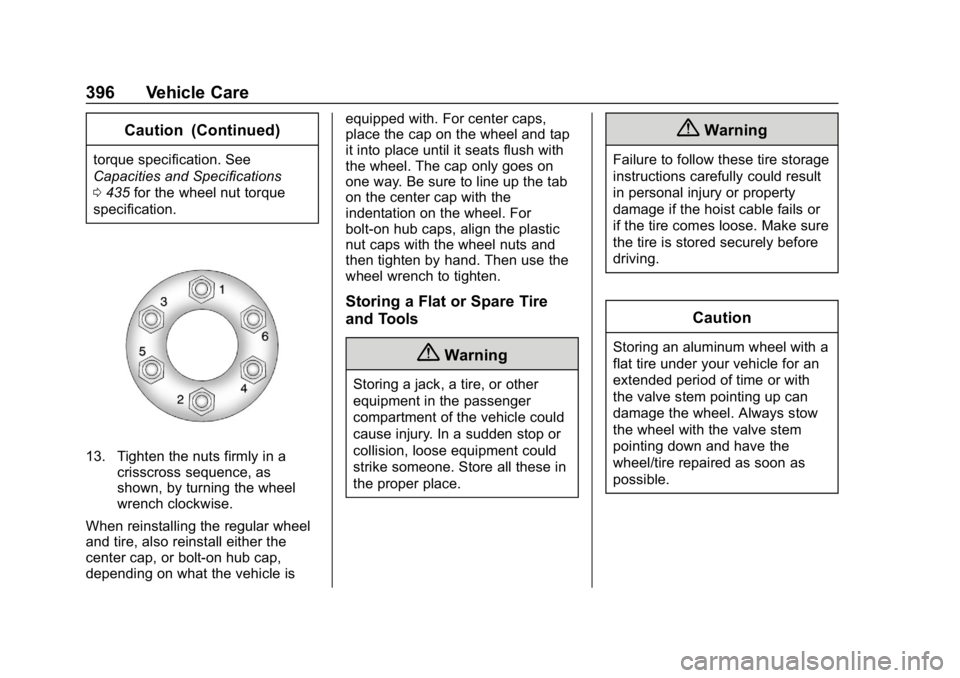
13. Tighten the nuts firmly in a crisscross sequence, as
shown, by turning the wheel
wrench clockwise.
When reinstalling the regular wheel
and tire, also reinstall either the
center cap, or bolt-on hub cap,
depending on what the vehicle is equipped with. For center caps,
place the cap on the wheel and tap
it into place until it seats flush with
the wheel. The cap only goes on
one way. Be sure to line up the tab
on the center cap with the
indentation on the wheel. For
bolt-on hub caps, align the plastic
nut caps with the wheel nuts and
then tighten by hand. Then use the
wheel wrench to tighten.
Storing a Flat or Spare Tire
and Tools
{Warning
Storing a jack, a tire, or other
equipment in the passenger
compartment of the vehicle could
cause injury. In a sudden stop or
collision, loose equipment could
strike someone. Store all these in
the proper place.
{Warning
Failure to follow these tire storage
instructions carefully could result
in personal injury or property
damage if the hoist cable fails or
if the tire comes loose. Make sure
the tire is stored securely before
driving.
Caution
Storing an aluminum wheel with a
flat tire under your vehicle for an
extended period of time or with
the valve stem pointing up can
damage the wheel. Always stow
the wheel with the valve stem
pointing down and have the
wheel/tire repaired as soon as
possible.
Page 399 of 477

GMC Sierra/Sierra Denali Owner Manual (GMNA-Localizing-U.S./Canada/
Mexico-1500-11698638) - 2019 - CRC - 5/14/19
398 Vehicle Care
Caution (Continued)
and could damage the system.
Use only the tools supplied with
the hoist mechanism.
4. Insert the hoist end (10)through the hole (9) in the rear
bumper and onto the hoist
shaft.
Do not use the chiseled end of
the wheel wrench.
5. Raise the tire part way upward. Make sure the retainer is
seated in the wheel opening.
6. Raise the tire fully against the underside of the vehicle by
turning the wheel wrench clockwise until you hear two
clicks or feel it skip twice. You
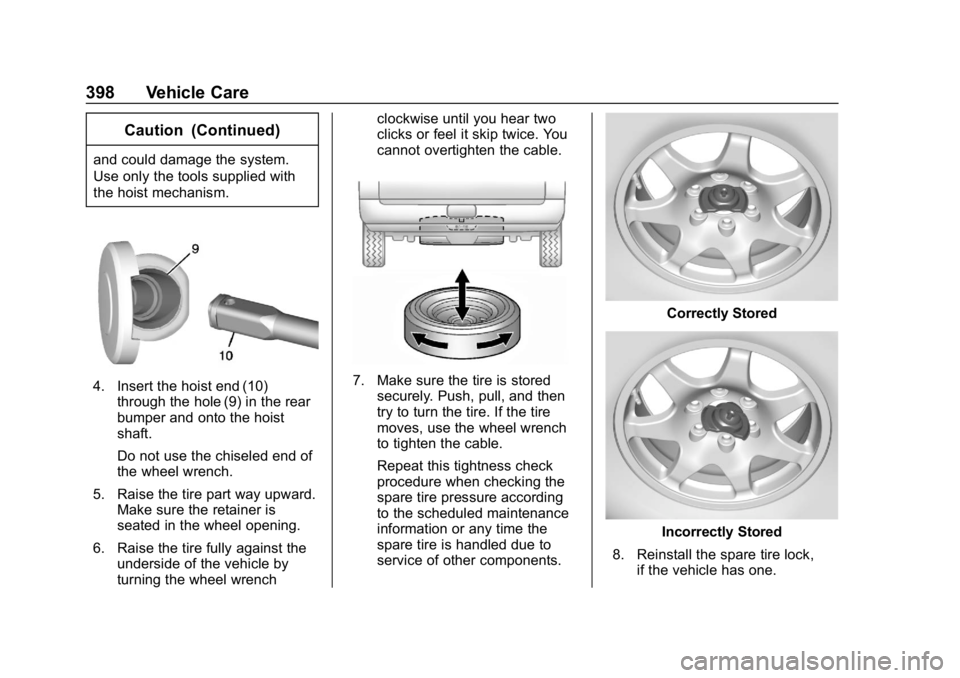
cannot overtighten the cable.7. Make sure the tire is stored
securely. Push, pull, and then
try to turn the tire. If the tire
moves, use the wheel wrench
to tighten the cable.
Repeat this tightness check
procedure when checking the
spare tire pressure according
to the scheduled maintenance
information or any time the
spare tire is handled due to
service of other components.
Correctly Stored
Incorrectly Stored
8. Reinstall the spare tire lock, if the vehicle has one.
Page 404 of 477

GMC Sierra/Sierra Denali Owner Manual (GMNA-Localizing-U.S./Canada/
Mexico-1500-11698638) - 2019 - CRC - 5/14/19
Vehicle Care 403
negative (−) terminal on the
dead battery because this can
cause sparks.
7. Connect one end of the red positive (+) cable to the remote
positive (+) terminal of the
vehicle with the discharged
battery.
8. Do not let the other end touch metal. Connect it to the
positive (+) terminal of the
good battery. Use a remote
positive (+) terminal if the
vehicle has one.
9. Connect one end of the black negative (−) cable to the
negative (−) terminal of the
good battery. Use a remote
negative (−) terminal if the
vehicle has one.
Do not let the other end touch
anything until the next step.
10. Connect the other end of the negative (−) cable to the
remote negative (−) terminal to
the discharged battery. 11. Start the vehicle with the good
battery and run the engine for a
while.
12. Try to start the vehicle that had the dead battery. If it will not
start after a few tries, it
probably needs service.
Caution
If the jumper cables are
connected or removed in the
wrong order, electrical shorting
may occur and damage the
vehicle. The repairs would not be
covered by the vehicle warranty.
Always connect and remove the
jumper cables in the correct order,
making sure that the cables do
not touch each other or other
metal.
Jumper Cable Removal
Reverse the sequence exactly when
removing the jumper cables.
After starting the disabled vehicle
and removing the jumper cables,
allow it to idle for several minutes.
Towing the Vehicle
Caution
Incorrectly towing a disabled
vehicle may cause damage. The
damage would not be covered by
the vehicle warranty. Do not lash
or hook to suspension
components. Use the proper
straps around the tires to secure
the vehicle. Do not drag a locked
wheel/tire while loading the
vehicle. Do not use a sling type
lift to tow the vehicle. This could
damage the vehicle.
GM recommends a flatbed tow truck
to transport a disabled vehicle. Use
ramps to help reduce approach
angles, if necessary. A towed
vehicle should have its drive wheels
off the ground. Contact Roadside
Assistance or a professional towing
service if the disabled vehicle must
be towed.