2019 GMC SIERRA weight
[x] Cancel search: weightPage 294 of 477

GMC Sierra/Sierra Denali Owner Manual (GMNA-Localizing-U.S./Canada/
Mexico-1500-11698638) - 2019 - CRC - 5/14/19
Driving and Operating 293
chains may be attached to the
attaching points on the bumper;
otherwise, safety chains should be
attached to holes on the trailer hitch.
Cross the safety chains under the
tongue of the trailer to help prevent
the tongue from contacting the road
if it becomes separated from the
hitch. Always leave enough slack in
the safety chains to allow the
combination to turn. Never allow
safety chains to drag on the ground.
Trailer Brakes
Loaded trailers over 900 kg
(2,000 lb) must be equipped with
brake systems and with brakes for
each axle. Trailer braking equipment
conforming to Canadian Standards
Association (CSA) requirement
CAN3-D313, or its equivalent, is
recommended.
State or local regulations may
require trailers to have their own
braking system if the loaded weight
of the trailer exceeds certain
minimums that can vary from state
to state. Read and follow the
instructions for the trailer brakes sothey are installed, adjusted, and
maintained properly. Never attempt
to tap into your vehicle's hydraulic
brake system. If you do, both the
vehicle antilock brakes and the
trailer brakes may not function,
which could result in a crash.
Trailer Wiring Harness
If the vehicle is not equipped with a
trailer connector on the rear bumper,
a 7-wire trailering harness is tied to
the vehicles frame. The harness
requires the installation of a trailer
connector, which is available
through your dealer.
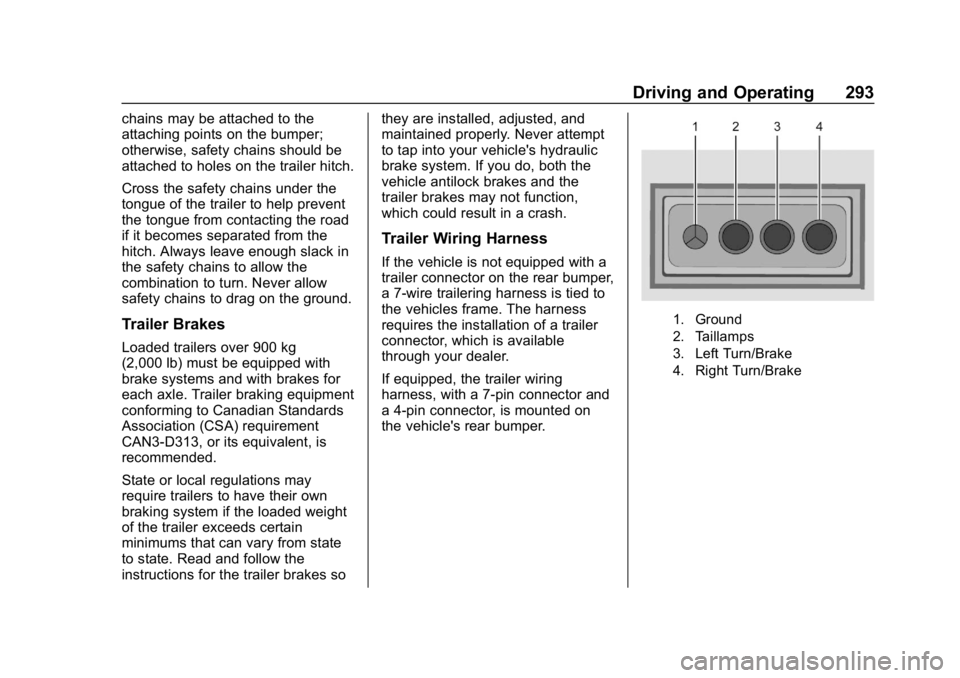
If equipped, the trailer wiring
harness, with a 7-pin connector and
a 4-pin connector, is mounted on
the vehicle's rear bumper.
1. Ground
2. Taillamps
3. Left Turn/Brake
4. Right Turn/Brake
Page 296 of 477

GMC Sierra/Sierra Denali Owner Manual (GMNA-Localizing-U.S./Canada/
Mexico-1500-11698638) - 2019 - CRC - 5/14/19
Driving and Operating 295
Pressing START LIGHT TEST in the
Trailering App automatically
activates trailer lamps. The
Trailering App is not a substitute for
manually inspecting your trailer
lamps. SeeTrailering App 0301.
Turn Signals When Towing a
Trailer
When properly connected, the trailer
turn signals will illuminate to indicate
the vehicle is turning, changing
lanes, or stopping. When towing a
trailer, the arrows on the instrument
cluster will illuminate even if the
trailer is not properly connected or
the bulbs are burned out.
Tow/Haul Mode
For instructions on how to enter
Tow/Haul Mode, see Driver Mode
Control 0250.
Tow/Haul assists when pulling a
heavy trailer or a large or heavy
load. See Tow/Haul Mode 0238.
Tow/Haul Mode is designed to be
most effective when the vehicle and
trailer combined weight is at least
75% of the vehicle's Gross Combined Weight Rating (GCWR).
See
“Weight of the Trailer” under
Trailer Towing 0286.
Tow/Haul Mode is most useful when
towing a heavy trailer or carrying a
large or heavy load:
. through rolling terrain.
. in stop-and-go traffic.
. in busy parking lots.
Operating the vehicle in Tow/Haul
Mode when lightly loaded or not
towing will not cause damage;
however, it is not recommended and
may result in unpleasant engine and
transmission driving characteristics
and reduced fuel economy.Integrated Trailer Brake
Control System
The vehicle may have an Integrated
Trailer Brake Control (ITBC) system
for use with electric trailer brakes or
most electric over hydraulic trailer
brake systems. These instructions
apply to both types of electric trailer
brakes.
This symbol is on the Trailer Brake
Control Panel on vehicles with an
ITBC system. The power output to
the trailer brakes is proportional to
the amount of vehicle braking. This
available power output to the trailer
brakes can be adjusted to a wide
range of trailering situations.
The ITBC system is integrated with
the vehicle’ s brake, antilock brake,
and StabiliTrak/Electronic Stability
Control (ESC) systems. In trailering
conditions that cause the vehicle’s
antilock brake or StabiliTrak/ESC
systems to activate, power sent to
the trailer's brakes will be
automatically adjusted to minimize
trailer wheel lock-up. This does not
imply that the trailer has
StabiliTrak/ESC.
If the vehicle’s brake, anti-lock
brake, or StabiliTrak/ESC systems
are not functioning properly, the
Page 302 of 477

GMC Sierra/Sierra Denali Owner Manual (GMNA-Localizing-U.S./Canada/
Mexico-1500-11698638) - 2019 - CRC - 5/14/19
Driving and Operating 301
Trailer tires deteriorate over time.
The trailer tire sidewall will show the
week and year the tire was
manufactured. Many trailer tire
manufacturers recommend
replacing tires more than six
years old.
Overloading is another leading
cause of trailer tire blow-outs. Never
load your trailer with more weight
than the tires are designed to
support. The load rating is located
on the trailer tire sidewall.
Always know the maximum speed
rating for the trailer tires before
driving. This may be significantly
lower than the vehicle tire speed
rating. The speed rating may be on
the trailer tire sidewall. If the speed
rating is not shown, the default
trailer tire speed rating is 105 km/h
(65 mph).
Trailering App
Trailer Light App
If equipped, the Trailer Lights App is
on the Home Page of the
infotainment display.Touch Start to cycle the trailer lights
on and off to determine if they are
working. The test follows this
sequence:
1. The running lights turn on first and remain on throughout the
sequence.
2. The brake lights turn on for about two seconds.
3. The left turn signal light flashes three times.
4. The right turn signal light flashes three times.
5. The reverse lights turn on for about two seconds.
6. Steps 2–5 repeat for approximately one minute and
45 seconds, or until the test
deactivates.
Touch Stop to stop the test. The test
will automatically end after
one minute and 45 seconds.
The sequence also deactivates
when any of the following occur:
. The ignition is turned off. .
The transmission is shifted out
of P (Park).
. The brake pedal pressed.
. The turn signal is activated.
. The hazard warning lights
activated.
Trailering App
If equipped, the Trailering App is on
the Home Page of the infotainment
display.
This feature allows profiles for
connected trailers to be created to
view status, and to store and track
trailer usage information.
The Trailering App Preview will
appear when the Trailering App is
opened for the first time from the
Home Page. Touch GET STARTED
in the Trailering App to go into
the app.
When a trailer is electrically
connected, there will be an option to
create a profile, use a guest profile,
or cancel. After Cancel is selected a
third time, Don’t Remind Me will
display and touching that will turn off
Page 313 of 477

GMC Sierra/Sierra Denali Owner Manual (GMNA-Localizing-U.S./Canada/
Mexico-1500-11698638) - 2019 - CRC - 5/14/19
312 Driving and Operating
Adding a Snow Plow or
Similar Equipment
Caution
Do not exceed 72 km/h (45 mph)
with a snow plow mounted to the
vehicle. The vehicle could
overheat and be damaged.
Before installing a snow plow on the
vehicle, follow these guidelines:
Caution
If the vehicle does not have the
snow plow prep package, RPO
VYU, adding a plow can damage
the vehicle, and the repairs would
not be covered by the vehicle
warranty. Unless the vehicle was
built to carry a snow plow, do not
add one to the vehicle. If the
vehicle has RPO VYU, then the
payload the vehicle can carry will
be reduced when a snow plow is (Continued)
Caution (Continued)
installed. The vehicle can be
damaged if either the front or rear
axle ratings or the Gross Vehicle
Weight Rating (GVWR) are
exceeded.
The plow the vehicle can carry
depends on many things, such as:
. The options the vehicle came
with, and the weight of those
options.
. The weight and number of
passengers to be carried.
. The weight of items added to the
vehicle, like a tool box or
truck cap.
. The total weight of any
additional cargo to be carried.
For example, if the snow plow
weighs 318 kg (700 lb), the total
weight of all occupants and cargo
inside the cab should not exceed
135 kg (300 lb). This means that you
may only be able to carry one
passenger. Even this may be too much if there is other equipment
already adding to the weight of the
vehicle.
To safely carry a snow plow on the
vehicle:
.
Follow all aftermarket snow plow
manufacturer ’s instructions for
the operation and transportation
of the snow plow.
. With a snow plow attached, the
engine coolant temperature
gauge may show a higher
temperature than while driving
without one. The snow plow
could block the airflow to the
radiator. This could be more
noticeable as vehicle speed
increases. At speeds above
72 km (45 mph), this may cause
the engine coolant to overheat.
. To increase the airflow, move the
snow plow blade postion.
. If driving more than 24 km
(15 mi), angle the plow blade
position.
Page 314 of 477

GMC Sierra/Sierra Denali Owner Manual (GMNA-Localizing-U.S./Canada/
Mexico-1500-11698638) - 2019 - CRC - 5/14/19
Driving and Operating 313
.Make sure the weight on the
front and rear axles does not
exceed the axle rating for each.
. For the front axle, if more cargo
or passengers must be carried,
appropriate counter ballast must
be installed rear of the rear axle.
Counter ballast must be properly
secured so it will not move
during driving.
. Rear ballast may be required to
ensure a proper front and rear
weight distribution ratio, even
though the actual weight at the
front axle may be less than the
front axle rating.
. The snow plow manufacturer or
installer can assist in
determining the amount of rear
ballast required, to help make
sure the snow plow/vehicle
combination does not exceed
the GVW rating, the front and
rear axle ratings, and the front
and rear weight distribution ratio.
. The total vehicle must not
exceed the GVW rating. Front axle reserve capacity is the
difference between the Gross Axle
Weight Rating (GAWR) and the front
axle weight of the vehicle with full
fuel and passengers. This is the
amount of weight that can be added
to the front axle before reaching the
front GAWR.
United States
Canada
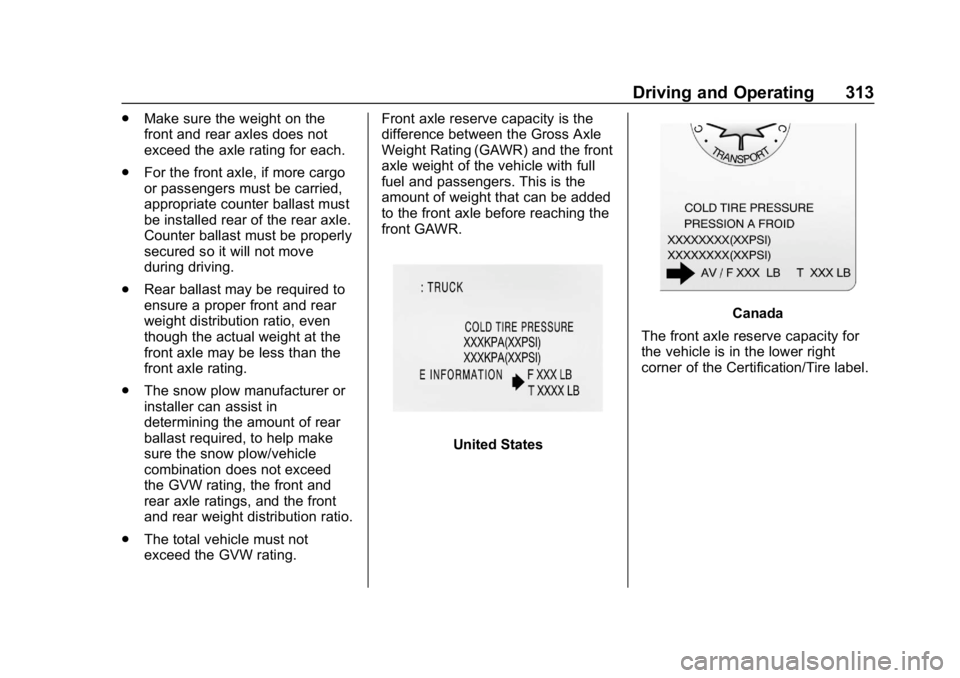
The front axle reserve capacity for
the vehicle is in the lower right
corner of the Certification/Tire label.
Page 315 of 477

GMC Sierra/Sierra Denali Owner Manual (GMNA-Localizing-U.S./Canada/
Mexico-1500-11698638) - 2019 - CRC - 5/14/19
314 Driving and Operating
To calculate the amount of weight
any front accessory, such as a snow
plow, is adding to the front axle, use
this formula:
(W x (A + W.B.)) /W.B.= Weight the
accessory is adding to the
front axle.
Where:W = Weight of added accessory
A = Distance that the accessory
is in front of the front axle
W.B. = Vehicle Wheelbase For example, adding a 318 kg
(700 lb) snow plow actually adds
more than 318 kg (700 lb) to the
front axle. Using the formula, if the
snow plow is 122 cm (4 ft) in front of
the front axle and the wheelbase is
305 cm (10 ft), then:
W = 318 kg (700 lb)
A = 122 cm (4 ft)
W.B. = 305 cm (10 ft)
(W x (A + W.B.)/W.B. =
(318 x (122 + 305))/305 = 445 kg
(980 lb)
This means if the front axle reserve
capacity is more than 445 kg
(980 lb), the snow plow could be
added without exceeding the
front GAWR.
Heavier equipment can be added on
the front of the vehicle if less cargo
or fewer passengers are carried,
or by positioning cargo toward the
rear. This reduces the load on the
front. However, the front GAWR,
rear GAWR, and Gross Vehicle
Weight Rating (GVWR) must never
be exceeded.
{Warning
On some vehicles that have
certain front mounted equipment,
such as a snow plow, it may be
possible to load the front axle to
the front Gross Axle Weight
Rating (GAWR) but not have
enough weight on the rear axle to
have proper braking performance.
If the brakes cannot work
properly, the vehice could crash.
Always follow the snow plow
manufacturer or installer's
recommendation for rear ballast
to ensure a proper front and rear
weight distribution ratio.
Maintaining a proper front and
rear weight distribution ratio is
necessary to provide proper
braking performance.
Total vehicle reserve capacity is the
difference between the GVWR and
the weight of the truck with full fuel
and passengers. It is the amount of
weight that can be added to the
vehicle before reaching the GVWR.
Page 316 of 477

GMC Sierra/Sierra Denali Owner Manual (GMNA-Localizing-U.S./Canada/
Mexico-1500-11698638) - 2019 - CRC - 5/14/19
Driving and Operating 315
Reserve capacity numbers are
intended as a guide when selecting
the amount of equipment or cargo
the truck can carry. If unsure of the
vehicle's front, rear, or total weight,
go to a weigh station and weigh the
vehicle. Your dealer can also help
with this.
The total vehicle reserve capacity
for the vehicle is in the lower right
corner of the Certification/Tire label
as shown previously.
See your dealer for additional
advice and information about using
a snow plow on the vehicle. Also,
seeVehicle Load Limits 0212.Pickup Conversion to
Chassis Cab
We are aware that some vehicle
owners might consider having the
pickup box removed and a
commercial or recreational body
installed. Owners should be aware
that, as manufactured, there are
differences between a chassis cab
and a pickup with the box removed
which could affect vehicle safety.
The components necessary to adapt
a pickup to permit its safe use with
a specialized body should be
installed by the body builder.
Page 348 of 477

GMC Sierra/Sierra Denali Owner Manual (GMNA-Localizing-U.S./Canada/
Mexico-1500-11698638) - 2019 - CRC - 5/14/19
Vehicle Care 347
.For the 6.2L engine, the proper
level is from 15 mm to 40 mm
(0.6 in to 1.6 in) below the
bottom of the fill plug hole,
located on the rear axle. Add
only enough fluid to reach the
proper level.
What to Use
Refer to Recommended Fluids and
Lubricants 0430 to determine what
kind of lubricant to use.
Noise Control System
Noise Emissions Warranty
General Motors warrants to the first
person who purchases this vehicle
for purposes other than resale and
to each subsequent purchaser that
this vehicle as manufactured by
General Motors, was designed, built
and equipped to conform at the time
it left General Motors’ s control with
all applicable U.S. EPA Noise
Control Regulations. This warranty
covers this vehicle as designed,
built and equipped by General
Motors, and is not limited to any
particular part, component or system of the vehicle manufactured
by General Motors. Defects in
design, assembly or in any part,
component or system of the vehicle
as manufactured by General
Motors, which, at the time it left
General Motors’s control, caused
noise emissions to exceed Federal
standards, are covered by this
warranty for the life of the vehicle.
The following information relates to
compliance with federal noise
emission standards for vehicles with
a Gross Vehicle Weight Rating
(GVWR) of more than 4 536 kg
(10,000 lb). The Maintenance
Schedule provides information on
maintaining the noise control system
to minimize degradation of the noise
emission control system during the
life of the vehicle. The noise control
system warranty is given in the
warranty manual.
These standards apply only to
vehicles sold in the United States.
TAMPERING WITH NOISE
CONTROL SYSTEM
PROHIBITED
Federal law prohibits the following
acts or the causing thereof:
1. The removal or rendering inoperative by any person,
other than for purposes of
maintenance, repair,
or replacement, of any device
or element of design
incorporated into any new
vehicle for the purpose of noise
control prior to its sale or
delivery to the ultimate
purchaser or while it is in
use; or
2. The use of the vehicle after such device or element of
design has been removed or
rendered inoperative by any
person.
Among those acts presumed to
constitute tampering are the acts
listed below.