Page 149 of 472

GMC Sierra/Sierra Denali Owner Manual (GMNA-Localizing-U.S./Canada/
Mexico-1500-11698638) - 2019 - crc - 5/15/18
148 Instruments and Controls
Passenger Airbag Status
Indicator The vehicle has a passenger
sensing system. See Passenger
Sensing System 0 92 for important
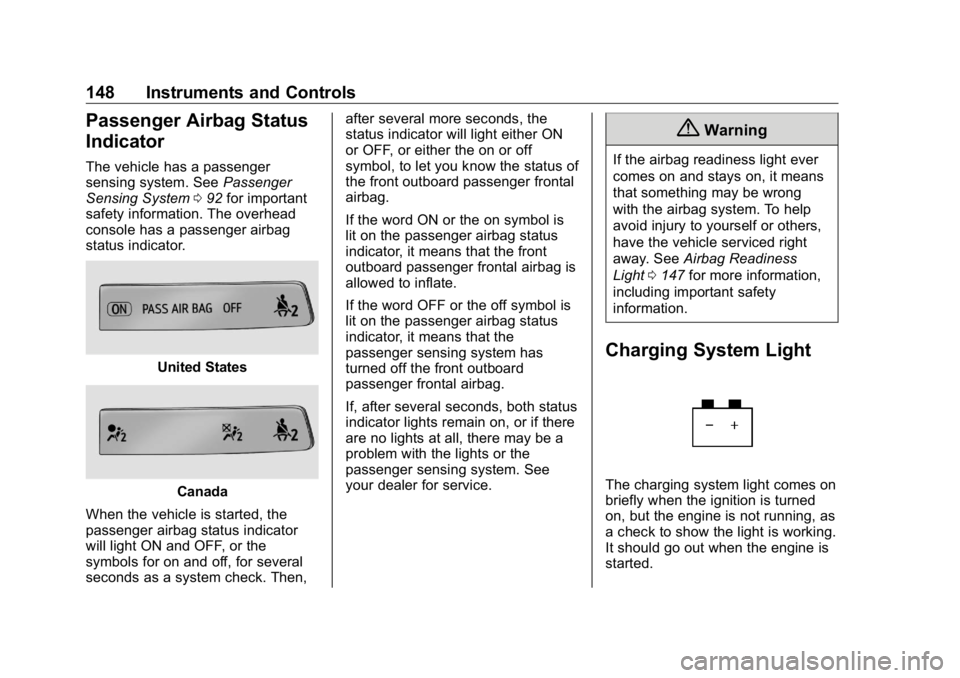
safety information. The overhead
console has a passenger airbag
status indicator.
United States
Canada
When the vehicle is started, the
passenger airbag status indicator
will light ON and OFF, or the
symbols for on and off, for several
seconds as a system check. Then, after several more seconds, the
status indicator will light either ON
or OFF, or either the on or off
symbol, to let you know the status of
the front outboard passenger frontal
airbag.
If the word ON or the on symbol is
lit on the passenger airbag status
indicator, it means that the front
outboard passenger frontal airbag is
allowed to inflate.
If the word OFF or the off symbol is
lit on the passenger airbag status
indicator, it means that the
passenger sensing system has
turned off the front outboard
passenger frontal airbag.
If, after several seconds, both status
indicator lights remain on, or if there
are no lights at all, there may be a
problem with the lights or the
passenger sensing system. See
your dealer for service. { WarningIf the airbag readiness light ever
comes on and stays on, it means
that something may be wrong
with the airbag system. To help
avoid injury to yourself or others,
have the vehicle serviced right
away. See Airbag Readiness
Light 0 147 for more information,
including important safety
information.
Charging System Light
The charging system light comes on
briefly when the ignition is turned
on, but the engine is not running, as
a check to show the light is working.
It should go out when the engine is
started.
Page 207 of 472

GMC Sierra/Sierra Denali Owner Manual (GMNA-Localizing-U.S./Canada/
Mexico-1500-11698638) - 2019 - crc - 5/16/18
206 Driving and Operating wet enough and you are going fast
enough. When the vehicle is
hydroplaning, it has little or no
contact with the road.
There is no hard and fast rule about
hydroplaning. The best advice is to
slow down when the road is wet.
Other Rainy Weather Tips Besides slowing down, other wet
weather driving tips include:
.
Allow extra following distance.
.
Pass with caution.
.
Keep windshield wiping
equipment in good shape.
.
Keep the windshield washer fluid
reservoir filled.
.
Have good tires with proper
tread depth. See Tires 0 358 .
.
Turn off cruise control.
Hill and Mountain Roads Driving on steep hills or through
mountains is different than driving
on flat or rolling terrain. Tips include: .
Keep the vehicle serviced and in
good shape.
.
Check all fluid levels and brakes,
tires, cooling system, and
transmission.
.
Shift to a lower gear when going
down steep or long hills.
{ WarningUsing the brakes to slow the
vehicle on a long downhill slope
can cause brake overheating, can
reduce brake performance, and
could result in a loss of braking.
Shift the transmission to a lower
gear to let the engine assist the
brakes on a steep downhill slope.
{ Warning
Coasting downhill in N (Neutral)
or with the ignition off is
dangerous. This can cause
overheating of the brakes and
(Continued) Warning (Continued) loss of steering assist. Always
have the engine running and the
vehicle in gear.
.
Drive at speeds that keep the
vehicle in its own lane. Do not
swing wide or cross the
center line.
.
Be alert on top of hills;
something could be in your lane
(e.g., stalled car, crash).
.
Pay attention to special road
signs (e.g., falling rocks area,
winding roads, long grades,
passing or no-passing zones)
and take appropriate action.
Winter Driving Driving on Snow or Ice
Snow or ice between the tires and
the road creates less traction or
grip, so drive carefully. Wet ice can
occur at about 0 °C (32 °F) when
Page 399 of 472

GMC Sierra/Sierra Denali Owner Manual (GMNA-Localizing-U.S./Canada/
Mexico-1500-11698638) - 2019 - crc - 5/15/18
398 Vehicle Care negative ( − ) terminal on the
dead battery because this can
cause sparks.
7. Connect one end of the red
positive (+) cable to the remote
positive (+) terminal of the
vehicle with the discharged
battery.
8. Do not let the other end touch
metal. Connect it to the
positive (+) terminal of the
good battery. Use a remote
positive (+) terminal if the
vehicle has one.
9. Connect one end of the black
negative ( − ) cable to the
negative ( − ) terminal of the
good battery. Use a remote
negative ( − ) terminal if the
vehicle has one.
Do not let the other end touch
anything until the next step.
10. Connect the other end of the
negative ( − ) cable to the
remote negative ( − ) terminal to
the discharged battery. 11. Start the vehicle with the good
battery and run the engine for a
while.
12. Try to start the vehicle that had
the dead battery. If it will not
start after a few tries, it
probably needs service.
CautionIf the jumper cables are
connected or removed in the
wrong order, electrical shorting
may occur and damage the
vehicle. The repairs would not be
covered by the vehicle warranty.
Always connect and remove the
jumper cables in the correct order,
making sure that the cables do
not touch each other or other
metal.
Jumper Cable Removal
Reverse the sequence exactly when
removing the jumper cables.
After starting the disabled vehicle
and removing the jumper cables,
allow it to idle for several minutes. Towing the Vehicle CautionIncorrectly towing a disabled
vehicle may cause damage. The
damage would not be covered by
the vehicle warranty. Do not lash
or hook to suspension
components. Use the proper
straps around the tires to secure
the vehicle. Do not drag a locked
wheel/tire while loading the
vehicle. Do not use a sling type
lift to tow the vehicle. This could
damage the vehicle.
GM recommends a flatbed tow truck
to transport a disabled vehicle. Use
ramps to help reduce approach
angles, if necessary. A towed
vehicle should have its drive wheels
off the ground. Contact Roadside
Assistance or a professional towing
service if the disabled vehicle must
be towed.