2019 FORD TRANSIT remove seats
[x] Cancel search: remove seatsPage 24 of 529

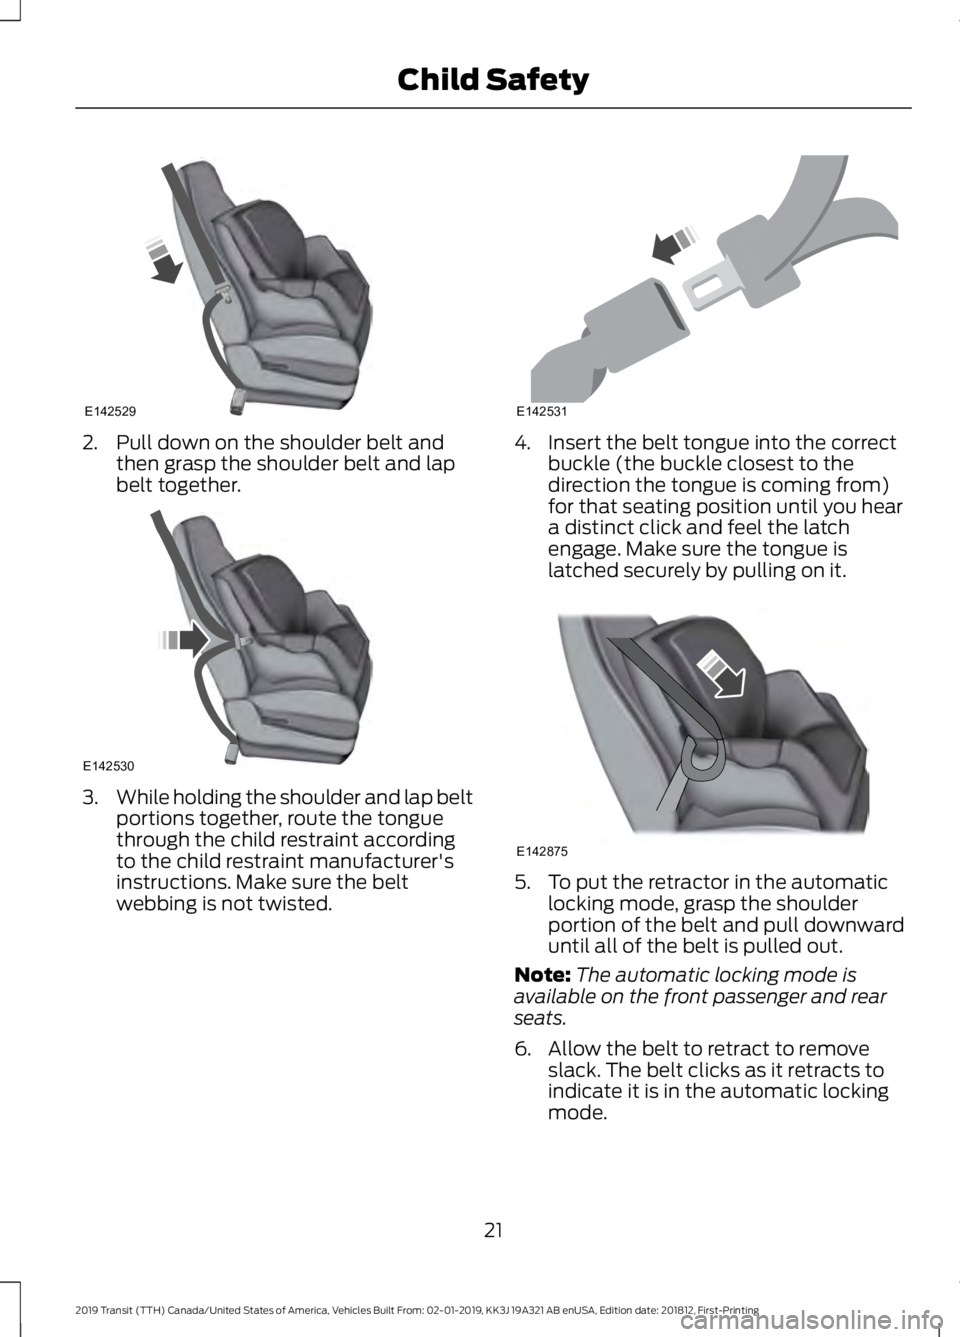
2. Pull down on the shoulder belt and
then grasp the shoulder belt and lap
belt together. 3.
While holding the shoulder and lap belt
portions together, route the tongue
through the child restraint according
to the child restraint manufacturer's
instructions. Make sure the belt
webbing is not twisted. 4. Insert the belt tongue into the correct
buckle (the buckle closest to the
direction the tongue is coming from)
for that seating position until you hear
a distinct click and feel the latch
engage. Make sure the tongue is
latched securely by pulling on it. 5. To put the retractor in the automatic
locking mode, grasp the shoulder
portion of the belt and pull downward
until all of the belt is pulled out.
Note: The automatic locking mode is
available on the front passenger and rear
seats.
6. Allow the belt to retract to remove slack. The belt clicks as it retracts to
indicate it is in the automatic locking
mode.
21
2019 Transit (TTH) Canada/United States of America, Vehicles Built From: 02-01-2019, KK3J 19A321 AB enUSA, Edition date: 201812, First-Printing Child SafetyE142529 E142530 E142531 E142875
Page 39 of 529

•
Can the child sit all the way back
against their vehicle seat backrest with
knees bent comfortably at the edge of
the seat cushion?
• Can the child sit without slouching?
• Does the lap belt rest low across the
hips?
• Is the shoulder belt centered on the
shoulder and chest?
• Can the child stay seated like this for
the whole trip?
Always use booster seats in conjunction
with your vehicle lap and shoulder belt.
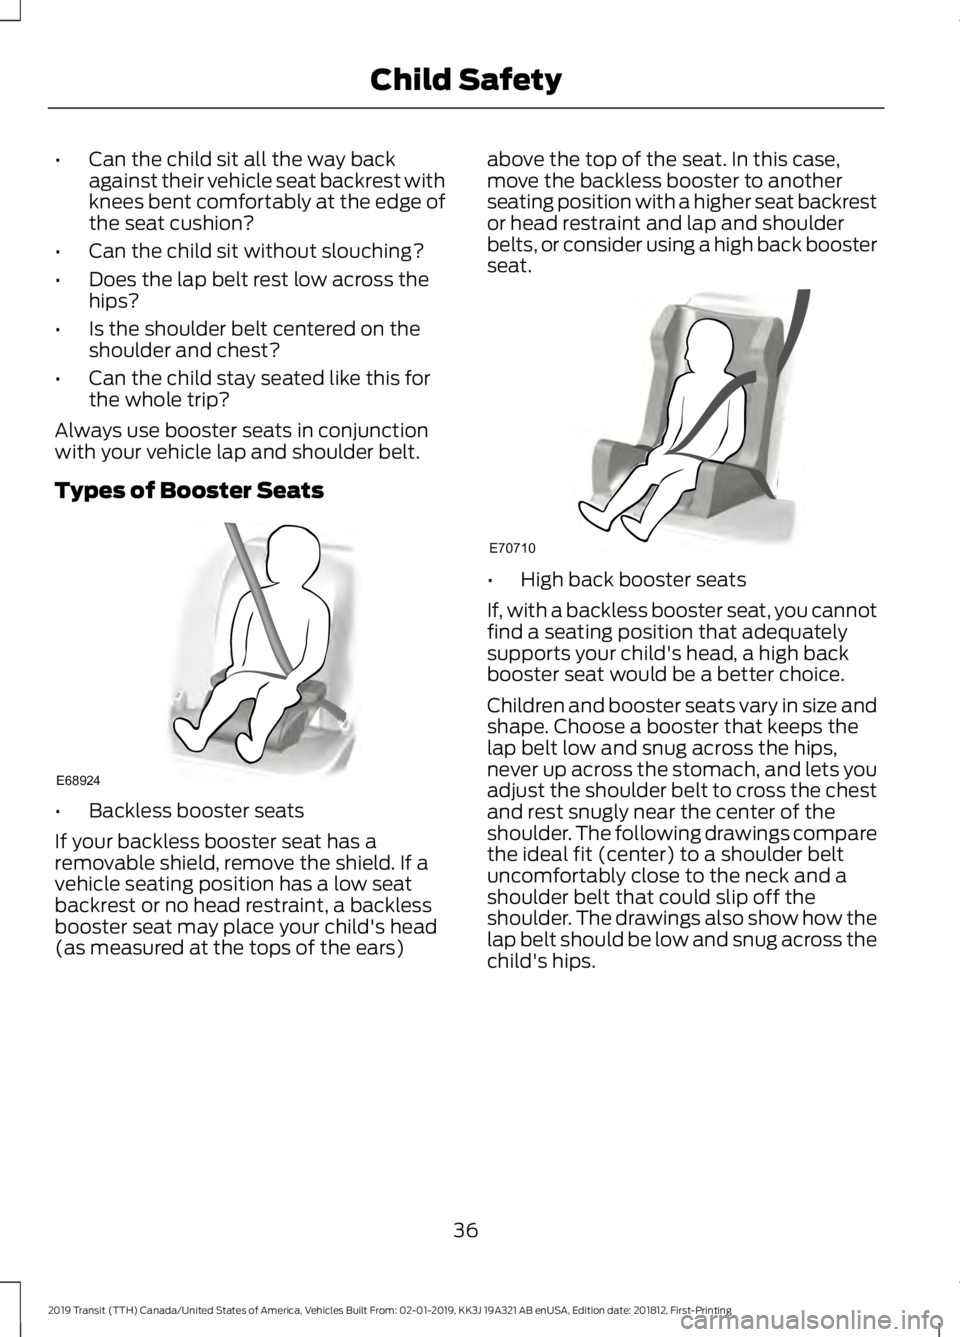
Types of Booster Seats •
Backless booster seats
If your backless booster seat has a
removable shield, remove the shield. If a
vehicle seating position has a low seat
backrest or no head restraint, a backless
booster seat may place your child's head
(as measured at the tops of the ears) above the top of the seat. In this case,
move the backless booster to another
seating position with a higher seat backrest
or head restraint and lap and shoulder
belts, or consider using a high back booster
seat.
•
High back booster seats
If, with a backless booster seat, you cannot
find a seating position that adequately
supports your child's head, a high back
booster seat would be a better choice.
Children and booster seats vary in size and
shape. Choose a booster that keeps the
lap belt low and snug across the hips,
never up across the stomach, and lets you
adjust the shoulder belt to cross the chest
and rest snugly near the center of the
shoulder. The following drawings compare
the ideal fit (center) to a shoulder belt
uncomfortably close to the neck and a
shoulder belt that could slip off the
shoulder. The drawings also show how the
lap belt should be low and snug across the
child's hips.
36
2019 Transit (TTH) Canada/United States of America, Vehicles Built From: 02-01-2019, KK3J 19A321 AB enUSA, Edition date: 201812, First-Printing Child SafetyE68924 E70710
Page 42 of 529

Recommendations for Attaching Child Safety Restraints for Children
Use Any Attachment Method as Indicated Below by X
Combined Weight ofChild and Child
Restraint
Restraint
Type Seatbelt
Only
Seatbelt
and LATCH (Lower
Anchors and Top Tether
Anchor)
Seatbelt
and Top Tether
Anchor
LATCH
(Lower
Anchors Only)
LATCH
(Lower
Anchors and Top Tether
Anchor)
X
X
Up to 65 lb
(29.5 kg)
Rear facing
child
restraint
X
Over
65 lb
(29.5 kg)
Rear facing
child
restraint
X
X
X
Up to
65 lb
(29.5 kg)
Forward
facingchild
restraint
X
X
Over
65 lb
(29.5 kg)
Forward
facingchild
restraint
Note: The child restraint must rest tightly
against the vehicle seat upon which it is
installed. It may be necessary to lift or
remove the head restraint. See Seats (page
111
).
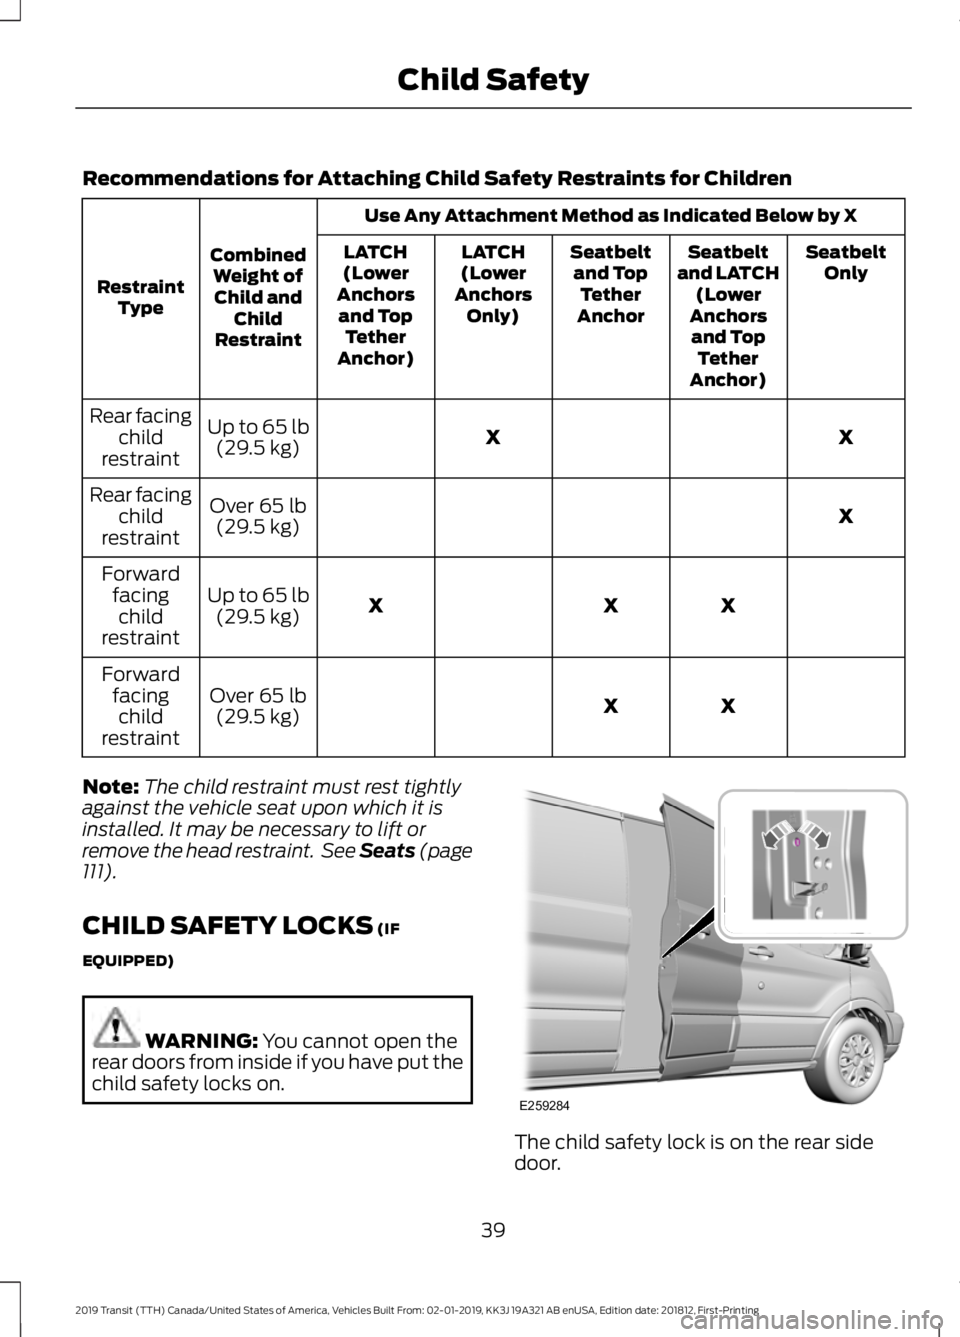
CHILD SAFETY LOCKS
(IF
EQUIPPED) WARNING:
You cannot open the
rear doors from inside if you have put the
child safety locks on. The child safety lock is on the rear side
door.
39
2019 Transit (TTH) Canada/United States of America, Vehicles Built From: 02-01-2019, KK3J 19A321 AB enUSA, Edition date: 201812, First-Printing Child SafetyE259284
Page 53 of 529

WARNING: Your vehicle may have
an airbag deactivation switch. Before
driving, always look at the switch to
make sure it is in the appropriate
position. Failure to put the switch in the
proper position can increase the risk of
serious injury or death in a crash. The front passenger airbag on and off
switch has indicators that will illuminate,
indicating that the front passenger frontal
airbag is either on or off. The indicator lamp
is located on the instrument panel.
Note:
The passenger airbag status indicator
OFF and ON lamps illuminate for a short
period of time when you switch the ignition
on to confirm it is functional. Passenger airbag
Passenger airbag status
indicator
Switch position
Disabled
OFF: Lit
Off
ON: Unlit Enabled
OFF: Unlit
On
ON: Lit
Turning the Passenger Airbag Off WARNING:
If the light does not
illuminate when the passenger airbag
switch is off and you switch the ignition
on, have the passenger airbag switch
serviced immediately by a qualified
technician. WARNING:
To avoid switching on
the airbag, always remove the ignition
key with the switch in the off position. WARNING: Never
place front
seat mounted rear-facing child or infant
seats in front of an active passenger
airbag. WARNING:
You must switch the
passenger airbag off when using a
rearward facing child restraint on the
front seat.
50
2019 Transit (TTH) Canada/United States of America, Vehicles Built From: 02-01-2019, KK3J 19A321 AB enUSA, Edition date: 201812, First-Printing Supplementary Restraints SystemE282245
Page 115 of 529

The head restraint consists of:
Energy absorbing head restraint.
A
Guide sleeve adjust and unlock
button.
B
Guide sleeve unlock and remove
button.
C
Steel stems.
D
Adjusting the Head Restraint WARNING: Adjust the head
restraints for all passengers before you
drive your vehicle. This will help minimize
the risk of neck injury in the event of a
crash. Do not adjust the head restraints
when your vehicle is moving.
Note: Adjust the seat backrest to an upright
driving position before adjusting the head
restraint. Adjust the head restraint so that
the top of it is level with the top of your head
and as far forward as possible.
Raising the Head Restraint
Lift the head restraint up.
Lowering the Head Restraint
1. Press and hold button B.
2. Push the head restraint down. Removing the Head Restraint WARNING:
Do not remove the
head restraint from an occupied seat.
1. Lift the head restraint up until it reaches its highest position.
2. Press and hold buttons B and C.
3. Remove the head restraint.
Installing the Head Restraint WARNING:
Install head restraints
correctly to help minimize the risk of neck
injury in the event of a crash.
1. Align the steel stems into the guide sleeves.
2. Press and hold buttons B and C.
3. Push the head restraint down.
MANUAL SEATS
Moving the Seat Backward or
Forward WARNING:
Do not place cargo or
any objects behind the seat backrest
before returning it to the original position.
Pull on the seat backrest to make sure
that it has fully latched after returning
the seat backrest to its original position.
An unlatched seat may become
dangerous if you stop suddenly or have
a crash. WARNING:
Do not adjust the
driver seat when your vehicle is moving.
This may result in sudden seat
movement, causing the loss of control
of your vehicle.
112
2019 Transit (TTH) Canada/United States of America, Vehicles Built From: 02-01-2019, KK3J 19A321 AB enUSA, Edition date: 201812, First-Printing SeatsE215998
Page 121 of 529

2. While holding the handle in this
position, tilt the top of the seat forward
to release the seat frame rear catches
from the floor.
3. When the rear seat latches are clear of
the floor, release the handle.
4. Pull the seat backward to release the seat frame front catches.
5. Remove the seat from the vehicle.
Note: Two persons are required to release
the seat handles and remove the seat.
Note: You can only remove seats that have
integral release handles.
Note: The seatback does not fold forward.
Installing the Seats WARNING: Make sure that the
floor catches are free from foreign
material before installing the seats. WARNING:
Make sure that you
securely fasten the seat catches when
installing. Check the latches are correctly
engaged by checking the red latch
indicators. 1. Align the seat frame front catches.
2. Push the seat forward to engage the
seat frame front catches.
3. Align the seat frame rear catches.
4. Allow the seat to drop under its own weight for the last 6-8 in (15-20 cm).
118
2019 Transit (TTH) Canada/United States of America, Vehicles Built From: 02-01-2019, KK3J 19A321 AB enUSA, Edition date: 201812, First-Printing SeatsE178062
Page 148 of 529

3. Remove the diesel exhaust fluid tank
filler cap.
4. Insert the spout into the diesel exhaust
fluid tank filler pipe until the seal on the
spout fully seats.
5. Pour the fluid into the tank.
Note: The fluid stops flowing when the
tank is full.
6. Return the container to the vertical position slightly below the diesel
exhaust fluid tank filler pipe.
7. Allow any fluid remaining in the spout to drain back into the container.
8. Remove the spout from the diesel exhaust fluid tank filler pipe.
9. Remove the spout from the diesel exhaust fluid container and replace the
cap.
10. Replace the diesel exhaust fluid tank
filler cap. Turn it clockwise until you
feel a strong resistance. Do not attempt to start the engine if you
have filled the diesel exhaust fluid tank
with incorrect fluid. Incorrect diesel
exhaust fluid use could cause damage not
covered by the vehicle Warranty. Have your
vehicle immediately checked.
Selective Catalytic Reductant
System Warning Lamp
The warning lamp illuminates if
the system detects the diesel
exhaust fluid level is low or if
there is a system malfunction.
If the warning lamp illuminates, the
information display messages give you an
indication whether the concern is fluid
related or if there is a selective catalytic
reductant system malfunction. If the
warning lamp illuminates when your
vehicle is moving, and the fluid is at a
sufficient level, this indicates a system
malfunction. Have your vehicle checked
as soon as possible.
Note: When filling the diesel exhaust fluid
tank from empty, there may be a short
period before the increased diesel exhaust
fluid level is registered.
DIESEL PARTICULATE FILTER
- 3.2L DIESEL WARNING: Do not park or idle your
vehicle over dry leaves, dry grass or other
combustible materials. The regeneration
process creates very high exhaust gas
temperatures and the exhaust will
radiate a considerable amount of heat
during and after regeneration and after
you have switched the engine off. This is
a potential fire hazard.
145
2019 Transit (TTH) Canada/United States of America, Vehicles Built From: 02-01-2019, KK3J 19A321 AB enUSA, Edition date: 201812, First-Printing Engine Emission ControlE144358
Page 247 of 529

If the Engine Does Not Start or Runs
Rough
1. Remove the Schrader valve cap.
2. Attach suitable tool with a tube to the
Schrader valve and place the end of
the tube into a suitable container.
3. Open the Schrader valve.
4. Switch the ignition on until a steady stream of fuel can be seen coming out
of the tube.
5. Switch the ignition off.
6. Remove the tool from the Schrader valve.
7. Refit the Schrader valve cap.
8. Switch the ignition on for at least 30 seconds then switch the ignition off.
9. Repeat this process three times.
10. Start the engine.
FUEL FILTER - GASOLINE
Your vehicle is equipped with a lifetime
fuel filter that is integrated with the fuel
tank. Regular maintenance or replacement
is not needed. CHANGING THE 12V BATTERY
The battery is under the driver seat.
Note:
If you have power seats and the
battery has no charge, jump-start your
vehicle to move the seat. See Jump
Starting the Vehicle (page 196).
Removing the Battery 1. Fully raise the driver seat and move it
fully forward. Pull the tabs upward and
remove the cover.
Note: Your vehicle may not have this cover. 244
2019 Transit (TTH) Canada/United States of America, Vehicles Built From: 02-01-2019, KK3J 19A321 AB enUSA, Edition date: 201812, First-Printing MaintenanceE177379
1 E152526
1 2
E152529