2019 FORD TAURUS instrument panel
[x] Cancel search: instrument panelPage 4 of 515

Introduction
About This Manual
..........................................7
Symbols Glossary ............................................
7
Data Recording .................................................
9
Perchlorate ........................................................
11
Ford Credit .........................................................
11
Replacement Parts Recommendation ........................................................................\
....
12
Special Notices ...............................................
12
Mobile Communications Equipment ........................................................................\
....
13
Export Unique Options .................................
13
Environment
Protecting the Environment .......................
14
At a Glance
Instrument Panel Overview ........................
15
Child Safety
General Information ......................................
17
Installing Child Restraints ...........................
18
Booster Seats .................................................
24
Child Restraint Positioning ........................
26
Child Safety Locks ........................................
28
Seatbelts
Principle of Operation .................................
29
Fastening the Seatbelts .............................
30
Seatbelt Height Adjustment .....................
32
Seatbelt Warning Lamp and Indicator Chime .............................................................
32
Seatbelt Reminder ........................................
33
Child Restraint and Seatbelt Maintenance ...............................................
34
Seatbelt Extension .......................................
35
Personal Safety System ™
Personal Safety System ™.........................
36 Supplementary Restraints
System
Principle of Operation ..................................
37
Driver and Passenger Airbags ..................
38
Front Passenger Sensing System ...........
39
Side Airbags .....................................................
41
Safety Canopy ™............................................
42
Crash Sensors and Airbag Indicator ......
44
Airbag Disposal ..............................................
45
Keys and Remote Controls
General Information on Radio Frequencies ................................................
46
Remote Control .............................................
46
Replacing a Lost Key or Remote Control ........................................................................\
..
50
MyKey ™
Principle of Operation ..................................
51
Creating a MyKey ...........................................
52
Clearing All MyKeys ......................................
52
Checking MyKey System Status ..............
53
Using MyKey With Remote Start Systems ........................................................
53
MyKey Troubleshooting ..............................
53
Doors and Locks
Locking and Unlocking ................................
55
Keyless Entry ..................................................
58
Interior Luggage Compartment Release ........................................................................\
..
60
Security
Passive Anti-Theft System ........................
62
Anti-Theft Alarm ...........................................
63
Steering Wheel
Adjusting the Steering Wheel ..................
64
Audio Control .................................................
64
Voice Control ..................................................
64
1
Taurus (CPH) Canada/United States of America, enUSA, Edition date: 201806, First-Printing Table of Contents
Page 7 of 515

Roadside Emergencies
Roadside Assistance
..................................210
Hazard Flashers .............................................
211
Fuel Shutoff ....................................................
211
Jump Starting the Vehicle .........................
212
Post-Crash Alert System ..........................
214
Transporting the Vehicle ...........................
214
Customer Assistance
Getting the Services You Need ...............
216
In California (U.S. Only) .............................
217
The Better Business Bureau (BBB) Auto Line Program (U.S. Only) .....................
218
Utilizing the Mediation/Arbitration Program (Canada Only) .......................
219
Getting Assistance Outside the U.S. and Canada ........................................................
219
Ordering Additional Owner's Literature ........................................................................\
.
221
Reporting Safety Defects (U.S. Only) ........................................................................\
.
221
Reporting Safety Defects (Canada Only) ........................................................................\
.
221
Fuses
Fuse Specification Chart ..........................
223
Changing a Fuse ..........................................
232
Maintenance
General Information ..................................
234
Opening and Closing the Hood .............
234
Under Hood Overview - 3.5L Duratec ........................................................................\
235
Under Hood Overview - 3.5L Ecoboost™ ........................................................................\
.
237
Engine Oil Dipstick - 3.5L Duratec/3.5L Ecoboost™ ...............................................
238
Engine Oil Check .........................................
238
Oil Change Indicator Reset .....................
239
Engine Coolant Check ..............................
240
Automatic Transmission Fluid Check - 3.5L Duratec/3.5L Ecoboost™ .........
244Brake Fluid Check
.......................................
247
Power Steering Fluid Check ...................
248
Washer Fluid Check ...................................
248
Fuel Filter .......................................................
248
Changing the 12V Battery ........................
248
Checking the Wiper Blades ....................
250
Changing the Wiper Blades .....................
251
Adjusting the Headlamps .........................
251
Changing a Bulb ..........................................
252
Changing the Engine Air Filter ................
253
Vehicle Care
General Information ..................................
255
Cleaning Products ......................................
255
Cleaning the Exterior .................................
255
Waxing .............................................................
257
Cleaning the Engine ...................................
257
Cleaning the Windows and Wiper Blades ........................................................................\
257
Cleaning the Interior ..................................
258
Cleaning the Instrument Panel and Instrument Cluster Lens ......................
258
Cleaning Leather Seats ............................
259
Repairing Minor Paint Damage .............
260
Cleaning the Wheels .................................
260
Vehicle Storage ...........................................
260
Wheels and Tires
General Information ..................................
263
Tire Sealant and Inflator Kit ...................
263
Tire Care .........................................................
269
Using Summer Tires ..................................
282
Using Snow Chains ....................................
282
Tire Pressure Monitoring System ..........
283
Changing a Road Wheel ..........................
287
Technical Specifications ...........................
291
4
Taurus (CPH) Canada/United States of America, enUSA, Edition date: 201806, First-Printing Table of Contents
Page 18 of 515

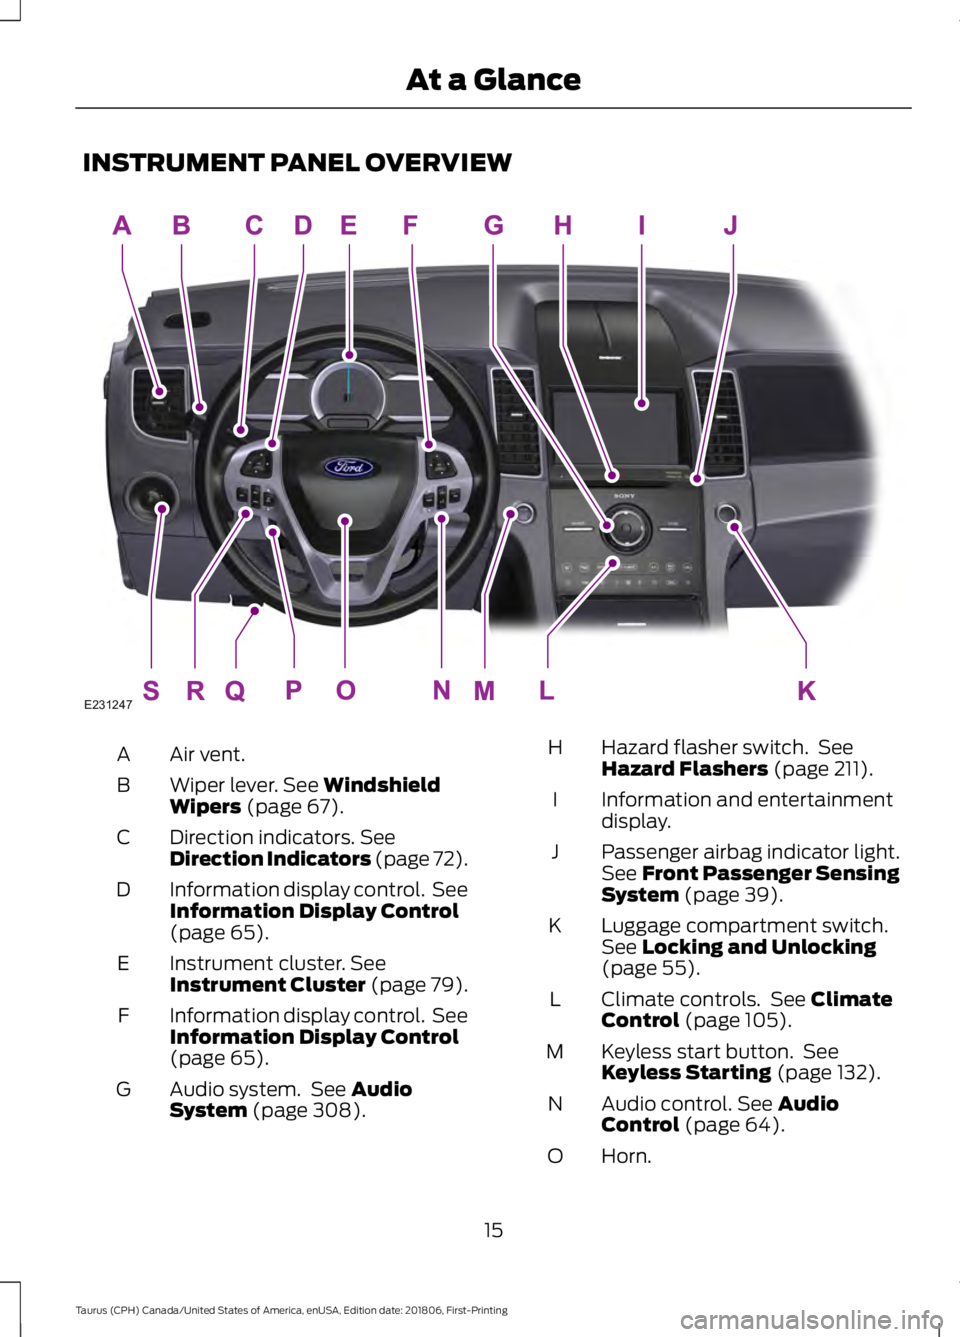
INSTRUMENT PANEL OVERVIEW
Air vent.
A
Wiper lever. See Windshield
Wipers (page 67).
B
Direction indicators.
See
Direction Indicators (page 72).
C
Information display control. See
Information Display Control
(page
65).
D
Instrument cluster.
See
Instrument Cluster (page 79).
E
Information display control. See
Information Display Control
(page
65).
F
Audio system. See
Audio
System (page 308).
G Hazard flasher switch. See
Hazard Flashers
(page 211).
H
Information and entertainment
display.
I
Passenger airbag indicator light.
See
Front Passenger Sensing
System (page 39).
J
Luggage compartment switch.
See
Locking and Unlocking
(page 55).
K
Climate controls. See
Climate
Control (page 105).
L
Keyless start button. See
Keyless Starting
(page 132).
M
Audio control.
See Audio
Control (page 64).
N
Horn.
O
15
Taurus (CPH) Canada/United States of America, enUSA, Edition date: 201806, First-Printing At a GlanceE231247
Page 43 of 515

The front passenger sensing system uses
a passenger airbag status indicator that
will illuminate indicating that the front
passenger frontal airbag is either ON
(enabled) or OFF (disabled).
The indicator lamp is located in the center
stack of the instrument panel.
Note:
The passenger airbag status indicator
OFF and ON indicator lamps will illuminate
for a short period of time when the ignition
is first turned on to confirm it is functional.
The front passenger sensing system is
designed to disable (will not inflate) the
front passenger frontal airbag when the
front passenger seat is unoccupied, or a
rear facing infant seat, a forward-facing
child restraint, or a booster seat is
detected. Even with this technology,
parents are strongly encouraged to
always properly restrain children in the rear
seat. The sensor also turns off the
passenger front airbag and seat-mounted
side airbag when the passenger seat is
empty.
• When the front passenger sensing
system disables (will not inflate) the
front passenger frontal airbag, the
passenger airbag status indicator will
illuminate the OFF lamp and stay lit to
remind you that the front passenger
frontal airbag is disabled.
• If the child restraint has been installed
and the passenger airbag status
indicator illuminates the ON lamp, then
turn the vehicle off, remove the child
restraint from the vehicle and reinstall
the restraint following the child
restraint manufacturer's instructions. The front passenger sensing system is
designed to enable (may inflate) the front
passenger frontal airbag anytime the
system senses that a person of adult size
is sitting properly in the front passenger
seat.
•
When the front passenger sensing
system enables the front passenger
frontal airbag (may inflate), the
passenger airbag status indicator will
illuminate the ON lamp and remain
illuminated.
If a person of adult size is sitting in the front
passenger seat, but the airbag off indicator
lamp is lit, it is possible that the person is
not sitting properly in the seat. If this
happens:
• Turn the vehicle off and ask the person
to place the seatback in the full upright
position.
• Have the person sit upright in the seat,
centered on the seat cushion, with the
person ’s legs comfortably extended.
• Restart the vehicle and have the person
remain in this position for about two
minutes. This will allow the system to
detect that person and enable the
passenger ’s frontal airbag.
• If the indicator OFF lamp remains lit
even after this, the person should be
advised to ride in the rear seat.
40
Taurus (CPH) Canada/United States of America, enUSA, Edition date: 201806, First-Printing Supplementary Restraints System
Page 53 of 515

Note:
If you remote start your vehicle with
an integrated keyhead transmitter, you must
switch the ignition on before driving your
vehicle. If you remote start your vehicle with
an intelligent access transmitter, you must
press the push button ignition switch on the
instrument panel once while applying the
brake pedal before driving your vehicle.
The power windows do not work during
remote start and the radio does not turn
on automatically.
The parking lamps remain on and the
vehicle runs for 5, 10 or 15 minutes,
depending on the setting.
Extending the Engine Running Time
To extend the engine running time duration
of your vehicle during remote start, repeat
steps 1 and 2 while the engine is running.
If the duration is set to 10 minutes, the
duration extends by another 10 minutes.
For example, if your vehicle had been
running from the first remote start for 5
minutes, your vehicle continues to run now
for a total of 20 minutes. You can extend
the remote start up to a maximum of 35
minutes.
Wait at least five seconds before remote
starting after the engine stops running.
Turning Your Vehicle Off After Remote
Starting Press the button once. The
parking lamps turn off.
You may have to be closer to your vehicle
to remotely switch off your vehicle after
remote starting. This is due to the added
noise of your running vehicle.
You can switch this feature on or off in the
information display. See General
Information (page 85). Memory Feature
(If Equipped)
You can use the remote control to recall
memory settings for the driver seat, power
mirrors, power steering column and power
adjustable foot pedals. Press the unlock
button on the remote control or unlock
your vehicle with the intelligent access key
to recall the memory positions. You can
program the remote control or intelligent
access key to recall memory positions. See
Memory Function
(page 120).
REPLACING A LOST KEY OR
REMOTE CONTROL
Replacement keys or remote controls can
be purchased from an authorized dealer.
Authorized dealers can program remote
controls for your vehicle. See
Passive
Anti-Theft System (page 62).
50
Taurus (CPH) Canada/United States of America, enUSA, Edition date: 201806, First-Printing Keys and Remote ControlsE138625
Page 59 of 515

Opening the Luggage
Compartment
With the Remote Control
Press the button twice within
three seconds.
From the Instrument Panel Press the button on the
instrument panel.
Activating Intelligent Access (If
Equipped)
You can unlock and lock the vehicle
without taking the keys out of your pocket
or purse when your intelligent access key
is within
3 ft (1 m) of your vehicle.
Intelligent access uses a sensor on the
back of the door handle for unlocking and
a separate sensor on the face of each door
handle for locking.
The system will not function if:
• Your vehicle battery has no charge.
• The key battery has no charge.
• The key frequencies are jammed.
Note: The system may not function if the
passive key is close to metal objects or
electronic devices, for example keys or a cell
phone.
Note: If the system does not function, use
the key blade to lock and unlock your
vehicle. See
Remote Control (page 46).
Unlocking Using Intelligent Access With your intelligent access key within
3 ft
(1 m) of your vehicle, touch the unlock
sensor on the back of the door handle for
a brief period and then pull on the door
handle to unlock, being careful to not
touch the lock sensor at the same time or
pulling the door handle too quickly. The
intelligent access system requires a brief
delay to authenticate your intelligent
access key fob.
Locking Using Intelligent Access With your intelligent access key within
3 ft
(1 m) of your vehicle, touch the outer door
handle lock sensor for approximately one
second to lock, being careful to not touch
the unlock sensor on the back of the door
handle at the same time. After locking, you
can immediately pull on the door handle
to confirm locking occurred without
inadvertently unlocking.
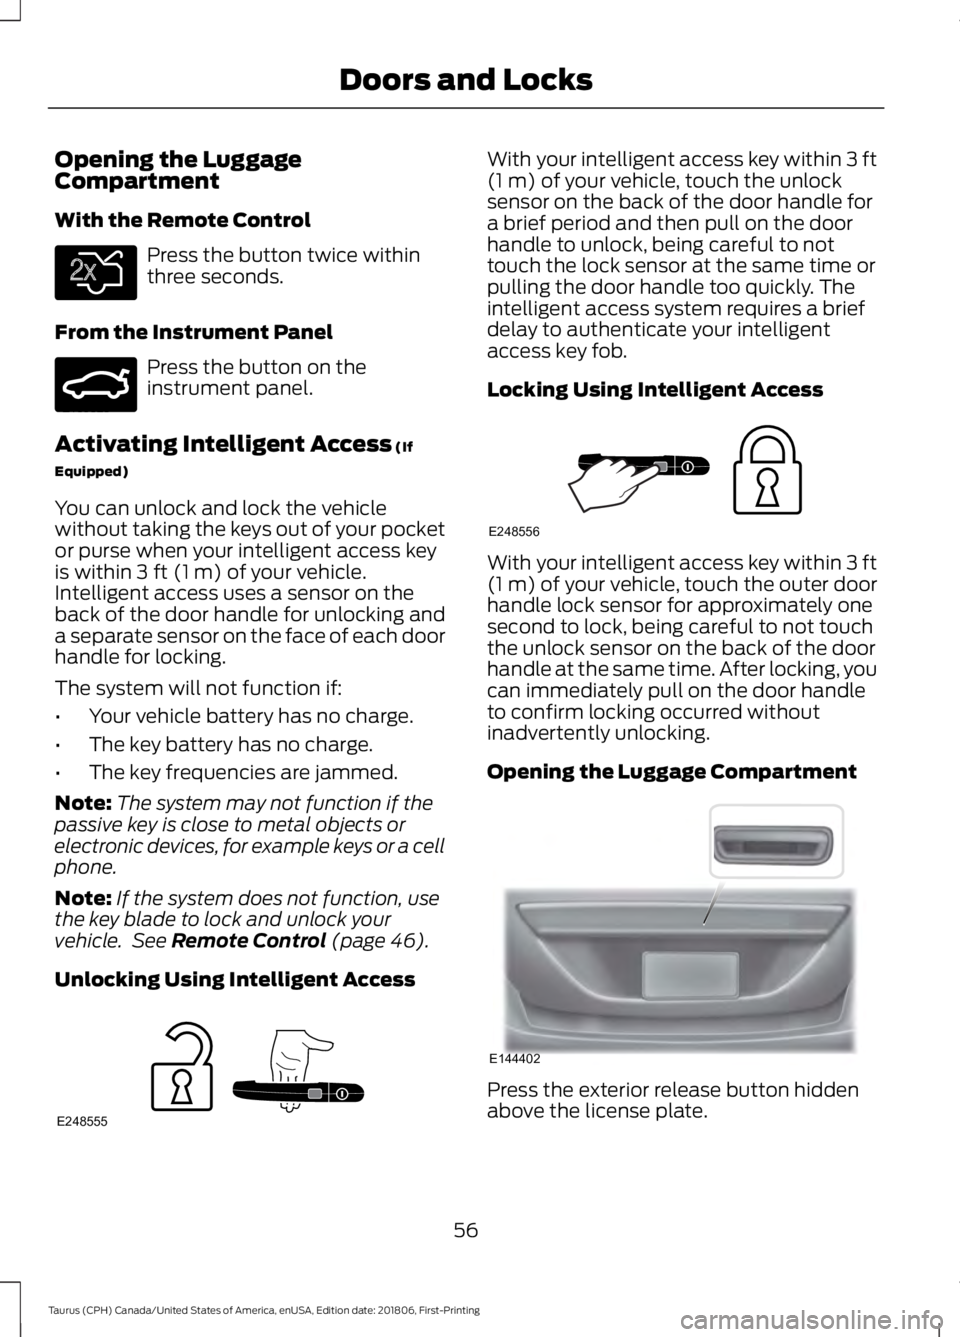
Opening the Luggage Compartment Press the exterior release button hidden
above the license plate.
56
Taurus (CPH) Canada/United States of America, enUSA, Edition date: 201806, First-Printing Doors and LocksE138630 E159323 E248555 E248556 E144402
Page 72 of 515

GENERAL INFORMATION
Condensation in the Exterior Front
Lamps and Rear Lamps
Exterior front lamps and rear lamps have
vents to accommodate normal changes
in air pressure.
Condensation can be a natural by-product
of this design. When moist air enters the
lamp assembly through the vents, there is
a possibility that condensation can occur
when the temperature is cold. When
normal condensation occurs, a fine mist
can form on the interior of the lens. The
fine mist eventually clears and exits
through the vents during normal operation.
Clearing time may take as long as 48 hours
under dry weather conditions.
Examples of acceptable condensation are:
•
The presence of a fine mist (no streaks,
drip marks or large droplets).
• A fine mist covers less than 50% of the
lens.
Examples of unacceptable condensation
are:
• A water puddle inside the lamp.
• Streaks, drip marks or large droplets
present on the interior of the lens.
If you see any unacceptable condensation,
have your vehicle checked by an authorized
dealer. LIGHTING CONTROL Off.A
Parking lamps, instrument panel
lamps, license plate lamps and
tail lamps.
B
Headlamps.
C
High Beams Push the lever away from you to switch
the high beam on.
Push the lever away from you again or pull
the lever toward you to switch the high
beam off.
69
Taurus (CPH) Canada/United States of America, enUSA, Edition date: 201806, First-Printing LightingE224599
A E167827
Page 74 of 515

Use the instrument lighting dimmer to
adjust the brightness of the instrument
panel and all applicable lighting in your
vehicle.
•
Tap the top or bottom of the control
to the first detent to brighten or dim all
interior lighting incrementally.
• Press and hold the top or bottom of
the control to the first detent until you
reach the level you desire.
• Press and hold the top of the control
to the second detent to switch the
interior lights on.
• Press and hold the bottom of the
control to the second detent to switch
the interior lights off.
HEADLAMP EXIT DELAY
Set the delay time to keep the headlamps
on for up to three minutes after switching
off the ignition.
Follow the steps below to change the
delay time:
Note: Complete steps 1 through 6 within 10
seconds.
1. Switch the ignition off.
2. Select the autolamp position on the lighting control.
3. Switch the lighting control to the off position.
4. Switch the ignition on.
5. Switch the ignition off.
6. Select the autolamp position on the lighting control. The headlamps and
parking lamps turn on.
7. Switch the lighting control to the off position when reaching the required
delay time. The headlamps and parking
lamps turn off. Set the headlamp exit delay to one of the
following settings:
•
Off.
• 10 seconds.
• 20 seconds.
• 120 seconds.
Note: Adjust the time delay using the
display controls in the information display.
See Information Displays (page 85).
DAYTIME RUNNING LAMPS WARNING:
The daytime running
lamps system does not activate the rear
lamps and may not provide adequate
lighting during low visibility driving
conditions. Make sure you switch the
headlamps on, as appropriate, during all
low visibility conditions. Failure to do so
may result in a crash.
The system turns the lamps on in daylight
conditions.
To switch the system on, switch the
lighting control to any position except
headlamps.
AUTOMATIC HIGH BEAM
CONTROL
(If Equipped) WARNING:
The system does not
relieve you of your responsibility to drive
with due care and attention. You may
need to override the system if it does not
turn the high beams on or off.
71
Taurus (CPH) Canada/United States of America, enUSA, Edition date: 201806, First-Printing Lighting