2019 FORD TAURUS sensor
[x] Cancel search: sensorPage 198 of 515
WARNING: The collision warning
system with brake support cannot help
prevent all collisions. Do not rely on this
system to replace driver judgment and
the need to maintain distance and
speed.
Note: The system does not detect, warn or
respond to potential collisions with vehicles
to the rear or sides of the vehicle.
Note: The collision warning system is active
at speeds above approximately
5 mph
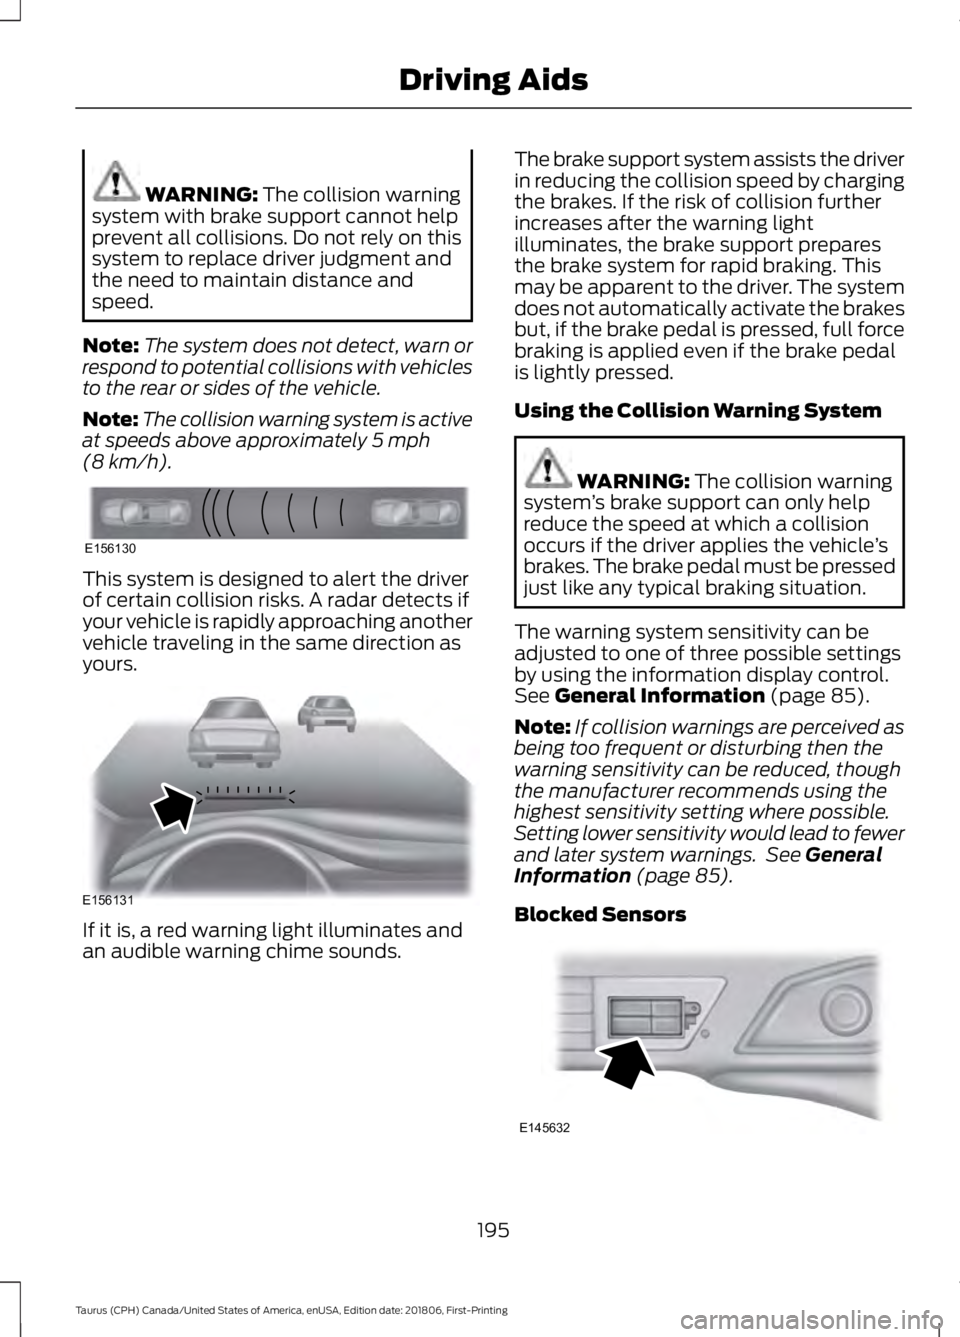
(8 km/h). This system is designed to alert the driver
of certain collision risks. A radar detects if
your vehicle is rapidly approaching another
vehicle traveling in the same direction as
yours.
If it is, a red warning light illuminates and
an audible warning chime sounds. The brake support system assists the driver
in reducing the collision speed by charging
the brakes. If the risk of collision further
increases after the warning light
illuminates, the brake support prepares
the brake system for rapid braking. This
may be apparent to the driver. The system
does not automatically activate the brakes
but, if the brake pedal is pressed, full force
braking is applied even if the brake pedal
is lightly pressed.
Using the Collision Warning System WARNING: The collision warning
system ’s brake support can only help
reduce the speed at which a collision
occurs if the driver applies the vehicle ’s
brakes. The brake pedal must be pressed
just like any typical braking situation.
The warning system sensitivity can be
adjusted to one of three possible settings
by using the information display control.
See
General Information (page 85).
Note: If collision warnings are perceived as
being too frequent or disturbing then the
warning sensitivity can be reduced, though
the manufacturer recommends using the
highest sensitivity setting where possible.
Setting lower sensitivity would lead to fewer
and later system warnings. See
General
Information (page 85).
Blocked Sensors 195
Taurus (CPH) Canada/United States of America, enUSA, Edition date: 201806, First-Printing Driving AidsE156130 E156131 E145632
Page 199 of 515

If a message regarding a blocked sensor
appears in the information display, the
radar signals from the sensor have been
obstructed. The sensors are located behind
a fascia cover near the driver side of the
lower grille. When the sensors are
obstructed, a vehicle ahead cannot be
detected and the collision warning system
does not function. The following table lists
possible causes and actions for this
message being displayed. Action
Cause
Clean the grille surface in front of the radaror remove the object causing the obstruc- tion
The surface of the radar in the grille is dirty
or obstructed in some way
Wait a short time. It may take several
minutes for the radar to detect that it is no longer obstructed
The surface of the radar in the grille is clean
but the message remains in the display
The collision warning system is temporarily
disabled. Collision warning should automat-ically reactivate a short time after the weather conditions improve
Heavy rain, spray, snow, or fog is interfering
with the radar signals
The collision warning system is temporarily
disabled. Collision warning should automat-ically reactivate a short time after the weather conditions improve
Swirling water, or snow or ice on the surface
of the road may interfere with the radar signals
System Limitations WARNING: The collision warning
system ’s brake support can only help
reduce the speed at which a collision
occurs if the driver applies the vehicle ’s
brakes. The brake pedal must be pressed
just like any typical braking situation.
Due to the nature of radar technology,
there may be certain instances where
vehicles do not provide a collision warning.
These include:
• Stationary vehicles or vehicles moving
below 6 mph (10 km/h).
• Pedestrians or objects in the roadway.
• Oncoming vehicles in the same lane. •
Severe weather conditions (see
blocked sensor section).
• Debris build-up on the grille near the
headlamps (see blocked sensor
section).
• Small distance to vehicle ahead.
• Steering wheel and pedal movements
are large (very active driving style).
If the front end of the vehicle is hit or
damaged, the radar sensing zone may be
altered causing missed or false collision
warnings. See your authorized dealer to
have your collision warning radar checked
for proper coverage and operation.
196
Taurus (CPH) Canada/United States of America, enUSA, Edition date: 201806, First-Printing Driving Aids
Page 228 of 515

Protected Components
Fuse Amp Rating
Fuse or Relay
Number
Climate controlled seats.
30A 1
28
Electric fan relay 1.
40A 1
29
Electric fan relay 2.
40A 1
30
Electric fan relay 3.
25A 1
31
Massage control seat relay.
Relay
32
Right-hand cooling fan relay.
Relay
33
Blower motor relay.
Relay
34
Left-hand cooling fan Number 1 relay.
Relay
35
Not used.
-
36
Not used.
-
37
Not used.
-
38
Not used.
-
39
Not used.
-
40
Not used.
-
41
Passenger power seat.
30A 2
42
Anti-lock brake system valves.
20A 1
43
Not used.
-
44
Rain sensor.
5A 2
45
Not used.
-
46
Not used.
-
47
Not used.
-
48
Not used.
-
49
Heated mirrors.
15A 2
50
Not used.
-
51
225
Taurus (CPH) Canada/United States of America, enUSA, Edition date: 201806, First-Printing Fuses
Page 229 of 515

Protected Components
Fuse Amp Rating
Fuse or Relay
Number
Not used.
-
52
Not used.
-
53
Not used.
-
54
Wiper relay.
Relay
55
Not used.
-
56
Left-hand high intensity discharge head-
lamp.
20A 2
57
Alternator A-line.
10A 2
58
Brake on/off switch.
10A 2
59
Not used.
-
60
Not used.
-
61
A/C clutch relay.
10A 2
62
Not used.
-
63
Massage control seats.
15A 2
64
Fuel pump relay.
30A 2
65
Fuel injectors.
Powertrain control module relay.
Relay
66
Oxygen sensor heater.
20A 2
67
Mass airflow sensor.
Variable camshaft timing solenoid valve.
Canister vent solenoid.
Canister purge solenoid.
Ignition coils.
20A 2
68
Vehicle power 1 (powertrain control
module).
20A 2
69
A/C clutch.
15A 2
70
Fan control relay coils 1-3.
Variable air conditioning compressor.
Auxiliary transmission warmup.
226
Taurus (CPH) Canada/United States of America, enUSA, Edition date: 201806, First-Printing Fuses
Page 234 of 515
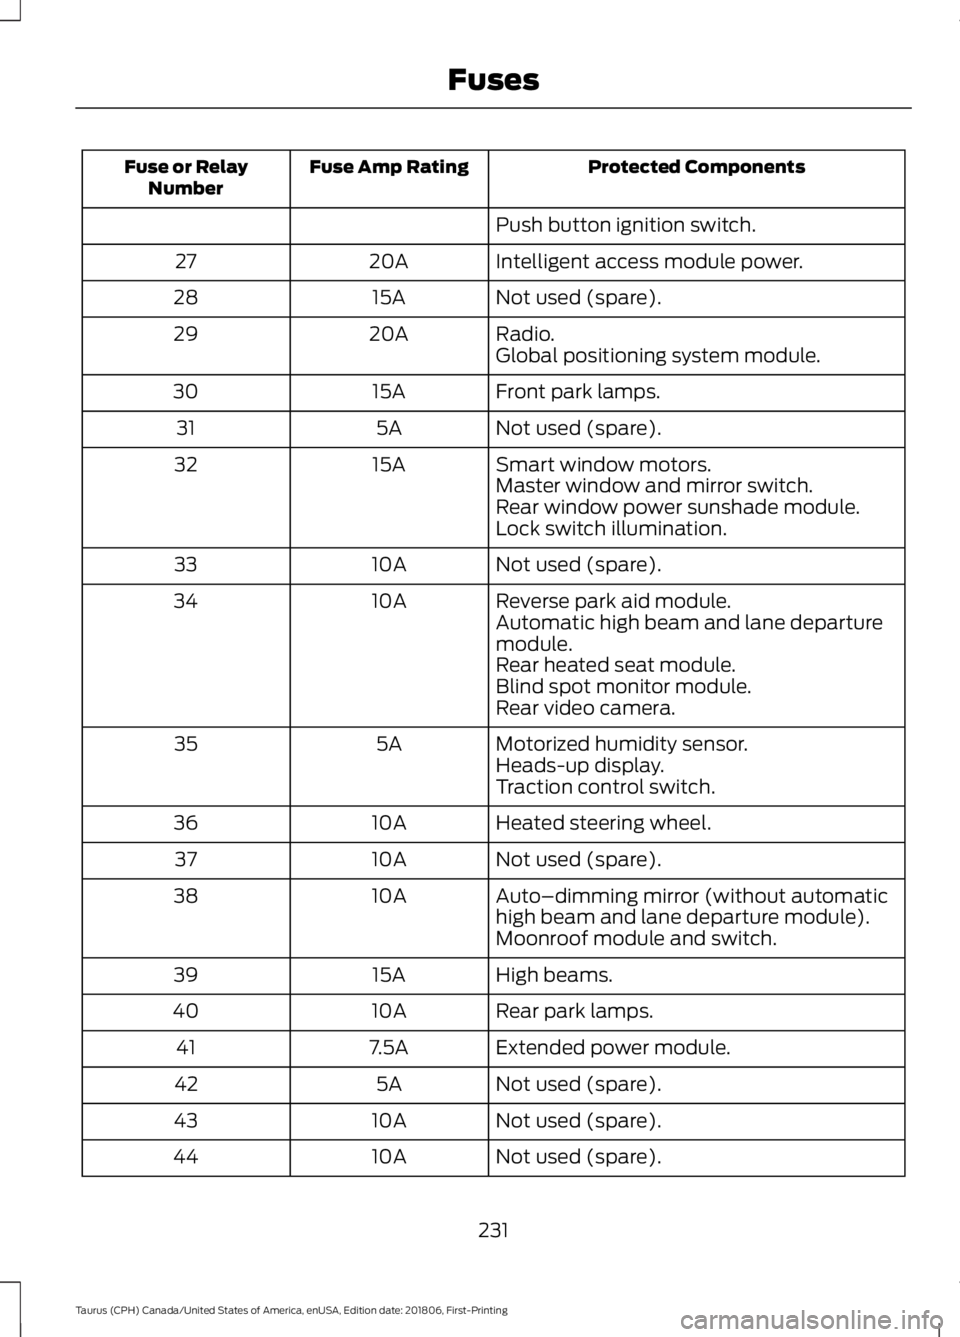
Protected Components
Fuse Amp Rating
Fuse or Relay
Number
Push button ignition switch.
Intelligent access module power.
20A
27
Not used (spare).
15A
28
Radio.
20A
29
Global positioning system module.
Front park lamps.
15A
30
Not used (spare).
5A
31
Smart window motors.
15A
32
Master window and mirror switch.
Rear window power sunshade module.
Lock switch illumination.
Not used (spare).
10A
33
Reverse park aid module.
10A
34
Automatic high beam and lane departure
module.
Rear heated seat module.
Blind spot monitor module.
Rear video camera.
Motorized humidity sensor.
5A
35
Heads-up display.
Traction control switch.
Heated steering wheel.
10A
36
Not used (spare).
10A
37
Auto–dimming mirror (without automatic
high beam and lane departure module).
10A
38
Moonroof module and switch.
High beams.
15A
39
Rear park lamps.
10A
40
Extended power module.
7.5A
41
Not used (spare).
5A
42
Not used (spare).
10A
43
Not used (spare).
10A
44
231
Taurus (CPH) Canada/United States of America, enUSA, Edition date: 201806, First-Printing Fuses
Page 248 of 515
7. Remove the dipstick and inspect the
fluid level. The fluid should be in the
designated areas for normal operating
temperature.
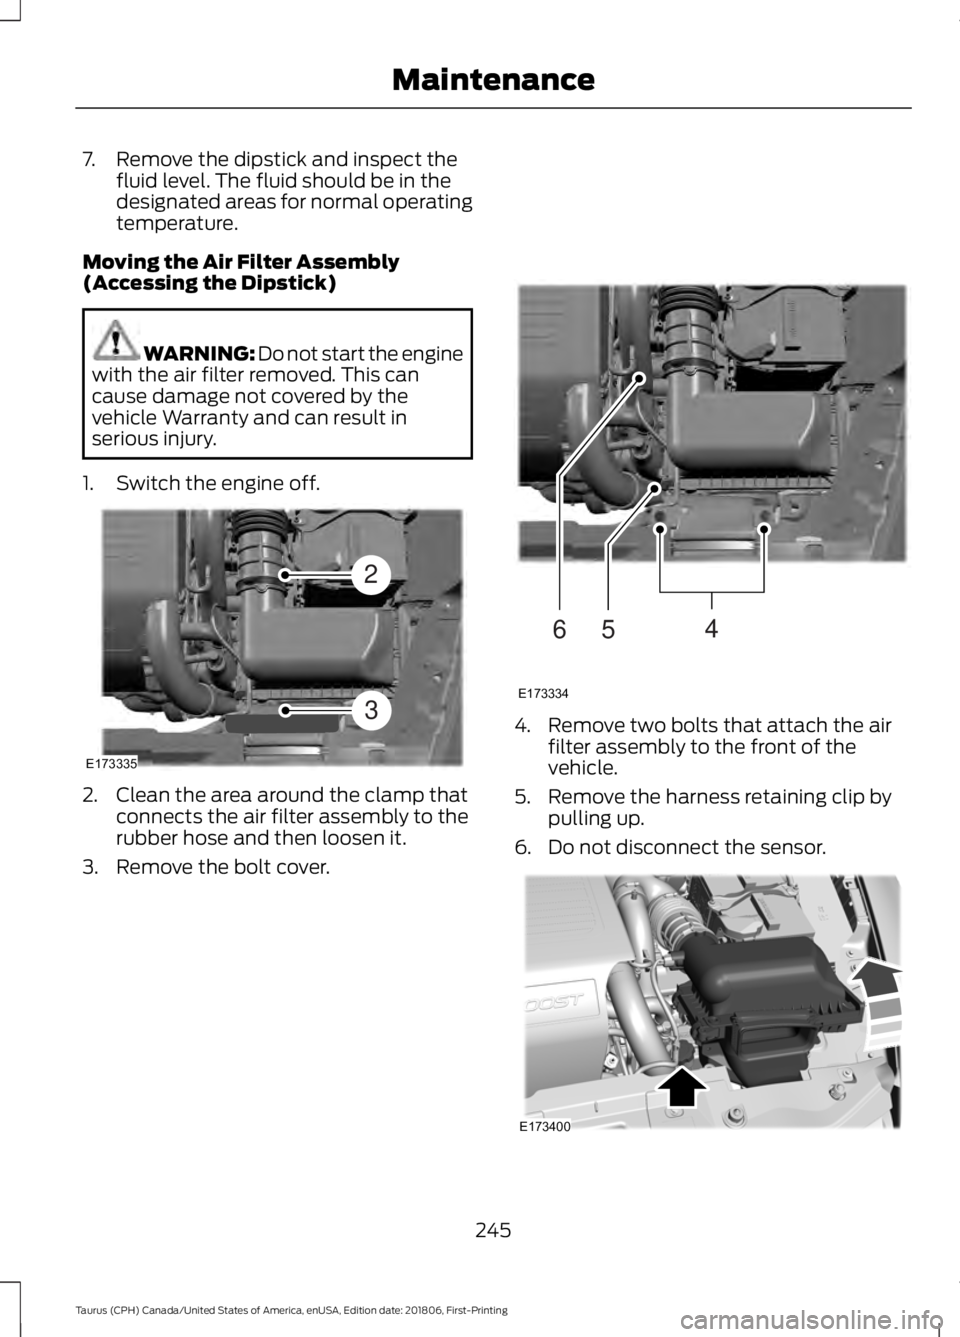
Moving the Air Filter Assembly
(Accessing the Dipstick) WARNING: Do not start the engine
with the air filter removed. This can
cause damage not covered by the
vehicle Warranty and can result in
serious injury.
1. Switch the engine off. 2. Clean the area around the clamp that
connects the air filter assembly to the
rubber hose and then loosen it.
3. Remove the bolt cover. 4. Remove two bolts that attach the air
filter assembly to the front of the
vehicle.
5. Remove the harness retaining clip by pulling up.
6. Do not disconnect the sensor. 245
Taurus (CPH) Canada/United States of America, enUSA, Edition date: 201806, First-Printing MaintenanceE173335
2
3 E173334
654 E173400
Page 267 of 515
General Information
WARNING: Failure to follow these
guidelines could result in an increased
risk of loss of vehicle control, injury or
death.
Note: Do not use the kit if a tire has become
severely damaged by driving the vehicle with
a tire that has insufficient air pressure. Only
punctured areas located within the tire tread
can be sealed with the kit.
Do not attempt to repair punctures larger
than ¼ inch (6 millimeters) or damage to
the tire's sidewall. The tire may not
completely seal.
Loss of air pressure may adversely affect
tire performance. For this reason:
Note: Do not drive the vehicle above
50 mph (80 km/h)
.
Note: Do not drive further than
120 mi
(200 km). Drive only to the closest
authorized Ford dealer or tire repair shop to
have your tire inspected.
• Drive carefully and avoid abrupt
steering maneuvers.
• Periodically monitor tire inflation
pressure in the affected tire. If the tire
is losing pressure, have the vehicle
towed.
• Read the information in the Tips for
Use of the Kit section to make sure safe
operation of the kit and your vehicle.
Tips for Use of the Kit
Read the following list of tips to ensure
safe operation of the kit: •
Before operating the kit, make sure
your vehicle is safely off the road and
away from moving traffic. Turn on the
hazard lights.
• Always set the parking brake to ensure
the vehicle does not move
unexpectedly.
• Do not remove any foreign objects,
such as nails or screws, from the tire.
• When using the kit, leave the engine
running, only if the vehicle is outdoors
or in a well-ventilated area, so the
compressor does not drain the vehicle
battery.
• Do not allow the compressor to
operate continuously for more than 15
minutes. This will help prevent the
compressor from overheating.
• Never leave the kit unattended when
it is operating.
• Sealant compound contains latex.
Make sure that you use the non-latex
gloves provided to avoid an allergic
reaction.
• Keep the kit away from children.
• Only use the kit when the ambient
temperature is between
-22°F (-30°C)
and 158°F (70°C).
• Only use the sealing compound before
the use by date. The use by date is on
the lower right-hand corner of the label
on the sealant canister, bottle. Check
the use by date regularly and replace
the canister after four years.
• Do not store the kit unsecured inside
the passenger compartment of the
vehicle as it may cause injury during a
sudden stop or crash. Always store the
kit in its original location.
• After sealant use, the tire pressure
monitoring system sensor and valve
stem on the wheel must be replaced
by an authorized Ford dealer.
264
Taurus (CPH) Canada/United States of America, enUSA, Edition date: 201806, First-Printing Wheels and Tires
Page 270 of 515
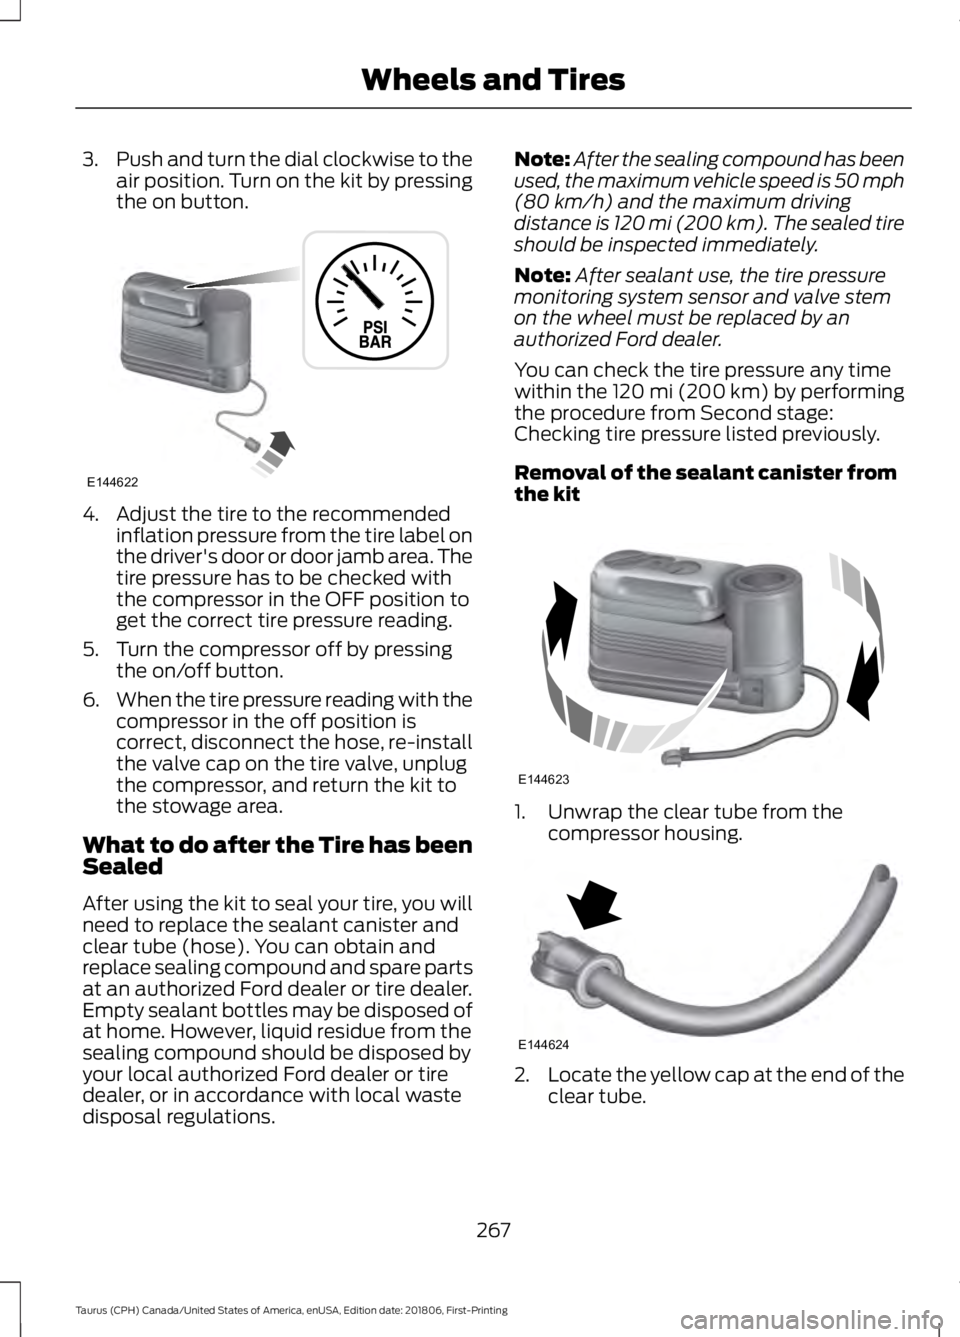
3.
Push and turn the dial clockwise to the
air position. Turn on the kit by pressing
the on button. 4. Adjust the tire to the recommended
inflation pressure from the tire label on
the driver's door or door jamb area. The
tire pressure has to be checked with
the compressor in the OFF position to
get the correct tire pressure reading.
5. Turn the compressor off by pressing the on/off button.
6. When the tire pressure reading with the
compressor in the off position is
correct, disconnect the hose, re-install
the valve cap on the tire valve, unplug
the compressor, and return the kit to
the stowage area.
What to do after the Tire has been
Sealed
After using the kit to seal your tire, you will
need to replace the sealant canister and
clear tube (hose). You can obtain and
replace sealing compound and spare parts
at an authorized Ford dealer or tire dealer.
Empty sealant bottles may be disposed of
at home. However, liquid residue from the
sealing compound should be disposed by
your local authorized Ford dealer or tire
dealer, or in accordance with local waste
disposal regulations. Note:
After the sealing compound has been
used, the maximum vehicle speed is 50 mph
(80 km/h) and the maximum driving
distance is 120 mi (200 km). The sealed tire
should be inspected immediately.
Note: After sealant use, the tire pressure
monitoring system sensor and valve stem
on the wheel must be replaced by an
authorized Ford dealer.
You can check the tire pressure any time
within the 120 mi (200 km) by performing
the procedure from Second stage:
Checking tire pressure listed previously.
Removal of the sealant canister from
the kit 1. Unwrap the clear tube from the
compressor housing. 2.
Locate the yellow cap at the end of the
clear tube.
267
Taurus (CPH) Canada/United States of America, enUSA, Edition date: 201806, First-Printing Wheels and TiresE144622 E144623 E144624