2019 FORD TAURUS parking brake
[x] Cancel search: parking brakePage 267 of 515
General Information
WARNING: Failure to follow these
guidelines could result in an increased
risk of loss of vehicle control, injury or
death.
Note: Do not use the kit if a tire has become
severely damaged by driving the vehicle with
a tire that has insufficient air pressure. Only
punctured areas located within the tire tread
can be sealed with the kit.
Do not attempt to repair punctures larger
than ¼ inch (6 millimeters) or damage to
the tire's sidewall. The tire may not
completely seal.
Loss of air pressure may adversely affect
tire performance. For this reason:
Note: Do not drive the vehicle above
50 mph (80 km/h)
.
Note: Do not drive further than
120 mi
(200 km). Drive only to the closest
authorized Ford dealer or tire repair shop to
have your tire inspected.
• Drive carefully and avoid abrupt
steering maneuvers.
• Periodically monitor tire inflation
pressure in the affected tire. If the tire
is losing pressure, have the vehicle
towed.
• Read the information in the Tips for
Use of the Kit section to make sure safe
operation of the kit and your vehicle.
Tips for Use of the Kit
Read the following list of tips to ensure
safe operation of the kit: •
Before operating the kit, make sure
your vehicle is safely off the road and
away from moving traffic. Turn on the
hazard lights.
• Always set the parking brake to ensure
the vehicle does not move
unexpectedly.
• Do not remove any foreign objects,
such as nails or screws, from the tire.
• When using the kit, leave the engine
running, only if the vehicle is outdoors
or in a well-ventilated area, so the
compressor does not drain the vehicle
battery.
• Do not allow the compressor to
operate continuously for more than 15
minutes. This will help prevent the
compressor from overheating.
• Never leave the kit unattended when
it is operating.
• Sealant compound contains latex.
Make sure that you use the non-latex
gloves provided to avoid an allergic
reaction.
• Keep the kit away from children.
• Only use the kit when the ambient
temperature is between
-22°F (-30°C)
and 158°F (70°C).
• Only use the sealing compound before
the use by date. The use by date is on
the lower right-hand corner of the label
on the sealant canister, bottle. Check
the use by date regularly and replace
the canister after four years.
• Do not store the kit unsecured inside
the passenger compartment of the
vehicle as it may cause injury during a
sudden stop or crash. Always store the
kit in its original location.
• After sealant use, the tire pressure
monitoring system sensor and valve
stem on the wheel must be replaced
by an authorized Ford dealer.
264
Taurus (CPH) Canada/United States of America, enUSA, Edition date: 201806, First-Printing Wheels and Tires
Page 268 of 515

•
When inflating a tire or other objects,
use the black air hose only. Do not use
the transparent hose which is designed
for sealant application only.
• Operating the kit could cause an
electrical disturbance in radio, CD, and
DVD player operation.
What to do when a Tire Is
Punctured
A tire puncture within the tire tread area
can be repaired in two stages with the kit.
• In the first stage, the tire will be
reinflated with a sealing compound
and air. After the tire has been
reinflated, you will need to drive the
vehicle a short distance 4 mi (6 km) to
distribute the sealant in the tire.
• In the second stage, you will need to
check the tire pressure and adjust, if
necessary, to the vehicle tire inflation
pressure.
First Stage: Reinflating the Tire
with Sealing Compound and Air WARNING: Do not stand directly
over the kit while inflating the tire. If you
notice any unusual bulges or
deformations in the tire's sidewall during
inflation, stop and call roadside
assistance. WARNING:
If the tire does not
inflate to the recommended tire pressure
within 15 minutes, stop and call roadside
assistance.
Preparation: Park the vehicle in a safe, level
and secure area, away from moving traffic.
Turn the hazard lights on. Apply the parking
brake and turn the engine off. Inspect the
flat tire for visible damage. Sealant compound contains latex. To
avoid any allergic reactions, use the
non-latex gloves in the accessory box on
the underside of the kit housing.
Do not remove any foreign object that has
pierced the tire. If a puncture is in the tire
sidewall, stop and call roadside assistance.
1. Remove the valve cap from the tire
valve.
2. Unwrap the clear tube from the compressor housing.
3. Remove the tube cap and fasten the metal connector of the tube to the tire
valve, turning clockwise. Make sure the
connection is tightly fastened. 4. Plug the power cable into the 12-volt
power point in the vehicle.
5. Remove the warning sticker on the canister and place it on the top of the
instrument panel or the center of the
dash.
6. Start the vehicle only if the vehicle is outdoors or in a well-ventilated area.
265
Taurus (CPH) Canada/United States of America, enUSA, Edition date: 201806, First-Printing Wheels and TiresE144619
Page 292 of 515
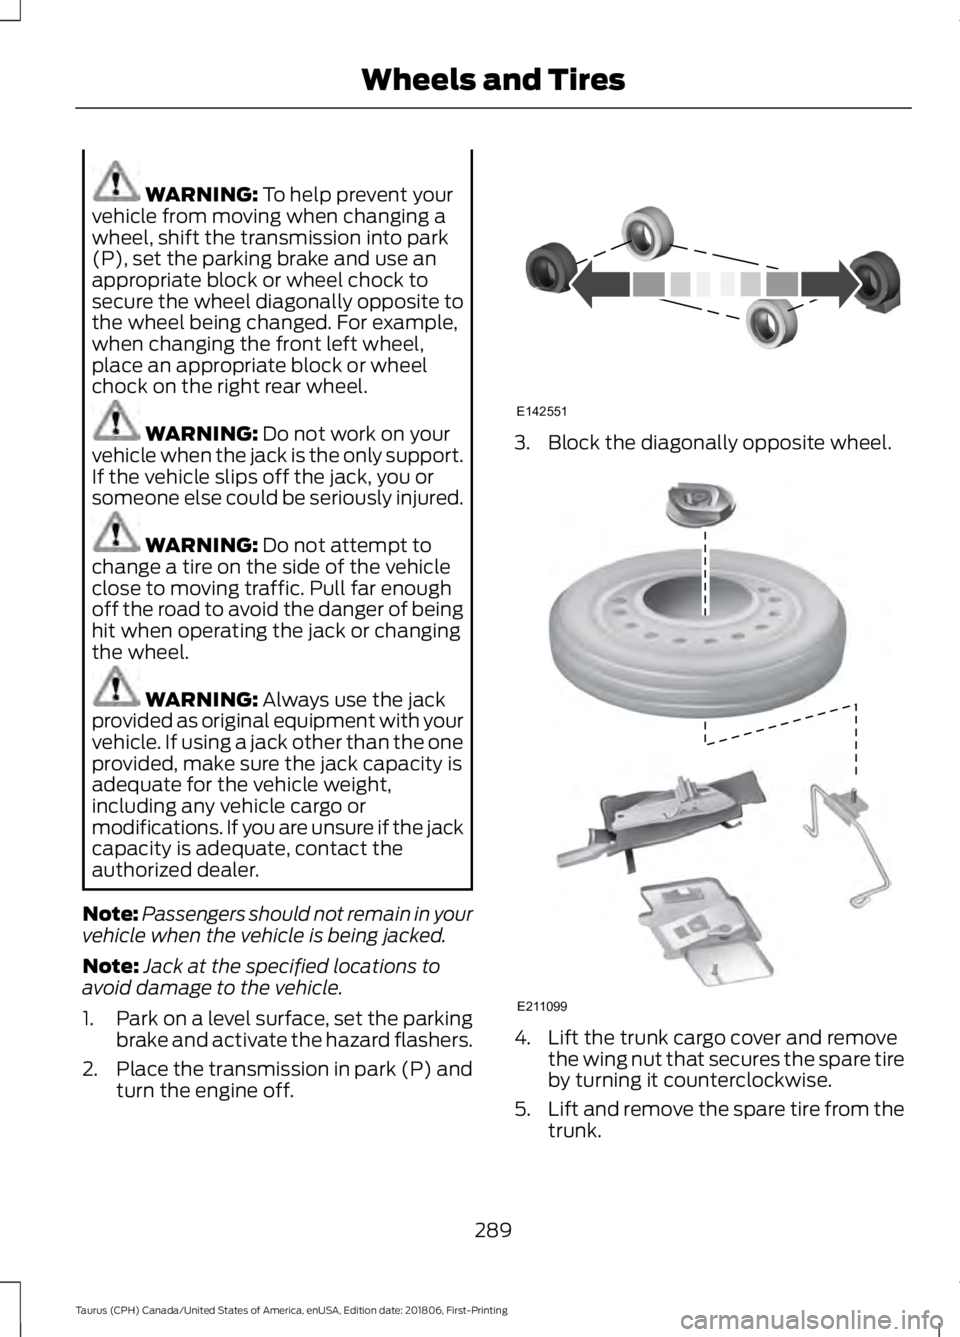
WARNING: To help prevent your
vehicle from moving when changing a
wheel, shift the transmission into park
(P), set the parking brake and use an
appropriate block or wheel chock to
secure the wheel diagonally opposite to
the wheel being changed. For example,
when changing the front left wheel,
place an appropriate block or wheel
chock on the right rear wheel. WARNING:
Do not work on your
vehicle when the jack is the only support.
If the vehicle slips off the jack, you or
someone else could be seriously injured. WARNING:
Do not attempt to
change a tire on the side of the vehicle
close to moving traffic. Pull far enough
off the road to avoid the danger of being
hit when operating the jack or changing
the wheel. WARNING:
Always use the jack
provided as original equipment with your
vehicle. If using a jack other than the one
provided, make sure the jack capacity is
adequate for the vehicle weight,
including any vehicle cargo or
modifications. If you are unsure if the jack
capacity is adequate, contact the
authorized dealer.
Note: Passengers should not remain in your
vehicle when the vehicle is being jacked.
Note: Jack at the specified locations to
avoid damage to the vehicle.
1. Park on a level surface, set the parking
brake and activate the hazard flashers.
2. Place the transmission in park (P) and
turn the engine off. 3. Block the diagonally opposite wheel.
4. Lift the trunk cargo cover and remove
the wing nut that secures the spare tire
by turning it counterclockwise.
5. Lift and remove the spare tire from the
trunk.
289
Taurus (CPH) Canada/United States of America, enUSA, Edition date: 201806, First-Printing Wheels and TiresE142551 E211099
Page 303 of 515
Specification
Name
XY-75W140-QL WSL-M2C192-A
Power Transfer Unit (PTU) fluid (All Wheel Drive)
(Canada)
Motorcraft® SAE 75W-140 Synthetic Rear Axle Lubricant
CXY-75W140-1L
WSS-M14P19-A
Windshield washer fluid (U.S. and Mexico):
Motorcraft® Premium Windshield Wash Concentrate
with Bitterant
ZC-32-B2
WSS-M14P19-A
Windshield washer fluid (Canada):
Motorcraft® Premium Quality Windshield Washer Fluid
CXC-37-(A, B, D, F)
WSH-M17B19-A
A/C refrigerant (U.S.):
Motorcraft® R-134a Refrigerant
YN-19
WSH-M17B19-A
A/C refrigerant (Canada):
R-134a Refrigerant
CYN-19-R
WSH-M17B19-A
A/C refrigerant (Mexico):
Motorcraft® R-134a Refrigerant
MYN-19-R
WSH-M1C231-B
A/C refrigerant compressor oil:
Motorcraft® PAG Refrigerant Compressor Oil
YN-12-D
ESA-M1C75-B
Transmission, parking brake linkage and pivots and brake
pedal shift grease:
Premium Long-Life Grease
XG-1-E1
ESB-M1C93-B
Multi-purpose grease:
Motorcraft® Multi-Purpose Grease Spray
XL-5-A
-
Lock cylinders (U.S.):
Penetrating and Lock Lubricant
XL-1
-
Lock cylinders (Canada):
Penetrating Fluid
CXC-51-A
300
Taurus (CPH) Canada/United States of America, enUSA, Edition date: 201806, First-Printing Capacities and Specifications
Page 307 of 515
Specification
Name
WSP-M2C197-A
Rear axle fluid (Canada)
Motorcraft® SAE 80W-90 Premium Rear Axle Lubricant
CXY-80W90-1L
WSS-M2C938-A
Automatic transmission fluid (U.S. and Mexico):
MERCON® LV
Motorcraft® MERCON® LV Automatic Transmission Fluid
XT-10-QLVC
WSS-M2C938-A
Automatic transmission fluid (Canada):
MERCON® LV
Motorcraft® MERCON® LV Automatic Transmission Fluid
CXT-10-LV12
WSL-M2C192-A
Power Transfer Unit (PTU) fluid (All Wheel Drive) (U.S.
and Mexico)
Motorcraft® SAE 75W-140 Synthetic Rear Axle Lubricant
XY-75W140-QL
WSL-M2C192-A
Power Transfer Unit (PTU) fluid (All Wheel Drive)
(Canada)
Motorcraft® SAE 75W-140 Synthetic Rear Axle Lubricant
CXY-75W140-1L
WSS-M14P19-A
Windshield washer fluid (U.S. and Mexico):
Motorcraft® Premium Windshield Wash Concentrate
with Bitterant
ZC-32-B2
WSS-M14P19-A
Windshield washer fluid (Canada):
Motorcraft® Premium Quality Windshield Washer Fluid
CXC-37-(A, B, D, F)
WSH-M17B19-A
A/C refrigerant (U.S.):
Motorcraft® R-134a Refrigerant
YN-19
WSH-M17B19-A
A/C refrigerant (Canada):
R-134a Refrigerant
CYN-19-R
WSH-M17B19-A
A/C refrigerant (Mexico):
Motorcraft® R-134a Refrigerant
MYN-19
WSH-M1C231-B
A/C refrigerant compressor oil:
Motorcraft® PAG Refrigerant Compressor Oil
YN-12-D
ESA-M1C75-B
Transmission, parking brake linkage and pivots and brake
pedal shift grease:
304
Taurus (CPH) Canada/United States of America, enUSA, Edition date: 201806, First-Printing Capacities and Specifications
Page 329 of 515

USING SYNC™ WITH YOUR
PHONE
Hands-free calling is one of the main
features of SYNC. While the system
supports a variety of features, many are
dependent on your cell phone's
functionality. At a minimum, most cell
phones with Bluetooth wireless technology
support the following functions:
•
Answering an incoming call.
• Ending a call.
• Using privacy mode.
• Dialing a number.
• Redialing.
• Call waiting notification.
• Caller identification. Other features, such as text messaging
using Bluetooth and automatic phonebook
download, are cell phone-dependent
features. To check your cell phone's
compatibility, see your cell phone's manual
and visit www.SYNCMyRide.com,
www.SYNCMyRide.ca or
www.syncmaroute.ca.
Pairing Your Cell Phone for the
First Time
Note:
SYNC can support downloading up
to approximately 1000 entries per
Bluetooth-enabled cell phone.
Note: Make sure to switch on the ignition
and the radio. Put the transmission in
position park (P) (automatic transmission)
or neutral with the parking brake applied
(manual transmission).
Note: To scroll through the menus, press
the up and down arrows on your audio
system.
Wirelessly pairing your cell phone with
SYNC allows you to make and receive
hands-free calls.
Press the phone button. When the display indicates there is no cell phone paired,
do the following: Action and Description
Message
Press the
OK button.
NO PHONE
FIND SYNC 1. Press the
OK button.
2. Put your cell phone into Bluetooth discovery mode. See your device's manual if necessary.
3. When prompted on your cell phone's display, enter the six-digit PIN provided by SYNC in the radio display. The
display indicates when the pairing is successful.
326
Taurus (CPH) Canada/United States of America, enUSA, Edition date: 201806, First-Printing SYNC™
Page 330 of 515

Depending on your cell phone's capability
and your market, the system may prompt
you with questions, such as setting the
current cell phone as the primary cell
phone (the cell phone SYNC automatically
tries to connect with first upon vehicle
start-up) and downloading your
phonebook.
Pairing Subsequent Cell Phones
Note:
To scroll through the menus, press
the up and down arrows on your audio
system.
Note: Make sure to switch on the ignition
and the radio. Put the transmission in
position park (P) (automatic transmission)
or neutral with the parking brake applied
(manual transmission).
Press the phone button, then scroll to: Action
Message
Press the
OK button.
PHONE SETNGS
Press the
OK button.
BT DEVICES
Press the
OK button. When the following message appears
in the display.
ADD DEVICE
FIND SYNC
1. Press the
OK button.
2. Put your cell phone into Bluetooth discovery mode. See your device's manual if necessary.
3. When prompted on your cell phone's display, enter the six-digit PIN provided by SYNC in the radio display. The
display indicates when the pairing is successful.
The system then prompts with questions, such as if you would like to set the current cell
phone as the primary cell phone (the cell phone SYNC automatically tries to connect
with first upon vehicle start-up) or download your phonebook.
Phone Voice Commands
Press the voice icon and say: Voice Commands
Phone
You can then say any of the following
commands.
Call History Incoming
Call History Missed
Call History Outgoing Voice Commands
Phonebook ___
Phonebook ___ at Home
Phonebook ___ at Work
Phonebook ___ in Office
Phonebook ___ on Cell
___ is a dynamic listing that should be the
name of a contact in your phonebook. For
example you could say "Call Mom".
327
Taurus (CPH) Canada/United States of America, enUSA, Edition date: 201806, First-Printing SYNC™
Page 447 of 515
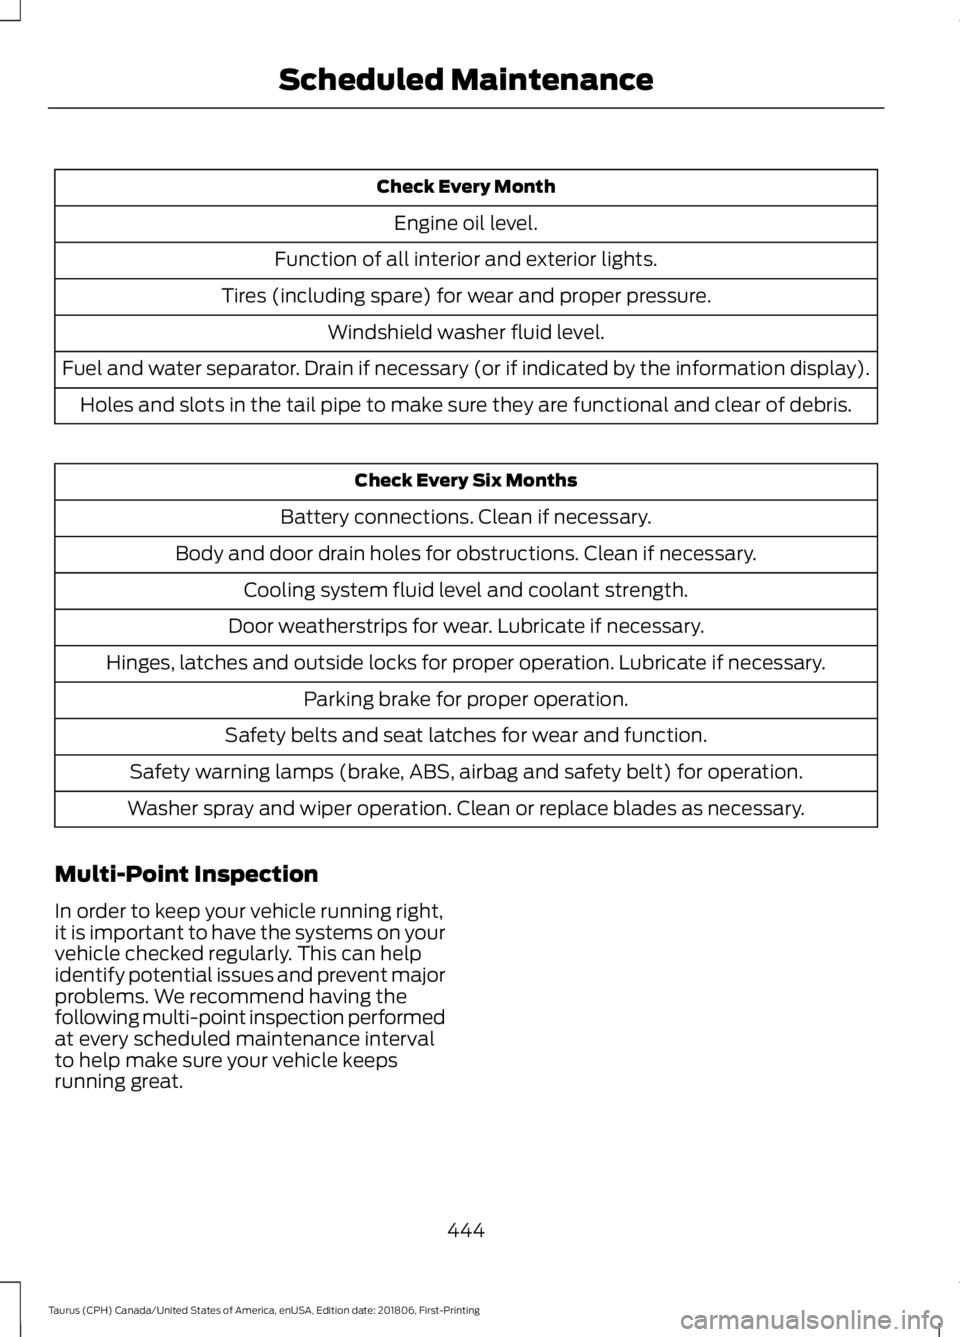
Check Every Month
Engine oil level.
Function of all interior and exterior lights.
Tires (including spare) for wear and proper pressure. Windshield washer fluid level.
Fuel and water separator. Drain if necessary (or if indicated by the information display). Holes and slots in the tail pipe to make sure they are functional and clear of debris. Check Every Six Months
Battery connections. Clean if necessary.
Body and door drain holes for obstructions. Clean if necessary. Cooling system fluid level and coolant strength.
Door weatherstrips for wear. Lubricate if necessary.
Hinges, latches and outside locks for proper operation. Lubricate if necessary. Parking brake for proper operation.
Safety belts and seat latches for wear and function.
Safety warning lamps (brake, ABS, airbag and safety belt) for operation.
Washer spray and wiper operation. Clean or replace blades as necessary.
Multi-Point Inspection
In order to keep your vehicle running right,
it is important to have the systems on your
vehicle checked regularly. This can help
identify potential issues and prevent major
problems. We recommend having the
following multi-point inspection performed
at every scheduled maintenance interval
to help make sure your vehicle keeps
running great.
444
Taurus (CPH) Canada/United States of America, enUSA, Edition date: 201806, First-Printing Scheduled Maintenance