2019 FORD POLICE INTERCEPTOR seats
[x] Cancel search: seatsPage 48 of 370
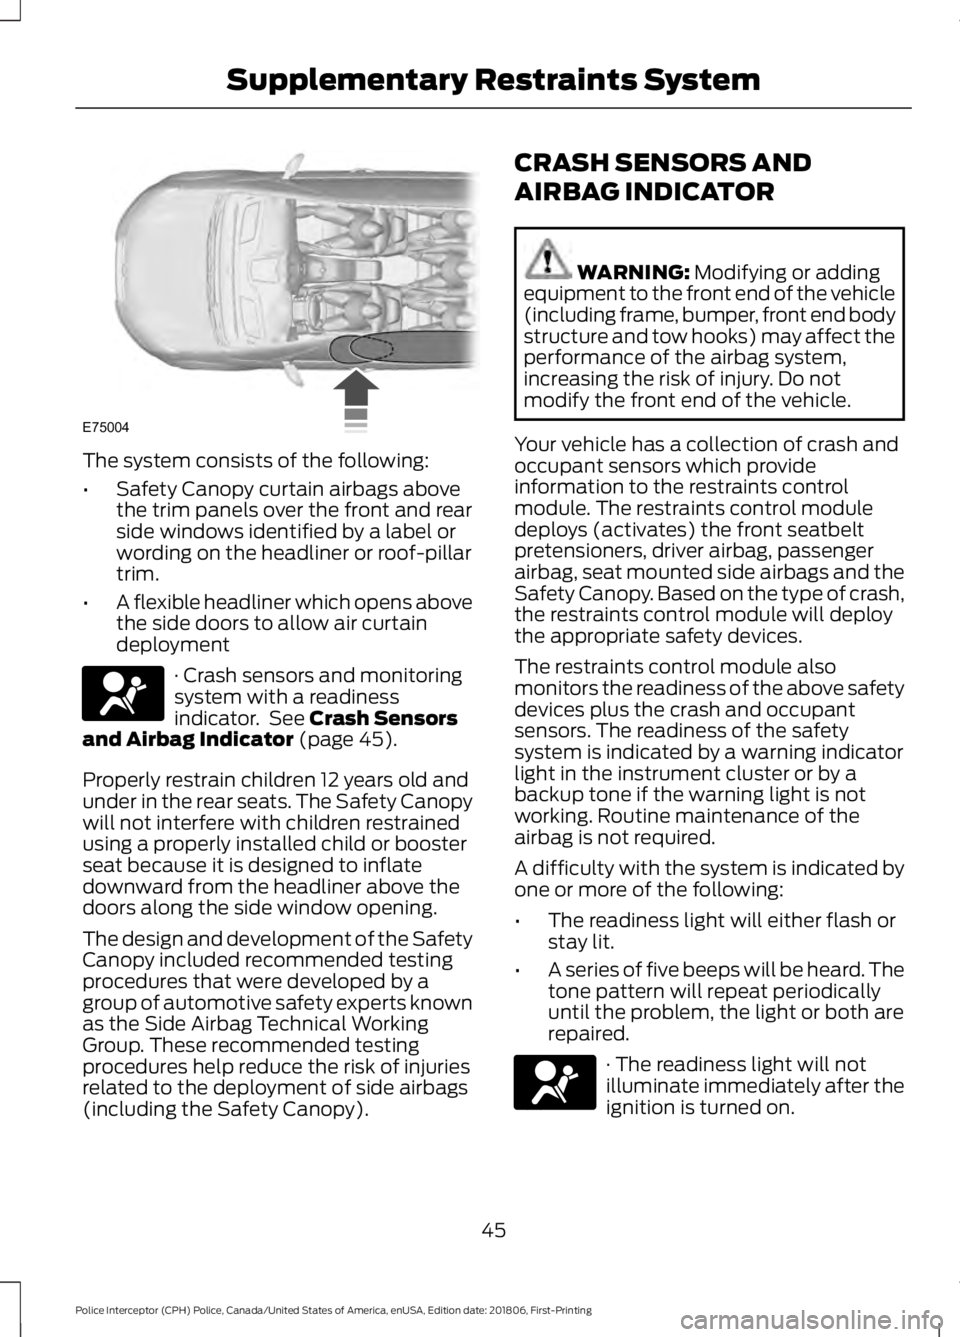
The system consists of the following:
•
Safety Canopy curtain airbags above
the trim panels over the front and rear
side windows identified by a label or
wording on the headliner or roof-pillar
trim.
• A flexible headliner which opens above
the side doors to allow air curtain
deployment · Crash sensors and monitoring
system with a readiness
indicator. See Crash Sensors
and Airbag Indicator (page 45).
Properly restrain children 12 years old and
under in the rear seats. The Safety Canopy
will not interfere with children restrained
using a properly installed child or booster
seat because it is designed to inflate
downward from the headliner above the
doors along the side window opening.
The design and development of the Safety
Canopy included recommended testing
procedures that were developed by a
group of automotive safety experts known
as the Side Airbag Technical Working
Group. These recommended testing
procedures help reduce the risk of injuries
related to the deployment of side airbags
(including the Safety Canopy). CRASH SENSORS AND
AIRBAG INDICATOR WARNING:
Modifying or adding
equipment to the front end of the vehicle
(including frame, bumper, front end body
structure and tow hooks) may affect the
performance of the airbag system,
increasing the risk of injury. Do not
modify the front end of the vehicle.
Your vehicle has a collection of crash and
occupant sensors which provide
information to the restraints control
module. The restraints control module
deploys (activates) the front seatbelt
pretensioners, driver airbag, passenger
airbag, seat mounted side airbags and the
Safety Canopy. Based on the type of crash,
the restraints control module will deploy
the appropriate safety devices.
The restraints control module also
monitors the readiness of the above safety
devices plus the crash and occupant
sensors. The readiness of the safety
system is indicated by a warning indicator
light in the instrument cluster or by a
backup tone if the warning light is not
working. Routine maintenance of the
airbag is not required.
A difficulty with the system is indicated by
one or more of the following:
• The readiness light will either flash or
stay lit.
• A series of five beeps will be heard. The
tone pattern will repeat periodically
until the problem, the light or both are
repaired. · The readiness light will not
illuminate immediately after the
ignition is turned on.
45
Police Interceptor (CPH) Police, Canada/United States of America, enUSA, Edition date: 201806, First-Printing Supplementary Restraints SystemE75004 E67017 E67017
Page 50 of 370
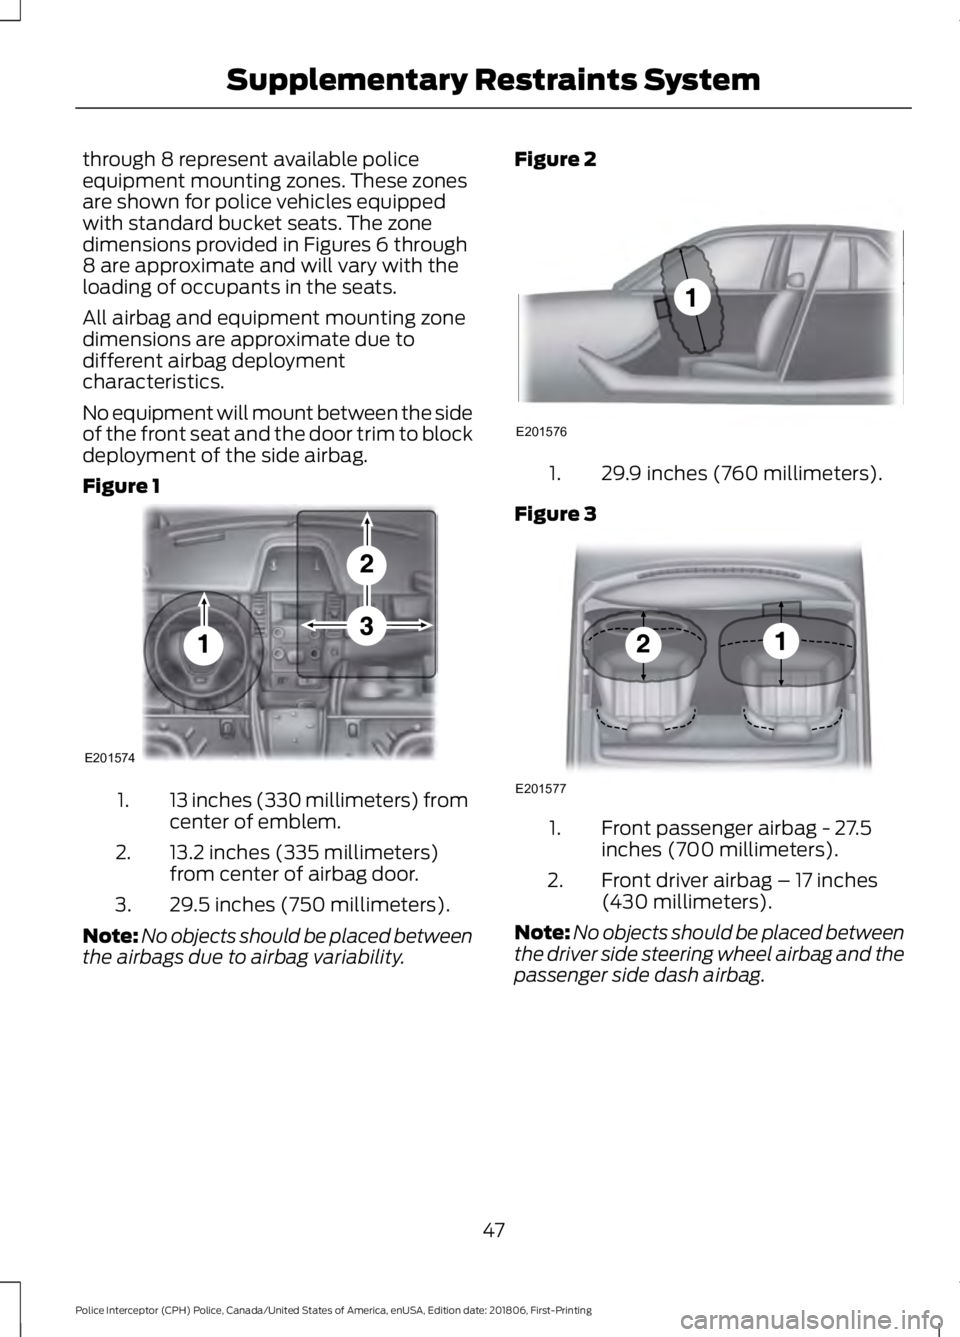
through 8 represent available police
equipment mounting zones. These zones
are shown for police vehicles equipped
with standard bucket seats. The zone
dimensions provided in Figures 6 through
8 are approximate and will vary with the
loading of occupants in the seats.
All airbag and equipment mounting zone
dimensions are approximate due to
different airbag deployment
characteristics.
No equipment will mount between the side
of the front seat and the door trim to block
deployment of the side airbag.
Figure 1
13 inches (330 millimeters) from
center of emblem.
1.
13.2 inches (335 millimeters)
from center of airbag door.
2.
29.5 inches (750 millimeters).
3.
Note: No objects should be placed between
the airbags due to airbag variability. Figure 2 29.9 inches (760 millimeters).
1.
Figure 3 Front passenger airbag - 27.5
inches (700 millimeters).
1.
Front driver airbag – 17 inches
(430 millimeters).
2.
Note: No objects should be placed between
the driver side steering wheel airbag and the
passenger side dash airbag.
47
Police Interceptor (CPH) Police, Canada/United States of America, enUSA, Edition date: 201806, First-Printing Supplementary Restraints SystemE201574 E201576 E201577
Page 52 of 370
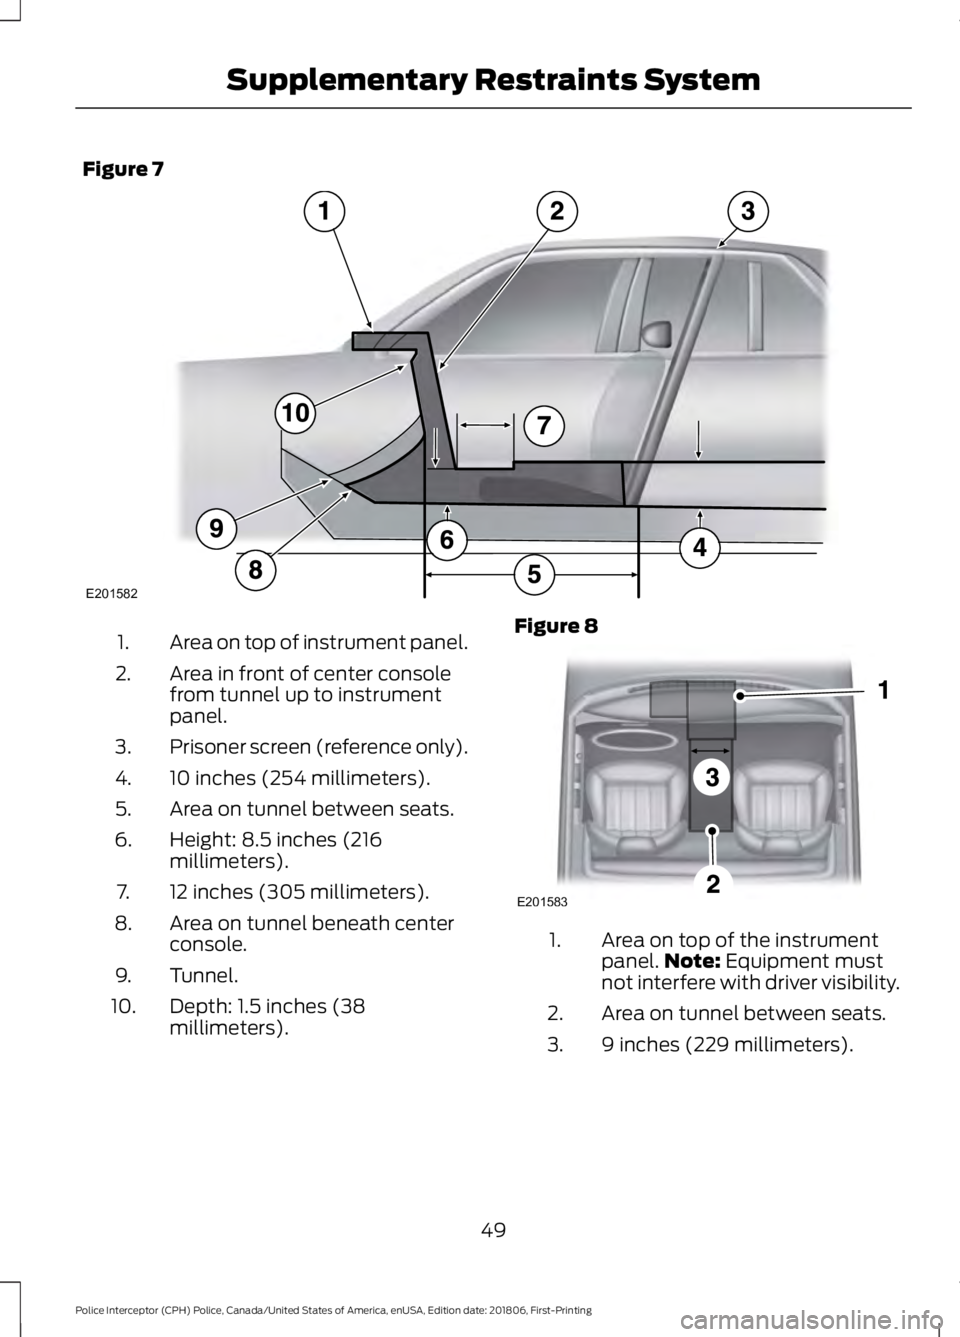
Figure 7
Area on top of instrument panel.
1.
Area in front of center console
from tunnel up to instrument
panel.
2.
Prisoner screen (reference only).
3.
10 inches (254 millimeters).
4.
Area on tunnel between seats.
5.
Height: 8.5 inches (216
millimeters).
6.
12 inches (305 millimeters).
7.
Area on tunnel beneath center
console.
8.
Tunnel.
9.
Depth: 1.5 inches (38
millimeters).
10. Figure 8
Area on top of the instrument
panel.
Note: Equipment must
not interfere with driver visibility.
1.
Area on tunnel between seats.
2.
9 inches (229 millimeters).
3.
49
Police Interceptor (CPH) Police, Canada/United States of America, enUSA, Edition date: 201806, First-Printing Supplementary Restraints SystemE201582 E201583
Page 85 of 370

Seats
Action
Message
Objects are by the passenger seat. After you move the objectsaway from the seat, if the warning stays on or continues to
come on, contact an authorized dealer as soon as possible.
Occupant Sensor
BLOCKED Remove
Objects Near Passenger Seat
Tire Pressure Monitoring System Action
Message
One or more tires on your vehicle have low tire pressure. SeeTire Pressure Monitoring System (page 218).
Tire Pressure Low
The tire pressure monitoring system is malfunctioning. If thewarning stays on or continues to come on, contact an
authorized dealer.
See Tire Pressure Monitoring System (page 218).
Tire Pressure Monitor
Fault
A tire pressure sensor is malfunctioning, or your spare tire is
in use. If the warning stays on or continues to come on, contact
an authorized dealer as soon as possible. See Tire Pressure Monitoring System
(page 218).
Tire Pressure Sensor
Fault
Traction Control Action
Message
Displays the status of the traction control system. See UsingTraction Control
(page 123).
Traction Control Off
82
Police Interceptor (CPH) Police, Canada/United States of America, enUSA, Edition date: 201806, First-Printing Information Displays
Page 87 of 370

Air directed to the instrument panel and
footwell air vents turns off. You can also
use this setting to defog and clear the
windshield of a thin covering of ice.
Switching Maximum Air
Conditioning On and Off
Press and release the button for
maximum cooling.
The left-hand and right-hand settings set
to LO, recirculated air flows through the
instrument panel air vents, air conditioning
turns on and the blower motor adjusts to
the highest speed.
Switching Recirculated Air On and
Off Press and release the button to
switch between outside air and
recirculated air.
The air currently in the passenger
compartment recirculates. This may
reduce the time needed to cool the interior
(when used with A/C) and reduce
unwanted odors from entering your vehicle.
Note: Recirculated air may turn off (or
prevent you from switching on) in all air flow
modes except MAX A/C to reduce the risk
of fogging. Recirculation may also turn on
and off in various air distribution control
combinations during hot weather in order
to improve cooling efficiency.
HINTS ON CONTROLLING THE
INTERIOR CLIMATE
General Hints
Note: Prolonged use of recirculated air may
cause the windows to fog up.
Note: You may feel a small amount of air
from the footwell air vents regardless of the
air distribution setting. Note:
To reduce humidity build-up inside
your vehicle, do not drive with the system
switched off or with recirculated air always
switched on.
Note: Do not place objects under the front
seats as this may interfere with the airflow
to the rear seats.
Note: Remove any snow, ice or leaves from
the air intake area at the base of the
windshield.
Note: To improve the time to reach a
comfortable temperature in hot weather,
drive with the windows open until you feel
cold air through the air vents.
Quickly Heating the Interior
1. Adjust the blower motor speed to the highest speed setting.
2. Adjust the temperature control to the highest setting.
3. Direct air to the footwell air vents.
Recommended Settings for
Heating
1. Adjust the blower motor speed to the center setting.
2. Adjust the temperature control to the midway point of the hot settings.
3. Direct air to the footwell air vents.
Quickly Cooling the Interior
1. Select MAX A/C.
2. Drive with the windows open for a short
period of time.
Recommended Settings for
Cooling
1. Adjust the blower motor speed to the center setting.
2. Adjust the temperature control to the midway point of the cold settings.
84
Police Interceptor (CPH) Police, Canada/United States of America, enUSA, Edition date: 201806, First-Printing Climate Control
Page 89 of 370
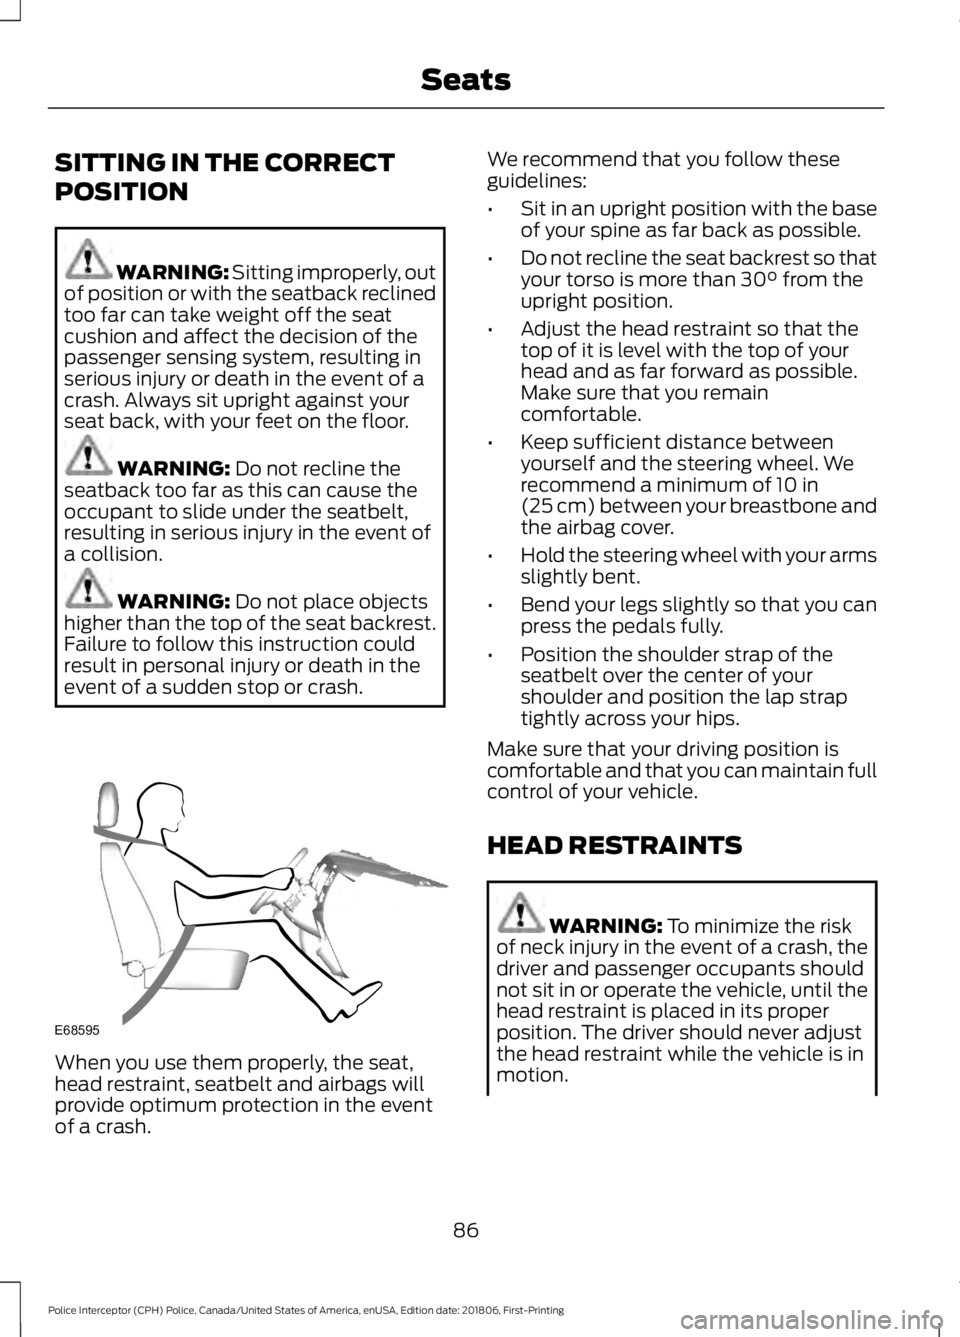
SITTING IN THE CORRECT
POSITION
WARNING: Sitting improperly, out
of position or with the seatback reclined
too far can take weight off the seat
cushion and affect the decision of the
passenger sensing system, resulting in
serious injury or death in the event of a
crash. Always sit upright against your
seat back, with your feet on the floor. WARNING:
Do not recline the
seatback too far as this can cause the
occupant to slide under the seatbelt,
resulting in serious injury in the event of
a collision. WARNING:
Do not place objects
higher than the top of the seat backrest.
Failure to follow this instruction could
result in personal injury or death in the
event of a sudden stop or crash. When you use them properly, the seat,
head restraint, seatbelt and airbags will
provide optimum protection in the event
of a crash. We recommend that you follow these
guidelines:
•
Sit in an upright position with the base
of your spine as far back as possible.
• Do not recline the seat backrest so that
your torso is more than
30° from the
upright position.
• Adjust the head restraint so that the
top of it is level with the top of your
head and as far forward as possible.
Make sure that you remain
comfortable.
• Keep sufficient distance between
yourself and the steering wheel. We
recommend a minimum of
10 in
(25 cm) between your breastbone and
the airbag cover.
• Hold the steering wheel with your arms
slightly bent.
• Bend your legs slightly so that you can
press the pedals fully.
• Position the shoulder strap of the
seatbelt over the center of your
shoulder and position the lap strap
tightly across your hips.
Make sure that your driving position is
comfortable and that you can maintain full
control of your vehicle.
HEAD RESTRAINTS WARNING:
To minimize the risk
of neck injury in the event of a crash, the
driver and passenger occupants should
not sit in or operate the vehicle, until the
head restraint is placed in its proper
position. The driver should never adjust
the head restraint while the vehicle is in
motion.
86
Police Interceptor (CPH) Police, Canada/United States of America, enUSA, Edition date: 201806, First-Printing SeatsE68595
Page 90 of 370
WARNING: The adjustable head
restraint is a safety device. Whenever
possible it should be installed and
properly adjusted when the seat is
occupied. An improperly adjusted head
restraint may provide reduced protection
to an occupant during certain rear
impacts. WARNING:
Install the head
restraint properly to help minimize the
risk of neck injury in the event of a crash.
Note: Adjust the seatback to an upright
driving position before adjusting the head
restraint. Adjust the head restraint so that
the top of it is level with the top of your head
and as far forward as possible. Make sure
that you remain comfortable. If you are
extremely tall, adjust the head restraint to
its highest position.
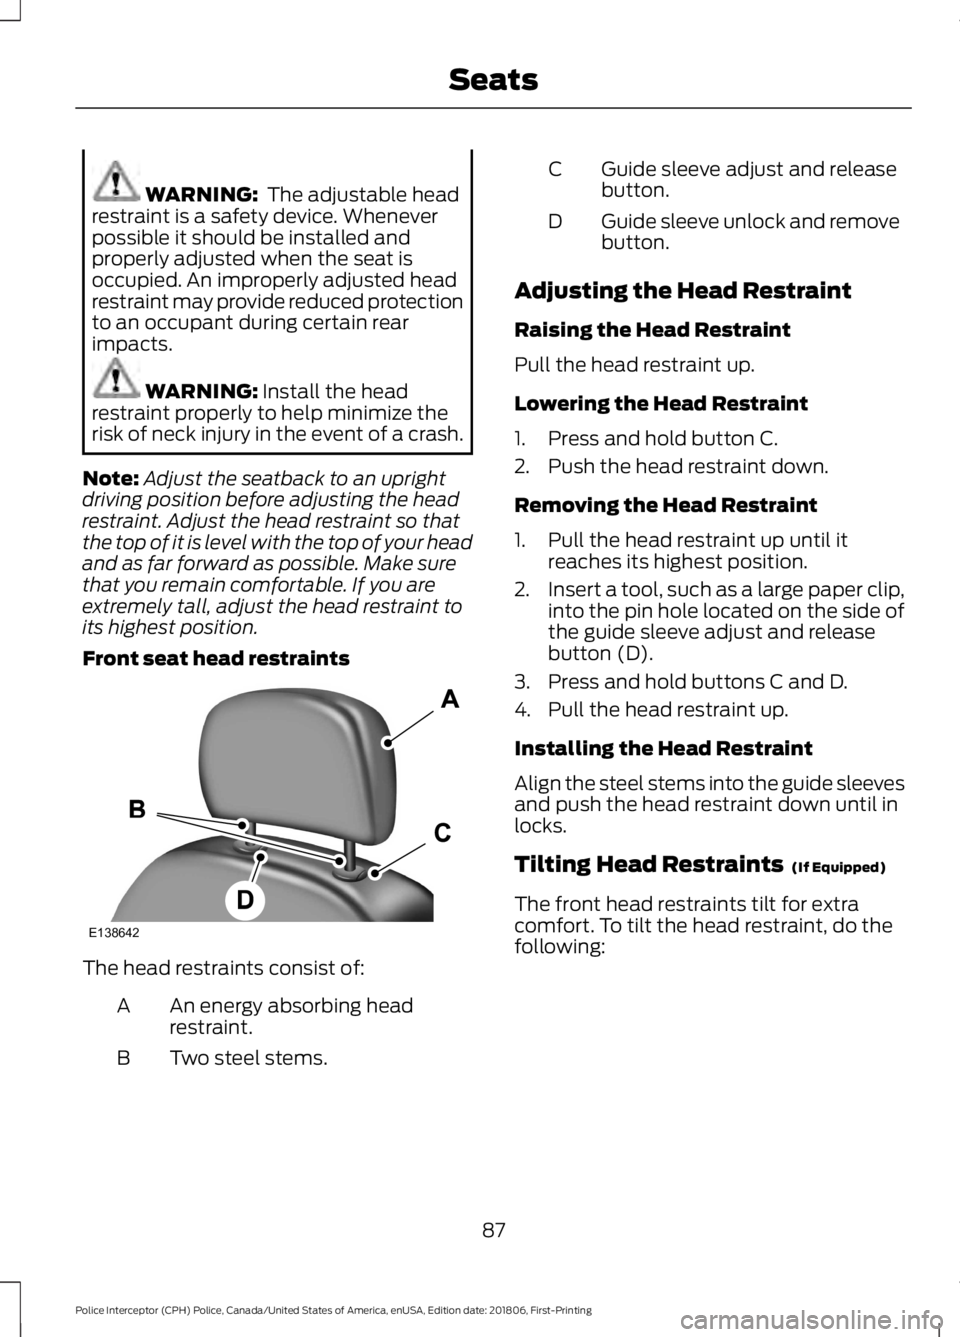
Front seat head restraints The head restraints consist of:
An energy absorbing head
restraint.
A
Two steel stems.
B Guide sleeve adjust and release
button.
C
Guide sleeve unlock and remove
button.
D
Adjusting the Head Restraint
Raising the Head Restraint
Pull the head restraint up.
Lowering the Head Restraint
1. Press and hold button C.
2. Push the head restraint down.
Removing the Head Restraint
1. Pull the head restraint up until it reaches its highest position.
2. Insert a tool, such as a large paper clip,
into the pin hole located on the side of
the guide sleeve adjust and release
button (D).
3. Press and hold buttons C and D.
4. Pull the head restraint up.
Installing the Head Restraint
Align the steel stems into the guide sleeves
and push the head restraint down until in
locks.
Tilting Head Restraints
(If Equipped)
The front head restraints tilt for extra
comfort. To tilt the head restraint, do the
following:
87
Police Interceptor (CPH) Police, Canada/United States of America, enUSA, Edition date: 201806, First-Printing SeatsE138642
Page 91 of 370
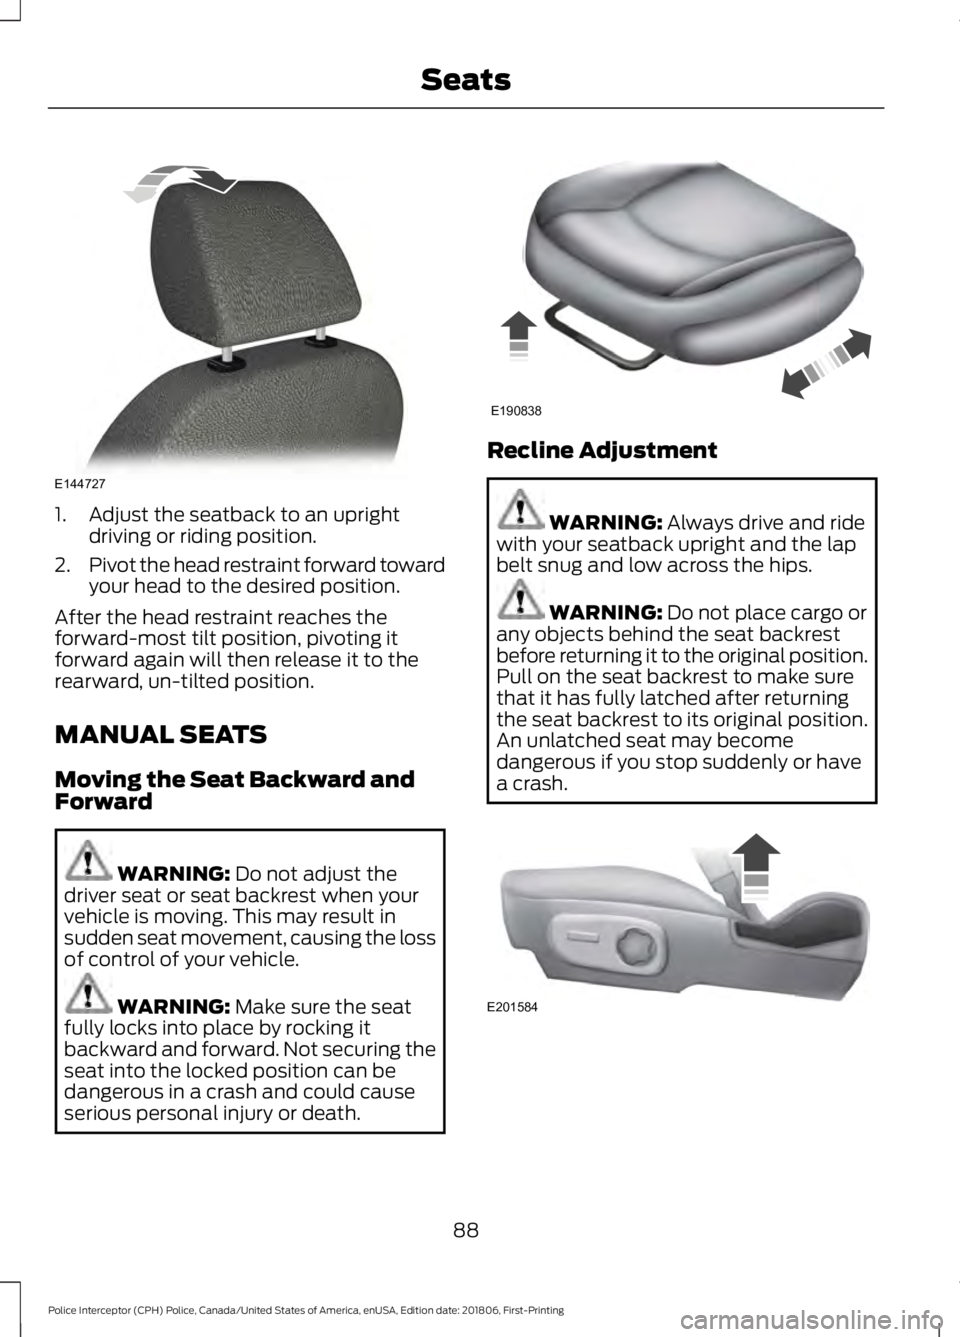
1. Adjust the seatback to an upright
driving or riding position.
2. Pivot the head restraint forward toward
your head to the desired position.
After the head restraint reaches the
forward-most tilt position, pivoting it
forward again will then release it to the
rearward, un-tilted position.
MANUAL SEATS
Moving the Seat Backward and
Forward WARNING: Do not adjust the
driver seat or seat backrest when your
vehicle is moving. This may result in
sudden seat movement, causing the loss
of control of your vehicle. WARNING:
Make sure the seat
fully locks into place by rocking it
backward and forward. Not securing the
seat into the locked position can be
dangerous in a crash and could cause
serious personal injury or death. Recline Adjustment
WARNING:
Always drive and ride
with your seatback upright and the lap
belt snug and low across the hips. WARNING:
Do not place cargo or
any objects behind the seat backrest
before returning it to the original position.
Pull on the seat backrest to make sure
that it has fully latched after returning
the seat backrest to its original position.
An unlatched seat may become
dangerous if you stop suddenly or have
a crash. 88
Police Interceptor (CPH) Police, Canada/United States of America, enUSA, Edition date: 201806, First-Printing SeatsE144727 E190838 E201584