2019 FORD POLICE INTERCEPTOR fuses
[x] Cancel search: fusesPage 6 of 370

Hill Start Assist
..............................................121
Traction Control
Principle of Operation ................................
123
Using Traction Control ...............................
123
Stability Control
Principle of Operation ................................
124
Using Stability Control ...............................
125
Parking Aids
Principle of Operation ................................
126
Rear Parking Aid ...........................................
126
Rear View Camera .......................................
127
Cruise Control
Principle of Operation ................................
130
Using Cruise Control ...................................
130
Driving Aids
Blind Spot Information System ..............
132
Cross Traffic Alert ........................................
134
Steering ............................................................
137
Load Carrying
Rear Loadspace Hatches .........................
138
Rear Under Floor Storage .........................
138
Load Limit ......................................................
138
Towing
Towing a Trailer ............................................
144
Recommended Towing Weights ...........
145
Essential Towing Checks ..........................
146
Towing the Vehicle on Four Wheels ......
148
Driving Hints
Breaking-In ....................................................
149
Economical Driving .....................................
149
Driving Through Water ..............................
150Floor Mats
......................................................
150
Roadside Emergencies
Roadside Assistance ..................................
152
Hazard Flashers ............................................
153
Fuel Shutoff ...................................................
153
Jump Starting the Vehicle ........................
154
Transporting the Vehicle ...........................
156
Customer Assistance
Getting the Services You Need ...............
157
In California (U.S. Only) ............................
158
The Better Business Bureau (BBB) Auto Line Program (U.S. Only) .....................
159
Utilizing the Mediation/Arbitration Program (Canada Only) ......................
160
Getting Assistance Outside the U.S. and Canada .......................................................
160
Ordering Additional Owner's Literature ........................................................................\
.
162
Reporting Safety Defects (U.S. Only) ........................................................................\
.
162
Reporting Safety Defects (Canada Only) ........................................................................\
.
162
Fuses
Fuse Specification Chart ..........................
164
Changing a Fuse ...........................................
173
Maintenance
General Information ....................................
175
Opening and Closing the Hood ..............
175
Under Hood Overview - 3.5L Duratec/ 3.7L ................................................................
176
Under Hood Overview - 3.5L Ecoboost™ ........................................................................\
.
178
Engine Oil Dipstick - 3.5L Duratec/3.5L Ecoboost™/3.7L ......................................
179
Engine Oil Check ..........................................
179
Oil Change Indicator Reset ......................
180
Engine Coolant Check ................................
181
3
Police Interceptor (CPH) Police, Canada/United States of America, enUSA, Edition date: 201806, First-Printing Table of Contents
Page 46 of 370

•
Wait at least two minutes and verify
that the airbag readiness light is no
longer illuminated.
• If the airbag readiness light remains
illuminated, this may or may not be a
problem due to the front passenger
sensing system.
Do not attempt to repair or service the
system. Take your vehicle immediately to
an authorized dealer.
If it is necessary to modify an advanced
front airbag system to accommodate a
person with disabilities, contact the Ford
Customer Relationship Center. See
Getting the Services You Need (page
157).
SIDE AIRBAGS WARNING:
Do not place objects
or mount equipment on or near the
airbag cover, on the side of the seatbacks
(of the front seats), or in front seat areas
that may come into contact with a
deploying airbag. Failure to follow these
instructions may increase the risk of
personal injury in the event of a crash. WARNING:
Do not use accessory
seat covers. The use of accessory seat
covers may prevent the deployment of
the side airbags and increase the risk of
injury in an accident. WARNING:
Do not lean your head
on the door. The side airbag could injure
you as it deploys from the side of the
seatback. WARNING:
Do not attempt to
service, repair, or modify the airbag, its
fuses or the seat cover on a seat
containing an airbag as you could be
seriously injured or killed. Contact your
authorized dealer as soon as possible. WARNING:
If the side airbag has
deployed, the airbag will not function
again. The side airbag system (including
the seat) must be inspected and serviced
by an authorized dealer. If the airbag is
not replaced, the unrepaired area will
increase the risk of injury in a crash.
The side airbags are located on the
outboard side of the seatbacks of the front
seats. In certain sideways crashes, the
airbag on the side affected by the crash
will be inflated. The airbag was designed
to inflate between the door panel and
occupant to further enhance the protection
provided occupants in side impact crashes. The system consists of the following:
•
A label or embossed side panel
indicating that side airbags are fitted
to your vehicle.
• Side airbags located inside the driver
and front passenger seatbacks.
• Front passenger sensing system.
43
Police Interceptor (CPH) Police, Canada/United States of America, enUSA, Edition date: 201806, First-Printing Supplementary Restraints SystemE152533
Page 147 of 370

TOWING A TRAILER
WARNING: Towing trailers
beyond the maximum
recommended gross trailer
weight exceeds the limit of your
vehicle and could result in engine
damage, transmission damage,
structural damage, loss of
vehicle control, vehicle rollover
and personal injury. WARNING:
Do not exceed
the GVWR or the GAWR
specified on the certification
label.
Note: See
Recommended
Towing Weights (page 145).
Your vehicle may have electrical
items, such as fuses or relays,
related to towing. See
Fuses
(page 164).
Your vehicle's load capacity
designation is by weight, not by
volume, so you cannot necessarily
use all available space when
loading a vehicle or trailer.
Towing a trailer places an extra
load on your vehicle's engine,
transmission, axle, brakes, tires
and suspension. Inspect these
components periodically during,
and after, any towing operation. Load Placement
To help minimize how trailer
movement affects your vehicle
when driving:
•
Load the heaviest items closest
to the trailer floor.
• Load the heaviest items
centered between the left and
right side trailer tires.
• Load the heaviest items above
the trailer axles or just slightly
forward toward the trailer
tongue. Do not allow the final
trailer tongue weight to go
above or below 10-15% of the
loaded trailer weight.
• Select a ball mount with the
correct rise or drop and load
capacity. When both the
loaded vehicle and trailer are
connected, the trailer frame
should be level, or slightly
angled down toward your
vehicle, when viewed from the
side.
When driving with a trailer or
payload, a slight takeoff vibration
or shudder may be present due to
the increased payload weight.
Additional information regarding
proper trailer loading and setting
your vehicle up for towing is
located in another chapter of this
manual. See
Load Limit (page
138).
You can also find information in
the
RV & Trailer Towing Guide
available at your authorized
dealer, or online.
144
Police Interceptor (CPH) Police, Canada/United States of America, enUSA, Edition date: 201806, First-Printing Towing
Page 157 of 370

4. You can attempt to start the vehicle
by pressing the brake pedal and
START/STOP, or press START/STOP
without pressing the brake pedal.
5. If the vehicle does not start, repeat steps 1 through 4.
JUMP STARTING THE VEHICLE WARNING:
Batteries normally
produce explosive gases which can
cause personal injury. Therefore, do not
allow flames, sparks or lighted
substances to come near the battery.
When working near the battery, always
shield your face and protect your eyes.
Always provide correct ventilation. WARNING:
Keep batteries out of
reach of children. Batteries contain
sulfuric acid. Avoid contact with skin,
eyes or clothing. Shield your eyes when
working near the battery to protect
against possible splashing of acid
solution. In case of acid contact with skin
or eyes, flush immediately with water for
a minimum of 15 minutes and get prompt
medical attention. If acid is swallowed,
call a physician immediately. WARNING:
Use only adequately
sized cables with insulated clamps.
Preparing Your Vehicle
Do not attempt to push-start your
automatic transmission vehicle.
Note: Attempting to push-start a vehicle
with an automatic transmission may cause
transmission damage.
Note: Use only a 12-volt supply to start your
vehicle. Note:
Do not disconnect the battery of the
disabled vehicle as this could damage the
vehicle electrical system.
Park the booster vehicle close to the hood
of the disabled vehicle, making sure the
two vehicles do not touch.
Connecting the Jumper Cables WARNING:
Do not attach the
cables to fuel lines, engine rocker covers,
the intake manifold or electrical
components as grounding points. Stay
clear of moving parts. To avoid reverse
polarity connections, make sure that you
correctly identify the positive (+) and
negative (-) terminals on both the
disabled and booster vehicles before
connecting the cables. WARNING:
Do not attach the end
of the positive cable to the studs or
L-shaped eyelet located above the
positive (+) terminal of your vehicle ’s
battery. High current may flow through
and cause damage to the fuses. WARNING:
Do not connect the
end of the second cable to the negative
(-) terminal of the battery to be jumped.
A spark may cause an explosion of the
gases that surround the battery.
Note: In the illustration, the bottom vehicle
represents the booster vehicle.
154
Police Interceptor (CPH) Police, Canada/United States of America, enUSA, Edition date: 201806, First-Printing Roadside Emergencies
Page 167 of 370

FUSE SPECIFICATION CHART
Power Distribution Box
WARNING: Always disconnect the
battery before servicing high current
fuses. WARNING: To reduce risk of
electrical shock, always replace the
cover to the power distribution box
before reconnecting the battery or
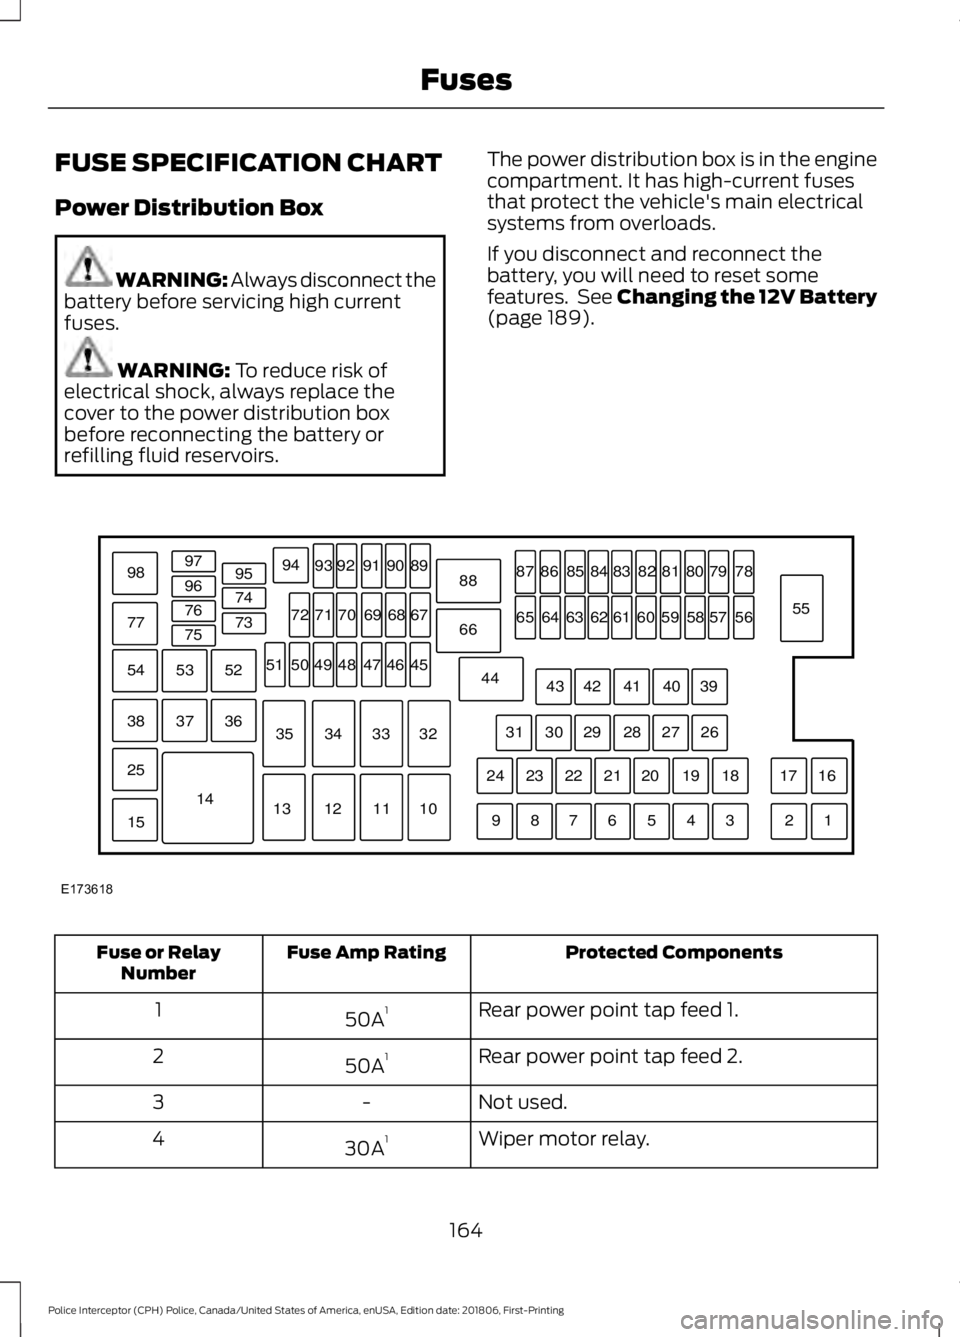
refilling fluid reservoirs. The power distribution box is in the engine
compartment. It has high-current fuses
that protect the vehicle's main electrical
systems from overloads.
If you disconnect and reconnect the
battery, you will need to reset some
features. See Changing the 12V Battery
(page
189). Protected Components
Fuse Amp Rating
Fuse or Relay
Number
Rear power point tap feed 1.
50A 1
1
Rear power point tap feed 2.
50A 1
2
Not used.
-
3
Wiper motor relay.
30A 1
4
164
Police Interceptor (CPH) Police, Canada/United States of America, enUSA, Edition date: 201806, First-Printing FusesE173618
97
98
77 96
95
94
9392 919089
88
66
44 78
56
39 26 18 16
17
3 1
2
4
5
6
7
8
9 19
20
21
22
23
24 27
28
29
30
31 40
41
42
43 55
57
58
59
60
61
62
63
64
65 79
80
81
82
83
84
85
86
87
67
45
32
10
11
12
13 33
34
35 46
47
48
49
50
51 68
69
70
71
72
74
73
76
75
53
37 36
54
38
25
15
1452
Page 168 of 370

Protected Components
Fuse Amp Rating
Fuse or Relay
Number
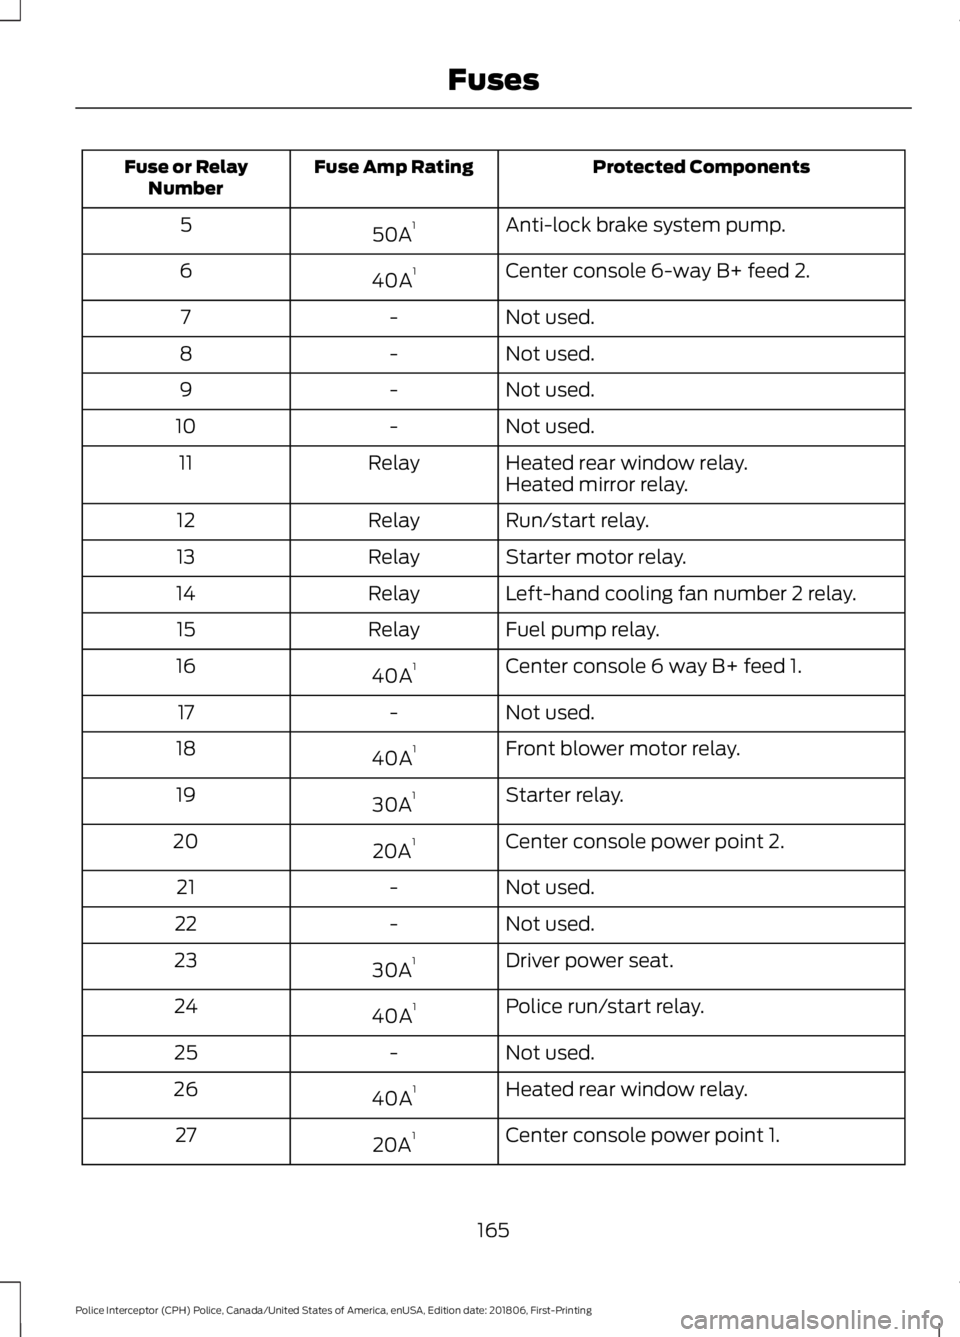
Anti-lock brake system pump.
50A 1
5
Center console 6-way B+ feed 2.
40A 1
6
Not used.
-
7
Not used.
-
8
Not used.
-
9
Not used.
-
10
Heated rear window relay.
Relay
11
Heated mirror relay.
Run/start relay.
Relay
12
Starter motor relay.
Relay
13
Left-hand cooling fan number 2 relay.
Relay
14
Fuel pump relay.
Relay
15
Center console 6 way B+ feed 1.
40A 1
16
Not used.
-
17
Front blower motor relay.
40A 1
18
Starter relay.
30A 1
19
Center console power point 2.
20A 1
20
Not used.
-
21
Not used.
-
22
Driver power seat.
30A 1
23
Police run/start relay.
40A 1
24
Not used.
-
25
Heated rear window relay.
40A 1
26
Center console power point 1.
20A 1
27
165
Police Interceptor (CPH) Police, Canada/United States of America, enUSA, Edition date: 201806, First-Printing Fuses
Page 169 of 370

Protected Components
Fuse Amp Rating
Fuse or Relay
Number
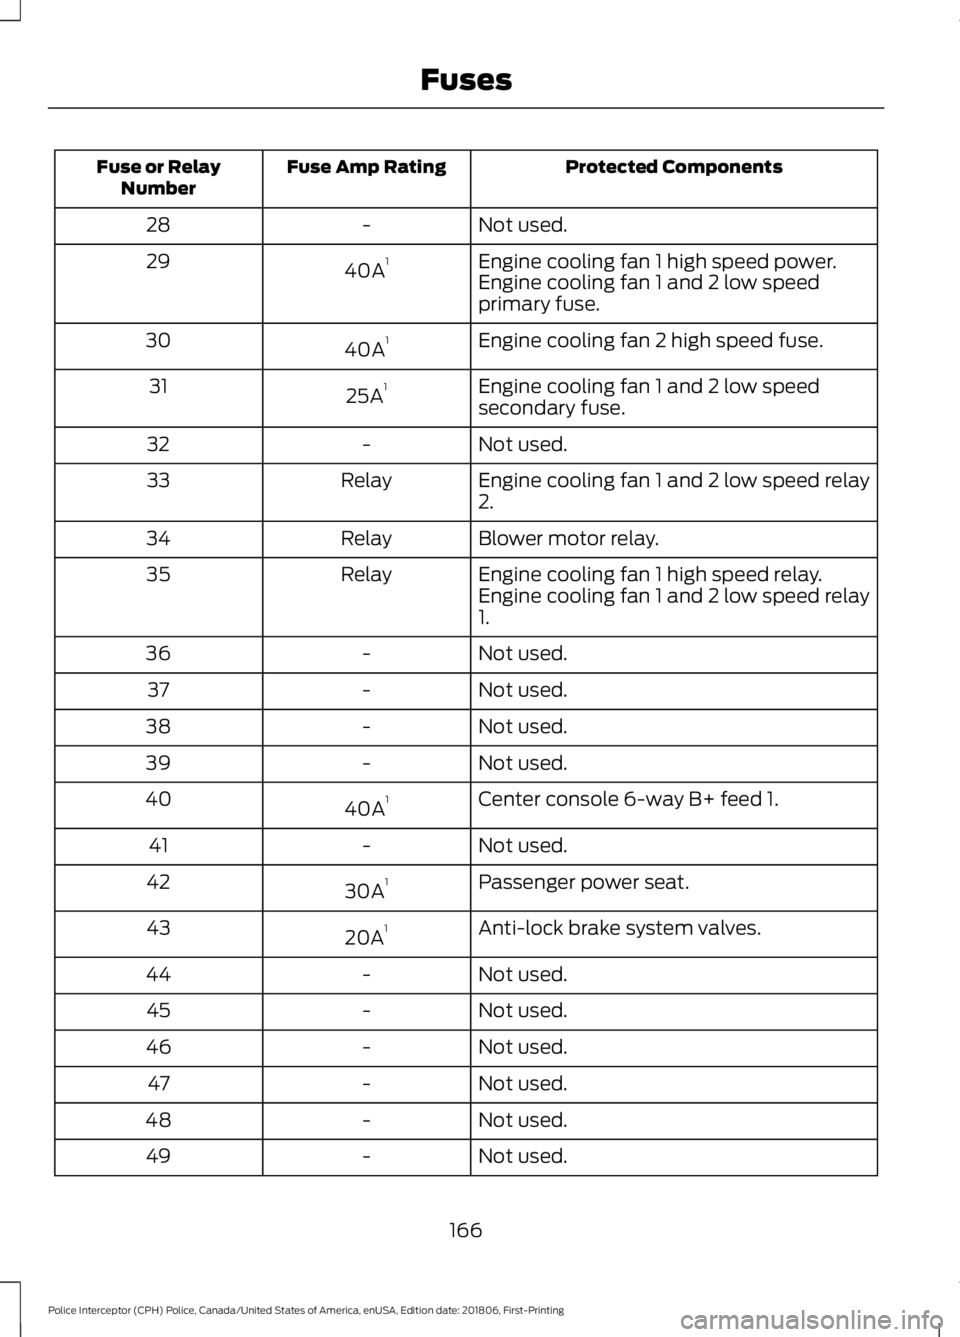
Not used.
-
28
Engine cooling fan 1 high speed power.
40A 1
29
Engine cooling fan 1 and 2 low speed
primary fuse.
Engine cooling fan 2 high speed fuse.
40A 1
30
Engine cooling fan 1 and 2 low speed
secondary fuse.
25A 1
31
Not used.
-
32
Engine cooling fan 1 and 2 low speed relay
2.
Relay
33
Blower motor relay.
Relay
34
Engine cooling fan 1 high speed relay.
Relay
35
Engine cooling fan 1 and 2 low speed relay
1.
Not used.
-
36
Not used.
-
37
Not used.
-
38
Not used.
-
39
Center console 6-way B+ feed 1.
40A 1
40
Not used.
-
41
Passenger power seat.
30A 1
42
Anti-lock brake system valves.
20A 1
43
Not used.
-
44
Not used.
-
45
Not used.
-
46
Not used.
-
47
Not used.
-
48
Not used.
-
49
166
Police Interceptor (CPH) Police, Canada/United States of America, enUSA, Edition date: 201806, First-Printing Fuses
Page 170 of 370

Protected Components
Fuse Amp Rating
Fuse or Relay
Number
Heated mirrors.
15A 2
50
Not used.
-
51
Not used.
-
52
Not used.
-
53
Not used.
-
54
Wiper relay.
Relay
55
Not used.
-
56
Not used.
-
57
Alternator A-line.
10A 2
58
Brake on/off switch.
10A 2
59
Not used.
-
60
Not used.
-
61
A/C clutch relay.
10A 2
62
Not used.
-
63
Not used.
-
64
Fuel pump relay.
30A 2
65
Powertrain control module relay.
Relay
66
Oxygen sensor heater.
20A 2
67
Mass airflow sensor.
Variable camshaft timing solenoid valve.
Canister vent solenoid.
Canister purge solenoid.
Ignition coils.
20A 2
68
Vehicle power 1 (powertrain control
module).
20A 2
69
A/C clutch.
15A 2
70
Fan control relay coils 1-3).
167
Police Interceptor (CPH) Police, Canada/United States of America, enUSA, Edition date: 201806, First-Printing Fuses