2019 FORD MUSTANG automatic transmission
[x] Cancel search: automatic transmissionPage 190 of 495

Note:
Proper system operation requires a
clear view of the road by the camera. Have
any windshield damage in the area of the
camera's field of view repaired.
Note: If something hits the front end of your
vehicle or damage occurs, the radar sensing
zone may change. This could cause missed
or false vehicle detections. Contact an
authorized dealer to have the radar checked
for proper coverage and operation.
Note: If your vehicle detects excessive heat
at the camera or a potential misalignment
condition, a message may display in the
information display indicating temporary
sensor unavailability. When operational
conditions are correct, the message
deactivates. For example, when the ambient
temperature around the sensor decreases
or the sensor automatically recalibrates
successfully.
DRIVE CONTROL (IF EQUIPPED)
Selectable Drive Modes
(If Equipped)
Selectable drive modes deliver a
customized driving experience using a
variety of electronic vehicle systems. The
systems optimize vehicle dynamics and
powertrain response based on your
selected mode. Systems associated with
selectable drive modes are:
• Electronically power assisted steering.
See
Steering (page 183).
• Electronic stability control and traction
control maintain your vehicle control
in adverse conditions or high
performance driving.
See Stability
Control (page 158).
• Electronic throttle control enhances
the powertrain response to your driving
input. •
Adaptive dampers (if equipped).
• Active exhaust adjusts the sound
characteristics of your vehicle (if
equipped).
Using Selectable Drive Modes
Note: Your vehicle may have some of the
drive modes that follow. To change the drive mode setting, press
the mode button on the instrument panel
under the display. The first press
illuminates the selected mode, subsequent
presses change the selected mode.
Note:
Mode changes are not available when
the ignition is off or when the transmission
is in reverse (R). Some modes may be
unavailable when the transmission is in drive
(D) or sport (S).
187
Mustang (CZG) Canada/United States of America, Vehicles Built From: 14-05-2018, enUSA, Edition date: 201804, Second-Printing Driving AidsE294773
Page 191 of 495
Modes:
•
Normal – Best suited for everyday
driving. If your vehicle has adaptive
dampers, the suspension delivers a
balanced combination of comfort and
handling. Selectable steering defaults
to
Normal but can be changed using
the steering button.
• Sport
– Engages when you shift your
automatic transmission into sport (S).
Sport mode increases throttle
response and helps your vehicle
accelerate faster, but does not change
the vehicle dynamics or stability
system.
• Sport +
– Best suited for spirited
driving. This mode increases throttle
response, and if your vehicle has active
exhaust, it takes on a more powerful
tone. If your vehicle has adaptive
dampers, the suspension becomes
stiffer, body motion reduces and the
steering becomes more precise.
Selectable steering defaults to
Sport.
Depending on vehicle configuration,
you may be able to change the
selectable steering setting by pressing
the steering button.
• Track – Provides a performance driving
experience. Throttle response
increases, and if your vehicle has active
exhaust, it takes on a more powerful
tone. A performance oriented traction
control mode is automatically utilized.
In this mode, traction control
intervention is reduced and tuned
specifically for track usage only. This
mode is not intended for public roads.
See
Using Stability Control (page
159). If your vehicle is equipped with
adaptive dampers, the suspension is
optimized for transient handling
maneuvers. This mode offers
maximum control and confidence in handling on road courses or auto-cross
style events. Selectable steering
defaults to
Sport. Depending on
vehicle configuration, you could change
the selectable steering setting by
pressing the steering button.
• Drag Strip
- Provides a performance
driving experience tailored to driving
on a drag strip. The engine responds
directly to your inputs, and if your
vehicle has active exhaust, it takes on
a more powerful tone. This mode is not
intended for public roads. If your
vehicle has adaptive dampers, the
setting is optimized for straight line
maximum acceleration. Selectable
steering defaults to
Sport. Depending
on vehicle configuration, you could
change the selectable steering setting
by pressing the steering button.
• Snow / Wet
- Provides a confident
handling driving experience during poor
weather. If your vehicle has adaptive
dampers, the suspension delivers a
balanced combination of comfort and
handling. Selectable steering defaults
to
Normal. Depending on vehicle
configuration, you could change the
selectable steering setting by pressing
the steering button.
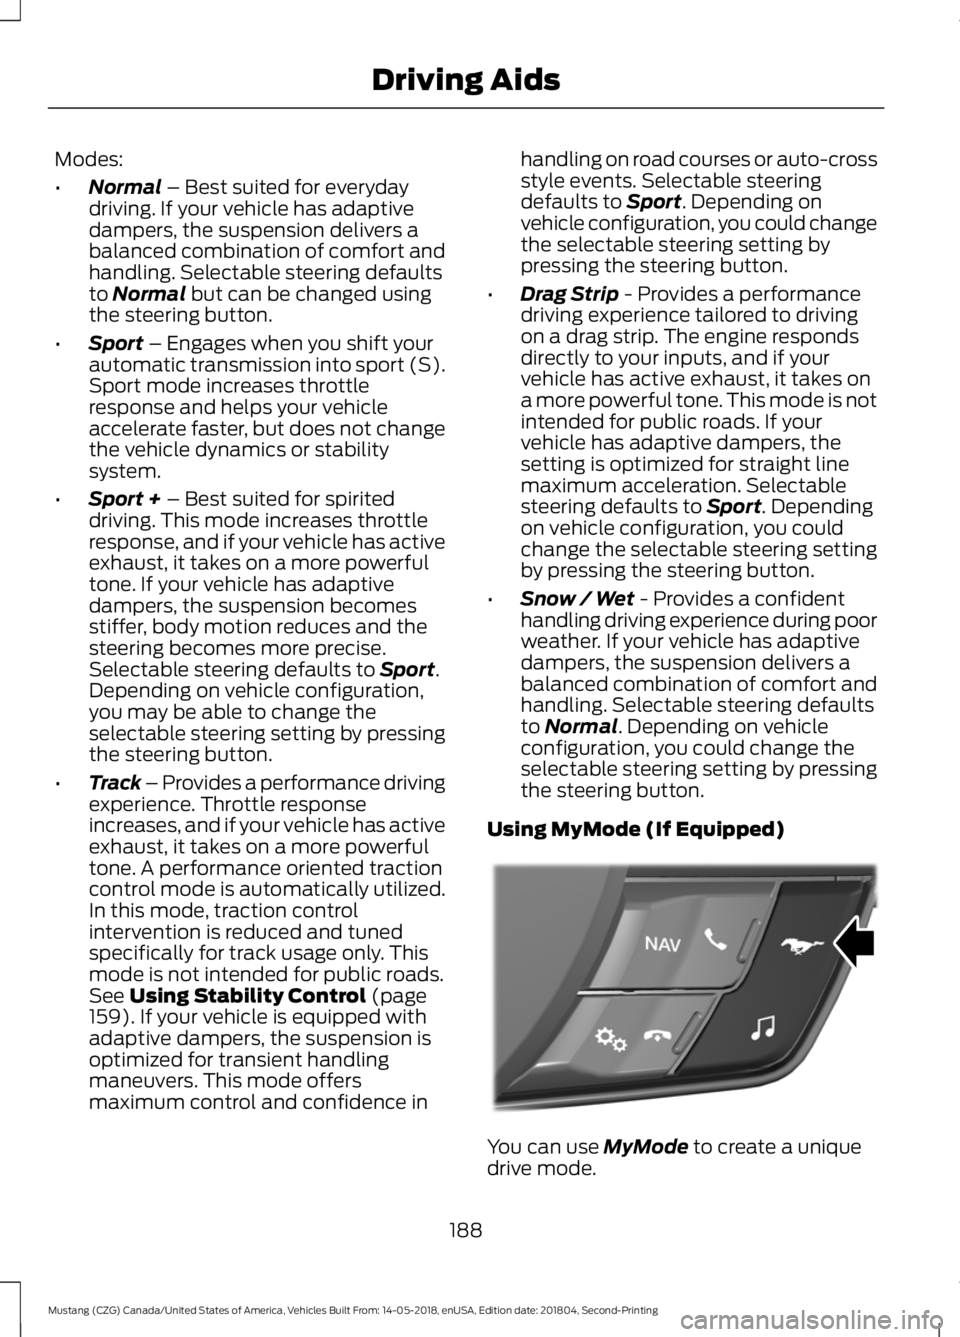
Using MyMode (If Equipped) You can use
MyMode to create a unique
drive mode.
188
Mustang (CZG) Canada/United States of America, Vehicles Built From: 14-05-2018, enUSA, Edition date: 201804, Second-Printing Driving AidsE294774
Page 202 of 495

When Towing a Trailer
•
Do not drive faster than 70 mph
(113 km/h) during the first 500 mi
(800 km).
• Do not make full-throttle starts.
• Check your hitch, electrical connections
and trailer wheel lug nuts thoroughly
after you have traveled 50 mi (80 km).
• When stopped in congested or heavy
traffic during hot weather, place the
transmission in park (P) or neutral (N)
to aid engine and transmission cooling
and to help air conditioning
performance.
• Switch off the speed control with
heavy loads or in hilly terrain. The
speed control may turn off
automatically when you are towing on
long, steep grades.
• Shift to a lower gear when driving down
a long or steep hill. Do not apply the
brakes continuously, as they may
overheat and become less effective.
• If your transmission is equipped with a
Grade Assist or Tow/Haul feature, use
this feature when towing. This provides
engine braking and helps eliminate
excessive transmission shifting for
optimum fuel economy and
transmission cooling.
• Allow more distance for stopping with
a trailer attached. Anticipate stops and
brake gradually.
• Avoid parking on a slope. However, if
you must park on a slope:
1. Turn the steering wheel to point your vehicle tires away from traffic flow.
2. Set your vehicle parking brake.
3. Place the automatic transmission in park (P) or manual transmission in a
low gear. 4. Place wheel chocks in front and back
of the trailer wheels. Chocks are not
included with your vehicle.
Launching or Retrieving a Boat or
Personal Watercraft (PWC)
Note: Disconnect the wiring to the trailer
before
backing the trailer into the water.
Note: Reconnect the wiring to the trailer
after
removing the trailer from the water.
When backing down a ramp during boat
launching or retrieval:
• Do not allow the static water level to
rise above the bottom edge of the rear
bumper.
• Do not allow waves to break higher
than
6 in (15 cm) above the bottom
edge of the rear bumper.
Exceeding these limits may allow water to
enter vehicle components:
• Causing internal damage to the
components.
• Affecting driveability, emissions, and
reliability.
Any time the rear axle submerges in water,
replace the rear axle lubricant. Water may
contaminate the rear axle lubricant, which
is not a normal maintenance inspection
item unless there is a possibility of a leak
or other axle repair is required.
TOWING THE VEHICLE ON
FOUR WHEELS
Emergency Towing WARNING:
If your vehicle has a
steering wheel lock make sure the
ignition is in the accessory or on position
when being towed.
199
Mustang (CZG) Canada/United States of America, Vehicles Built From: 14-05-2018, enUSA, Edition date: 201804, Second-Printing Towing
Page 212 of 495
JUMP STARTING THE VEHICLE
WARNING: Batteries normally
produce explosive gases which can
cause personal injury. Therefore, do not
allow flames, sparks or lighted
substances to come near the battery.
When working near the battery, always
shield your face and protect your eyes.
Always provide correct ventilation. WARNING:
Keep batteries out of
reach of children. Batteries contain
sulfuric acid. Avoid contact with skin,
eyes or clothing. Shield your eyes when
working near the battery to protect
against possible splashing of acid
solution. In case of acid contact with skin
or eyes, flush immediately with water for
a minimum of 15 minutes and get prompt
medical attention. If acid is swallowed,
call a physician immediately. WARNING:
Use only adequately
sized cables with insulated clamps.
Note: Do not attempt to push-start your
automatic transmission vehicle. Attempting
to push-start a vehicle with an automatic
transmission may cause transmission
damage.
Note: Do not disconnect the battery of the
disabled vehicle as this could damage the
vehicle electrical system.
Preparing Your Vehicle
Note: Use only a 12-volt supply to start your
vehicle.
Park the booster vehicle close to the hood
of the disabled vehicle, making sure the
two vehicles do not touch. Removing the Battery Shield
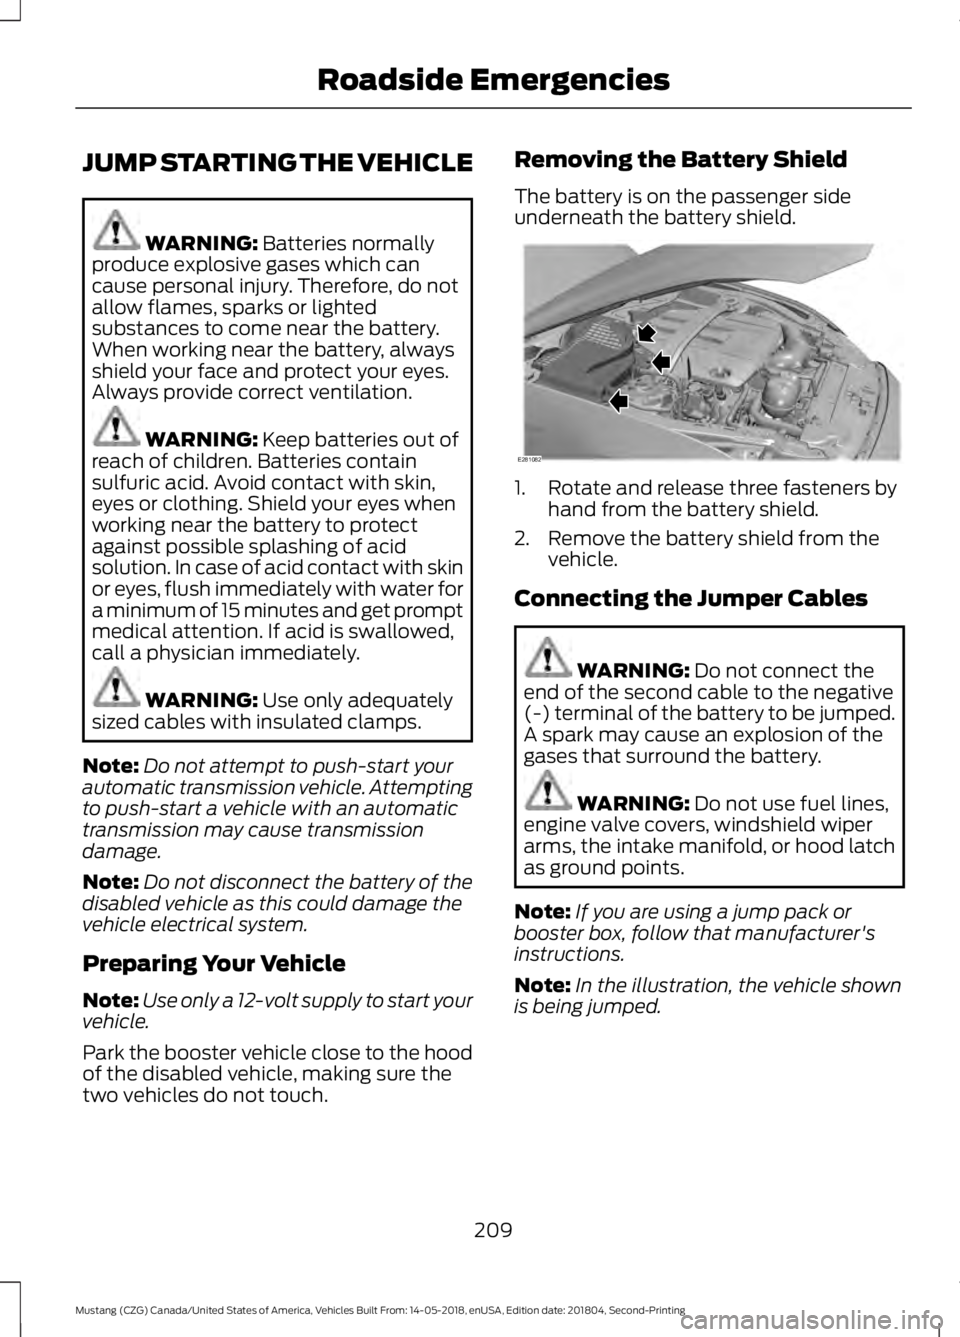
The battery is on the passenger side
underneath the battery shield.
1. Rotate and release three fasteners by
hand from the battery shield.
2. Remove the battery shield from the vehicle.
Connecting the Jumper Cables WARNING:
Do not connect the
end of the second cable to the negative
(-) terminal of the battery to be jumped.
A spark may cause an explosion of the
gases that surround the battery. WARNING:
Do not use fuel lines,
engine valve covers, windshield wiper
arms, the intake manifold, or hood latch
as ground points.
Note: If you are using a jump pack or
booster box, follow that manufacturer's
instructions.
Note: In the illustration, the vehicle shown
is being jumped.
209
Mustang (CZG) Canada/United States of America, Vehicles Built From: 14-05-2018, enUSA, Edition date: 201804, Second-Printing Roadside EmergenciesE281082
Page 244 of 495

1. Stop your vehicle as soon as it is safe
to do so. Fully apply the parking brake,
shift into park (P) or neutral (N).
2. Leave the engine running until the coolant temperature gauge needle
returns to the normal position. If the
temperature does not drop after
several minutes, follow the remaining
steps.
3. Switch the engine off and wait for it to
cool. Check the coolant level.
4. If the coolant level is at or below the minimum mark, add prediluted coolant
immediately.
5. If the coolant level is normal, restart the engine and continue.
MANUAL TRANSMISSION
FLUID CHECK
1. Clean the filler plug. The filler plug is on the right-hand side of the
transmission. 2. Remove the filler plug.
3. The correct fluid fill level is 0.0–0.1 in
(0– 3 mm) below the bottom edge of
the filler hole.
4. Add fluid through the filler hole.
5. Install the filler plug. 6. Tighten the filler plug until you feel a
strong resistance.
Only use fluid that meets Ford
specifications. See
Capacities and
Specifications (page 294).
AUTOMATIC TRANSMISSION
FLUID CHECK
If required, have an authorized dealer check
and change the transmission fluid at the
correct service interval. See
Scheduled
Maintenance (page 422).
The automatic transmission does not have
a transmission fluid dipstick.
Refer to your scheduled maintenance
information for scheduled intervals for fluid
checks and changes. Your transmission
does not consume fluid. However, if the
transmission slips, shifts slowly or if you
notice a sign of leaking fluid, contact an
authorized dealer.
Do not use supplemental transmission
fluid additives, treatments or cleaning
agents. The use of these materials may
affect transmission operation and result
in damage to internal transmission
components.
BRAKE FLUID CHECK WARNING:
Do not use any fluid
other than the recommended brake fluid
as this will reduce brake efficiency. Use
of incorrect fluid could result in the loss
of vehicle control, serious personal injury
or death.
241
Mustang (CZG) Canada/United States of America, Vehicles Built From: 14-05-2018, enUSA, Edition date: 201804, Second-Printing MaintenanceE174951
Page 254 of 495
Note:
The Track Exhaust Mode setting is
only for use at tracks and not for use on
public roadways. Use of this setting results
in increased exterior noise, which may not
meet state and local laws and regulations.
It is the obligation of the driver to operate
the vehicle in a manner that complies with
state and local requirements. Only use the
Track Exhaust Mode
setting at a
competition track or an off-road course
where elevated exterior vehicle noise is
acceptable.
Lap Timer
Gives you the ability to record lap times at
three separate tracks.
Launch Control (If Equipped)
Maximizes your vehicle's traction from a
standing start.
Use launch control, follow these steps:
1. Bring your vehicle to a complete stop.
2. Make sure launch control is enabled. The indicator illuminates in the
instrument display when launch control
is enabled.
See Warning Lamps and
Indicators (page 84).
3. Fully depress the clutch pedal.
4. Shift the transmission into 1st gear.
5. Fully depress the accelerator pedal and
allow the engine RPM to stabilize.
6. Release the clutch pedal.
Line Lock
Line lock is a feature intended for use at
tracks only and should not be used on
public roadways. Use of this feature may
result in significantly increased rear tire
wear. It is intended to condition the rear
tires to maximize traction prior to track use.
Line lock maintains brake force at the front
wheels, allowing the rear wheels to spin
with minimal vehicle movement. This feature is located in the
Track Apps
menu. Make selections through the 5-way
information display control and OK button
located on the steering wheel.
Using
Line Lock
There are three line lock stages:
• Initiated.
• Engaged.
• Off.
Initiating
Line Lock
The initiation stage verifies that the vehicle
is ready for line lock function, and confirms
driver intent. Follow the prompts in the
information display to initiate line lock.
The following conditions must be met to
initialize line lock:
• The vehicle is on a level surface.
• The engine is running.
• The vehicle is traveling less than
25 mph (40 km/h)
.
• Selectable drive mode is not in wet
mode (if equipped).
• There are no electronic stability control
faults.
If you want to cancel line lock once it is
initialized, press the left information
display control. Once initiated, line lock is
prepared for activation and remains
initiated up to 25 mph (40 km/h). If vehicle
speed exceeds 25 mph (40 km/h), line lock
automatically cancels.
251
Mustang (CZG) Canada/United States of America, Vehicles Built From: 14-05-2018, enUSA, Edition date: 201804, Second-Printing Track Use
Page 255 of 495
Engaging Line Lock
Follow the prompts in the information
display to engage line lock after it is
initialized. To engage, firmly apply the
brakes. Then press the OK button. Once
engaged, release the brake pedal. The
front brakes remain applied and the rear
brakes release. At this point, the
engagement timer is initiated and shown
on the driver information display.
The following conditions must be met to
engage line lock:
• The vehicle is on a level surface.
• The engine is running.
• The vehicle is stopped.
• The parking brake is not applied.
• The driver door is closed.
• The transmission is in a forward gear.
• Selectable drive mode is not in wet
mode (if equipped).
• There are no electronic stability control
faults.
• The steering wheel must be in the
straight ahead position.
Releasing
Line Lock
While line lock is engaged, you can exit
(release) the feature using the OK button.
When you press the OK button, line lock
releases immediately and normal vehicle
function resumes. When line lock engages,
a countdown timer shows the remaining
time before line lock is released
automatically. If you exceed the time limit,
or another vehicle condition requires line
lock to release, the system safely
disengages and normal vehicle function
resumes.
Note: If you apply the brake pedal while
line lock is engaged, line lock automatically
cancels and normal brake function resumes. Start Option
Allows you to select the type of countdown
the information display shows before
starting an event.
Status Screen
Provides the status of your chosen
performance-related settings.
View/Clear Results
Allows you to view and clear the last and
saved results of the
Acceleration Timer,
Brake Performance, and All Time Best
results.
252
Mustang (CZG) Canada/United States of America, Vehicles Built From: 14-05-2018, enUSA, Edition date: 201804, Second-Printing Track Use
Page 302 of 495
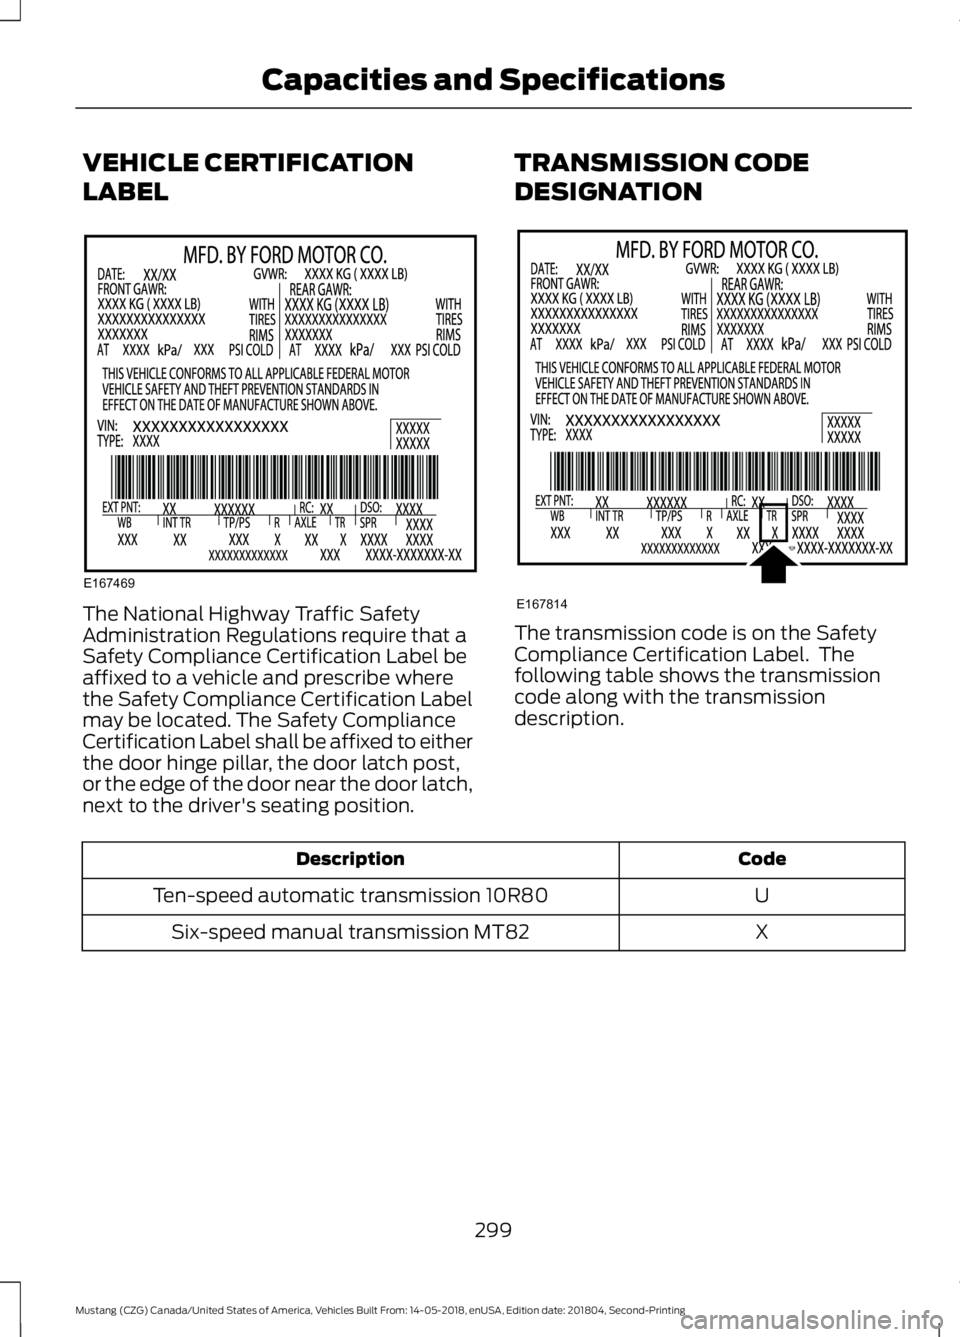
VEHICLE CERTIFICATION
LABEL
The National Highway Traffic Safety
Administration Regulations require that a
Safety Compliance Certification Label be
affixed to a vehicle and prescribe where
the Safety Compliance Certification Label
may be located. The Safety Compliance
Certification Label shall be affixed to either
the door hinge pillar, the door latch post,
or the edge of the door near the door latch,
next to the driver's seating position.
TRANSMISSION CODE
DESIGNATION The transmission code is on the Safety
Compliance Certification Label. The
following table shows the transmission
code along with the transmission
description.
Code
Description
U
Ten-speed automatic transmission 10R80
X
Six-speed manual transmission MT82
299
Mustang (CZG) Canada/United States of America, Vehicles Built From: 14-05-2018, enUSA, Edition date: 201804, Second-Printing Capacities and SpecificationsE167469 E167814