2019 FORD FIESTA ECU
[x] Cancel search: ECUPage 212 of 443
CHANGING THE ENGINE AIR
FILTER
WARNING: To reduce the risk of
vehicle damage and personal burn
injuries, do not start your engine with the
air cleaner removed and do not remove
it while the engine is running.
When changing the air filter element, use
only the air filter element listed. See
Motorcraft Parts
(page 245).
On vehicles with an EcoBoost engine, when
servicing the air cleaner it is important that
no foreign material enters the air induction
system. The engine and turbocharger are
susceptible to damage from even small
particles.
Change the air filter element at the correct
interval. See
Normal Scheduled
Maintenance (page 387).
Note: Failure to use the correct air filter
element may result in severe engine
damage. Your warranty may be void for any
damage to the engine if the correct air filter
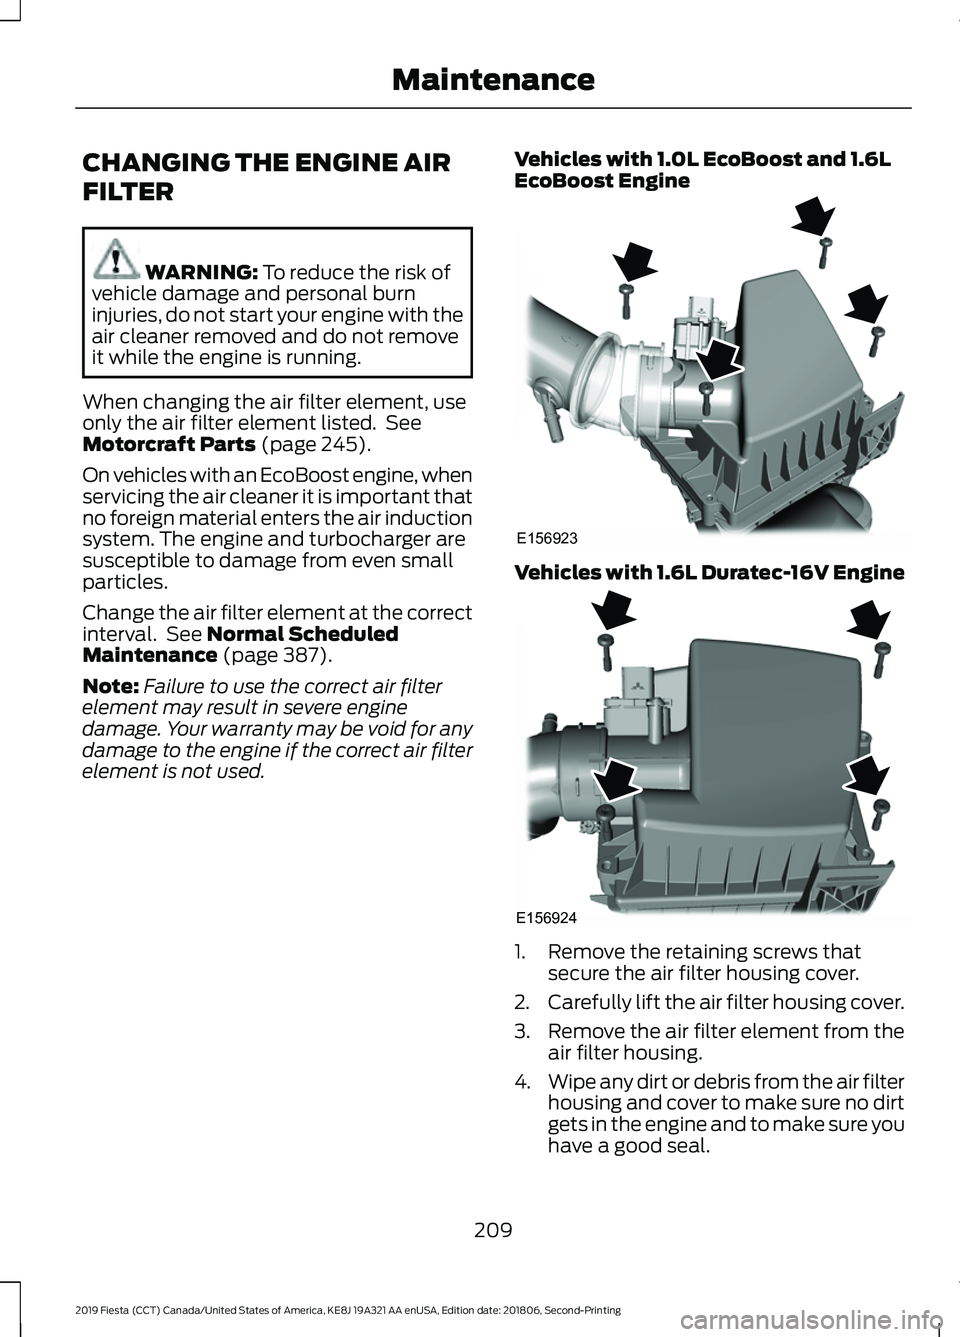
element is not used. Vehicles with 1.0L EcoBoost and 1.6L
EcoBoost Engine Vehicles with 1.6L Duratec-16V Engine
1. Remove the retaining screws that
secure the air filter housing cover.
2. Carefully lift the air filter housing cover.
3. Remove the air filter element from the
air filter housing.
4. Wipe any dirt or debris from the air filter
housing and cover to make sure no dirt
gets in the engine and to make sure you
have a good seal.
209
2019 Fiesta (CCT) Canada/United States of America, KE8J 19A321 AA enUSA, Edition date: 201806, Second-Printing MaintenanceE156923 E156924
Page 213 of 443
5. Install a new air filter element. Be
careful not to crimp the filter element
edges between the air filter housing
and cover. This could cause filter
damage and allow unfiltered air to
enter the engine if not correctly seated.
6. Install the air filter housing cover.
7. Install the retaining screws to secure the air filter housing cover to the air
filter housing.
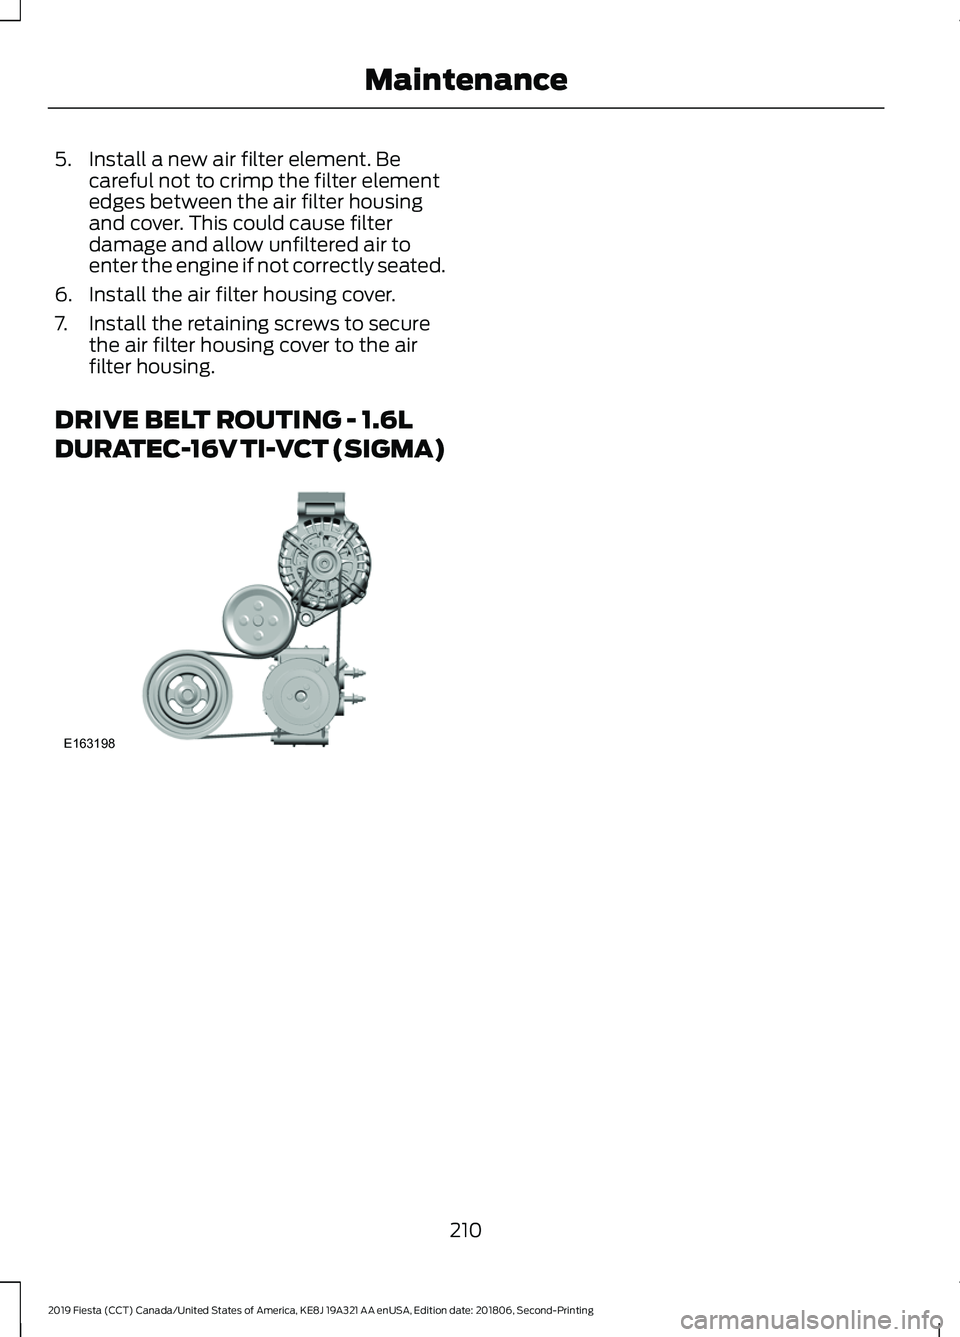
DRIVE BELT ROUTING - 1.6L
DURATEC-16V TI-VCT (SIGMA) 210
2019 Fiesta (CCT) Canada/United States of America, KE8J 19A321 AA enUSA, Edition date: 201806, Second-Printing MaintenanceE163198
Page 242 of 443
When driving with a type 1 or 2
dissimilar spare tire listed above, do
not:
•
Exceed 50 mph (80 km/h).
• Load the vehicle beyond maximum
vehicle load rating listed on the Safety
Compliance Label.
• Tow a trailer.
• Use more than one dissimilar spare tire
at a time.
• Use commercial car washing
equipment.
• Try to repair the dissimilar spare tire.
When driving with a type 3 dissimilar
spare tire listed above, do not:
• Exceed
70 mph (113 km/h).
• Use more than one dissimilar spare
wheel and tire assembly at a time.
• Use commercial car washing
equipment.
Use of one of the dissimilar spare tires
listed above at any one wheel location can
lead to impairment of the following:
• Handling, stability and braking
performance.
• Comfort and noise.
• Ground clearance and parking at curbs.
• Winter weather driving capability.
• Wet weather driving capability.
• All-wheel driving capability (if
applicable).
The usage of a full-size dissimilar spare
wheel and tire assembly can lead to
impairment of the following:
• Handling, stability and braking
performance.
• Comfort and noise.
• Ground clearance and parking at curbs.
• Winter weather driving capability. •
Wet weather driving capability.
• All-wheel driving capability.
When driving with the full-size dissimilar
spare wheel and tire assembly additional
caution should be given to:
• Towing a trailer.
• Driving vehicles equipped with a
camper body.
• Driving vehicles with a load on the
cargo rack.
Drive cautiously when using a full-size
dissimilar spare wheel and tire assembly
and seek service as soon as possible.
Tire Change Procedure WARNING:
When one of the front
wheels is off the ground, the
transmission alone will not prevent the
vehicle from moving or slipping off the
jack, even if the transmission is in park
(P). WARNING:
Do not attempt to
change a tire on the side of the vehicle
close to moving traffic. Pull far enough
off the road to avoid the danger of being
hit when operating the jack or changing
the wheel. WARNING:
To help prevent your
vehicle from moving when changing a
wheel, shift the transmission into park
(P), set the parking brake and use an
appropriate block or wheel chock to
secure the wheel diagonally opposite to
the wheel being changed. For example,
when changing the front left wheel,
place an appropriate block or wheel
chock on the right rear wheel.
239
2019 Fiesta (CCT) Canada/United States of America, KE8J 19A321 AA enUSA, Edition date: 201806, Second-Printing Wheels and Tires
Page 243 of 443
WARNING: Do not get under a
vehicle that is only supported by a
vehicle jack. WARNING:
Always use the jack
provided as original equipment with your
vehicle. If using a jack other than the one
provided, make sure the jack capacity is
adequate for the vehicle weight,
including any vehicle cargo or
modifications. If you are unsure if the jack
capacity is adequate, contact the
authorized dealer. WARNING:
Make sure there is no
grease or oil on the threads or the
surface between the wheel lugs and
nuts. This can cause the lug nuts to
loosen while driving.
Note: Passengers should not remain in the
vehicle when the vehicle is being jacked.
1. Park on a level surface, set the parking
brake and activate the hazard flashers.
2. Place the transmission in park (P) (automatic transmission) or reverse
(R) (manual transmission) and turn
the engine off.
3. Remove the carpeted wheel cover.
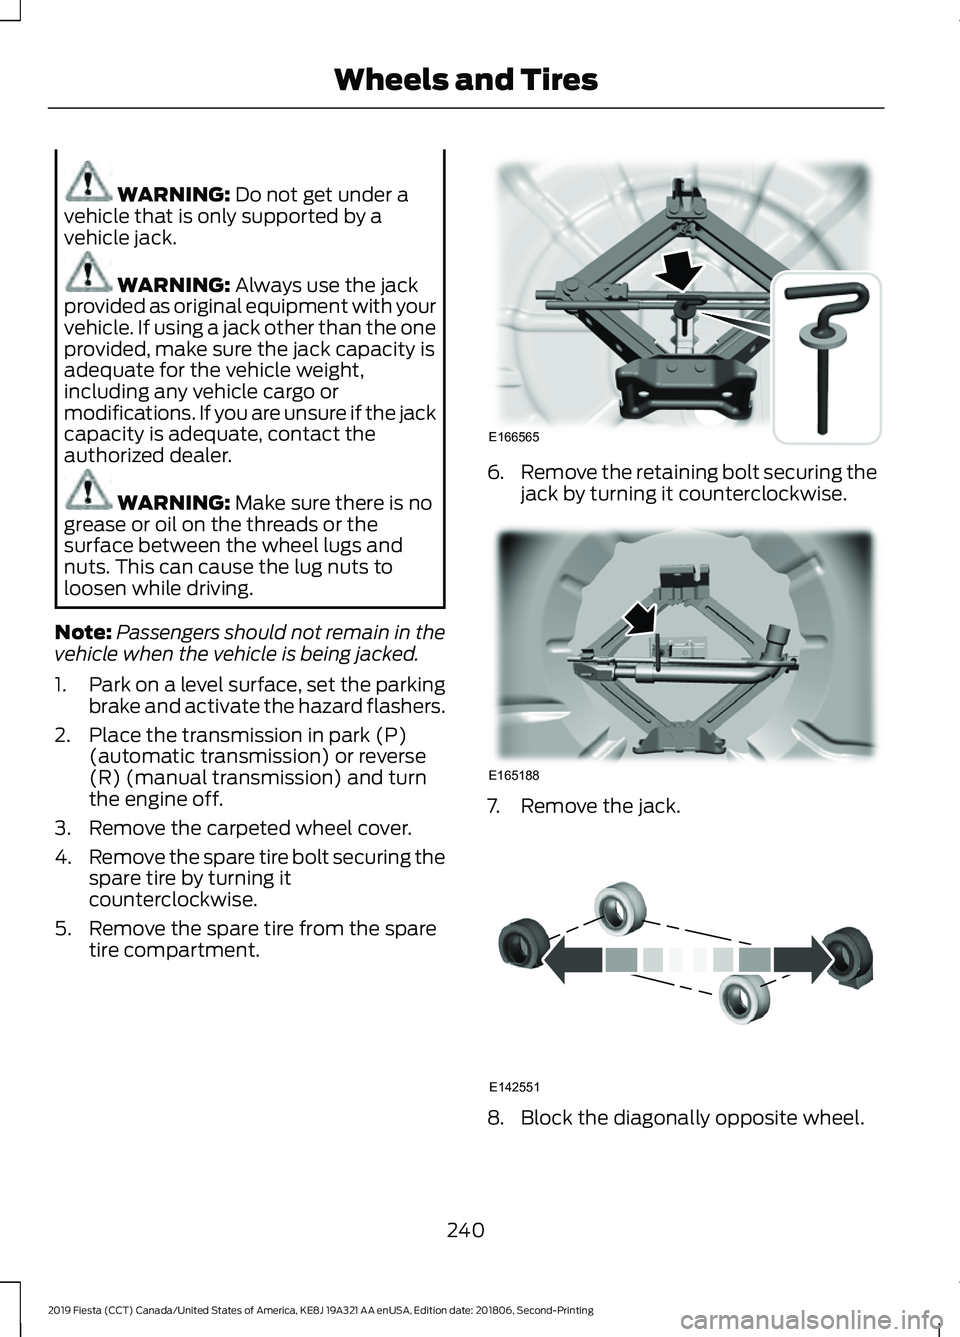
4. Remove the spare tire bolt securing the
spare tire by turning it
counterclockwise.
5. Remove the spare tire from the spare tire compartment. 6.
Remove the retaining bolt securing the
jack by turning it counterclockwise. 7. Remove the jack.
8. Block the diagonally opposite wheel.
240
2019 Fiesta (CCT) Canada/United States of America, KE8J 19A321 AA enUSA, Edition date: 201806, Second-Printing Wheels and TiresE166565 E165188 E142551
Page 244 of 443

9. Loosen each wheel lug nut one-half
turn counterclockwise but do not
remove them until the wheel is raised
off the ground.
Note: Jack at the specified locations to
avoid damage to the vehicle.
10. The vehicle jacking points are shown
here, and are depicted on the yellow
warning label on the jack. 11. Indentations in the sills show the
location of the jacking points. 12. Remove the lug nuts with the lug
wrench.
13. Replace the flat tire with the spare tire, making sure the valve stem is
facing outward. Reinstall the lug nuts
until the wheel is snug against the
hub. Do not fully tighten the lug nuts
until the wheel has been lowered. 14. Lower the wheel by turning the jack
handle counterclockwise. 15.
Remove the jack and fully tighten the
lug nuts in the order shown. See
Technical Specifications (page
241).
Stowing the Flat Tire
The full-size road wheel can be stowed in
the spare tire compartment.
1. Lift the carpeted wheel cover at an angle to access the spare tire
compartment.
2. Place the wheel in the spare tire well with the valve stem facing down. Use
the mini-spare bolt to secure the
wheel.
3. Place the jack and tools back into the spare tire compartment.
4. Replace the carpeted wheel cover.
TECHNICAL SPECIFICATIONS
241
2019 Fiesta (CCT) Canada/United States of America, KE8J 19A321 AA enUSA, Edition date: 201806, Second-Printing Wheels and TiresE145908 E142553 12
3
4
E90589
Page 245 of 443
Wheel Lug Nut Torque Specifications
WARNING: When you install a wheel, always remove any corrosion, dirt or foreign
materials present on the mounting surfaces of the wheel or the surface of the wheel
hub, brake drum or brake disc that contacts the wheel. Make sure to secure any fasteners
that attach the rotor to the hub so they do not interfere with the mounting surfaces of
the wheel. Installing wheels without correct metal-to-metal contact at the wheel
mounting surfaces can cause the wheel nuts to loosen and the wheel to come off while
your vehicle is in motion, resulting in loss of vehicle control, personal injury or death. Ib-ft (Nm)
*
Bolt size
100 (135)
M12 x 1.5
* Torque specifications are for nut and bolt threads free of oil, dirt and rust. Use only Ford
recommended replacement fasteners.
Retighten the lug nuts to the specified torque within 100 miles (160 kilometers) after any
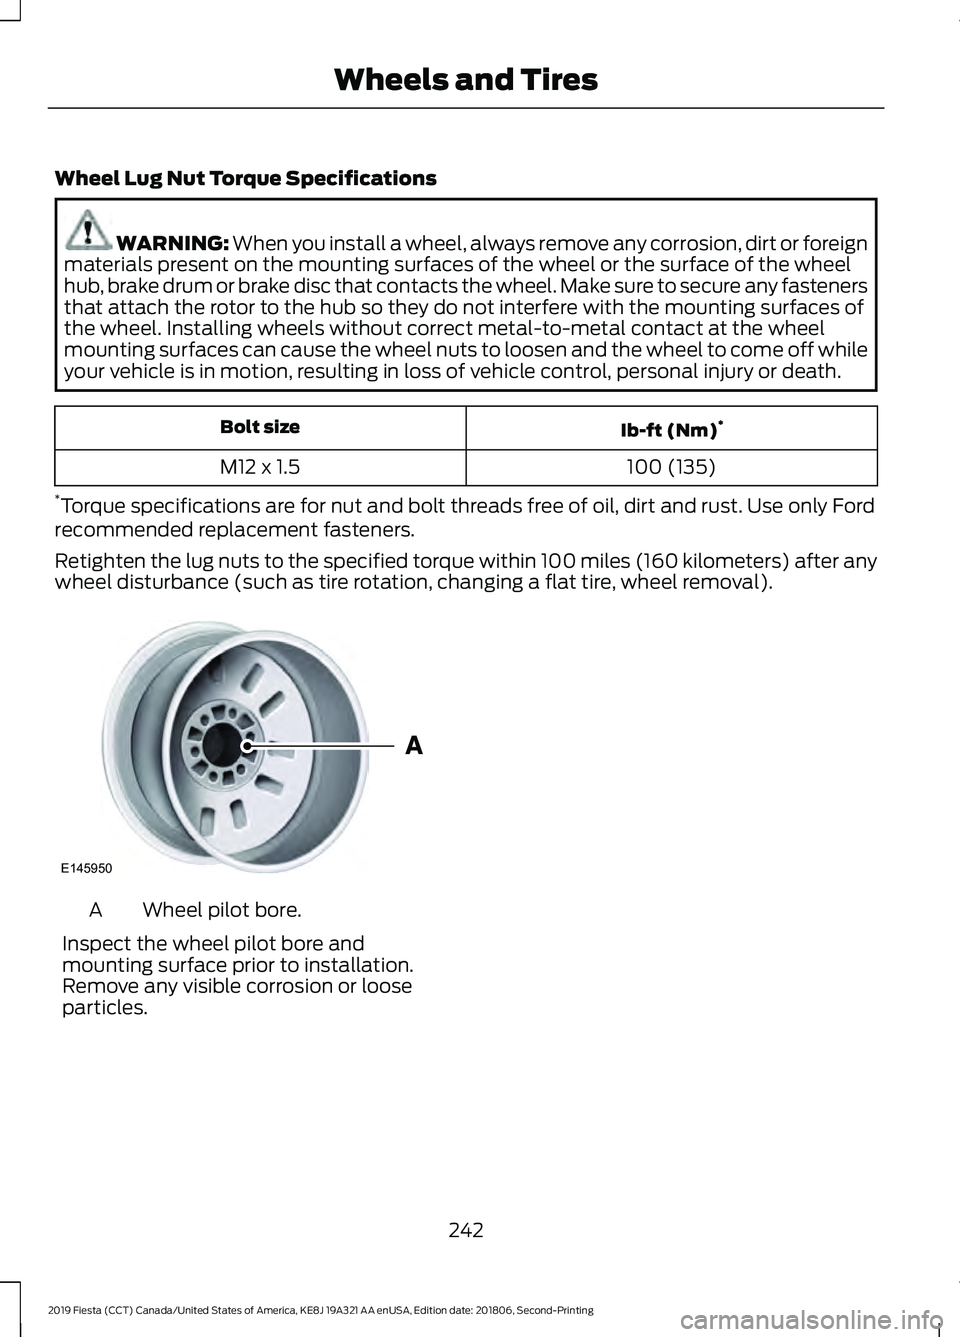
wheel disturbance (such as tire rotation, changing a flat tire, wheel removal). Wheel pilot bore.
A
Inspect the wheel pilot bore and
mounting surface prior to installation.
Remove any visible corrosion or loose
particles.
242
2019 Fiesta (CCT) Canada/United States of America, KE8J 19A321 AA enUSA, Edition date: 201806, Second-Printing Wheels and TiresE145950
Page 274 of 443
AUDIO INPUT JACK
WARNING: Driving while
distracted can result in loss of vehicle
control, crash and injury. We strongly
recommend that you use extreme
caution when using any device that may
take your focus off the road. Your
primary responsibility is the safe
operation of your vehicle. We
recommend against the use of any
hand-held device while driving and
encourage the use of voice-operated
systems when possible. Make sure you
are aware of all applicable local laws
that may affect the use of electronic
devices while driving. WARNING:
Do not connect or
adjust the settings on your portable
music player when your vehicle is
moving. WARNING:
Always place your
device in a secure location in your vehicle
so it does not become a projectile in a
sudden stop or crash. Failure to follow
this instruction could result in personal
injury.
Note: For optimum performance when
using any auxiliary device set the volume on
the device high. This reduces audio
interference when charging the device using
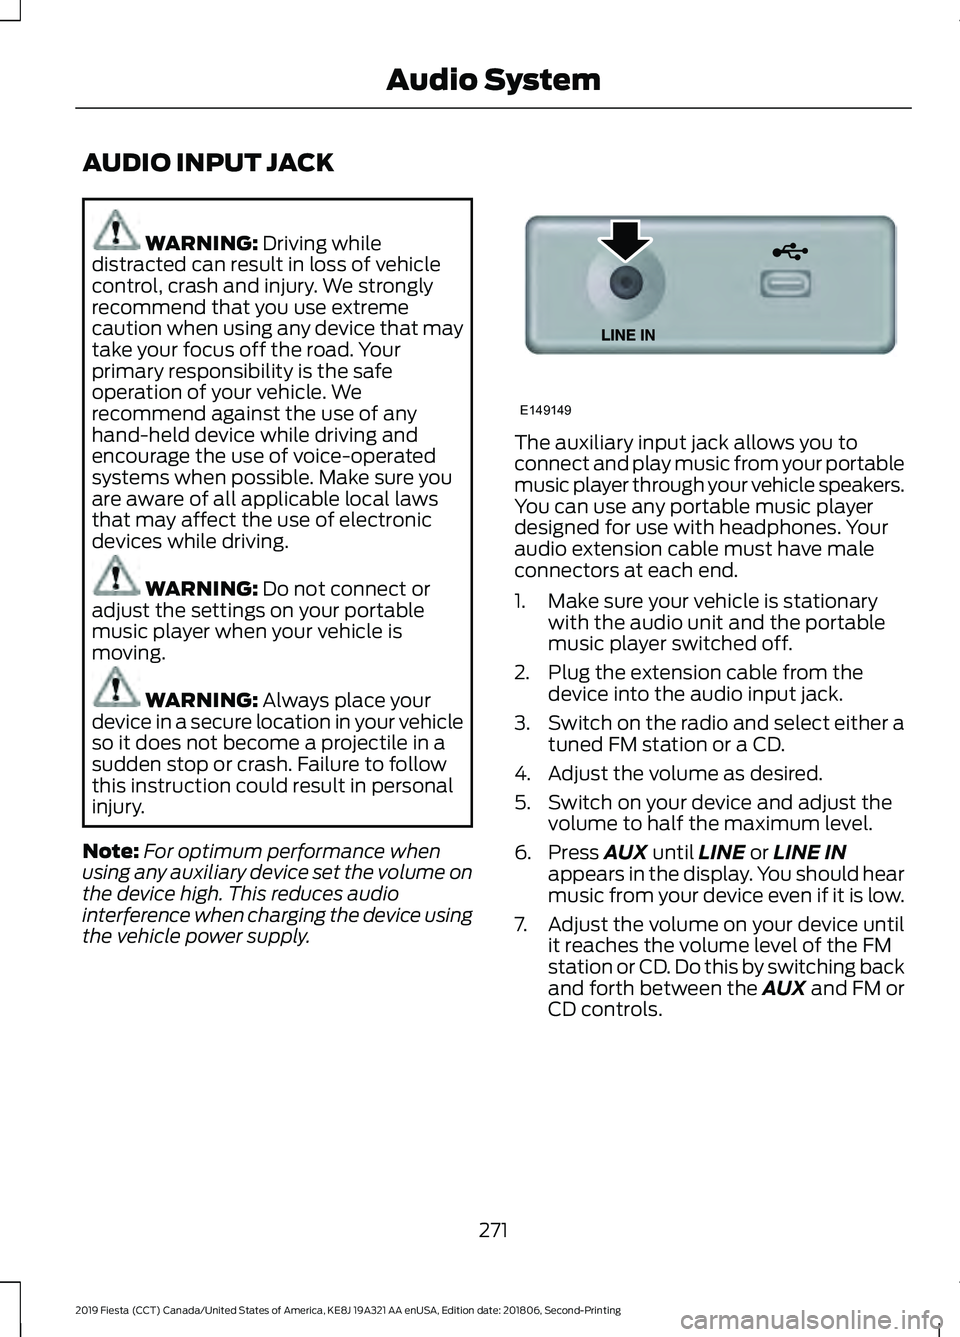
the vehicle power supply. The auxiliary input jack allows you to
connect and play music from your portable
music player through your vehicle speakers.
You can use any portable music player
designed for use with headphones. Your
audio extension cable must have male
connectors at each end.
1. Make sure your vehicle is stationary
with the audio unit and the portable
music player switched off.
2. Plug the extension cable from the device into the audio input jack.
3. Switch on the radio and select either a
tuned FM station or a CD.
4. Adjust the volume as desired.
5. Switch on your device and adjust the volume to half the maximum level.
6. Press
AUX until LINE or LINE IN
appears in the display. You should hear
music from your device even if it is low.
7. Adjust the volume on your device until
it reaches the volume level of the FM
station or CD. Do this by switching back
and forth between the AUX and FM or
CD controls.
271
2019 Fiesta (CCT) Canada/United States of America, KE8J 19A321 AA enUSA, Edition date: 201806, Second-Printing Audio SystemE149149
Page 290 of 443
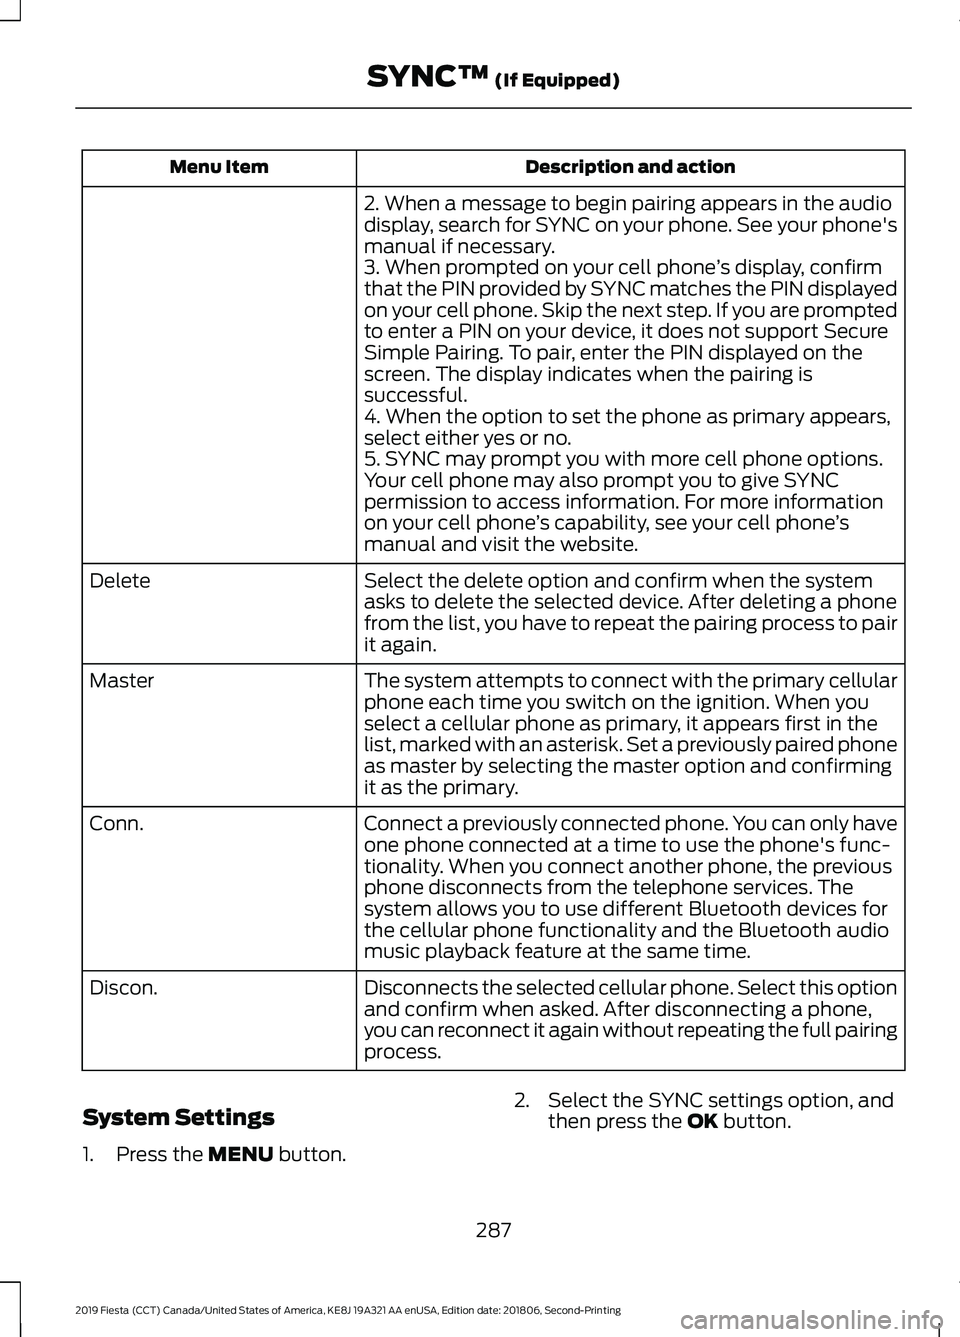
Description and action
Menu Item
2. When a message to begin pairing appears in the audio
display, search for SYNC on your phone. See your phone's
manual if necessary.
3. When prompted on your cell phone ’s display, confirm
that the PIN provided by SYNC matches the PIN displayed
on your cell phone. Skip the next step. If you are prompted
to enter a PIN on your device, it does not support Secure
Simple Pairing. To pair, enter the PIN displayed on the
screen. The display indicates when the pairing is
successful.
4. When the option to set the phone as primary appears,
select either yes or no.
5. SYNC may prompt you with more cell phone options.
Your cell phone may also prompt you to give SYNC
permission to access information. For more information
on your cell phone ’s capability, see your cell phone ’s
manual and visit the website.
Select the delete option and confirm when the system
asks to delete the selected device. After deleting a phone
from the list, you have to repeat the pairing process to pair
it again.
Delete
The system attempts to connect with the primary cellular
phone each time you switch on the ignition. When you
select a cellular phone as primary, it appears first in the
list, marked with an asterisk. Set a previously paired phone
as master by selecting the master option and confirming
it as the primary.
Master
Connect a previously connected phone. You can only have
one phone connected at a time to use the phone's func-
tionality. When you connect another phone, the previous
phone disconnects from the telephone services. The
system allows you to use different Bluetooth devices for
the cellular phone functionality and the Bluetooth audio
music playback feature at the same time.
Conn.
Disconnects the selected cellular phone. Select this option
and confirm when asked. After disconnecting a phone,
you can reconnect it again without repeating the full pairing
process.
Discon.
System Settings
1. Press the MENU button. 2. Select the SYNC settings option, and
then press the
OK button.
287
2019 Fiesta (CCT) Canada/United States of America, KE8J 19A321 AA enUSA, Edition date: 201806, Second-Printing SYNC™
(If Equipped)