2019 FORD F650/750 engine overheat
[x] Cancel search: engine overheatPage 13 of 387
•
The gearshift lever must be in P (Park)
or N (Neutral) in order for the starter
to operate.
• Try operating the starter switch several
times. This operation may clean
potentially corroded contacts or make
the switch temporarily operable until
you can reach the dealer.
• If all electrical connections are tight
and you need assistance to start, See
Jump Starting the Vehicle (page 156
).
If engine cranks but won ’t start
Prolonged starter cranking (in excess of 10
seconds) could cause damage to the
starter motor or the high-pressure fuel
pump.
• Check the fuel gauge. You may be out
of fuel. If the gauge shows that there
is fuel in the tank, the trouble may be
in the electrical system or the fuel
system. If equipped with an auxiliary
tank, be sure that the tank control
switch is set for the tank with fuel and
not on an empty tank.
• Leaving your ignition key turned to on
for over two minutes without starting
may make starting difficult because
the glow plugs will cease activation.
Reset the system by turning the ignition
key to off and then back to on again.
Note: If the system is out of fuel and the
engine will not start, do not continue
cranking the engine. Continued cranking can
damage the high-pressure fuel pump.
If the engine runs hot
The following could cause the engine to
overheat:
• Lack of coolant
• Dirty cooling system.
• Plugged radiator fins, A/C condenser
and/or oil cooler
• Malfunctioning fan drive •
Driving with frozen coolant
• Sticking thermostat
• Overloading or pulling heavy trailers
during hot weather
• Grill or radiator air blockage
• Slipping or missing drive belt
• Plugged or very dirty air filter
If fuses burn out WARNING:
Replacement fuses
and circuit breakers must always be the
same rating as the original equipment
shown. Never replace a fuse or circuit
breaker with one of a higher rating.
Higher rated fuses or circuit breakers
could allow circuit overloading in the
event of a circuit malfunction, resulting
in severe vehicle damage or personal
injury due to fire.
Burned-out or blown fuses usually indicate
an electrical short-circuit, although a fuse
may occasionally burn out from vibration.
Insert a second fuse. If this fuse
immediately burns out and you cannot
locate the cause, return your vehicle to
your dealer for a circuit check. See
Changing a Fuse
(page 176).
Selective catalytic reduction system
speed limit and Idle-only modes
If the vehicle ’s speed is limited or in an
idle-only mode, the selective catalytic
reduction system may be limiting the
vehicle ’s functions due to low or
contaminated DEF. Check the DEF. See
Selective Catalytic Reductant System
(page
105).
SYMBOLS GLOSSARY
These are some of the symbols you may
see on your vehicle.
10
F650750 (TBC) , enUSA, Edition date: 201804, Second-Printing Introduction
Page 97 of 387
Note:
Do not blend used engine oil with
diesel fuel under any circumstances.
Blending used oil with the fuel will
significantly increase your vehicle ’s exhaust
emissions and reduce engine life due to
increased internal wear. Using low sulfur diesel fuel
(16-500 ppm) or high sulfur
diesel fuel (greater than 500
ppm) in your diesel engine will cause
certain emission components to
malfunction which may also cause the
service engine soon light to illuminate
indicating an emissions-related concern.
Diesel fuel is adjusted seasonally for cold
temperature. For best results at
temperatures below 19°F (-7°C), it is
recommended to use a diesel fuel which
has been seasonally adjusted for the
ambient conditions.
Fuel Requirements - Choosing The
Right Fuel: Vehicles Operated
Where Ultra Low Sulfur Diesel Fuel
Is Not Required
For the engine to operate reliably on
low-sulfur or high-sulfur diesel fuel, the
engine must be a factory built high-sulfur
engine (available as a dealer order option
for select markets) or an ultra low sulfur
diesel fuel configured engine that has been
retrofitted for high-sulfur diesel fuel using
Ford Motor Company dealer service parts.
Failure to use retrofit components other
than those available through your
authorized dealer will result in coolant
system damage, engine overheating,
selective catalyst reduction system or
diesel particulate filter damage and
possible base engine damage. Use only a diesel engine configured for use
with high sulfur diesel fuel in markets with
diesel fuel that has sulfur content greater
than 15 ppm. Using low sulfur diesel fuel
(16–500 ppm) or high sulfur diesel fuel
(greater than 500 ppm) in a diesel engine
designed to use only Ultra Low Sulfur
Diesel fuel may result in damage to engine
emission control devices and the
aftertreatment system, potentially
rendering the vehicle inoperable.
Vehicles with engines configured for use
with high sulfur diesel fuel are only
available for sale in countries where ultra
low sulfur diesel fuel is generally not
available or mandated by the government.
Vehicles originally sold in a ultra low sulfur
diesel fuel market that are subsequently
exported to non- ultra low sulfur diesel fuel
markets will need to be retrofitted (at the
customer
’s expense using Ford authorized
dealer service parts) in order to be reliably
operated on non- ultra low sulfur diesel
fuel.
Biodiesel WARNING:
Do not mix diesel with
gasoline, gasohol or alcohol. This could
cause an explosion.
Note: Do not use home heating oil,
agricultural fuel, raw fats and oils, waste
cooking greases, biodiesel fuels greater than
20% or any diesel fuel not intended for
highway use. Red dye is used to identify
fuels intended for agricultural and
non-highway use. Damage to the fuel
injection system, engine and exhaust
catalyst can occur if an improper fuel is
used.
You may operate your vehicle on diesel
fuels containing up to 20% biodiesel, also
known as B20.
94
F650750 (TBC) , enUSA, Edition date: 201804, Second-Printing Fuel and Refueling
Page 122 of 387
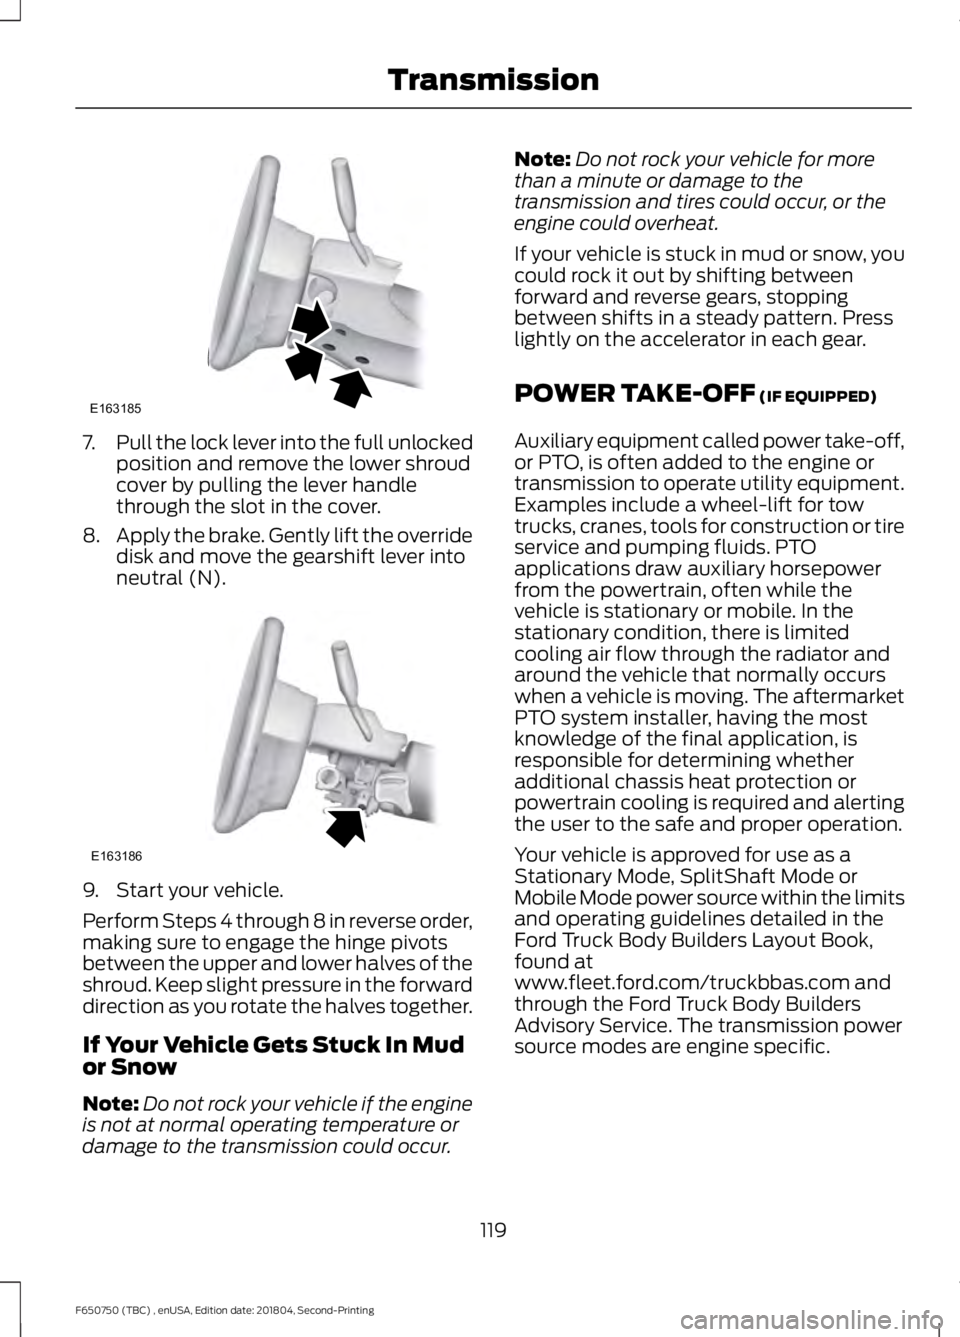
7.
Pull the lock lever into the full unlocked
position and remove the lower shroud
cover by pulling the lever handle
through the slot in the cover.
8. Apply the brake. Gently lift the override
disk and move the gearshift lever into
neutral (N). 9. Start your vehicle.
Perform Steps 4 through 8 in reverse order,
making sure to engage the hinge pivots
between the upper and lower halves of the
shroud. Keep slight pressure in the forward
direction as you rotate the halves together.
If Your Vehicle Gets Stuck In Mud
or Snow
Note:
Do not rock your vehicle if the engine
is not at normal operating temperature or
damage to the transmission could occur. Note:
Do not rock your vehicle for more
than a minute or damage to the
transmission and tires could occur, or the
engine could overheat.
If your vehicle is stuck in mud or snow, you
could rock it out by shifting between
forward and reverse gears, stopping
between shifts in a steady pattern. Press
lightly on the accelerator in each gear.
POWER TAKE-OFF (IF EQUIPPED)
Auxiliary equipment called power take-off,
or PTO, is often added to the engine or
transmission to operate utility equipment.
Examples include a wheel-lift for tow
trucks, cranes, tools for construction or tire
service and pumping fluids. PTO
applications draw auxiliary horsepower
from the powertrain, often while the
vehicle is stationary or mobile. In the
stationary condition, there is limited
cooling air flow through the radiator and
around the vehicle that normally occurs
when a vehicle is moving. The aftermarket
PTO system installer, having the most
knowledge of the final application, is
responsible for determining whether
additional chassis heat protection or
powertrain cooling is required and alerting
the user to the safe and proper operation.
Your vehicle is approved for use as a
Stationary Mode, SplitShaft Mode or
Mobile Mode power source within the limits
and operating guidelines detailed in the
Ford Truck Body Builders Layout Book,
found at
www.fleet.ford.com/truckbbas.com and
through the Ford Truck Body Builders
Advisory Service. The transmission power
source modes are engine specific.
119
F650750 (TBC) , enUSA, Edition date: 201804, Second-Printing TransmissionE163185 E163186
Page 143 of 387
STEERING
To help prevent damage to the power
steering system:
•
Do not hold the steering wheel at its
furthest turning points for more than
three to five seconds when the engine
is running.
• Avoid continuously steering back and
forth with elevated engine RPM as this
may overheat the system. If trying to
free a stuck vehicle, pause between
attempts to allow the power steering
system to cool or seek assistance.
Typical steering and driving maneuvers
allow the system to cool.
• Do not operate the vehicle if the power
steering pump fluid level is below the
MIN mark on the reservoir.
• Some noise is normal during operation.
If excessive, check for low power
steering pump fluid level before
seeking service by your dealer.
• Heavy or uneven efforts may be caused
by low power steering fluid. Check for
low power steering pump fluid level
before seeking service by your dealer.
• Do not fill the power steering pump
reservoir above the MAX mark on the
reservoir, as this may result in leaks
from the reservoir.
If the power steering system breaks down
or if you switch off the engine, you can
steer the vehicle manually, but it takes
more effort.
Operating the steering system excessively
at an elevated engine RPM (>1200 rpm)
for more than 2 minutes can result in
steering system damage from overheating.
Move the steering wheel to the full left
position then full right position at idle
speed, or stop using the system for 2
minutes to allow the system to cool down. If the power steering system exhibits heavy
or uneven efforts, check for the following
before seeking service from your dealer:
•
An improperly inflated tire.
• Overloading of front suspension.
• Uneven vehicle loading.
• Binding suspension components.
If the power steering system wanders or
pulls, check for:
• An improperly inflated tire.
• Uneven vehicle loading.
• Uneven tire wear.
• Loose or worn suspension
components.
• Loose or worn steering components.
• Improper vehicle alignment.
• High crosswinds.
If you service or replace any steering
components, install new fasteners. Many
fasteners have thread adhesive coatings,
or have prevailing torque features, which
you cannot re-use. Do not re-use a bolt or
nut. Torque fasteners to specifications.
A high crown in the road or high crosswinds
may also make the steering seem to
wander or pull.
140
F650750 (TBC) , enUSA, Edition date: 201804, Second-Printing Driving Aids
Page 150 of 387
•
Shift to a lower gear when driving down
a long or steep hill. Do not apply the
brakes continuously, as they may
overheat and become less effective.
• If your transmission is equipped with
the Tow/Haul feature, use this feature
when towing. This provides engine
braking and helps eliminate excessive
transmission shifting for optimum fuel
economy and transmission cooling.
• Allow more distance for stopping with
a trailer attached. Anticipate stops and
brake gradually.
FIFTH WHEEL OPERATION WARNING: Failure to follow the
fifth wheel manufacturer ’s instructions
for hooking and unhooking as well as
sliding the fifth wheel could result in an
accident, personal injury or death. WARNING:
When the tractor and
trailer are parked unattended, the trailer
brake hand control should never be used
to apply the brake, since air may leak
from the system, allowing vehicle
movement, resulting in possible property
damage, personal injury or death.
Before hook-up, make sure:
• The fifth wheel jaws are fully open.
• The fifth wheel is fully tilted back to
prevent body damage when the tractor
is backed under a trailer.
• You block the trailer wheels and adjust
and apply the trailer spring brakes.
Never chase a trailer.
• The brake hoses and light cords are
clear of the fifth wheel. Hook-up
1. Back the tractor squarely under the
trailer, engaging the fifth-wheel jaws
on the kingpin. Always back up slowly;
make sure the trailer is neither too high
nor too low. Avoid backing under the
trailer from an angle.
2. Connect the service and emergency brake hoses and trailer light connector.
3. Inspect the jaws of the fifth wheel to be sure they have fully closed on the
trailer kingpin and the trailer plate is
resting securely on the fifth wheel.
4. Make sure the coupler release lever is in the locked position.
5. Charge the trailer brake system. Set the trailer brakes, with either the hand
valve or tractor protection valve. Pull
against the trailer for an extra check of
proper hook-up. Do not pull hard
enough to damage or strain the
equipment.
6. Set the tractor parking brakes and fully
raise the trailer landing gear.
7. Check the operation of all trailer lights
and correct any lights that may be
faulty.
Un-hook
1. Try to keep the tractor and trailer in a straight line.
2. Apply the parking brakes.
3. Lower the trailer landing gear, making sure it is on solid, level ground. The
weight of the trailer is to be on the
landing gear.
4. Block the trailer wheels.
5. Disconnect the brake hoses and light cords. Be sure hoses and cords are
clear.
6. Pull coupler release lever to disengage
the fifth wheel jaws.
147
F650750 (TBC) , enUSA, Edition date: 201804, Second-Printing Towing
Page 201 of 387
4. Replace the coolant reservoir cap and
turn it clockwise until you feel a strong
resistance.
5. Check the coolant level in the coolant reservoir the next few times you drive
your vehicle. If necessary, add enough
prediluted engine coolant to bring the
coolant level to the proper level.
Note: If prediluted coolant is not available,
use the approved antifreeze concentrate
diluting it to 50/50 with distilled water. See
Capacities and Specifications (page 261).
Using water that has not been deionized
may contribute to deposit formation,
corrosion or plugging of the small cooling
system passageways.
If you have to add more than 1.1 qt (1 L) of
engine coolant per month, have your
vehicle checked as soon as possible.
Operating an engine with a low level of
coolant can result in engine overheating
and possible engine damage.
In case of emergency, you can add a large
amount of water without prediluted
coolant in order to reach a vehicle service
location. On arrival do the following:
1. Drain the cooling system.
2. Chemically clean the cooling system. We recommend Motorcraft Premium
Cooling System Flush.
3. Refill with prediluted coolant as soon as possible.
Water alone, without prediluted coolant,
can cause engine damage from corrosion,
overheating or freezing.
Do not use the following as a coolant
substitute:
• Alcohol.
• Methanol.
• Brine.
• Any coolant mixed with alcohol or
methanol antifreeze. Alcohol and other liquids can cause engine
damage from overheating or freezing.
Do not add extra inhibitors or non-specified
additives to the coolant. These can be
harmful and compromise the corrosion
protection of the coolant.
Engine and Secondary Cooling
System Refill Procedure
Perform this procedure when refilling the
engine or secondary cooling systems after
it has been drained or become extremely
low:
1. Before you remove the cap, turn the
engine off and let it cool.
2. When the engine is cool, wrap a thick cloth around the cap. Slowly turn cap
counterclockwise until pressure begins
to release.
3. Step back when the pressure releases.
4. When you are sure that all the pressure
has been released, use the cloth to turn
the cap counterclockwise and then
remove it.
5. Slowly add prediluted engine coolant to the coolant reservoir until the
coolant level is within the minimum
and maximum range as listed on the
reservoir.
6. Reinstall the pressure relief cap.
7. Start and run the engine at 2000 rpm for 2 minutes.
8. Shut the engine off, and remove the pressure relief cap as previously
outlined.
9. If required, add prediluted engine coolant to the coolant reservoir until
the coolant level is within the minimum
and maximum range as listed on the
reservoir.
198
F650750 (TBC) , enUSA, Edition date: 201804, Second-Printing Maintenance
Page 202 of 387
10.
Engine cooling system: Repeat steps
5 through 9 until the coolant level has
stabilized and is no longer dropping
after each step and the upper
radiator hose at the radiator is warm
to the touch, indicating that the
engine thermostat is open and
coolant is flowing through the
radiator.
11. Check the secondary cooling system.
Repeat steps 1 through 10 until the
coolant level has stabilized and is no
longer dropping after each step and
the lower passenger side of the
secondary radiator is warm to the
touch, indicating secondary
thermostat is open and coolant is
flowing through the entire system.
12. Check the coolant level in both systems before you drive your vehicle
the next few times.
13. If necessary, add prediluted engine coolant to the coolant reservoirs until
the coolant level is within the
minimum and maximum range as
listed on the reservoir. After you add
coolant, check the coolant
concentration.
Recycled Coolant
We do not recommend the use of recycled
coolant as an approved recycling process
is not yet available.
Dispose of used engine coolant in an
appropriate manner. Follow your
community ’s regulations and standards
for recycling and disposing of automotive
fluids. Severe Climates
If you drive in extremely cold climates:
•
It may be necessary to increase the
coolant concentration above 50%.
• A coolant concentration of 60%
provides improved freeze point
protection. Coolant concentrations
above 60% decrease the overheat
protection characteristics of the
coolant and may cause engine
damage.
If you drive in extremely hot climates:
• You can decrease the coolant
concentration to 40%.
• Coolant concentrations below 40%
decrease the freeze and corrosion
protection characteristics of the
coolant and may cause engine
damage.
Vehicles driven year-round in non-extreme
climates should use prediluted engine
coolant for optimum cooling system and
engine protection.
Coolant Change
Follow the specific mileage intervals, as
listed in the scheduled maintenance
information, to change the coolant. The
information display may display a message
to change coolant at this time. Add
prediluted coolant approved to the correct
specification. See Capacities and
Specifications (page 255).
199
F650750 (TBC) , enUSA, Edition date: 201804, Second-Printing Maintenance
Page 204 of 387
Adding Coolant
WARNING: Do not remove the
coolant reservoir cap when the engine is
on or the cooling system is hot. Wait 10
minutes for the cooling system to cool
down. Cover the coolant reservoir cap
with a thick cloth to prevent the
possibility of scalding and slowly remove
the cap. Failure to follow this instruction
could result in personal injury.
It is very important to use prediluted
coolant meeting the correct specification
in order to avoid plugging the small
passageways in the engine cooling system.
See
Capacities and Specifications
(page 269). Incorrect prediluted coolant
use can cause damage not covered by the
vehicle Warranty.
If the coolant level is at or below the
minimum mark, add prediluted coolant
immediately.
To top up the coolant level do the
following:
1. Unscrew the cap slowly. Any pressure escapes as you unscrew the cap.
2. Add prediluted coolant meeting the correct specification. See
Scheduled
Maintenance (page 322).
3. Add enough prediluted coolant to reach the correct level.
4. Replace the coolant reservoir cap, turn
it clockwise until you feel a strong
resistance.
5. Check the coolant level in the coolant reservoir the next few times you drive
your vehicle. Do not mix different colors or types of
prediluted coolant in your vehicle. Mixing
of prediluted coolant or using an incorrect
prediluted coolant may harm the engine
or cooling system components and may
not be covered by the vehicle Warranty.
In case of emergency, you can add a large
amount of water without prediluted
coolant in order to reach a vehicle service
location. On arrival do the following:
1. Drain the cooling system.
2. Chemically clean the cooling system.
We recommend Motorcraft Premium
Cooling System Flush.
3. Refill with prediluted coolant as soon as possible.
Water alone, without prediluted coolant,
can cause engine damage from corrosion,
overheating or freezing.
Do not use the following as a coolant
substitute:
• Alcohol.
• Methanol.
• Brine.
• Any coolant mixed with alcohol or
methanol antifreeze.
Alcohol and other liquids can cause engine
damage from overheating or freezing.
Do not add extra inhibitors or additives to
the coolant. These can be harmful and
compromise the corrosion protection of
the coolant.
Recycled Coolant
We do not recommend the use of recycled
coolant as an approved recycling process
is not yet available.
Dispose of used engine coolant in an
appropriate manner. Follow your
community ’s regulations and standards
for recycling and disposing of automotive
fluids.
201
F650750 (TBC) , enUSA, Edition date: 201804, Second-Printing Maintenance