2019 FORD F650/750 key
[x] Cancel search: keyPage 182 of 387

Engine compartment (with engine off)
Inspect for glazing, fraying or cracking. There should be no
more than 5-7 cracks per rib, per 1 in (2.5 cm)
Belts (fan, alternator,
water pump and air
conditioning
compressor)
Inspect for signs of fluid puddles or dripping fluid on the
ground under the engine, or the underside of the engine.
Fluid leaks
Inspect for debris that may have collected on the HVAC air
inlet grille or inside the exterior module as this may reduce
system performance.
HVAC air inlet Engine starting (with parking brake applied)
Before entering the cab, verify that the vehicle is equipped
with spare electrical fuses (if used), three red reflective
triangles, a properly charged and rated fire extinguisher and
wheel chocks.
Safety and emergency
equipment
Walk around the vehicle and verify all steps and grab handles,
inside and out (as well as behind), are tight and clean. Use
extreme caution and a three-point stance at all times.
Inspect door latches for proper closing, latching and locking.
Set the parking brake. Make sure the gearshift lever is in
neutral (N) or park (P) (if equipped with a park position).
Starting the engine
Diesel engine:
Turn the key to the on position. Turn the key
to start when the wait to start indicator light in the instrument
cluster turns off.
Gasoline engine:
Turn the key to start, and then release it
as soon as the engine starts.
Verify pressure builds to normal operating range.
Engine oil pressure
A tone indicating low air pressure should sound immediately
after the engine starts but before the compressor has built-
up pressure. The tone should stop when the air pressure
reaches
70 psi (483 kPa). Let the air pressure build to
governed cutout pressure, which should occur between
115– 130 psi (793–896 kPa)
.
Low air pressure warning
tone (if equipped with an
air compressor)
Press the accelerator and verify that it operates smoothly,
without any binding or irregular feel. Release the pedal and
verify the engine returns to idle speed immediately.
Accelerator
179
F650750 (TBC) , enUSA, Edition date: 201804, Second-Printing Vehicle Inspection Guide
Page 183 of 387

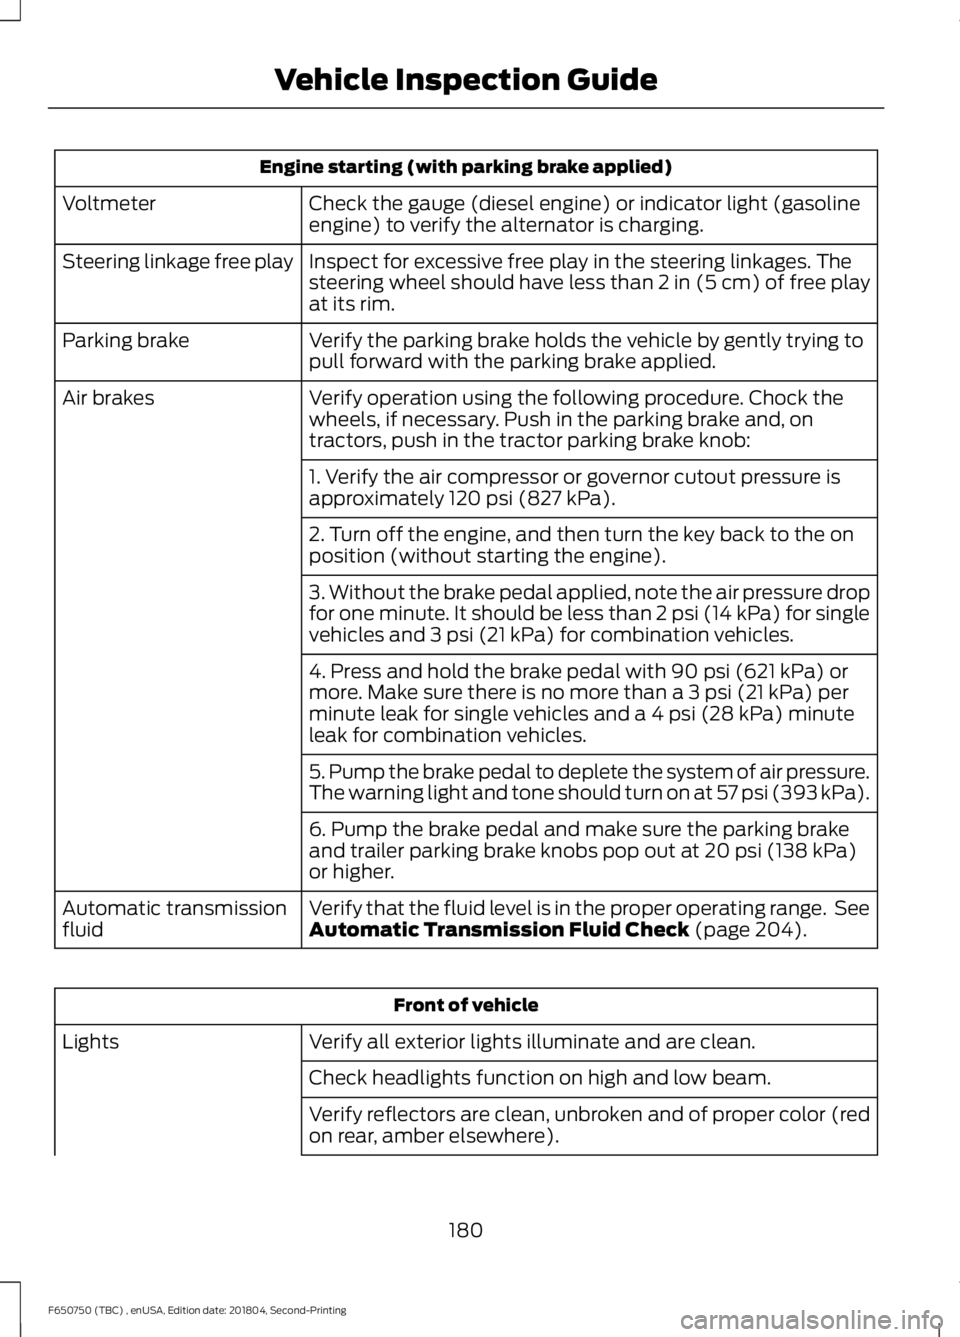
Engine starting (with parking brake applied)
Check the gauge (diesel engine) or indicator light (gasoline
engine) to verify the alternator is charging.
Voltmeter
Inspect for excessive free play in the steering linkages. The
steering wheel should have less than 2 in (5 cm) of free play
at its rim.
Steering linkage free play
Verify the parking brake holds the vehicle by gently trying to
pull forward with the parking brake applied.
Parking brake
Verify operation using the following procedure. Chock the
wheels, if necessary. Push in the parking brake and, on
tractors, push in the tractor parking brake knob:
Air brakes
1. Verify the air compressor or governor cutout pressure is
approximately 120 psi (827 kPa).
2. Turn off the engine, and then turn the key back to the on
position (without starting the engine).
3. Without the brake pedal applied, note the air pressure drop
for one minute. It should be less than 2 psi (14 kPa) for single
vehicles and
3 psi (21 kPa) for combination vehicles.
4. Press and hold the brake pedal with
90 psi (621 kPa) or
more. Make sure there is no more than a 3 psi (21 kPa) per
minute leak for single vehicles and a 4 psi (28 kPa) minute
leak for combination vehicles.
5. Pump the brake pedal to deplete the system of air pressure.
The warning light and tone should turn on at 57 psi (393 kPa).
6. Pump the brake pedal and make sure the parking brake
and trailer parking brake knobs pop out at
20 psi (138 kPa)
or higher.
Verify that the fluid level is in the proper operating range. See
Automatic Transmission Fluid Check
(page 204).
Automatic transmission
fluid Front of vehicle
Verify all exterior lights illuminate and are clean.
Lights
Check headlights function on high and low beam.
Verify reflectors are clean, unbroken and of proper color (red
on rear, amber elsewhere).
180
F650750 (TBC) , enUSA, Edition date: 201804, Second-Printing Vehicle Inspection Guide
Page 184 of 387

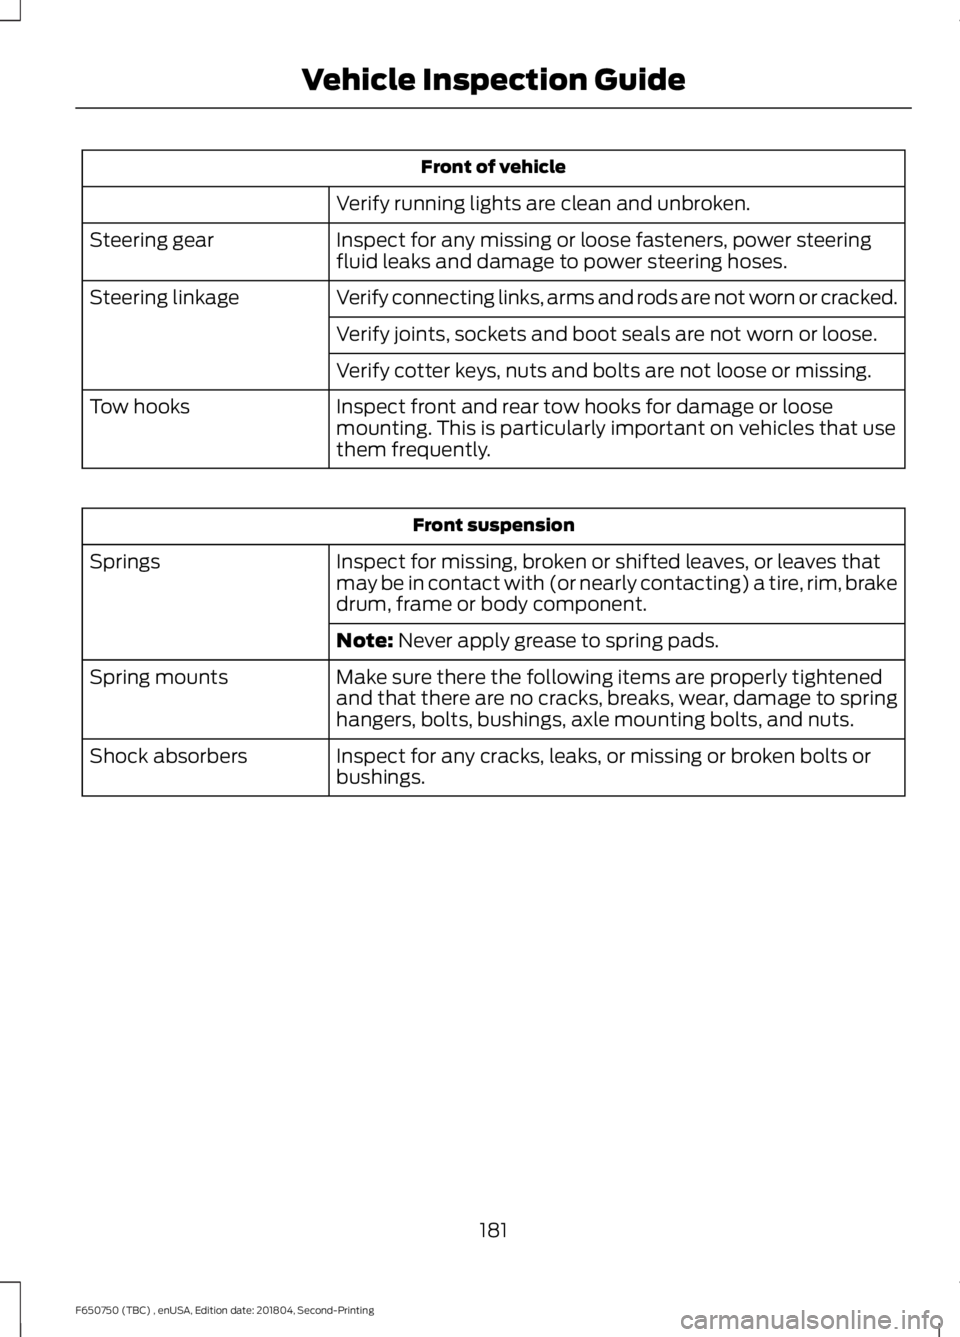
Front of vehicle
Verify running lights are clean and unbroken.
Inspect for any missing or loose fasteners, power steering
fluid leaks and damage to power steering hoses.
Steering gear
Verify connecting links, arms and rods are not worn or cracked.
Steering linkage
Verify joints, sockets and boot seals are not worn or loose.
Verify cotter keys, nuts and bolts are not loose or missing.
Inspect front and rear tow hooks for damage or loose
mounting. This is particularly important on vehicles that use
them frequently.
Tow hooks Front suspension
Inspect for missing, broken or shifted leaves, or leaves that
may be in contact with (or nearly contacting) a tire, rim, brake
drum, frame or body component.
Springs
Note: Never apply grease to spring pads.
Make sure there the following items are properly tightened
and that there are no cracks, breaks, wear, damage to spring
hangers, bolts, bushings, axle mounting bolts, and nuts.
Spring mounts
Inspect for any cracks, leaks, or missing or broken bolts or
bushings.
Shock absorbers
181
F650750 (TBC) , enUSA, Edition date: 201804, Second-Printing Vehicle Inspection Guide
Page 212 of 387

5. Turn the air conditioning (if equipped)
on and allow the engine to idle for at
least one minute.
6. Release the parking brake. With your foot on the brake pedal and with the
air conditioning on, put the vehicle in
drive (D) and allow the engine to idle
for at least one minute.
•If you do not allow the engine to
relearn its idle trim, the idle quality
of your vehicle may be adversely
affected until the idle trim is
eventually relearned.
7. Drive the vehicle to complete the relearning process
•The vehicle may need to be driven
10 mi (16 km) or more to relearn the
idle and fuel trim strategy along
with the ethanol content for flexible
fuel vehicles.
If the battery has been disconnected or a
new battery has been installed, the clock
and radio settings must be reset once the
battery is reconnected.
Always dispose of automotive
batteries in a responsible manner.
Follow your local authorized standards
for disposal. Call your local authorized
recycling center to find out more about
recycling automotive batteries.
Battery Management System (If
Equipped)
The battery management system (BMS)
monitors battery conditions and takes
actions to extend battery life. If excessive
battery drain is detected, the system may
temporarily disable certain electrical
features to protect the battery. Those
electrical accessories affected include the
rear defrost, heated/cooled seats, climate
control fan, heated steering wheel, audio
and navigation system. A message may be
shown in the information displays to alert the driver that battery protection actions
are active. These messages are only for
notification that an action is taking place,
and not intended to indicate an electrical
problem or that the battery requires
replacement.
Electrical accessory installation
To ensure proper operation of the BMS,
any electrical devices that are added to
the vehicle should not have their ground
connection made directly at the negative
battery post. A connection at the negative
battery post can cause inaccurate
measurements of the battery condition
and potential incorrect system operation.
Note:
Electrical or electronic accessories
added to the vehicle by the dealer or the
owner may adversely affect battery
performance and durability, and may also
affect the performance of other electrical
systems in the vehicle.
When a battery replacement is required,
the battery should only be replaced with
a Ford recommended replacement battery
which matches the electrical requirements
of the vehicle. After battery replacement,
or in some cases after charging the battery
with the external charger, the BMS requires
eight hours of vehicle sleep time (key off
with doors closed) to relearn the new
battery state of charge. Prior to relearning
the state of charge, the BMS may disable
electrical features (to protect the battery)
earlier than normal.
209
F650750 (TBC) , enUSA, Edition date: 201804, Second-Printing Maintenance
Page 286 of 387

SiriusXM Satellite Radio Service
Note:
SiriusXM reserves the unrestricted
right to change, rearrange, add or delete
programming including canceling, moving
or adding particular channels, and its prices,
at any time, with or without notice to you.
Ford Motor Company shall not be
responsible for any such programming
changes. SiriusXM satellite radio is a
subscription-based satellite radio service
that broadcasts a variety of music, sports,
news, weather, traffic and entertainment
programming. Your factory-installed
SiriusXM satellite radio system includes
hardware and a limited subscription term,
which begins on the date of sale or lease
of your vehicle. See an authorized dealer
for availability.
For more information on extended
subscription terms (a service fee is
required), the online media player and a
complete list of SiriusXM satellite radio
channels, and other features, please visit
www.siriusxm.com in the United States,
www.siriusxm.ca in Canada, or call
SiriusXM at 1-888-539-7474.
Satellite Radio Electronic Serial
Number (ESN)
You need your ESN to activate, modify or
track your satellite radio account. When in
satellite radio mode, tune to channel 0.
Troubleshooting Action
Condition
Message
No action required. This
message should disappear
shortly.
Radio requires more than
two seconds to produce
audio for the selected
channel.
Acquiring\b
If this message does not
clear shortly, or with an igni-
tion key cycle, your receiver
may have a fault. See an
authorized dealer for service.
There is an internal module
or system failure present.
Satellite antenna fault
SIRIUS system failure
Tune to another channel or
choose another preset.
The channel is no longer
available.
Invalid Channel
Contact SiriusXM at 1-888-
539-7474 to subscribe to
the channel, or tune to
another channel.
Your subscription does not
include this channel.
Unsubscribed Channel
283
F650750 (TBC) , enUSA, Edition date: 201804, Second-Printing Audio SystemE208625
Page 321 of 387

AUXILIARY SWITCHES
For maximum vehicle performance, keep
the following information in mind when
adding accessories or equipment to your
vehicle:
•
When adding accessories, equipment,
passengers and luggage to your
vehicle, do not exceed the total weight
capacity of the vehicle or of the front
or rear axle (GVWR or GAWR as
indicated on the Safety Compliance
Certification label). Ask an authorized
dealer for specific weight information.
• The Federal Communications
Commission (FCC) and Canadian
Radio Telecommunications
Commission (CRTC) regulate the use
of mobile communications systems
equipped with radio transmitters, for
example, two-way radios, telephones
and theft alarms. Any such equipment
installed in your vehicle should comply
with Federal Communications
Commission (FCC) and Canadian
Radio Telecommunications
Commission (CRTC) regulations, and
should be installed by an authorized
dealer.
• An authorized dealer needs to install
mobile communications systems.
Improper installation may harm the
operation of your vehicle, particularly
if the manufacturer did not design the
mobile communication system
specifically for automotive use.
• If you or an authorized Ford dealer add
any non-Ford electrical or electronic
accessories or components to your
vehicle, you may adversely affect
battery performance and durability. In
addition, you may also adversely affect
the performance of other electrical
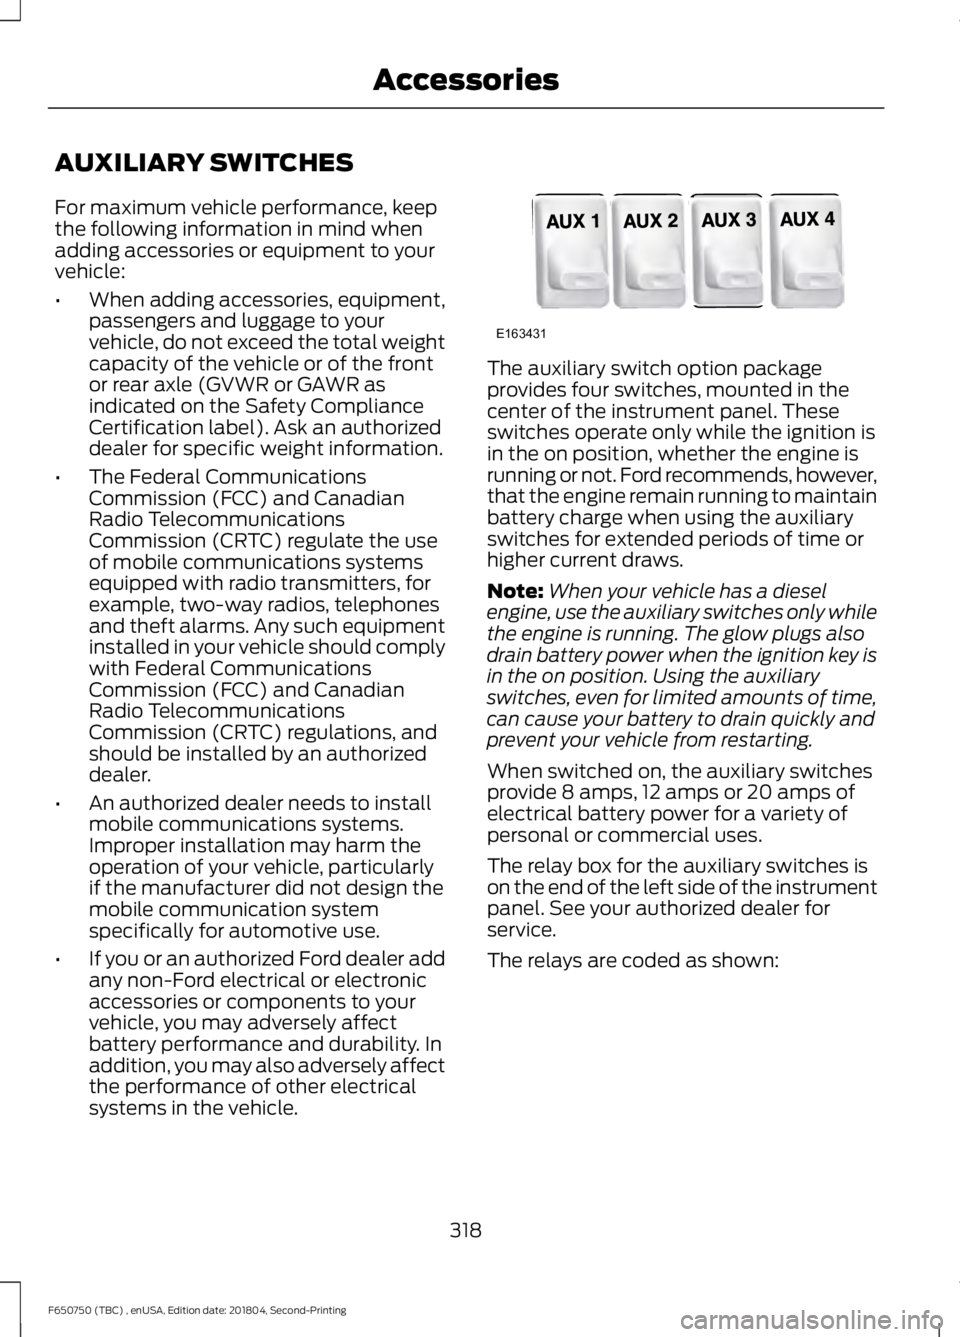
systems in the vehicle. The auxiliary switch option package
provides four switches, mounted in the
center of the instrument panel. These
switches operate only while the ignition is
in the on position, whether the engine is
running or not. Ford recommends, however,
that the engine remain running to maintain
battery charge when using the auxiliary
switches for extended periods of time or
higher current draws.
Note:
When your vehicle has a diesel
engine, use the auxiliary switches only while
the engine is running. The glow plugs also
drain battery power when the ignition key is
in the on position. Using the auxiliary
switches, even for limited amounts of time,
can cause your battery to drain quickly and
prevent your vehicle from restarting.
When switched on, the auxiliary switches
provide 8 amps, 12 amps or 20 amps of
electrical battery power for a variety of
personal or commercial uses.
The relay box for the auxiliary switches is
on the end of the left side of the instrument
panel. See your authorized dealer for
service.
The relays are coded as shown:
318
F650750 (TBC) , enUSA, Edition date: 201804, Second-Printing AccessoriesE163431
Page 378 of 387

2
2-Speed Rear Axle.........................................121
Axle Shifting........................................................... 121
A
A/C See: Climate Control........................................... 72
About This Manual...........................................7
Diesel Engine Information................................... 8
Minor Troubleshooting Guide............................ 9
Warnings.................................................................... 8
ABS See: Brakes............................................................ 122
ABS driving hints See: Hints on Driving With Anti-Lock
Brakes................................................................. 123
Accessories.....................................................318
Accessories See: Replacement Parts
Recommendation............................................ 13
Adjusting the Headlamps
.........................210
Horizontal Aim Adjustment............................. 211
Vertical Aim Adjustment................................. 210
Adjusting the Steering Wheel...................46
Air Brakes
.........................................................126
Air Chamber Stroke Indication...................... 126
Cam Brakes - Automatic Slack Adjusters............................................................ 127
Emergency Air Brake.......................................... 127
Air Conditioning See: Climate Control........................................... 72
Air Filter See: Changing the Engine Air Filter - 6.7L
Diesel.................................................................. 213
See: Changing the Engine Air Filter - 6.8L..................................................................... 216
Air Induction System Inspection.............221 Chassis-mounted Charge Air Cooler..........222
Air Suspension...............................................142 Air Suspension Dump Button........................ 142
Connecting and Disconnecting a Trailer with Air Suspension and Air Suspension
Dump Button................................................... 142
Suspension Conversions.................................. 142
System Indicator Light...................................... 142
Appendices.....................................................351 At a Glance
.........................................................17
Audible Warnings and Indicators.............63 Beltminder Warning............................................ 63
Door Ajar.................................................................. 63
Headlamps On Warning Chime...................... 63
Key in Ignition Warning Chime........................ 63
Parking Brake On Warning Chime.................. 63
Audio Control..................................................46 Media........................................................................\
. 47
Seek, Next or Previous........................................ 47
Audio Input Jack..........................................284
Audio System.................................................277 General Information.......................................... 277
Audio Unit - Vehicles With: AM/FM/CD/ SYNC..............................................................279
Accessing CD or MP3 Mode.......................... 280
Accessing the Auxiliary Media Sources............................................................. 279
Accessing the Folders..................................... 280
Accessing the Menu......................................... 280
Accessing the Phone Features..................... 280
Adjusting the Volume...................................... 280
Changing Radio Stations................................. 281
Ejecting the CD.................................................... 281
Fast Forwarding the Media............................. 281
Inserting a CD....................................................... 281
Muting the Audio................................................ 281
Playing or Pausing Media................................ 281
Rewinding the Media......................................... 281
Scanning the Audio........................................... 281
Selecting a Frequency Band.......................... 281
Setting the Memory Presets........................... 281
Switching Shuffle Mode On and Off...........281
Switching the Audio Unit On and Off.........281
Using Seek, Fast Forward and Reverse............................................................. 282
Audio Unit - Vehicles With: AM/ FM...................................................................278
Accessing the Clock Settings........................ 278
Accessing the Sound Settings...................... 279
Adjusting the Volume....................................... 279
Changing Radio Stations................................ 279
Selecting the Audio Modes............................ 279
Setting the Memory Presets.......................... 279
Switching the Audio Unit On and Off.........279
Using Seek, Fast Forward and Reverse.............................................................. 279
375
F650750 (TBC) , enUSA, Edition date: 201804, Second-Printing Index
Page 382 of 387

Engine Oil Pressure Gauge................................
57
Fuel Gauge.............................................................. 57
Gasoline Engines.................................................. 56
Gauge Package...................................................... 57
Information Display............................................. 58
Transmission Fluid Temperature Gauge................................................................... 57
Gearbox See: Transmission............................................... 115
General Driving Points................................149
Backing Up............................................................ 149
General Information.......................................... 149
Parking .................................................................... 150
General Information on Radio Frequencies..................................................40
General Maintenance Information
........322
Multi-point Inspection..................................... 326
Owner Checks and Services.......................... 324
Protecting Your Investment........................... 322
Why Maintain Your Vehicle?.......................... 322
Why Maintain Your Vehicle at Your Dealership?..................................................... 322
Getting Assistance Outside the U.S. and Canada..........................................................163
Getting the Services You Need...............160 Away From Home.............................................. 160
H
Handbrake See: Parking Brake.............................................. 123
Hazard Flashers
.............................................155
Headlamp Adjusting See: Adjusting the Headlamps...................... 210
Headlamp Removal See: Removing a Headlamp........................... 212
Headrest See: Head Restraints........................................... 75
Head Restraints...............................................75 Adjusting the Head Restraint........................... 76
Heated Exterior Mirrors.................................74
Heating See: Climate Control........................................... 72
Hints on Controlling the Interior Climate
............................................................73
Defogging the Side Windows in Cold
Weather............................................................... 74
General Hints.......................................................... 73Quickly Cooling the Interior...............................
73
Quickly Heating the Interior.............................. 73
Recommended Settings for Cooling.............73
Recommended Settings for Heating............73
Vehicle Stationary for Extended Periods During Extreme High Ambient
Temperatures.................................................... 74
Hints on Driving With Anti-Lock Brakes.............................................................123
Hood Lock See: Opening and Closing the Hood...........188
I
Ignition Switch
................................................86
In California (U.S. Only)..............................161
Information Display Control.......................47
Information Displays
....................................64
General Information........................................... 64
Information Messages
..................................67
Diesel Messages................................................... 67
Engine....................................................................... 70
Fuel........................................................................\
.... 70
Key........................................................................\
....... 71
Maintenance............................................................ 71
Park Brake................................................................. 71
Installing Child Restraints...........................20 Child Restraints..................................................... 20
Tether Strap Attachment.................................. 26
Using Cinch Tongue Lap and Shoulder Belts (All Front Center, Super Cab and Crew
Cab Rear Center Positions)......................... 23
Using Lap and Shoulder Belts.......................... 21
Using Lower Anchors and Tethers for CHildren (LATCH)............................................ 25
Using Tether Straps............................................. 25
Instrument Cluster
........................................56
Instrument Lighting Dimmer.....................50
Instrument Panel Overview.........................17
Interior Lamps
..................................................51
Interior Mirror...................................................55
Introduction.........................................................7
J
Jump Starting the Vehicle.........................156 Connecting the Jumper Cables..................... 156
Jump Starting....................................................... 157
379
F650750 (TBC) , enUSA, Edition date: 201804, Second-Printing Index