2019 FORD F650/750 maintenance schedule
[x] Cancel search: maintenance schedulePage 202 of 387
10.
Engine cooling system: Repeat steps
5 through 9 until the coolant level has
stabilized and is no longer dropping
after each step and the upper
radiator hose at the radiator is warm
to the touch, indicating that the
engine thermostat is open and
coolant is flowing through the
radiator.
11. Check the secondary cooling system.
Repeat steps 1 through 10 until the
coolant level has stabilized and is no
longer dropping after each step and
the lower passenger side of the
secondary radiator is warm to the
touch, indicating secondary
thermostat is open and coolant is
flowing through the entire system.
12. Check the coolant level in both systems before you drive your vehicle
the next few times.
13. If necessary, add prediluted engine coolant to the coolant reservoirs until
the coolant level is within the
minimum and maximum range as
listed on the reservoir. After you add
coolant, check the coolant
concentration.
Recycled Coolant
We do not recommend the use of recycled
coolant as an approved recycling process
is not yet available.
Dispose of used engine coolant in an
appropriate manner. Follow your
community ’s regulations and standards
for recycling and disposing of automotive
fluids. Severe Climates
If you drive in extremely cold climates:
•
It may be necessary to increase the
coolant concentration above 50%.
• A coolant concentration of 60%
provides improved freeze point
protection. Coolant concentrations
above 60% decrease the overheat
protection characteristics of the
coolant and may cause engine
damage.
If you drive in extremely hot climates:
• You can decrease the coolant
concentration to 40%.
• Coolant concentrations below 40%
decrease the freeze and corrosion
protection characteristics of the
coolant and may cause engine
damage.
Vehicles driven year-round in non-extreme
climates should use prediluted engine
coolant for optimum cooling system and
engine protection.
Coolant Change
Follow the specific mileage intervals, as
listed in the scheduled maintenance
information, to change the coolant. The
information display may display a message
to change coolant at this time. Add
prediluted coolant approved to the correct
specification. See Capacities and
Specifications (page 255).
199
F650750 (TBC) , enUSA, Edition date: 201804, Second-Printing Maintenance
Page 203 of 387
Engine-driven Cooling Fan
Your vehicle may have an engine driven
cooling fan drive also called a fan clutch.
This fan drive changes the fan speed to
match the vehicle
’s changing cooling air
flow requirements. Fan speed, fan noise
level and fuel consumption all will increase
based on the driving conditions that
include trailer towing, hill climbing, heavy
loads, high speed and high ambient
temperature, individually or in combination.
The fan drive is designed to provide the
minimum fan speed and resulting
minimum fan noise and fuel consumption
required to meet the ever-changing vehicle
cooling air flow requirements. You can hear
the amount of fan noise increasing and
decreasing as the engine power
requirements and vehicle driving conditions
change as you drive. This is normal to the
operation of your vehicle. You may also
hear high levels of the fan when the engine
is first started and should normally
decrease after driving for a short time.
ENGINE COOLANT CHECK -
6.8L WARNING: Do not remove the
coolant reservoir cap when the engine is
on or the cooling system is hot. Wait 10
minutes for the cooling system to cool
down. Cover the coolant reservoir cap
with a thick cloth to prevent the
possibility of scalding and slowly remove
the cap. Failure to follow this instruction
could result in personal injury. WARNING:
Do not put coolant in
the windshield washer reservoir. If
sprayed on the windshield, coolant could
make it difficult to see through the
windshield. WARNING:
To reduce the risk of
personal injury, make sure the engine is
cool before unscrewing the coolant
pressure relief cap. The cooling system
is under pressure. Steam and hot liquid
can come out forcefully when you loosen
the cap slightly. WARNING:
Do not add coolant
further than the MAX mark.
When the engine is cold, check the
concentration and level of the coolant at
the intervals listed in the scheduled
maintenance information. See Scheduled
Maintenance
(page 322).
Note: Make sure that the coolant level is
between the
MIN and the MAX marks on
the coolant reservoir.
Note: Coolant expands when it is hot. The
level may extend beyond the
MAX mark.
Maintain coolant concentration within
48% to 50%, which equates to a freeze
point between -30°F (-34°C) and -34°F
(-37°C). Coolant concentration should be
checked using a refractometer. We
recommend Robinair® Coolant and
Battery Refractometer 75240 (Rotunda
tool part number: ROB75240). We do not
recommend the use of hydrometers or
coolant test strips for measuring coolant
concentration.
Note: Automotive fluids are not
interchangeable. Do not use coolant or
windshield washer fluid outside of its
specified function and vehicle location.
Note: Do not use stop leak pellets, cooling
system sealants, or additives as they can
cause damage to the engine cooling or
heating systems. Resulting component
damage may not be covered by the vehicle
Warranty.
200
F650750 (TBC) , enUSA, Edition date: 201804, Second-Printing Maintenance
Page 204 of 387
Adding Coolant
WARNING: Do not remove the
coolant reservoir cap when the engine is
on or the cooling system is hot. Wait 10
minutes for the cooling system to cool
down. Cover the coolant reservoir cap
with a thick cloth to prevent the
possibility of scalding and slowly remove
the cap. Failure to follow this instruction
could result in personal injury.
It is very important to use prediluted
coolant meeting the correct specification
in order to avoid plugging the small
passageways in the engine cooling system.
See
Capacities and Specifications
(page 269). Incorrect prediluted coolant
use can cause damage not covered by the
vehicle Warranty.
If the coolant level is at or below the
minimum mark, add prediluted coolant
immediately.
To top up the coolant level do the
following:
1. Unscrew the cap slowly. Any pressure escapes as you unscrew the cap.
2. Add prediluted coolant meeting the correct specification. See
Scheduled
Maintenance (page 322).
3. Add enough prediluted coolant to reach the correct level.
4. Replace the coolant reservoir cap, turn
it clockwise until you feel a strong
resistance.
5. Check the coolant level in the coolant reservoir the next few times you drive
your vehicle. Do not mix different colors or types of
prediluted coolant in your vehicle. Mixing
of prediluted coolant or using an incorrect
prediluted coolant may harm the engine
or cooling system components and may
not be covered by the vehicle Warranty.
In case of emergency, you can add a large
amount of water without prediluted
coolant in order to reach a vehicle service
location. On arrival do the following:
1. Drain the cooling system.
2. Chemically clean the cooling system.
We recommend Motorcraft Premium
Cooling System Flush.
3. Refill with prediluted coolant as soon as possible.
Water alone, without prediluted coolant,
can cause engine damage from corrosion,
overheating or freezing.
Do not use the following as a coolant
substitute:
• Alcohol.
• Methanol.
• Brine.
• Any coolant mixed with alcohol or
methanol antifreeze.
Alcohol and other liquids can cause engine
damage from overheating or freezing.
Do not add extra inhibitors or additives to
the coolant. These can be harmful and
compromise the corrosion protection of
the coolant.
Recycled Coolant
We do not recommend the use of recycled
coolant as an approved recycling process
is not yet available.
Dispose of used engine coolant in an
appropriate manner. Follow your
community ’s regulations and standards
for recycling and disposing of automotive
fluids.
201
F650750 (TBC) , enUSA, Edition date: 201804, Second-Printing Maintenance
Page 207 of 387
AUTOMATIC TRANSMISSION
FLUID CHECK
The transmission does not consume fluid.
However, the fluid level should be checked
if the transmission is not working properly,
for example if the transmission slips, shifts
slowly or if there are signs of fluid loss.
The transmission fluid and filter on your
vehicle must be replaced at the specified
service interval. See Scheduled
Maintenance (page 322).
Automatic transmission fluid expands
when warmed. To check the fluid level
consistently and accurately, do the
following:
1. Drive the vehicle until it reaches normal
operating temperature. This may take
up to
20 mi (30 km).
2. Make sure that your vehicle is on level ground.
3. With the engine running, parking brake
engaged and your foot on the brake
pedal, move the gearshift lever through
all of the gear ranges. Allow sufficient
time for each gear to engage.
4. Make sure the parking brake is on. Make
sure the transmission is in park (P) or
neutral (N) and leave the engine
running.
5. Open the hood. See
Opening and
Closing the Hood (page 188).
6. Remove the dipstick and wipe it with a clean, lint-free cloth. See
Under
Hood Overview (page 191).
7. Replace the dipstick and remove it again to check the fluid level.
8. If the fluid level is correct, replace the dipstick and make sure it is fully seated.
Note: If the fluid level is between the
maximum and minimum marks, the fluid
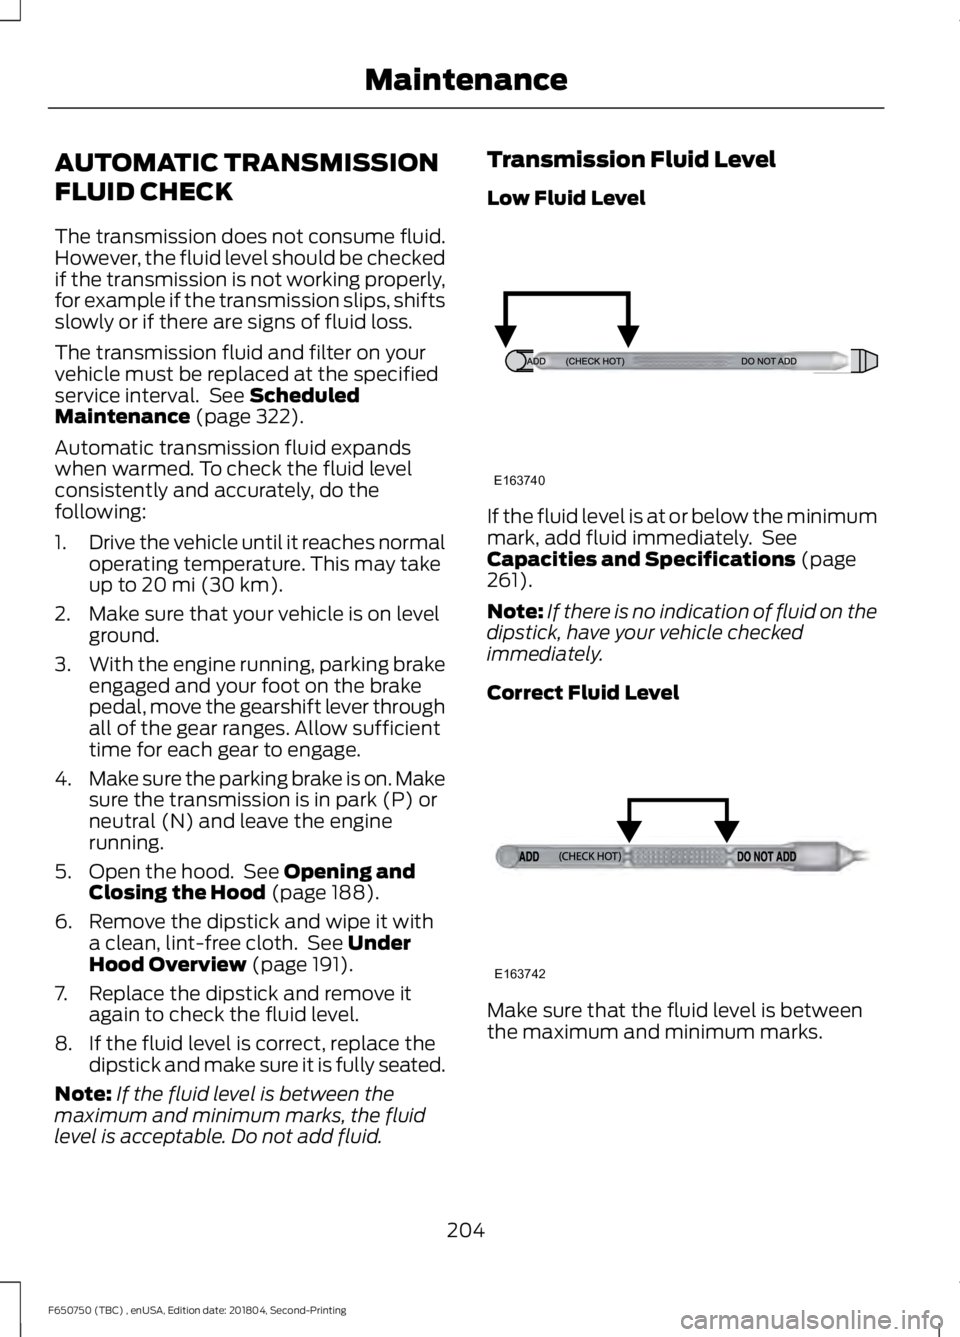
level is acceptable. Do not add fluid. Transmission Fluid Level
Low Fluid Level
If the fluid level is at or below the minimum
mark, add fluid immediately. See
Capacities and Specifications
(page
261).
Note: If there is no indication of fluid on the
dipstick, have your vehicle checked
immediately.
Correct Fluid Level Make sure that the fluid level is between
the maximum and minimum marks.
204
F650750 (TBC) , enUSA, Edition date: 201804, Second-Printing MaintenanceE163740 E163742
Page 209 of 387
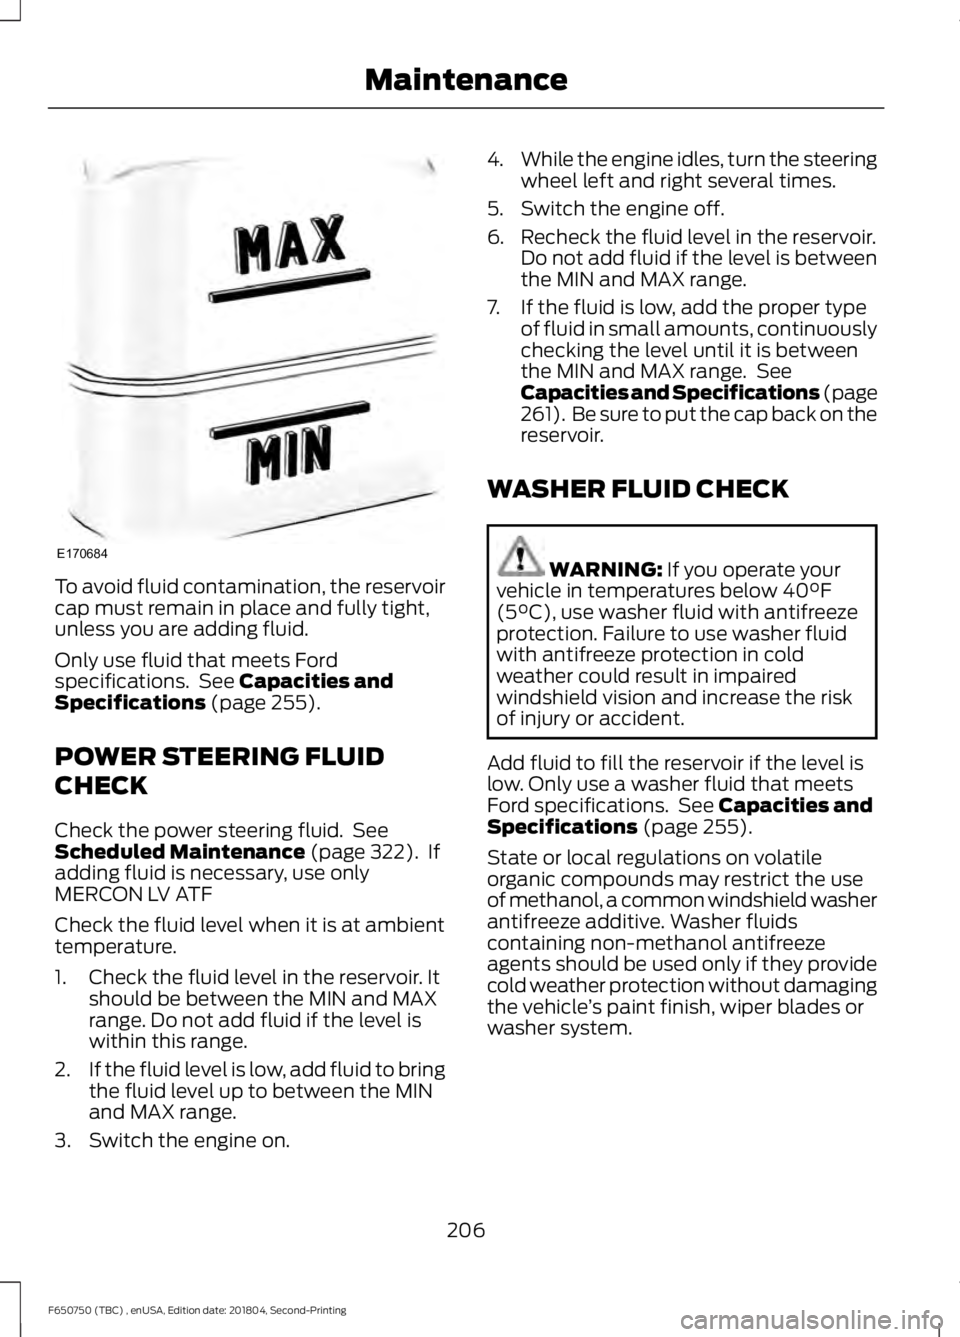
To avoid fluid contamination, the reservoir
cap must remain in place and fully tight,
unless you are adding fluid.
Only use fluid that meets Ford
specifications. See Capacities and
Specifications (page 255).
POWER STEERING FLUID
CHECK
Check the power steering fluid. See
Scheduled Maintenance
(page 322). If
adding fluid is necessary, use only
MERCON LV ATF
Check the fluid level when it is at ambient
temperature.
1. Check the fluid level in the reservoir. It should be between the MIN and MAX
range. Do not add fluid if the level is
within this range.
2. If the fluid level is low, add fluid to bring
the fluid level up to between the MIN
and MAX range.
3. Switch the engine on. 4.
While the engine idles, turn the steering
wheel left and right several times.
5. Switch the engine off.
6. Recheck the fluid level in the reservoir. Do not add fluid if the level is between
the MIN and MAX range.
7. If the fluid is low, add the proper type of fluid in small amounts, continuously
checking the level until it is between
the MIN and MAX range. See
Capacities and Specifications (page
261). Be sure to put the cap back on the
reservoir.
WASHER FLUID CHECK WARNING:
If you operate your
vehicle in temperatures below 40°F
(5°C), use washer fluid with antifreeze
protection. Failure to use washer fluid
with antifreeze protection in cold
weather could result in impaired
windshield vision and increase the risk
of injury or accident.
Add fluid to fill the reservoir if the level is
low. Only use a washer fluid that meets
Ford specifications. See
Capacities and
Specifications (page 255).
State or local regulations on volatile
organic compounds may restrict the use
of methanol, a common windshield washer
antifreeze additive. Washer fluids
containing non-methanol antifreeze
agents should be used only if they provide
cold weather protection without damaging
the vehicle ’s paint finish, wiper blades or
washer system.
206
F650750 (TBC) , enUSA, Edition date: 201804, Second-Printing MaintenanceE170684
Page 219 of 387
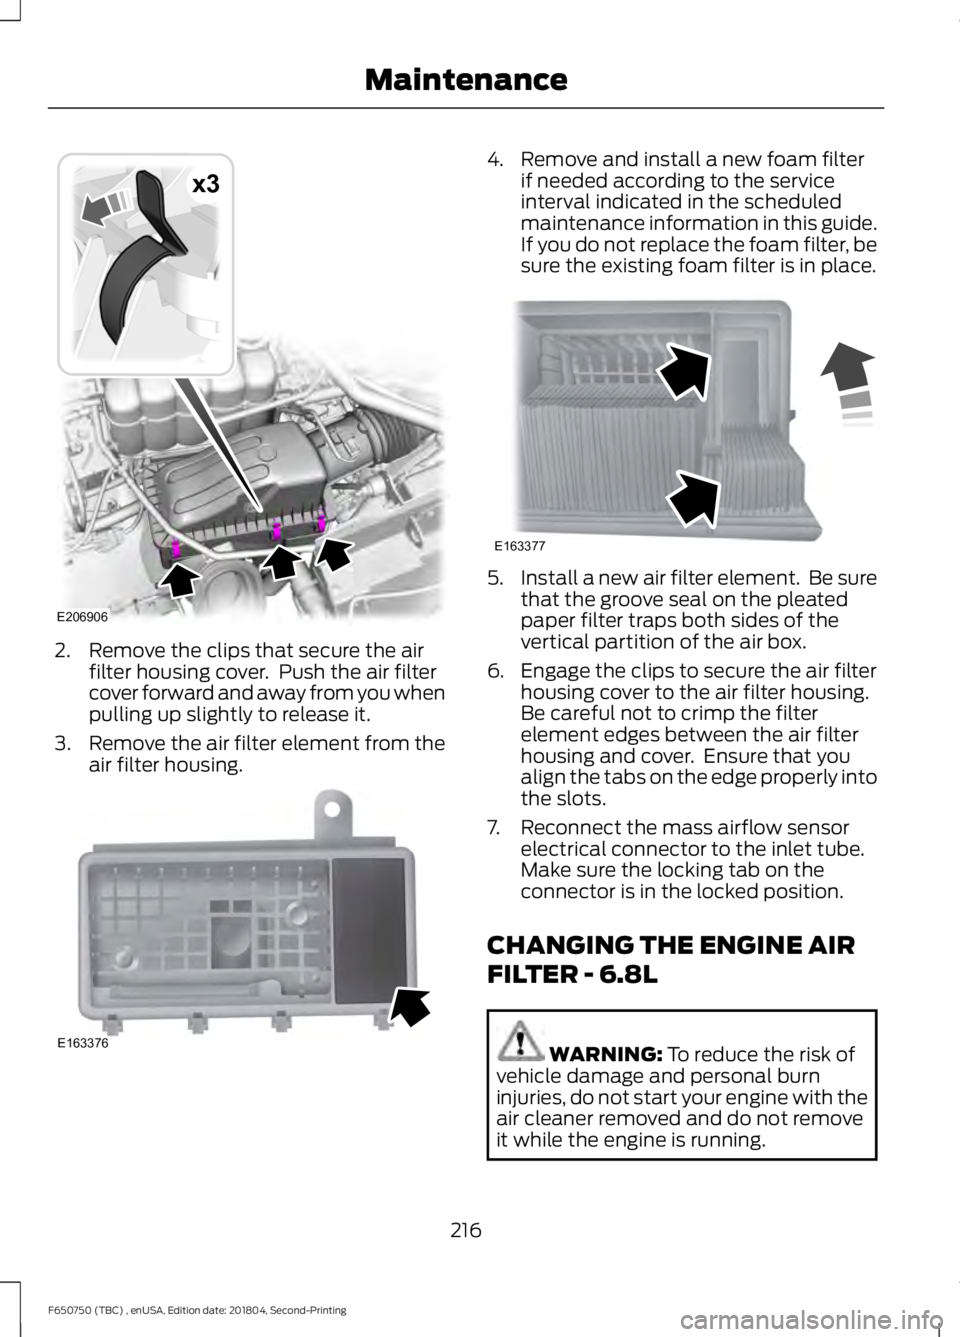
2. Remove the clips that secure the air
filter housing cover. Push the air filter
cover forward and away from you when
pulling up slightly to release it.
3. Remove the air filter element from the
air filter housing. 4. Remove and install a new foam filter
if needed according to the service
interval indicated in the scheduled
maintenance information in this guide.
If you do not replace the foam filter, be
sure the existing foam filter is in place. 5.
Install a new air filter element. Be sure
that the groove seal on the pleated
paper filter traps both sides of the
vertical partition of the air box.
6. Engage the clips to secure the air filter housing cover to the air filter housing.
Be careful not to crimp the filter
element edges between the air filter
housing and cover. Ensure that you
align the tabs on the edge properly into
the slots.
7. Reconnect the mass airflow sensor electrical connector to the inlet tube.
Make sure the locking tab on the
connector is in the locked position.
CHANGING THE ENGINE AIR
FILTER - 6.8L WARNING: To reduce the risk of
vehicle damage and personal burn
injuries, do not start your engine with the
air cleaner removed and do not remove
it while the engine is running.
216
F650750 (TBC) , enUSA, Edition date: 201804, Second-Printing MaintenanceE206906
x3 E163376 E163377
Page 220 of 387
Note:
Operating your vehicle in heavy
snowfall or extreme rain conditions may
allow excessive amounts of snow or water
into the air intake system. This could plug
or soak the air filter that could cause the
engine to lose power or shut down.
When replacing the air filter element, use
a Motorcraft® air filter element. See
Motorcraft Parts (page 258).
Note: Failure to use the correct air filter
element may result in severe engine
damage. Resulting component damage
may not be covered by the vehicle Warranty.
Change the air filter element at the correct
interval. See
Scheduled Maintenance
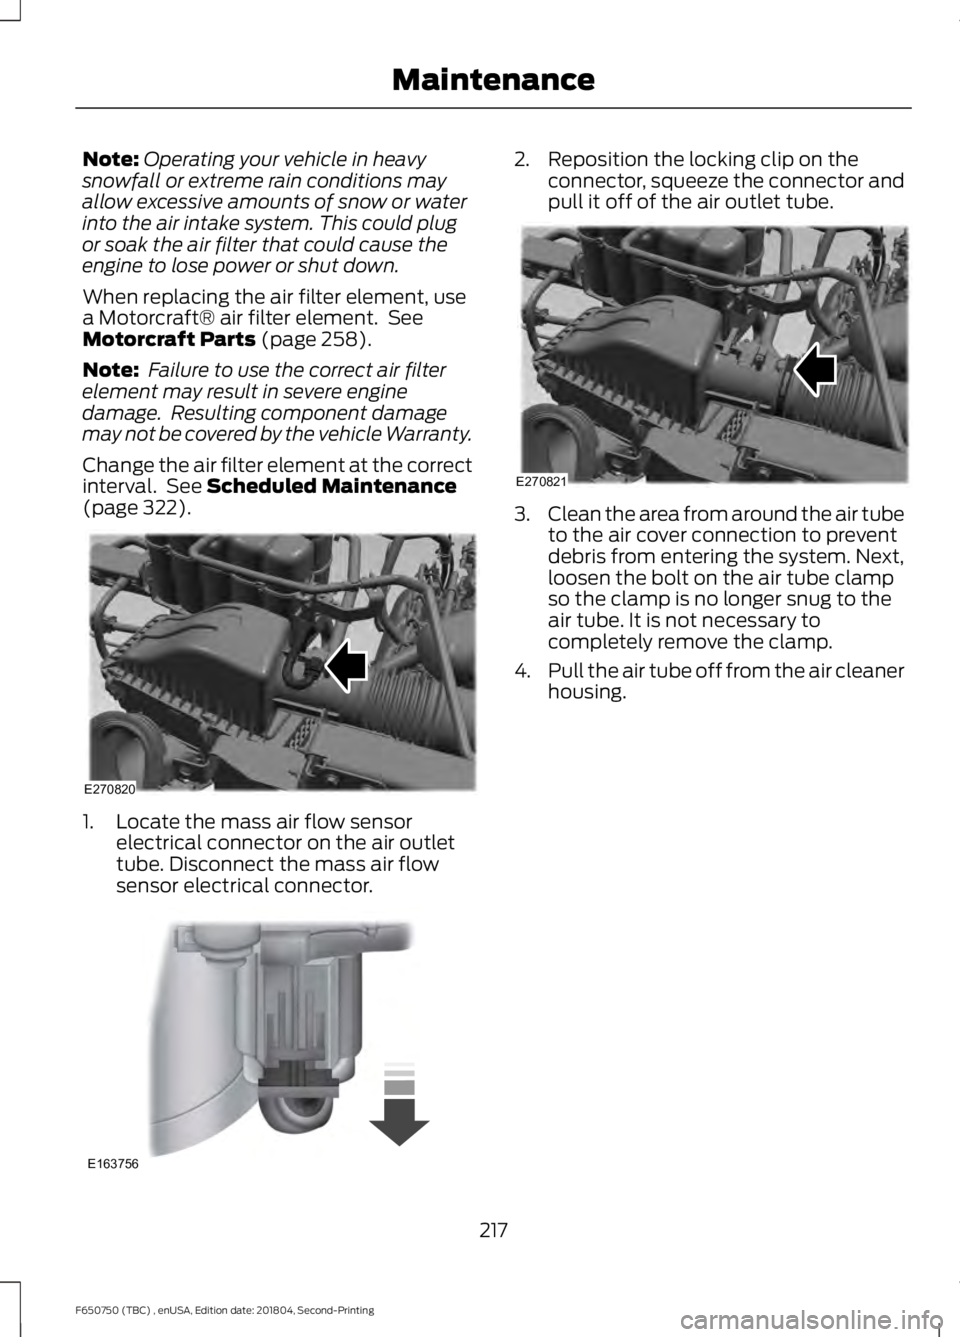
(page 322). 1. Locate the mass air flow sensor
electrical connector on the air outlet
tube. Disconnect the mass air flow
sensor electrical connector. 2. Reposition the locking clip on the
connector, squeeze the connector and
pull it off of the air outlet tube. 3.
Clean the area from around the air tube
to the air cover connection to prevent
debris from entering the system. Next,
loosen the bolt on the air tube clamp
so the clamp is no longer snug to the
air tube. It is not necessary to
completely remove the clamp.
4. Pull the air tube off from the air cleaner
housing.
217
F650750 (TBC) , enUSA, Edition date: 201804, Second-Printing MaintenanceE270820 E163756 E270821
Page 222 of 387
Regular fuel filter changes are an
important part of engine maintenance;
failing to keep with the scheduled
maintenance could lead to engine
performance issues and fuel injection
system damage. See Scheduled
Maintenance (page 322).
Use only recommended service parts
conforming to specifications. See
Motorcraft Parts
(page 257).
Note: Using fuel that has high levels of
impurities may require more frequent filter
replacements than the service interval
specifies.
Diesel Fuel Conditioner Module
Filter
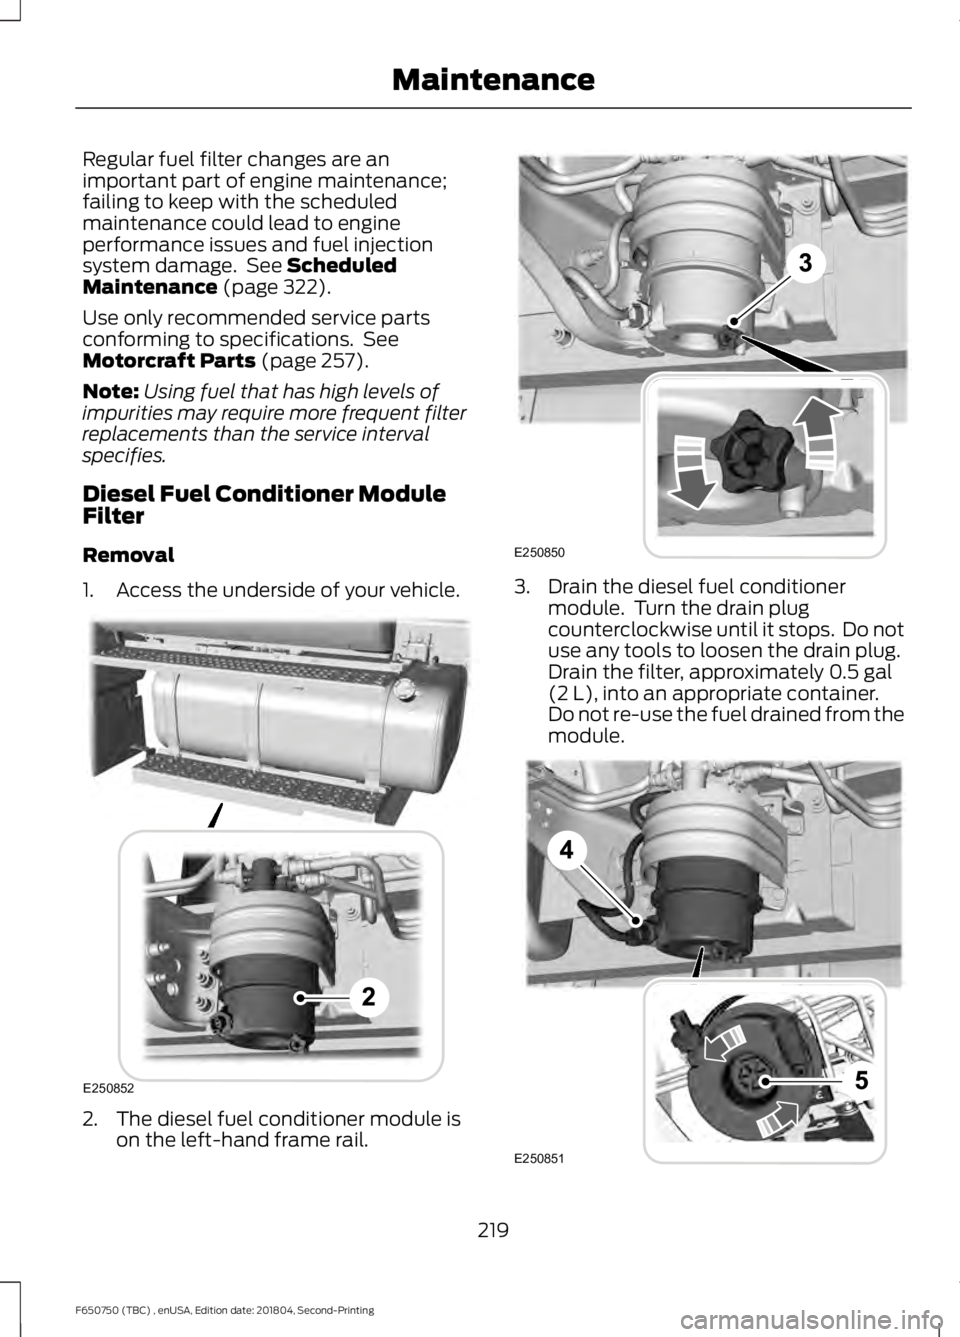
Removal
1. Access the underside of your vehicle. 2. The diesel fuel conditioner module is
on the left-hand frame rail. 3. Drain the diesel fuel conditioner
module. Turn the drain plug
counterclockwise until it stops. Do not
use any tools to loosen the drain plug.
Drain the filter, approximately
0.5 gal
(2 L), into an appropriate container.
Do not re-use the fuel drained from the
module. 219
F650750 (TBC) , enUSA, Edition date: 201804, Second-Printing MaintenanceE250852 E250850 E250851