2019 FORD F650/750 oil change
[x] Cancel search: oil changePage 98 of 387
Biodiesel fuel is a chemically converted
product from renewable fuel sources, such
as vegetable oils, animal fats and waste
cooking greases.
To help achieve acceptable engine
performance and durability when using
biodiesel in your vehicle:
•
Confirm the biodiesel content of the
fuel to be B20 (20% biodiesel) or less
• Only use biodiesel fuel of good quality
that complies with industry standards
• Follow the recommended service
maintenance intervals. See
Scheduled Maintenance (page 322).
• Do not store biodiesel fuel in the fuel
tank for more than 1 month
• Consider changing brands or reducing
biodiesel content if you have cold
temperature fuel gelling issues or a
frequent LOW FUEL PRESSURE
message appearing
• Do NOT use raw oils, fats or waste
cooking greases
Use of biodiesel in concentrations greater
than 20% may cause damage to your
vehicle, including engine and/or exhaust
after-treatment hardware (exhaust
catalyst and particulate filter) failures.
Concentrations greater than 20% can also
cause fuel filter restrictions that may result
in a lack of power or damage to fuel
system components, including fuel pump
and fuel injector failures.
SAE 5W-40 or SAE 15W-40 oil is
recommended for fuels with greater than
5% biodiesel (B5). Refer to the Special
operating conditions section under the
Schedule Maintenance chapter for more
information about oil change intervals and
other maintenance when operating on
biodiesel. Look for a label on the fuel pump to
confirm the amount of biodiesel contained
in a diesel fuel. Biodiesel content is often
indicated with the letter B followed by the
percent of biodiesel in the fuel. For
example, B20 indicates a fuel containing
20% biodiesel. Ask the service station
attendant to confirm the biodiesel content
of a diesel fuel if you do not see a label on
the fuel pump.
Biodiesel fuels degrade more easily than
diesel fuels not containing biodiesel and
should not be stored in the fuel tank for
more than 1 month. If you plan to park or
store your vehicle for more than 1 month,
then you should empty your vehicle fuel
tank of biodiesel fuel. You should fill the
tank with a pure petroleum-based diesel
fuel and run your vehicle for a minimum of
30 minutes.
Note:
Degraded or oxidized biodiesel can
damage fuel system seals and plastics and
corrode steel parts.
During cold weather, if you have problems
operating on biodiesel, you may need to
use a diesel fuel with lower biodiesel
content, try another brand, or discontinue
the use of biodiesel.
Diesel Fuel Additives
It should not be necessary to add any
aftermarket additives to your fuel if you
use a high quality diesel fuel that conforms
to ASTM industry specifications.
Aftermarket additives can damage the fuel
injector system or engine.
Use Motorcraft® cetane booster or an
equivalent cetane booster additive if you
suspect fuel has low cetane. Use
Motorcraft® anti-gel & performance
improver or an equivalent additive if there
is fuel gelling.
95
F650750 (TBC) , enUSA, Edition date: 201804, Second-Printing Fuel and Refueling
Page 152 of 387
BREAKING-IN
You need to break in new tires for
approximately 300 mi (480 km). During
this time, your vehicle may exhibit some
unusual driving characteristics.
Avoid driving too fast during the first
1,000 mi (1,600 km)
. Vary your speed
frequently and change up through the
gears early. Do not labor the engine.
Drive your new vehicle at least
1,000 mi
(1,600 km) before towing a trailer. Make
sure you use the specified engine oil. See
Capacities and Specifications
(page
261).
Do not add friction modifier compounds
or special break-in oils during the first few
thousand miles (kilometers) of operation.
These additives may prevent piston ring
seating.
GENERAL DRIVING POINTS
General Information
• Accelerate smoothly and evenly. Rapid
acceleration increases fuel
consumption without increasing engine
performance.
• When approaching a hill, press the
accelerator smoothly to start the
incline at full power, and then shift
down as needed to maintain vehicle
speed.
• When going down a hill, or long steep
grades, prevent overspeeding of the
engine. Normally, choose the same
gear to descend the hill that you use to
ascend the hill. The engine governor
has no control over engine speed when
it is being pushed by a loaded vehicle. •
Do not operate in a gear that permits
an engine speed more than the
maximum governed speed or high-idle
RPM (no load).
• Always shift to a lower gear at high
altitudes to prevent engine smoking.
Backing Up WARNING: All vehicles have blind
spots. To reduce the risk of severe injury
or property damage, never move your
vehicle to the side or rear or change lanes
without being sure your way is clear on
both sides and to your rear. WARNING:
To reduce the risk of
the possibility of personal injury while
backing up the vehicle, always be sure
your vehicle ’s path is clear.
Before backing up your vehicle, be sure you
can do so safely. If anything behind the cab
limits your view, do not rely on mirrors
alone to make sure that your intended path
is clear. If other people are in the vicinity,
have someone standing well behind your
vehicle and outside of your intended path
(visible through an exterior mirror) guide
you as you back up.
Although OSHA or some governmental
regulations may require the use of an
electrical or mechanical back up alarm to
warn bystanders, such an alarm does not
guarantee that the intended path is clear.
When in doubt, get out of your vehicle and
visually check the intended path is clear.
Back up slowly as to allow others time to
move, if necessary.
If you install an electrical back up alarm,
connect it to the backup lamp circuit.
149
F650750 (TBC) , enUSA, Edition date: 201804, Second-Printing Driving Hints
Page 155 of 387
In order to operate the engine in
temperatures of 32°F (0°C) or lower, read
the following instructions:
•
Make sure that the batteries are of
sufficient size and are fully charged.
Check other electrical components to
make sure they are in optimum
condition
• Use the proper coolant solution at the
concentration recommended
protecting the engine against damage
from freezing
• Try to keep the fuel tank full as much
as possible at the end of operation to
prevent condensation in the fuel
system
• Make sure you use proper cold weather
engine oil and that it is at its proper
level. Also, if necessary, make sure to
follow the engine oil and filter change
schedule found under the Special
operating conditions section listed in
the scheduled maintenance
information
• At temperatures of -9°F (-23°C) or
below, it is recommended that you use
an engine block heater to improve cold
engine starting
• If operating in arctic temperatures of
-20°F (-29°C)
or lower, consult your
truck dealer for information about
special cold weather equipment and
precautions
The following cold weather idling
guidelines are recommended:
• You can use Motorcraft® cetane
improvers or non-alcohol-based
cetane improvers from a reputable
manufacturer as needed.
• Maintain the engine cooling system
properly. •
Avoid shutting the engine down after
an extensive idling period. Drive your
vehicle for several miles with the
engine at normal operating
temperatures under a moderate load.
• Consider using an engine block heater.
• For extended idle times use an
approved idle speed increase device.
Winter Operating Tips for Arctic
Operation -20°F (-29°C) and
Below
The following information is a guideline
only and is not to be the only source of
possible solutions in resolving extreme
cold temperature issues.
Starting Aids WARNING:
Do not use starting
fluid, such as ether, in the air intake
system (see air filter decal). Such fluid
could cause immediate explosive
damage to the engine and possible
personal injury.
The use of the factory engine block heater
assists in engine starting in extreme cold
ambient temperatures. See
Engine Block
Heater (page 90).
Idle Control
Your vehicle may have a factory option for
a stationary elevated idle control through
dash-mounted upfitter switches that
allows the operator to elevate the idle rpm
for extended idle periods, as well as
aftermarket equipment such as PTO
operation. You must configure this feature
even if ordered from the factory. See your
authorized dealer for required upfitting.
152
F650750 (TBC) , enUSA, Edition date: 201804, Second-Printing Driving Hints
Page 181 of 387
VEHICLE INSPECTION
INFORMATION
To make sure your vehicle is ready to
operate, conduct a pre-trip inspection at
the beginning of each work period. Follow
the steps listed in this section to verify a
proper vehicle inspection procedure.
WARNING: Exercise great caution
when working on a vehicle equipped with
an automatic fan clutch. The fan starts
in motion only after the engine coolant
reaches a predetermined temperature
or the refrigerant pressure (if equipped
with air conditioning) reaches a
predetermined setting. The fan starts at
this point with no advance warning.
Never reach near, or permit objects to
protrude into, the fan blade radius while
the engine is running as this could result
in vehicle damage, personal injury or
death. WARNING:
Do not operate the
vehicle if any suspension conditions
listed in the following charts are evident.
Loss of steering or suspension could
result in property damage, personal injury
or death. WARNING:
If a wheel must be
changed, obtain expert tire service help.
Mounting and un-mounting of tires
should only be performed by a qualified
technician using necessary safety
procedures and equipment, otherwise
the result could be property damage,
personal injury or death.
Note: Always make sure you apply the
parking brake before starting the engine. Engine compartment (with engine off)
Use the dipstick to verify the oil level is in the proper operating
range. See
Engine Oil Dipstick (page 192).
Engine oil
Look through the plastic reservoir and verify the coolant level
is within the proper operating range. Do not remove the
pressure cap until the coolant has cooled. See
Engine
Coolant Check (page 200).
Engine coolant
Verify that the fluid level is in the proper operating range. See
Power Steering Fluid Check
(page 206).
Power steering fluid
Remove the master cylinder caps and inspect the fluid level.
See
Brake Fluid Check (page 205).
Brake fluid
178
F650750 (TBC) , enUSA, Edition date: 201804, Second-Printing Vehicle Inspection Guide
Page 196 of 387
To top up the engine oil level do the
following:
1. Clean the area surrounding the engine
oil filler cap before you remove it.
2. Remove the engine oil filler cap. See Under Hood Overview (page 190).
Turn it counterclockwise and remove
it.
3. Add engine oil of the proper viscosity and grade that meets Ford
specifications. See
Capacities and
Specifications (page 261). You may
have to use a funnel to pour the engine
oil into the opening.
4. Recheck the oil level.
5. If the oil level is correct, replace the dipstick and make sure it is fully seated.
6. Replace the engine oil filler cap. Turn it clockwise until you feel a strong
resistance.
Note: Do not add oil further than the
maximum mark. Oil levels above the
maximum mark may cause engine damage.
Note: Make sure you install the oil filler cap
correctly.
Note: Soak up any spillage with an
absorbent cloth immediately.
Engine lubrication for severe
service operation
The following conditions define severe
operation for which engine operation with
SAE 5W-40 oil which meets Ford
specification, WSS-M2C171-F1, is
recommended. Oil and oil filter change
intervals will be determined by the
Intelligent Oil Life Monitor™ as noted
previously.
ENGINE OIL CHECK - 6.8L
To check the engine oil level consistently
and accurately, do the following: 1.
Make sure the parking brake is on. Make
sure the transmission is in park (P) or
neutral (N).
2. Run the engine until it reaches normal operating temperature.
3. Make sure that your vehicle is on level ground.
4. Switch the engine off and wait 15 minutes for the oil to drain into the oil
pan. Checking the engine oil level too
soon after you switch the engine off
may result in an inaccurate reading.
5. Open the hood. See
Maintenance
(page 187).
6. Remove the dipstick and wipe it with a clean, lint-free cloth. See
Maintenance
(page 187).
7. Replace the dipstick and remove it again to check the oil level. See
Maintenance
(page 187).
8. Make sure that the oil level is between
the maximum and minimum marks. If
the oil level is at the minimum mark,
add oil immediately. See
Capacities
and Specifications (page 255).
9. If the oil level is correct, replace the dipstick and make sure it is fully seated.
Note: Do not remove the dipstick when the
engine is running.
Note: If the oil level is between the
maximum and minimum marks, the oil level
is acceptable. Do not add oil.
Note: The oil consumption of new engines
reaches its normal level after approximately
3,000 mi (5,000 km)
.
Adding Engine Oil WARNING:
Do not remove the
filler cap when the engine is running.
193
F650750 (TBC) , enUSA, Edition date: 201804, Second-Printing Maintenance
Page 197 of 387
Do not use supplemental engine oil
additives because they are unnecessary
and could lead to engine damage that may
not be covered by the vehicle Warranty.
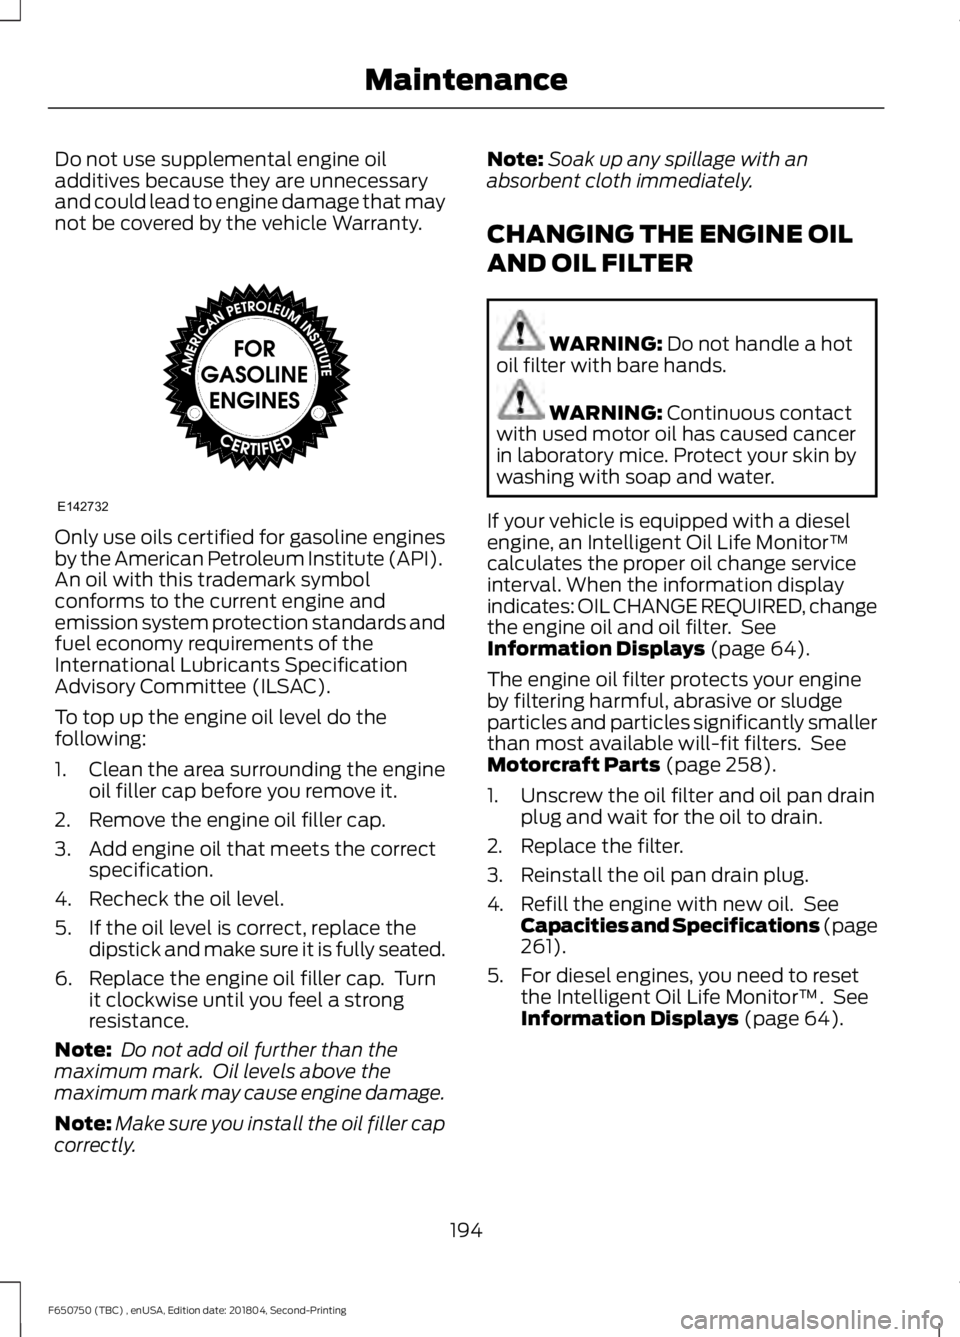
Only use oils certified for gasoline engines
by the American Petroleum Institute (API).
An oil with this trademark symbol
conforms to the current engine and
emission system protection standards and
fuel economy requirements of the
International Lubricants Specification
Advisory Committee (ILSAC).
To top up the engine oil level do the
following:
1. Clean the area surrounding the engine
oil filler cap before you remove it.
2. Remove the engine oil filler cap.
3. Add engine oil that meets the correct specification.
4. Recheck the oil level.
5. If the oil level is correct, replace the dipstick and make sure it is fully seated.
6. Replace the engine oil filler cap. Turn it clockwise until you feel a strong
resistance.
Note: Do not add oil further than the
maximum mark. Oil levels above the
maximum mark may cause engine damage.
Note: Make sure you install the oil filler cap
correctly. Note:
Soak up any spillage with an
absorbent cloth immediately.
CHANGING THE ENGINE OIL
AND OIL FILTER WARNING: Do not handle a hot
oil filter with bare hands. WARNING:
Continuous contact
with used motor oil has caused cancer
in laboratory mice. Protect your skin by
washing with soap and water.
If your vehicle is equipped with a diesel
engine, an Intelligent Oil Life Monitor™
calculates the proper oil change service
interval. When the information display
indicates: OIL CHANGE REQUIRED, change
the engine oil and oil filter. See
Information Displays
(page 64).
The engine oil filter protects your engine
by filtering harmful, abrasive or sludge
particles and particles significantly smaller
than most available will-fit filters. See
Motorcraft Parts
(page 258).
1. Unscrew the oil filter and oil pan drain plug and wait for the oil to drain.
2. Replace the filter.
3. Reinstall the oil pan drain plug.
4. Refill the engine with new oil. See Capacities and Specifications (page
261
).
5. For diesel engines, you need to reset the Intelligent Oil Life Monitor™. See
Information Displays
(page 64).
194
F650750 (TBC) , enUSA, Edition date: 201804, Second-Printing MaintenanceE142732
Page 198 of 387
Engine lubrication for severe
service operation
The following conditions define severe
operation for which engine operation with
SAE 5W-40 API CJ-4 is recommended. Oil
and oil filter change intervals will be
determined by the Intelligent Oil Life
Monitor™ as noted previously.
•
Frequent or extended idling (over 10
minutes per hour of normal driving).
• Low-speed operation/stationary use.
• If vehicle is operated in sustained
ambient temperatures below -9°F
(-23°C) or above 100°F (38°C).
• Frequent low-speed operation,
consistent heavy traffic less than
25 mph (40 km/h)
.
• Operating in severe dust conditions.
• Operating the vehicle off road.
• Towing a trailer over
1,000 mi
(1,600 km).
• Sustained, high-speed driving at Gross
Vehicle Weight Rating (maximum
loaded weight for vehicle operation).
• Use of fuels with sulfur content other
than ultra-low sulfur diesel (ULSD).
• Use of high-sulfur diesel fuel.
CHANGING THE CRANKCASE
VENT FILTER ELEMENT - 6.7L
DIESEL WARNING:
Do not dispose of
engine oil or oil filters in the household
refuse or the public sewage system. Use
an authorized waste disposal facility.
Do not clean or recondition the filter
element. We recommend that you demand the use
of genuine Ford and Motorcraft® parts
whenever your vehicle requires scheduled
maintenance or repair. Use the correct
specification filter element. See
Motorcraft Parts
(page 257).
Note: Operating your vehicle without a filter
element or with an unapproved filter
element may result in damage to the turbo
charger or exchanger and could lead to
engine damage that may not be covered by
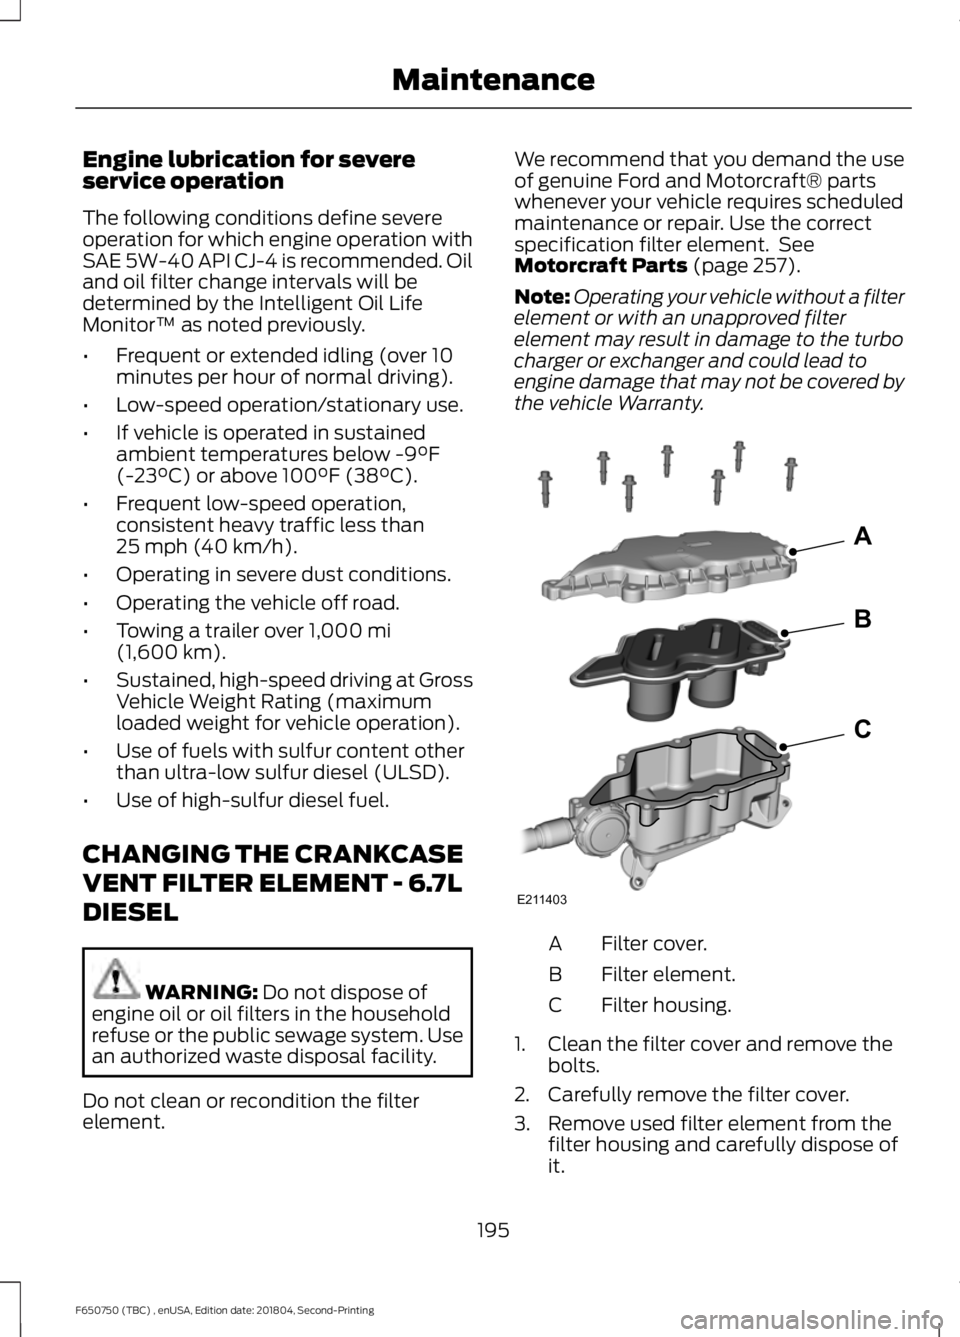
the vehicle Warranty. Filter cover.
A
Filter element.
B
Filter housing.
C
1. Clean the filter cover and remove the bolts.
2. Carefully remove the filter cover.
3. Remove used filter element from the filter housing and carefully dispose of
it.
195
F650750 (TBC) , enUSA, Edition date: 201804, Second-Printing MaintenanceE211403
A
B
C
Page 199 of 387
4.
Make sure that the sealing surfaces on
the filter housing and cover are clean
and free of debris.
5. Install the new filter element.
6. Install the filter cover.
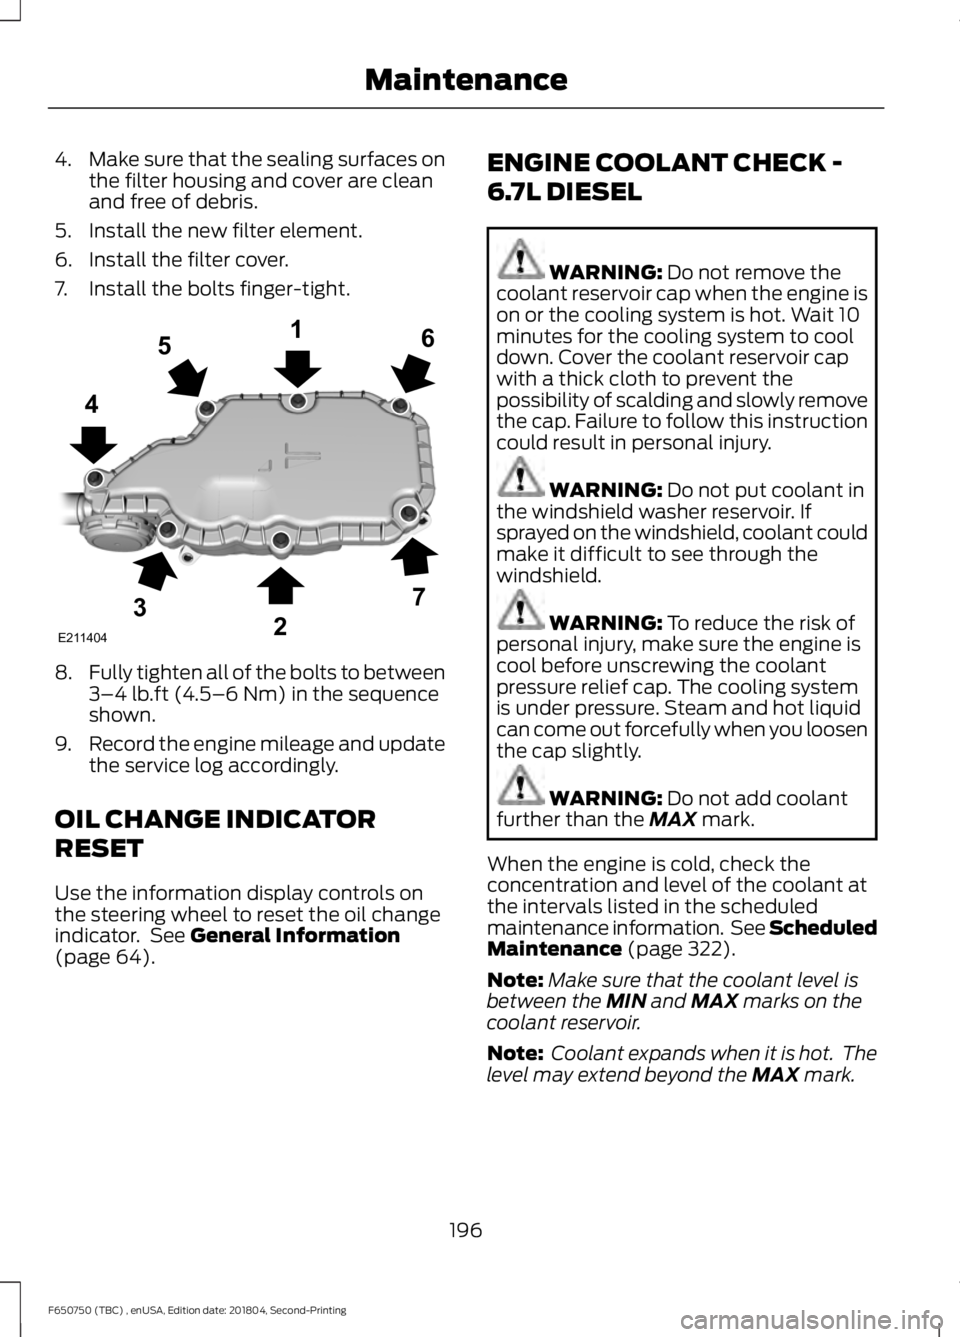
7. Install the bolts finger-tight. 8.
Fully tighten all of the bolts to between
3–4 lb.ft (4.5–6 Nm) in the sequence
shown.
9. Record the engine mileage and update
the service log accordingly.
OIL CHANGE INDICATOR
RESET
Use the information display controls on
the steering wheel to reset the oil change
indicator. See
General Information
(page 64). ENGINE COOLANT CHECK -
6.7L DIESEL WARNING:
Do not remove the
coolant reservoir cap when the engine is
on or the cooling system is hot. Wait 10
minutes for the cooling system to cool
down. Cover the coolant reservoir cap
with a thick cloth to prevent the
possibility of scalding and slowly remove
the cap. Failure to follow this instruction
could result in personal injury. WARNING:
Do not put coolant in
the windshield washer reservoir. If
sprayed on the windshield, coolant could
make it difficult to see through the
windshield. WARNING:
To reduce the risk of
personal injury, make sure the engine is
cool before unscrewing the coolant
pressure relief cap. The cooling system
is under pressure. Steam and hot liquid
can come out forcefully when you loosen
the cap slightly. WARNING:
Do not add coolant
further than the MAX mark.
When the engine is cold, check the
concentration and level of the coolant at
the intervals listed in the scheduled
maintenance information. See Scheduled
Maintenance
(page 322).
Note: Make sure that the coolant level is
between the
MIN and MAX marks on the
coolant reservoir.
Note: Coolant expands when it is hot. The
level may extend beyond the
MAX mark.
196
F650750 (TBC) , enUSA, Edition date: 201804, Second-Printing MaintenanceE211404
165
4
32
7