2019 FORD F650/750 light
[x] Cancel search: lightPage 41 of 387
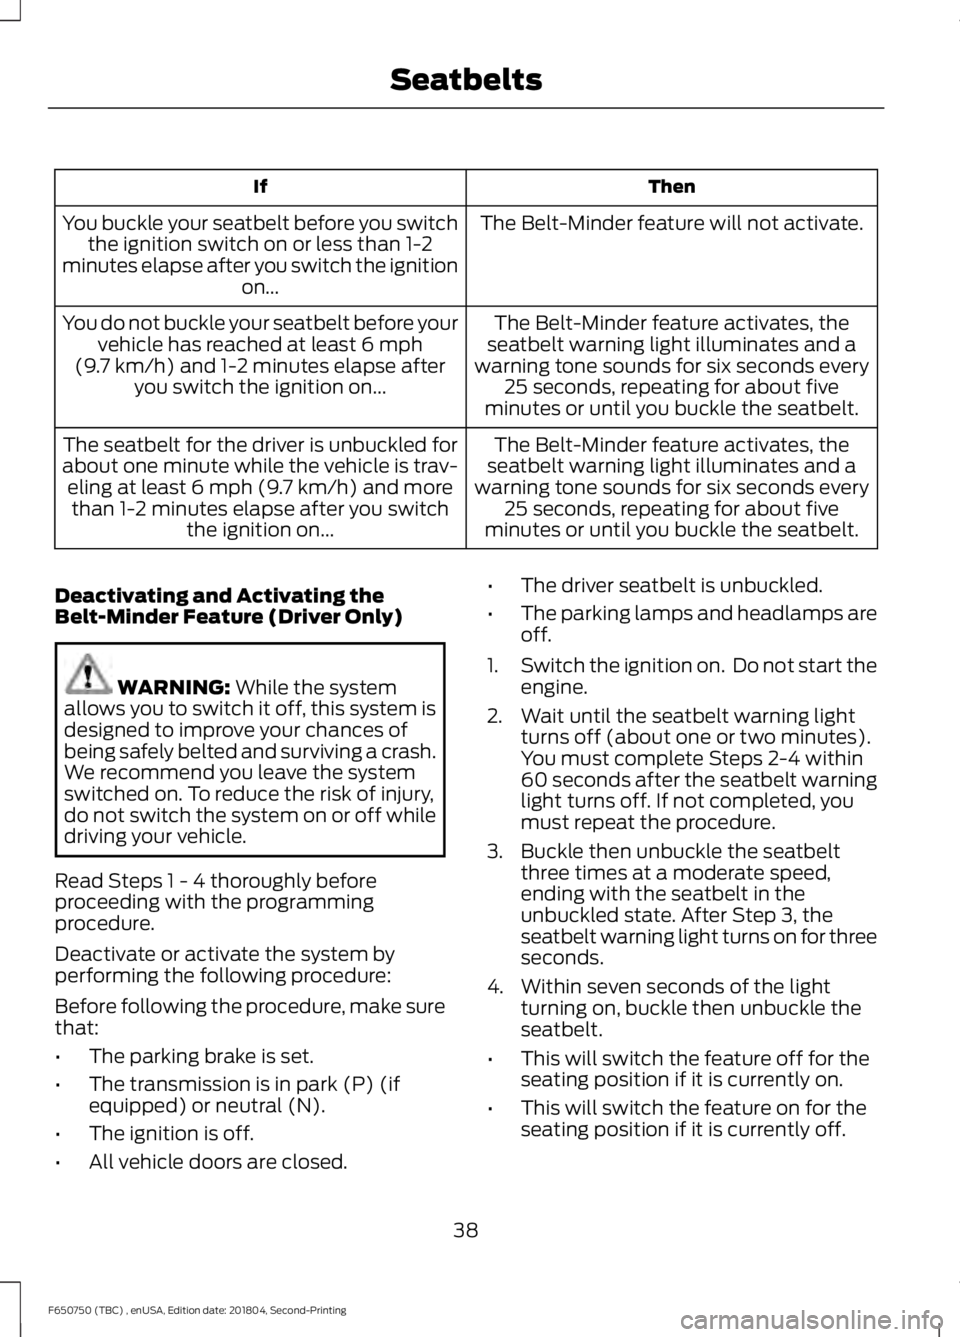
Then
If
The Belt-Minder feature will not activate.
You buckle your seatbelt before you switch
the ignition switch on or less than 1-2
minutes elapse after you switch the ignition on...
The Belt-Minder feature activates, the
seatbelt warning light illuminates and a
warning tone sounds for six seconds every 25 seconds, repeating for about five
minutes or until you buckle the seatbelt.
You do not buckle your seatbelt before your
vehicle has reached at least 6 mph
(9.7 km/h) and 1-2 minutes elapse after
you switch the ignition on...
The Belt-Minder feature activates, the
seatbelt warning light illuminates and a
warning tone sounds for six seconds every 25 seconds, repeating for about five
minutes or until you buckle the seatbelt.
The seatbelt for the driver is unbuckled for
about one minute while the vehicle is trav- eling at least
6 mph (9.7 km/h) and more
than 1-2 minutes elapse after you switch the ignition on...
Deactivating and Activating the
Belt-Minder Feature (Driver Only) WARNING:
While the system
allows you to switch it off, this system is
designed to improve your chances of
being safely belted and surviving a crash.
We recommend you leave the system
switched on. To reduce the risk of injury,
do not switch the system on or off while
driving your vehicle.
Read Steps 1 - 4 thoroughly before
proceeding with the programming
procedure.
Deactivate or activate the system by
performing the following procedure:
Before following the procedure, make sure
that:
• The parking brake is set.
• The transmission is in park (P) (if
equipped) or neutral (N).
• The ignition is off.
• All vehicle doors are closed. •
The driver seatbelt is unbuckled.
• The parking lamps and headlamps are
off.
1. Switch the ignition on. Do not start the
engine.
2. Wait until the seatbelt warning light turns off (about one or two minutes).
You must complete Steps 2-4 within
60 seconds after the seatbelt warning
light turns off. If not completed, you
must repeat the procedure.
3. Buckle then unbuckle the seatbelt three times at a moderate speed,
ending with the seatbelt in the
unbuckled state. After Step 3, the
seatbelt warning light turns on for three
seconds.
4. Within seven seconds of the light turning on, buckle then unbuckle the
seatbelt.
• This will switch the feature off for the
seating position if it is currently on.
• This will switch the feature on for the
seating position if it is currently off.
38
F650750 (TBC) , enUSA, Edition date: 201804, Second-Printing Seatbelts
Page 42 of 387
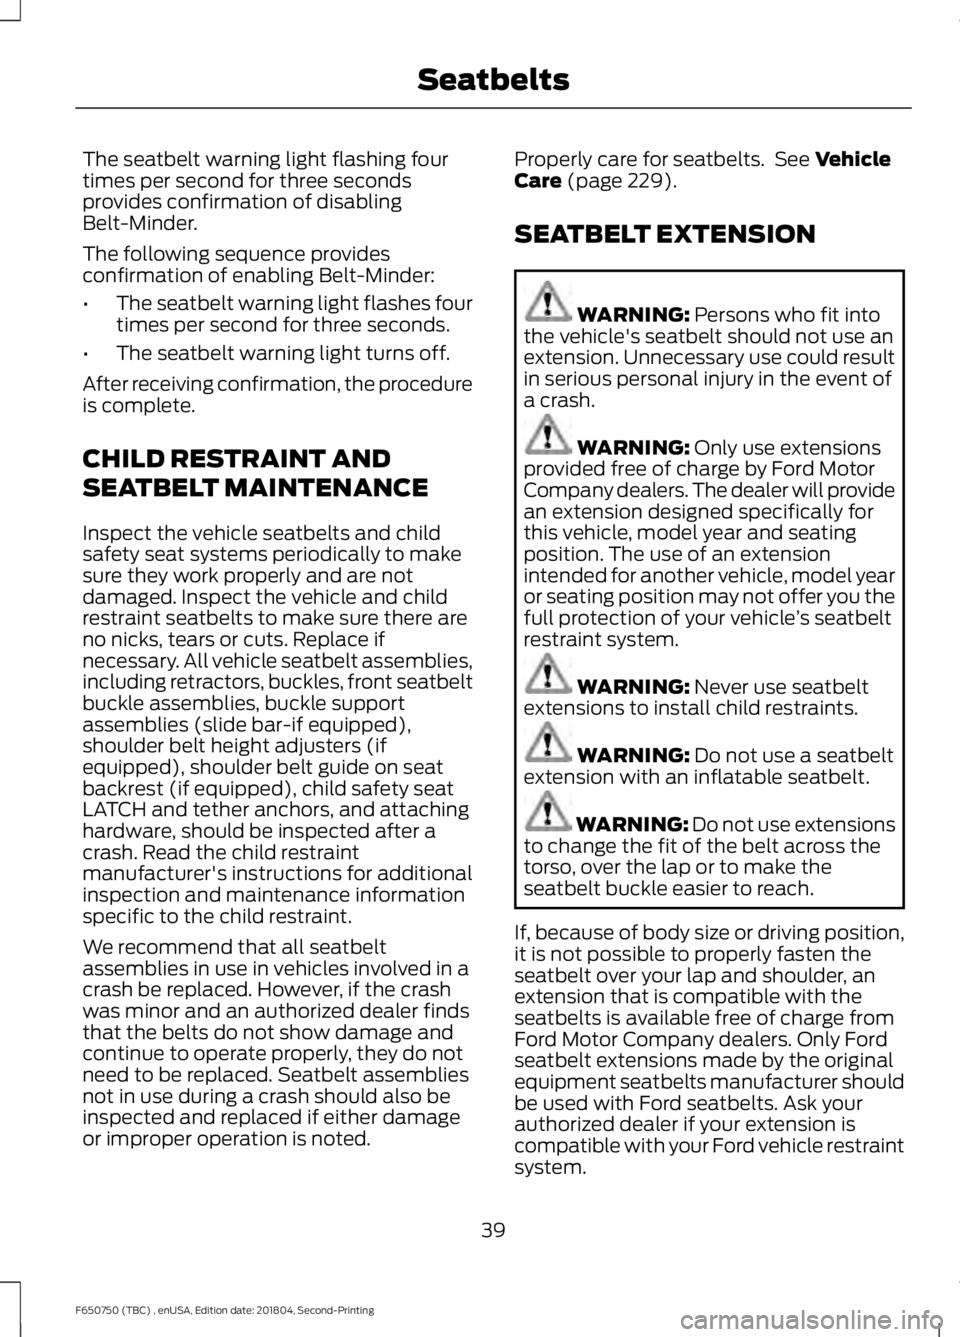
The seatbelt warning light flashing four
times per second for three seconds
provides confirmation of disabling
Belt-Minder.
The following sequence provides
confirmation of enabling Belt-Minder:
•
The seatbelt warning light flashes four
times per second for three seconds.
• The seatbelt warning light turns off.
After receiving confirmation, the procedure
is complete.
CHILD RESTRAINT AND
SEATBELT MAINTENANCE
Inspect the vehicle seatbelts and child
safety seat systems periodically to make
sure they work properly and are not
damaged. Inspect the vehicle and child
restraint seatbelts to make sure there are
no nicks, tears or cuts. Replace if
necessary. All vehicle seatbelt assemblies,
including retractors, buckles, front seatbelt
buckle assemblies, buckle support
assemblies (slide bar-if equipped),
shoulder belt height adjusters (if
equipped), shoulder belt guide on seat
backrest (if equipped), child safety seat
LATCH and tether anchors, and attaching
hardware, should be inspected after a
crash. Read the child restraint
manufacturer's instructions for additional
inspection and maintenance information
specific to the child restraint.
We recommend that all seatbelt
assemblies in use in vehicles involved in a
crash be replaced. However, if the crash
was minor and an authorized dealer finds
that the belts do not show damage and
continue to operate properly, they do not
need to be replaced. Seatbelt assemblies
not in use during a crash should also be
inspected and replaced if either damage
or improper operation is noted. Properly care for seatbelts. See Vehicle
Care (page 229).
SEATBELT EXTENSION WARNING:
Persons who fit into
the vehicle's seatbelt should not use an
extension. Unnecessary use could result
in serious personal injury in the event of
a crash. WARNING:
Only use extensions
provided free of charge by Ford Motor
Company dealers. The dealer will provide
an extension designed specifically for
this vehicle, model year and seating
position. The use of an extension
intended for another vehicle, model year
or seating position may not offer you the
full protection of your vehicle ’s seatbelt
restraint system. WARNING:
Never use seatbelt
extensions to install child restraints. WARNING:
Do not use a seatbelt
extension with an inflatable seatbelt. WARNING:
Do not use extensions
to change the fit of the belt across the
torso, over the lap or to make the
seatbelt buckle easier to reach.
If, because of body size or driving position,
it is not possible to properly fasten the
seatbelt over your lap and shoulder, an
extension that is compatible with the
seatbelts is available free of charge from
Ford Motor Company dealers. Only Ford
seatbelt extensions made by the original
equipment seatbelts manufacturer should
be used with Ford seatbelts. Ask your
authorized dealer if your extension is
compatible with your Ford vehicle restraint
system.
39
F650750 (TBC) , enUSA, Edition date: 201804, Second-Printing Seatbelts
Page 46 of 387
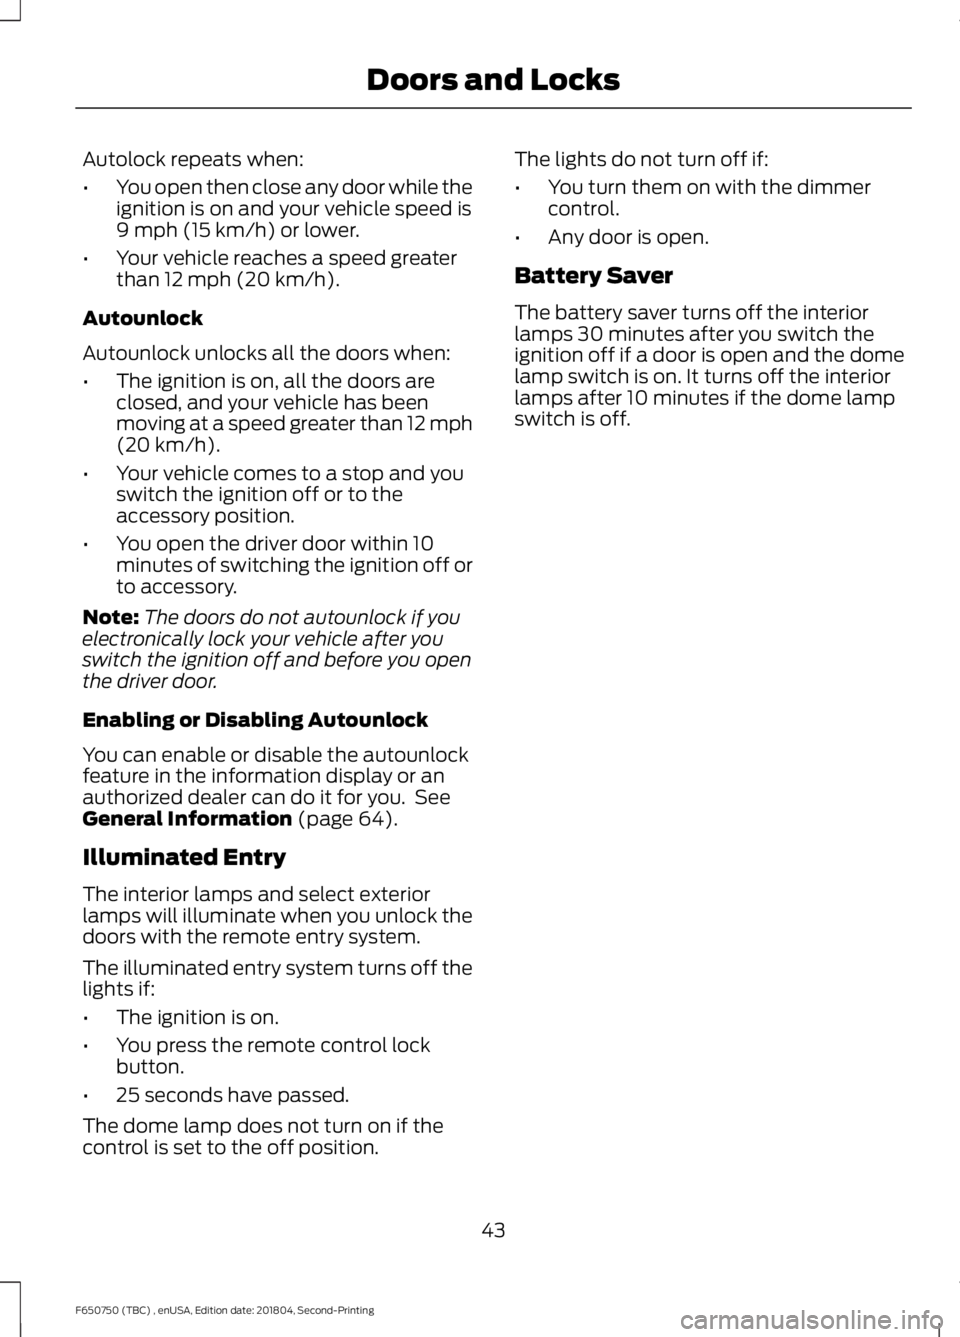
Autolock repeats when:
•
You open then close any door while the
ignition is on and your vehicle speed is
9 mph (15 km/h) or lower.
• Your vehicle reaches a speed greater
than
12 mph (20 km/h).
Autounlock
Autounlock unlocks all the doors when:
• The ignition is on, all the doors are
closed, and your vehicle has been
moving at a speed greater than 12 mph
(20 km/h)
.
• Your vehicle comes to a stop and you
switch the ignition off or to the
accessory position.
• You open the driver door within 10
minutes of switching the ignition off or
to accessory.
Note: The doors do not autounlock if you
electronically lock your vehicle after you
switch the ignition off and before you open
the driver door.
Enabling or Disabling Autounlock
You can enable or disable the autounlock
feature in the information display or an
authorized dealer can do it for you. See
General Information
(page 64).
Illuminated Entry
The interior lamps and select exterior
lamps will illuminate when you unlock the
doors with the remote entry system.
The illuminated entry system turns off the
lights if:
• The ignition is on.
• You press the remote control lock
button.
• 25 seconds have passed.
The dome lamp does not turn on if the
control is set to the off position. The lights do not turn off if:
•
You turn them on with the dimmer
control.
• Any door is open.
Battery Saver
The battery saver turns off the interior
lamps 30 minutes after you switch the
ignition off if a door is open and the dome
lamp switch is on. It turns off the interior
lamps after 10 minutes if the dome lamp
switch is off.
43
F650750 (TBC) , enUSA, Edition date: 201804, Second-Printing Doors and Locks
Page 52 of 387
GENERAL INFORMATION
Condensation in the Exterior Front
Lamps and Rear Lamps
Exterior front lamps and rear lamps have
vents to accommodate normal changes
in air pressure.
Condensation can be a natural by-product
of this design. When moist air enters the
lamp assembly through the vents, there is
a possibility that condensation can occur
when the temperature is cold. When
normal condensation occurs, a fine mist
can form on the interior of the lens. The
fine mist eventually clears and exits
through the vents during normal operation.
Clearing time may take as long as 48 hours
under dry weather conditions.
Examples of acceptable condensation are:
•
The presence of a fine mist (no streaks,
drip marks or large droplets).
• A fine mist covers less than 50% of the
lens.
Examples of unacceptable condensation
are:
• A water puddle inside the lamp.
• Streaks, drip marks or large droplets
present on the interior of the lens.
If you see any unacceptable condensation,
have your vehicle checked by an authorized
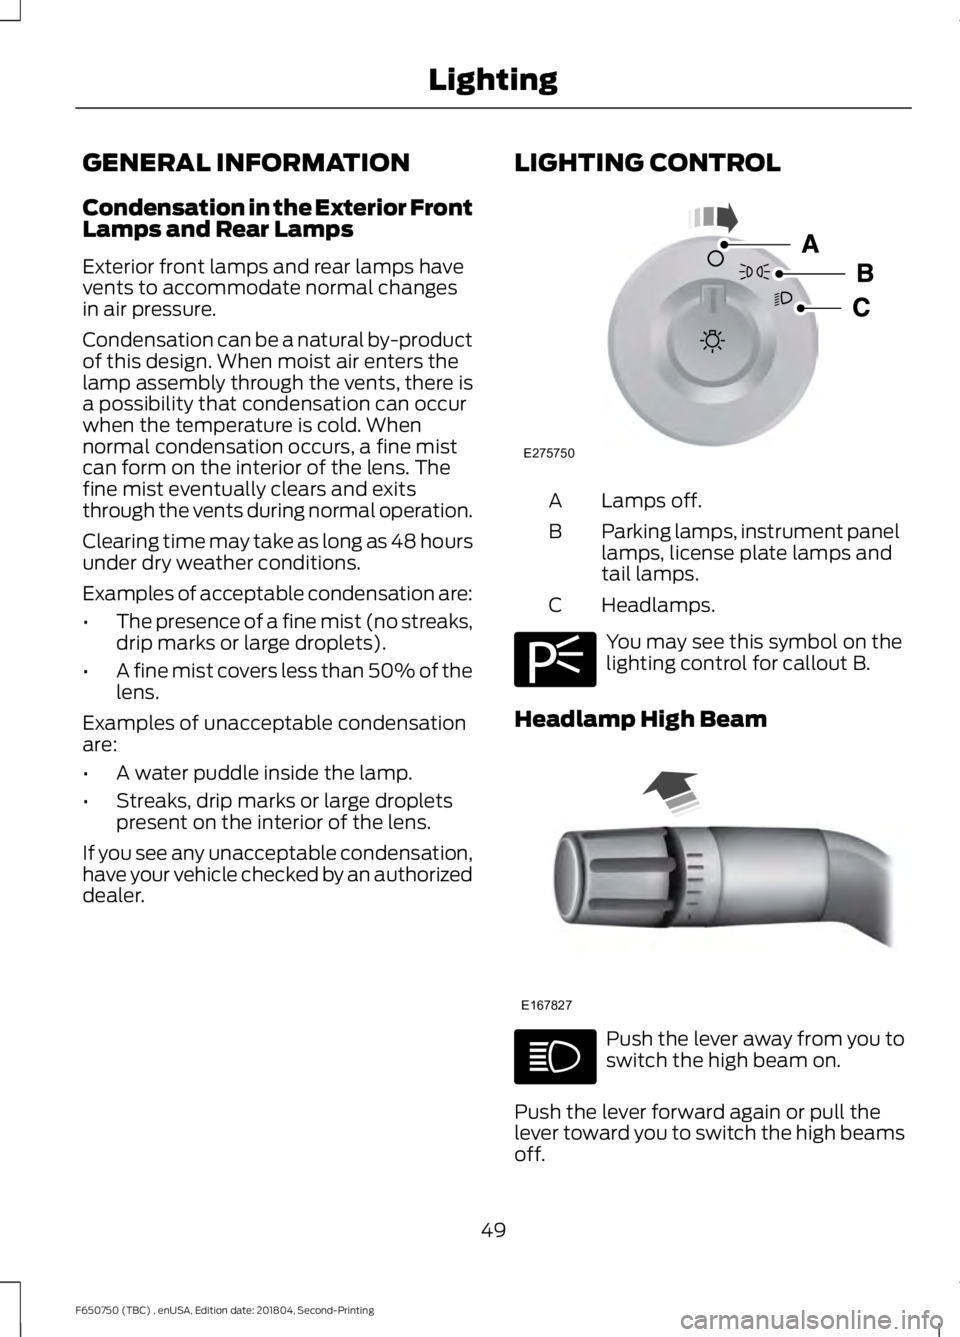
dealer. LIGHTING CONTROL Lamps off.
A
Parking lamps, instrument panel
lamps, license plate lamps and
tail lamps.
B
Headlamps.
C You may see this symbol on the
lighting control for callout B.
Headlamp High Beam Push the lever away from you to
switch the high beam on.
Push the lever forward again or pull the
lever toward you to switch the high beams
off.
49
F650750 (TBC) , enUSA, Edition date: 201804, Second-Printing LightingE275750 E275706 E167827
Page 53 of 387

Flashing the Headlamp High Beam
Slightly pull the lever toward you and
release it to flash the headlamps.
INSTRUMENT LIGHTING
DIMMER
Adjust the brightness of the instrument
panel and all applicable lit components in
the vehicle during headlamp and parking
lamp operation. •
Tap the top or bottom of the control
to brighten or dim all interior lit
components incrementally.
• Press and hold at the first position the
top or bottom of the control until you
reach the desired lighting level.
• Press and hold the top of the control
to the full on position to activate the
“dome on ” feature. This turns on the
interior courtesy lights. The lights
remain on until you press the bottom
of the control.
DAYTIME RUNNING LAMPS (IF
EQUIPPED) WARNING:
The daytime running
lamps system does not activate the rear
lamps and may not provide adequate
lighting during low visibility driving
conditions. Make sure you switch the
headlamps on, as appropriate, during all
low visibility conditions. Failure to do so
may result in a crash.
The system turns the lamps on in daylight
conditions.
To switch the system on, switch the
lighting control to any position except
headlamps.
50
F650750 (TBC) , enUSA, Edition date: 201804, Second-Printing LightingE163268 E163270
Page 54 of 387
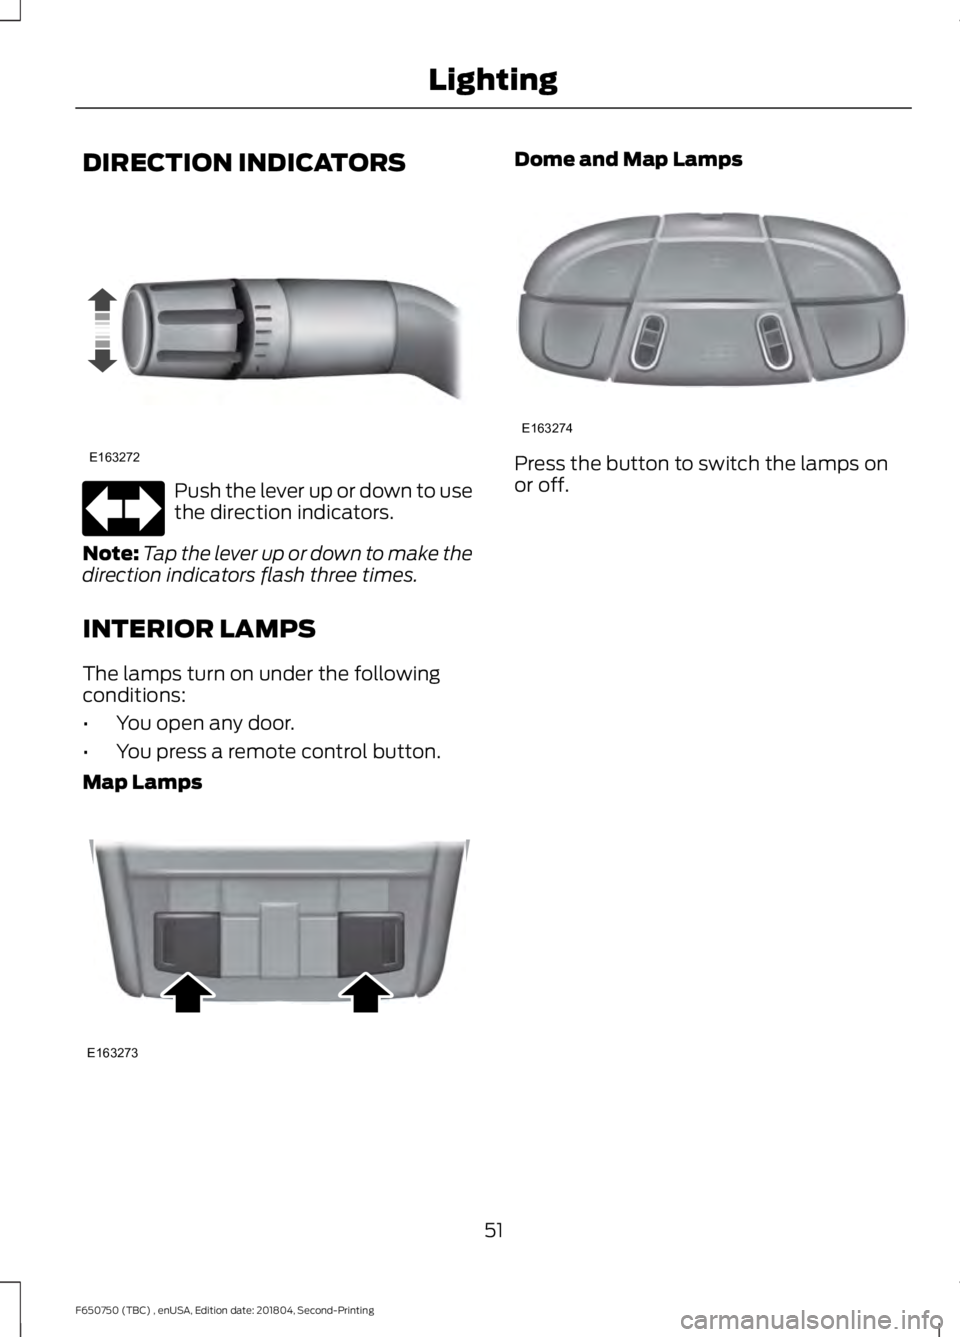
DIRECTION INDICATORS
Push the lever up or down to use
the direction indicators.
Note: Tap the lever up or down to make the
direction indicators flash three times.
INTERIOR LAMPS
The lamps turn on under the following
conditions:
• You open any door.
• You press a remote control button.
Map Lamps Dome and Map Lamps
Press the button to switch the lamps on
or off.
51
F650750 (TBC) , enUSA, Edition date: 201804, Second-Printing LightingE163272 E163273 E163274
Page 55 of 387
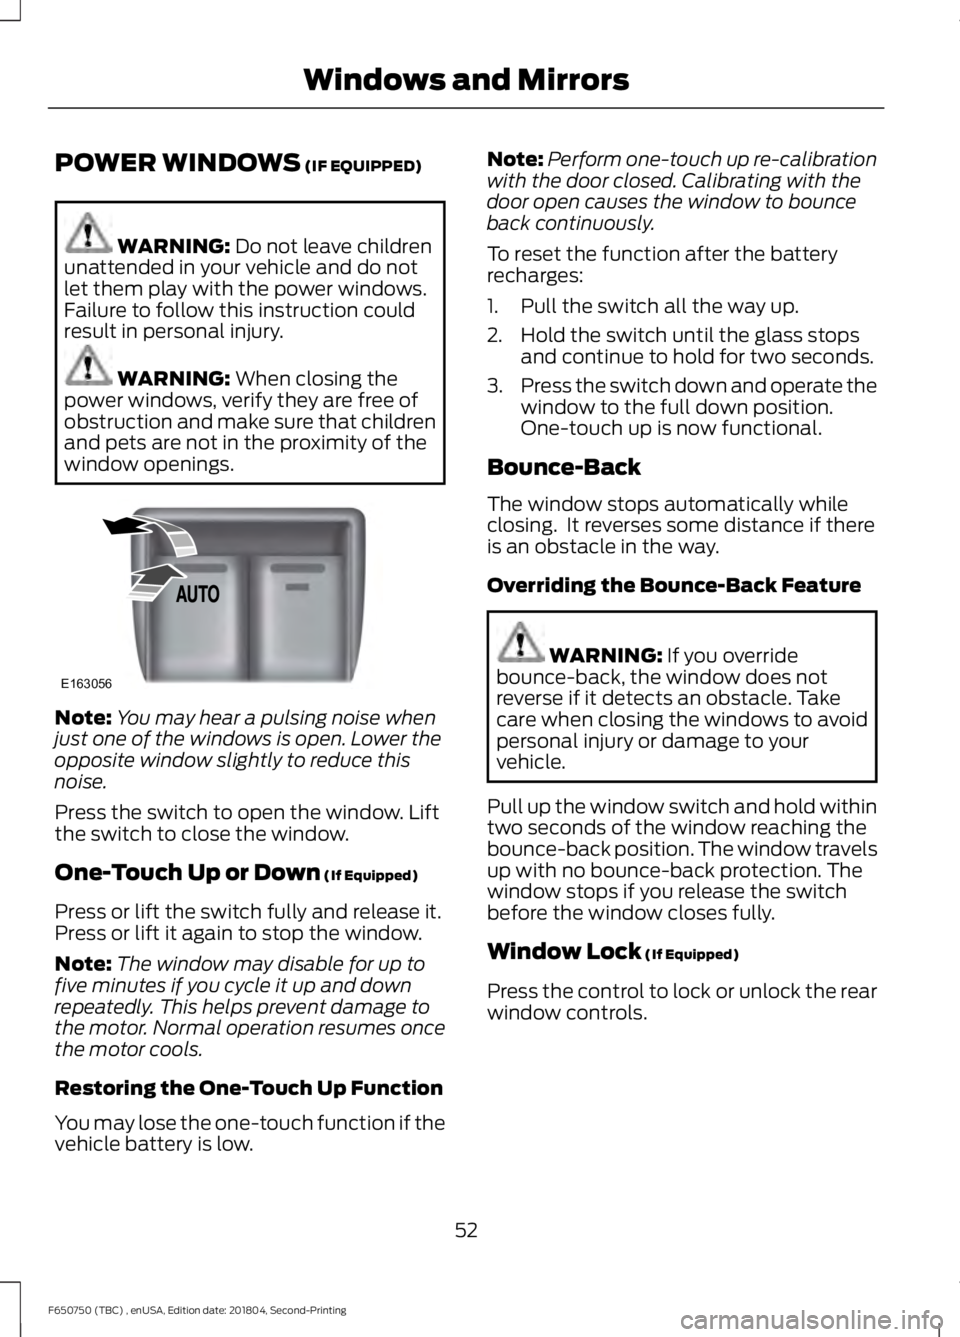
POWER WINDOWS (IF EQUIPPED)
WARNING:
Do not leave children
unattended in your vehicle and do not
let them play with the power windows.
Failure to follow this instruction could
result in personal injury. WARNING:
When closing the
power windows, verify they are free of
obstruction and make sure that children
and pets are not in the proximity of the
window openings. Note:
You may hear a pulsing noise when
just one of the windows is open. Lower the
opposite window slightly to reduce this
noise.
Press the switch to open the window. Lift
the switch to close the window.
One-Touch Up or Down
(If Equipped)
Press or lift the switch fully and release it.
Press or lift it again to stop the window.
Note: The window may disable for up to
five minutes if you cycle it up and down
repeatedly. This helps prevent damage to
the motor. Normal operation resumes once
the motor cools.
Restoring the One-Touch Up Function
You may lose the one-touch function if the
vehicle battery is low. Note:
Perform one-touch up re-calibration
with the door closed. Calibrating with the
door open causes the window to bounce
back continuously.
To reset the function after the battery
recharges:
1. Pull the switch all the way up.
2. Hold the switch until the glass stops and continue to hold for two seconds.
3. Press the switch down and operate the
window to the full down position.
One-touch up is now functional.
Bounce-Back
The window stops automatically while
closing. It reverses some distance if there
is an obstacle in the way.
Overriding the Bounce-Back Feature WARNING:
If you override
bounce-back, the window does not
reverse if it detects an obstacle. Take
care when closing the windows to avoid
personal injury or damage to your
vehicle.
Pull up the window switch and hold within
two seconds of the window reaching the
bounce-back position. The window travels
up with no bounce-back protection. The
window stops if you release the switch
before the window closes fully.
Window Lock
(If Equipped)
Press the control to lock or unlock the rear
window controls.
52
F650750 (TBC) , enUSA, Edition date: 201804, Second-Printing Windows and MirrorsE163056
Page 57 of 387
Note:
If you repeatedly fold and unfold the
mirrors several times within one minute, the
system may disable to protect the motors
from overheating. It resets to normal
function automatically within three to five
minutes.
You can also fold a mirror manually by
pushing it toward the door window glass.
After you manually adjust the mirror, you
need to reset it.
To reset the power –folding mirror system
and return it to its normal function:
• Fold the mirror manually by pushing it
toward the door window glass.
• Use the power –fold control to fold and
unfold the mirror two or three times.
The mirror makes a sound as it resets.
Heated Exterior Mirrors (If Equipped)
See
Heated Exterior Mirrors (page 74).
Signal Indicator Mirrors
(If Equipped)
The outer portion of the appropriate mirror
housing blinks when you use the direction
indicator.
Clearance Lamps
(If Equipped)
The lower, outer part of the mirror housings
light when you switch on the headlamps
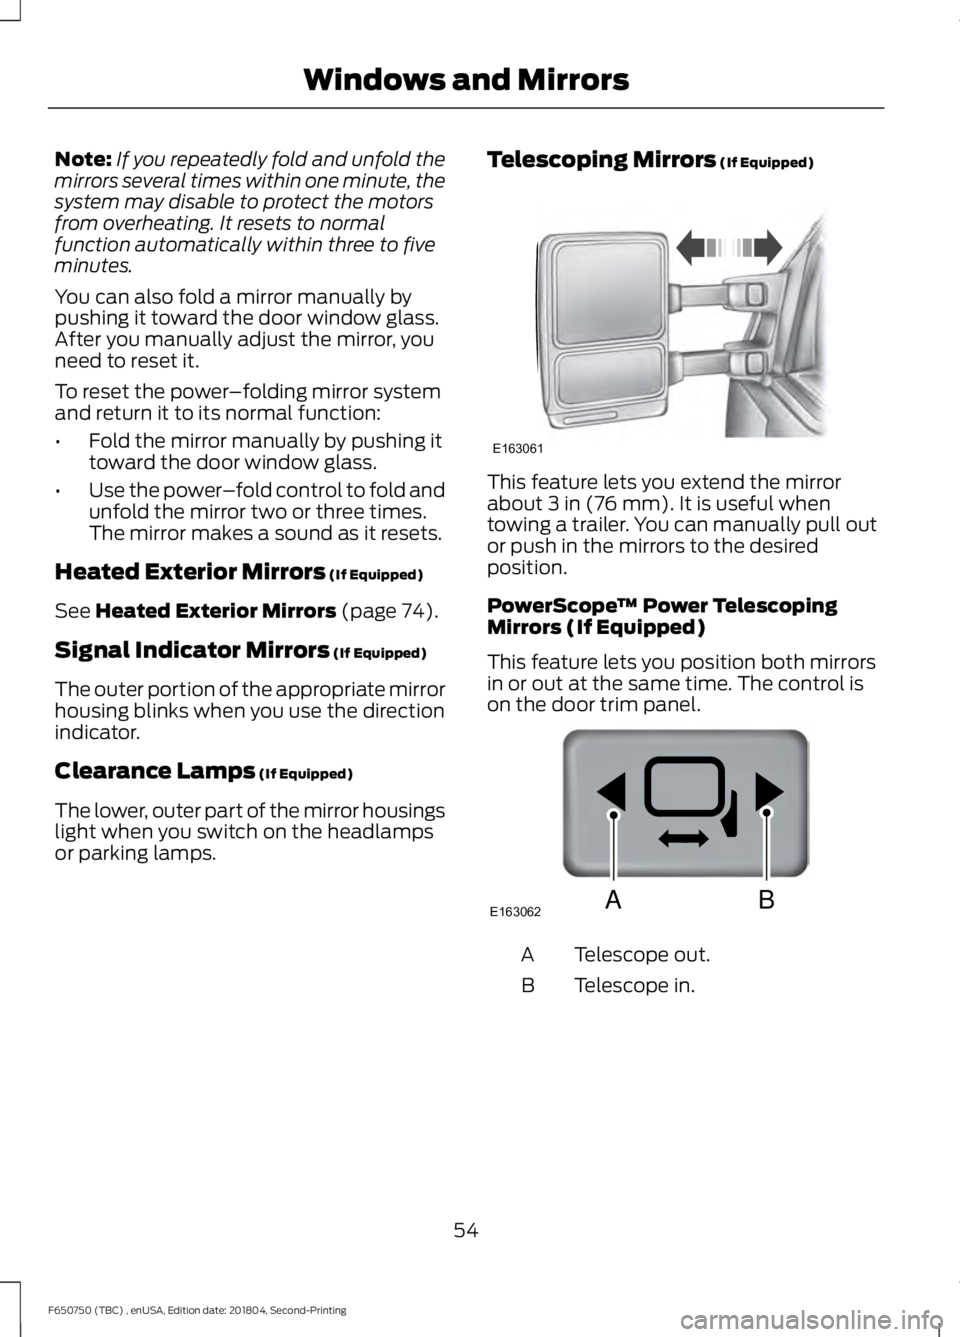
or parking lamps. Telescoping Mirrors
(If Equipped) This feature lets you extend the mirror
about
3 in (76 mm). It is useful when
towing a trailer. You can manually pull out
or push in the mirrors to the desired
position.
PowerScope ™ Power Telescoping
Mirrors (If Equipped)
This feature lets you position both mirrors
in or out at the same time. The control is
on the door trim panel. Telescope out.
A
Telescope in.
B
54
F650750 (TBC) , enUSA, Edition date: 201804, Second-Printing Windows and MirrorsE163061 E163062BA